


Botanical Blocks
Ботанические композиции в советских стеклоблоках: толстое стекло, рельефная поверхность и оптические искажения. Создание композиции и работа со светом.
Скопируйте полный промпт. Используйте указанную модель и референс, если он есть в примере.
Скопируйте полный промпт. Используйте указанную модель и референс, если он есть в примере.


76 промптов
Seedream 5.0 Pro
Nano Banana 2.1
GPT Image 2.5 Flare
108 примеров
Botanical Blocks
Ботанические композиции в советских стеклоблоках: толстое стекло, рельефная поверхность и оптические искажения. Создание композиции и работа со светом.
Скопируйте полный промпт. Используйте указанную модель и референс, если он есть в примере.
Скопируйте полный промпт. Используйте указанную модель и референс, если он есть в примере.
76 промптов
Seedream 5.0 Pro
Nano Banana 2.1
GPT Image 2.5 Flare
108 примеров
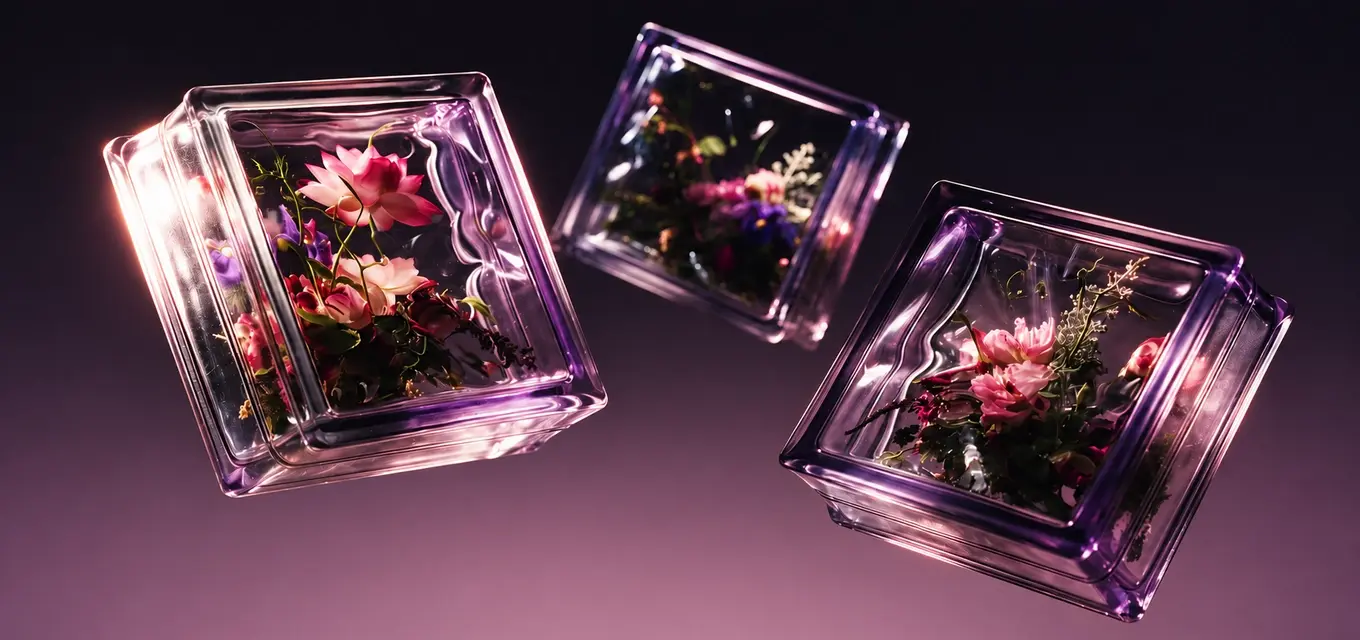
Растения в стеклоблоках
Seedream 5.0 Pro

Copy

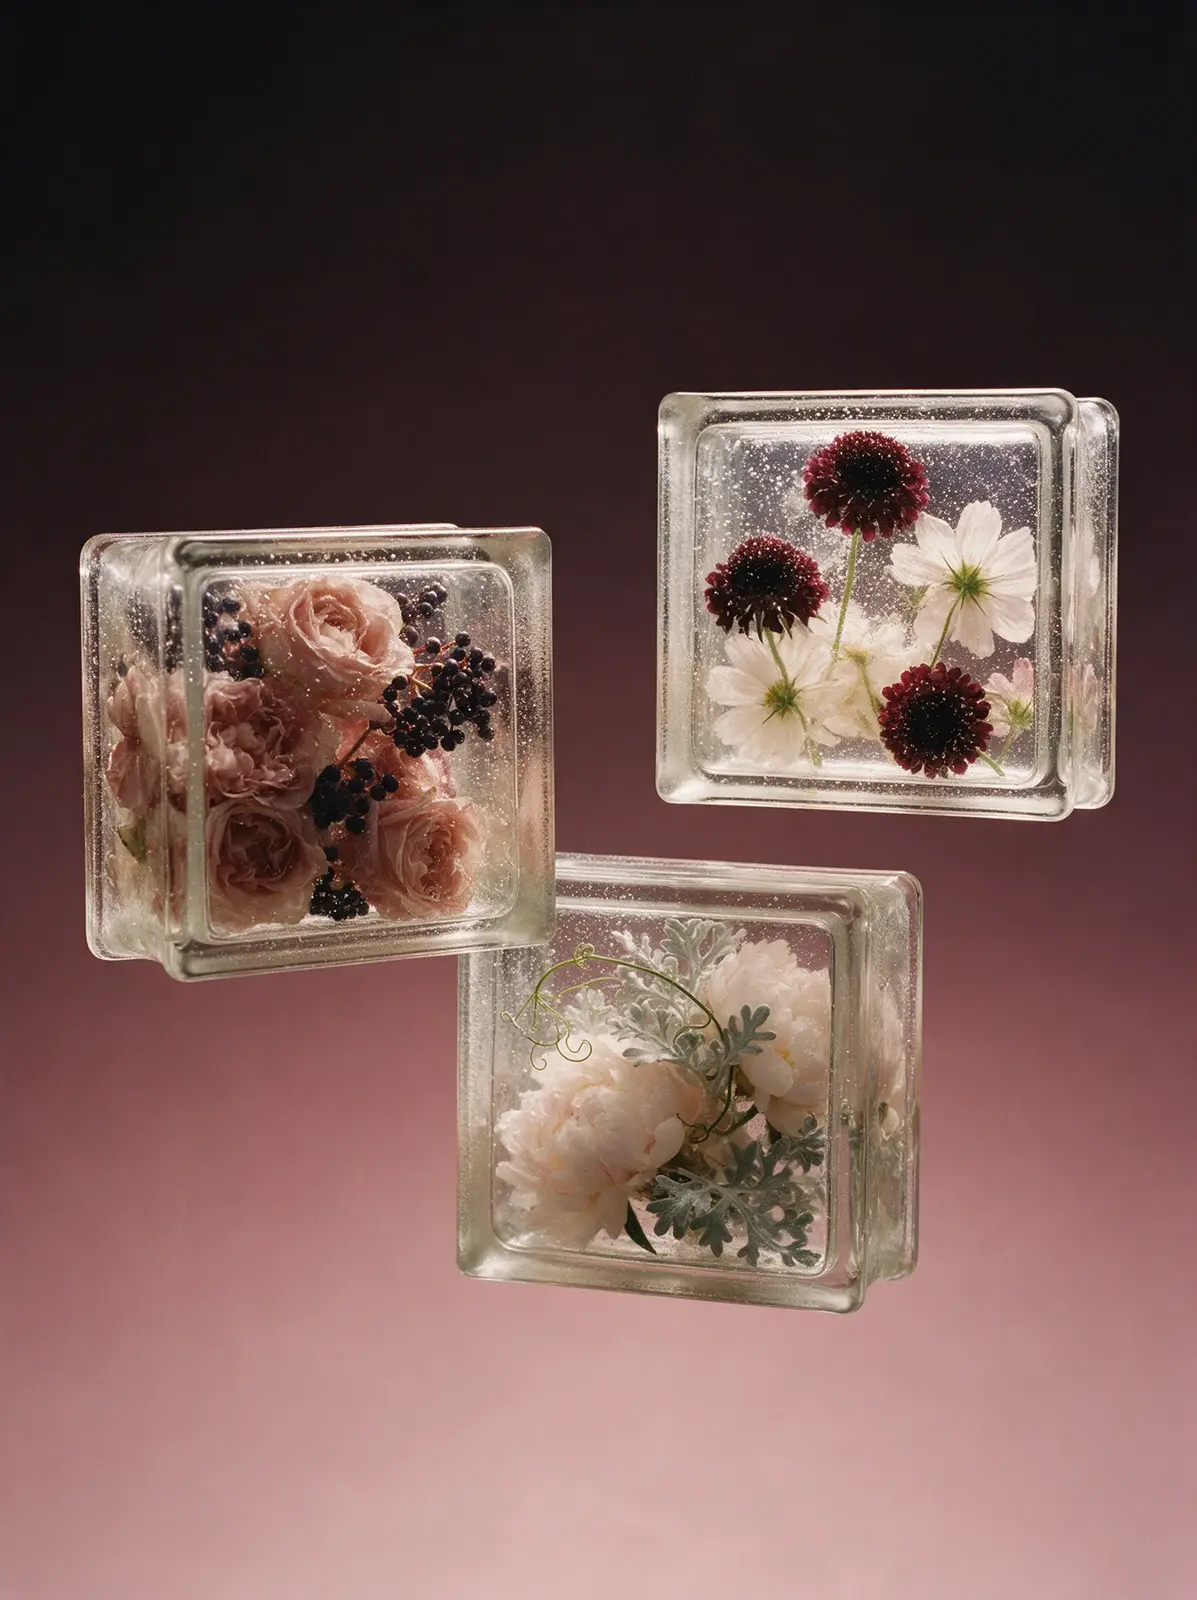
Real studio photograph, shot on medium format film. Three floating Soviet pressed-glass blocks are arranged in a loose horizontal composition with different spacing and depth, one slightly nearer, one slightly behind and one lower, creating a light elegant suspended rhythm with plenty of breathing room. Each block is tilted differently but remains clearly readable as a classic 1970s Soviet glass building brick with thick square proportions, raised perimeter rim, recessed front field, frosted seam along the narrow sides, softly rounded corners and solid heavy glass mass. The glass is monolithic all the way through, never hollow. Inside, each block contains a different floral mood within the same palette: one filled with dusty blush roses and dark elderberries, one with deep burgundy scabiosa and pale cosmos, and one with soft peonies, silver dusty miller and delicate curling tendrils. Each inclusion is dense but sculptural, with overlapping petals, stems and leaves embedded at multiple depths. The glass is visually present in front of everything through suspended air veils, thousands of tiny bubbles, slight milkiness, soft refractive distortion and deep edge reflections. Background: perfectly smooth gradient from near-black plum-brown at the top to dusty rose and muted antique pink toward the bottom. Soft backlight makes the pale petals glow and keeps the darker berries rich and dimensional. Not a render.
Seedream 5.0 Pro
Copy
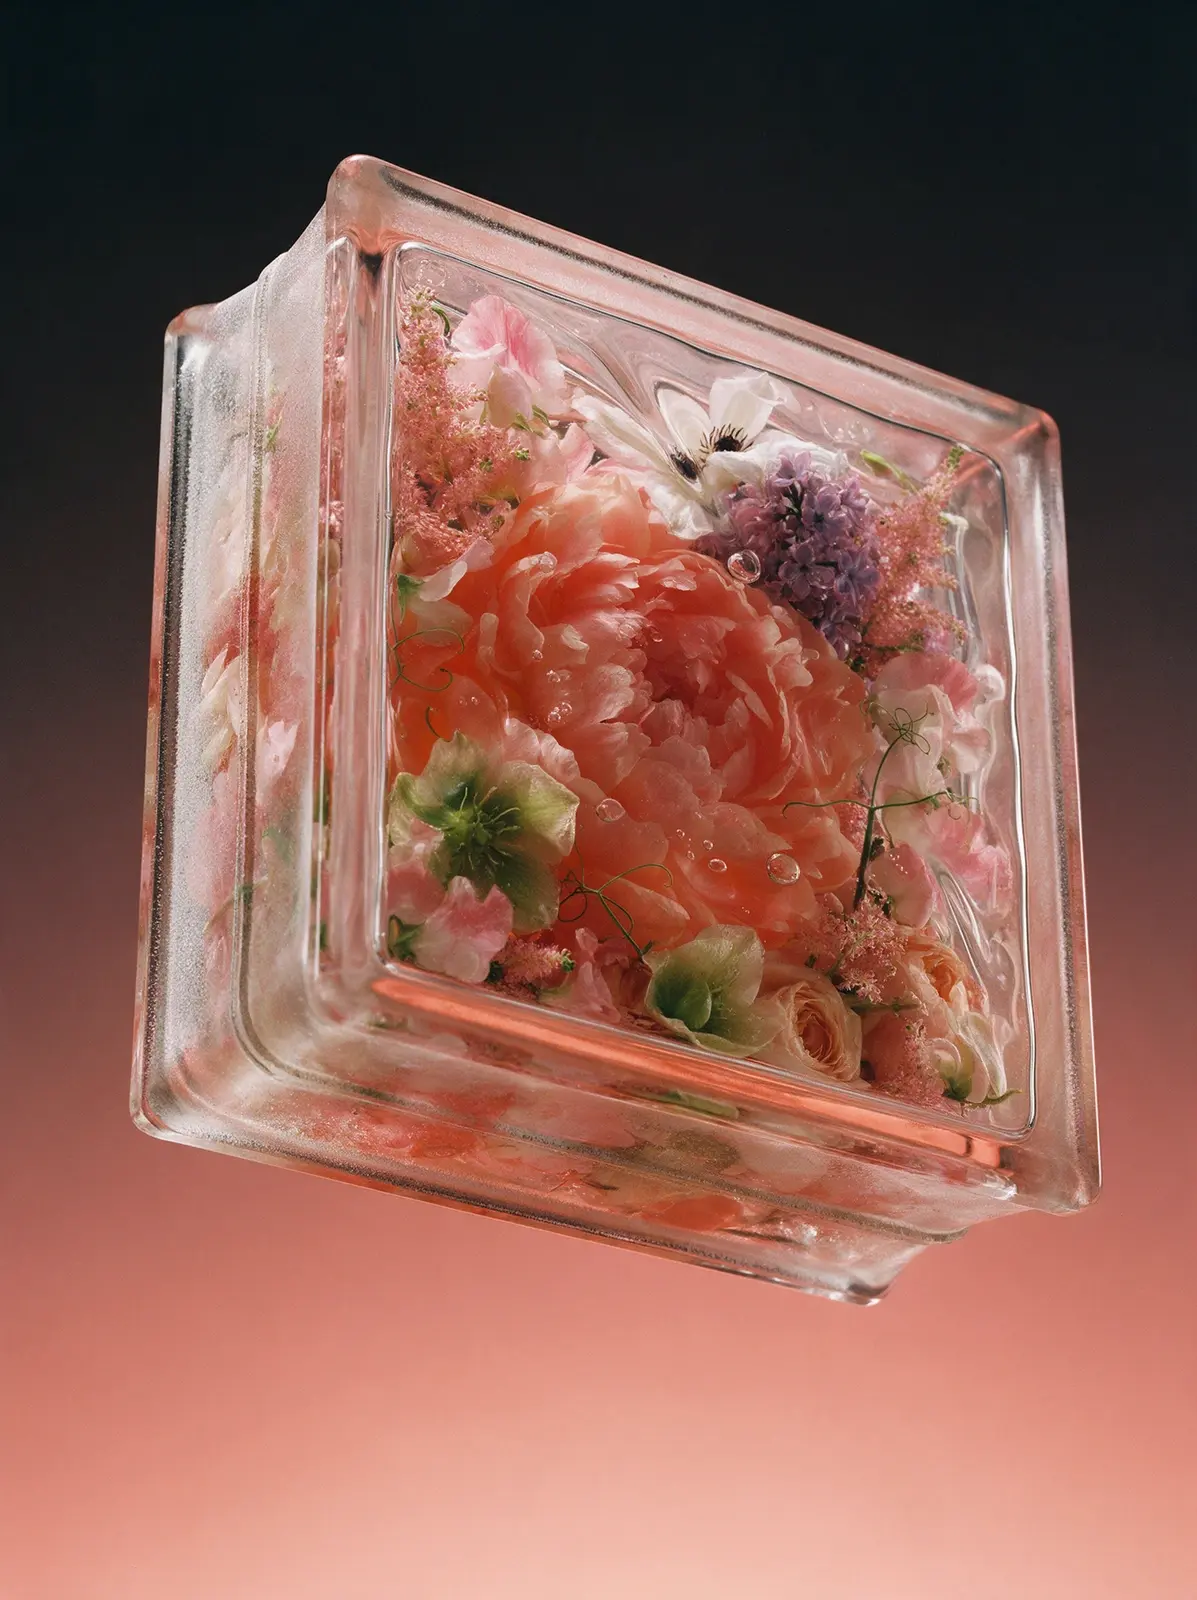
Real studio photograph, shot on medium format film. A classic Soviet glass building block hangs weightless in empty space, seen from below: tilted far back so its bottom narrow side with the frosted mortar channel faces the camera and the front face looms overhead in perspective. No floor, no surface, no shadow. Exact shape: a square brick about 19 by 19 by 8 centimeters, each square face with a narrow flat raised frame and a small step down into a slightly recessed wavy central field; the narrow sides each with a shallow channel holding a rough frosted matte band and a fine fusion seam; softly rounded corners. Solid glass all the way through. The flowers are life-size and the brick is small, so the block holds a tight close-up of a dense arrangement, filled edge to edge with no empty gaps and cut off by the frame on every side. Hero: one enormous ruffled blush-coral peony taking up almost half the face. Secondary: one white clematis with dark stamens and a cluster of lilac. Filling every remaining space: pink astilbe plumes, dusty sweet peas, apricot garden roses, pale green hellebore and curling sweet pea tendrils. How the flowers behave in the glass: petals touching the inner surface are pressed flat against it and turn silvery where they touch; tiny seed bubbles cling to every petal and a few larger round bubbles float between the blooms; faint wavy striae in the glass are visible only by how they bend the stems. The wavy front field makes outlines sway as if under water. At the step of the frame everything behind is sharply shifted and broken in a band around the face. Deeper flowers are softer and darker. The thick edges glow coral and pink with the colors trapped inside, showing stretched mirrored fragments of the peony. Faint pale pink glass. No smoke, no mist. Background: smooth seamless gradient from near-black at the top to soft peach-coral at the bottom. Strong backlight through the glass so the flowers glow from within, soft side light. Not a 3D render, not CGI.
Seedream 5.0 Pro
Copy
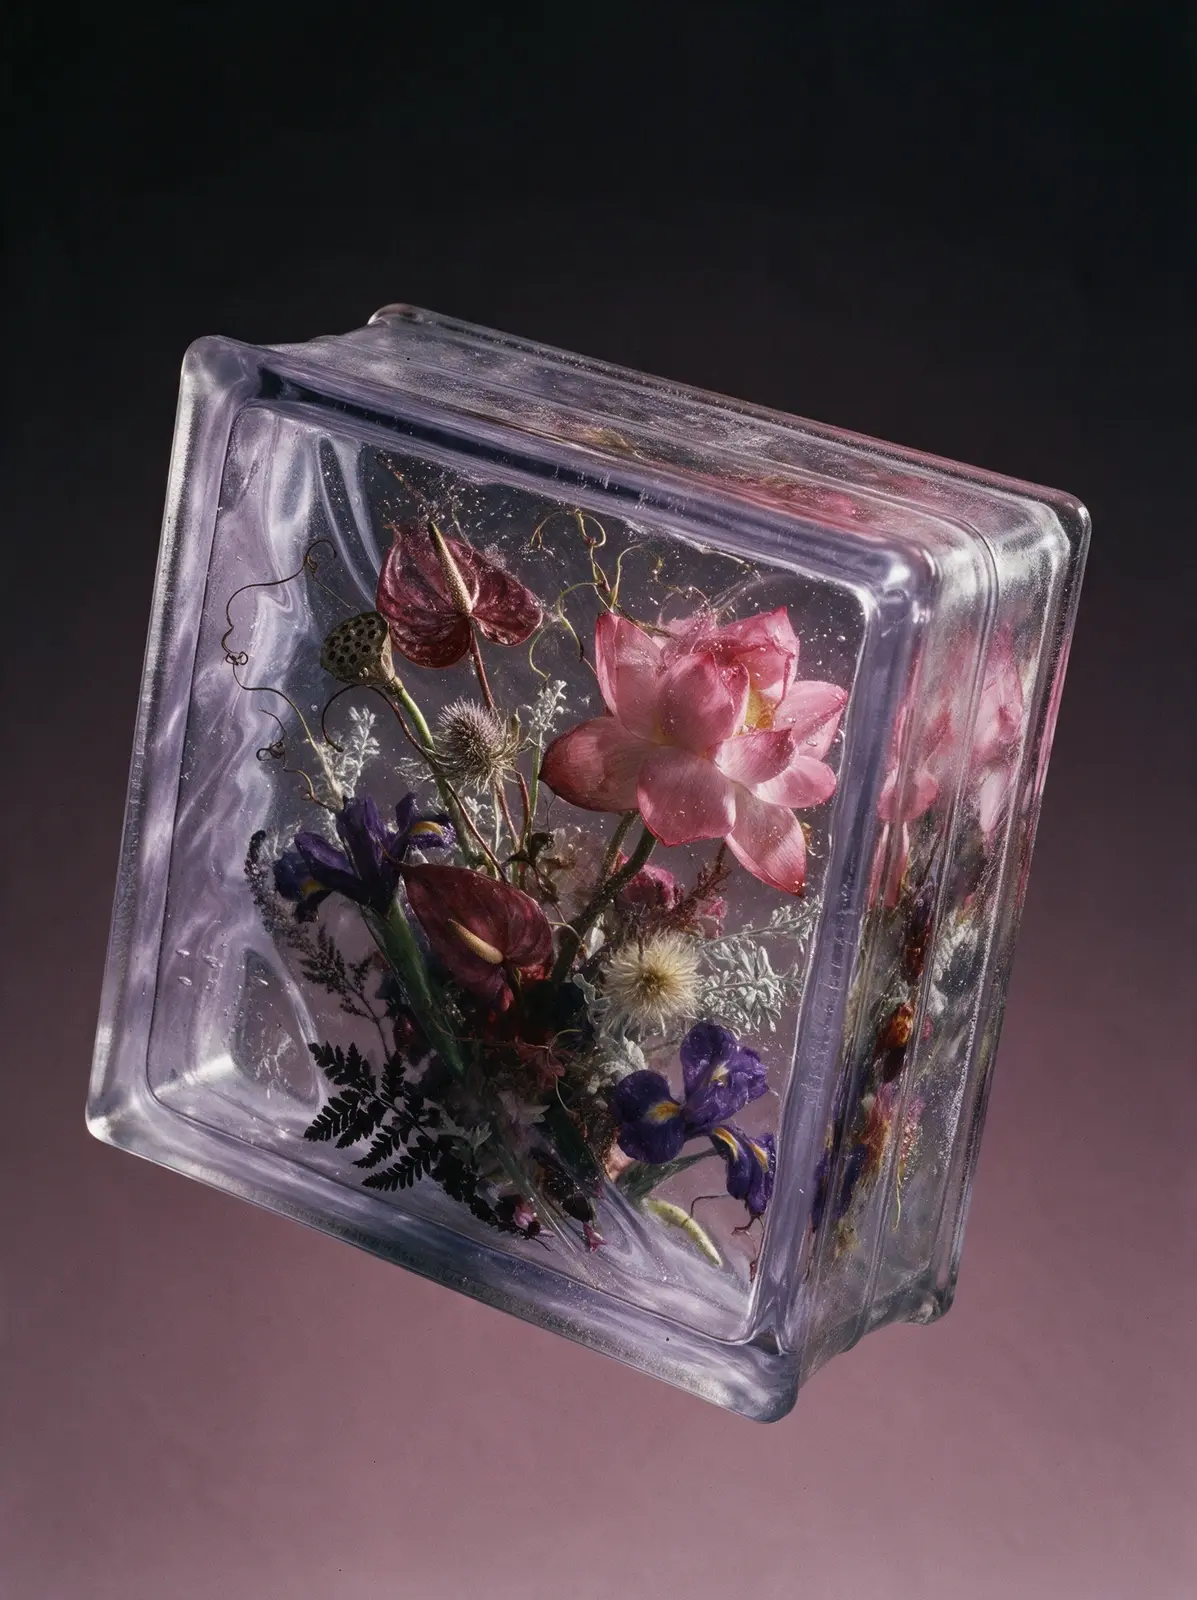
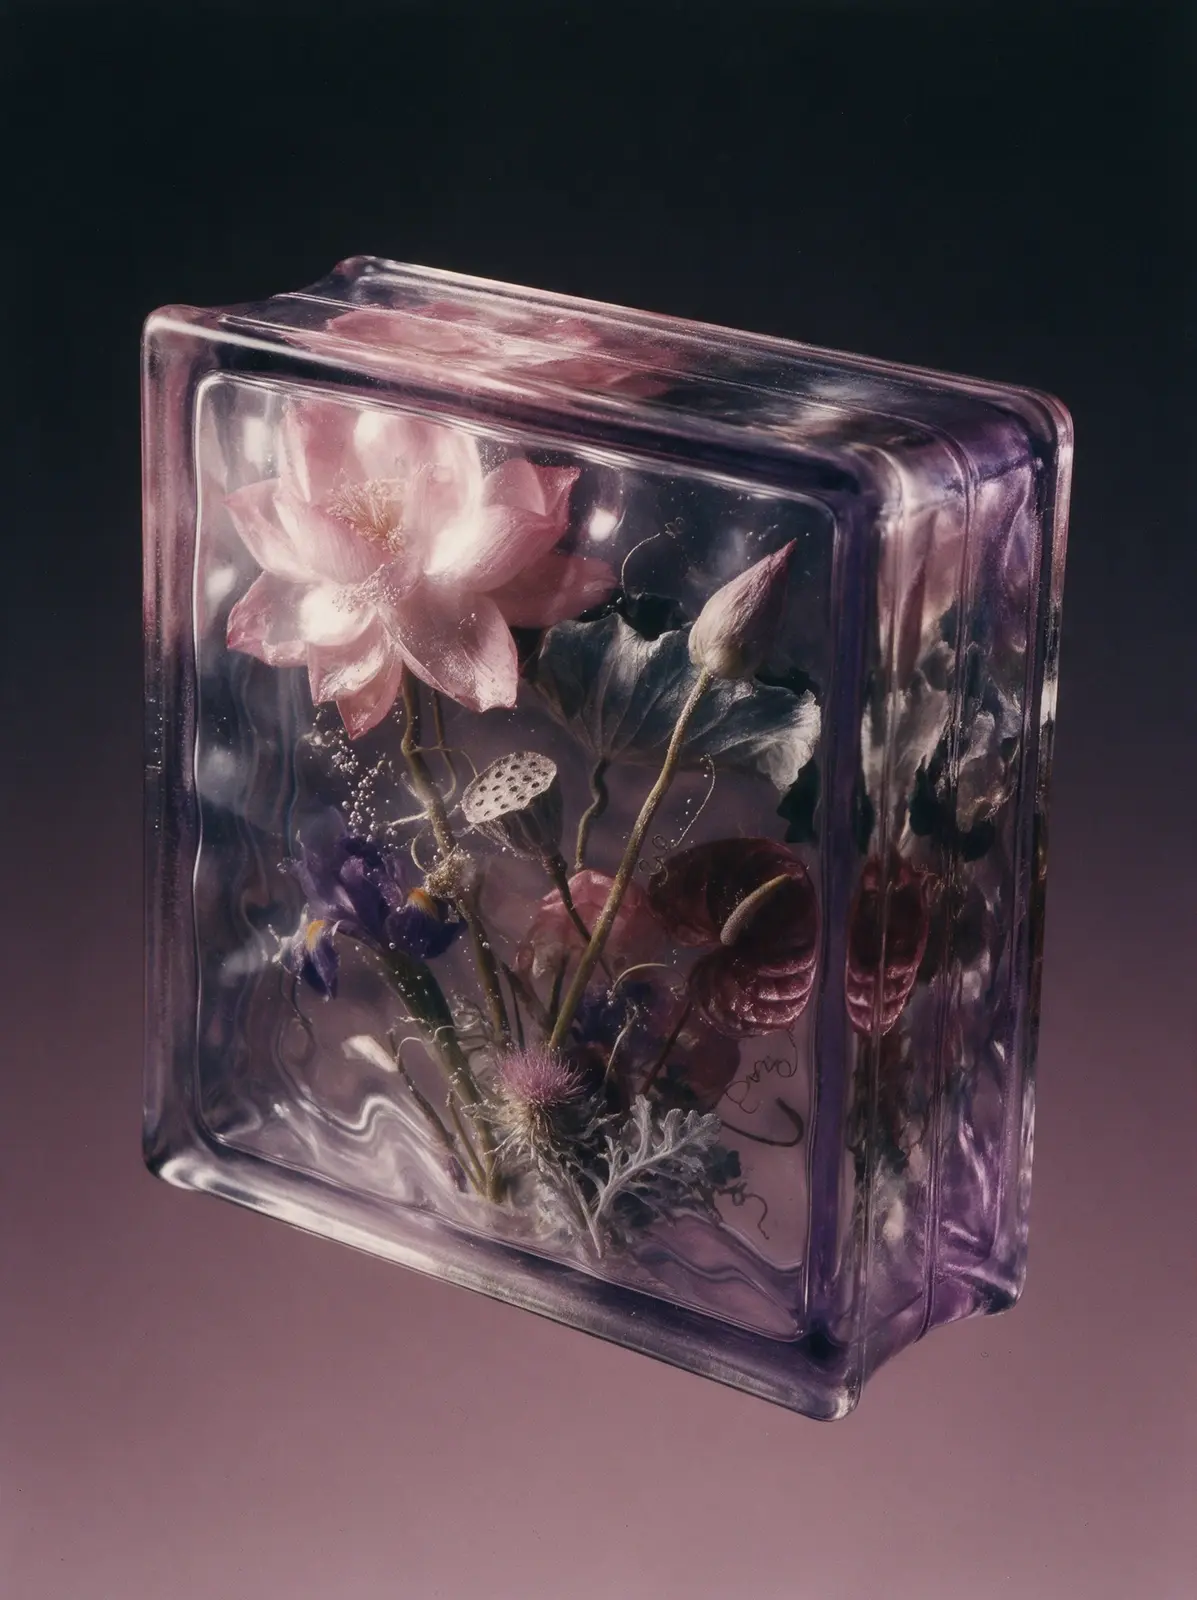
Real studio photograph, shot on medium format film. A Soviet glass block — the classic 1970s square pressed-glass brick with a flat rim around each face, softly rounded corners and a seam around its sides — floats tilted in mid-air, seen at a three-quarter angle with its side and top visible. Inside it, frozen in the glass the way flowers are frozen in a block of ice, is a wild sculptural ikebana-style arrangement packed edge to edge and cropped by the walls of the block: a large open pink lotus, a dried lotus seed pod, burgundy anthurium, a deep violet iris, a pale thistle, silvery dusty miller, dark fern and thin curling tendrils, stems arching in different directions, layered deep into the block. The thick wavy glass distorts everything like ice does: petals warp and wobble, stems break and shift, the deeper flowers blur into murky glass, tiny air bubbles cling to the petals, and the side faces show stretched reflections of the bouquet. The glass is heavy and faintly lavender. Background: a plain studio paper sweep in a soft gradient from near-black at the top to dusty mauve at the bottom. Dramatic side light and backlight shining through the glass, rich saturated flowers. No glow, no halo, no shadow beneath. Not a 3D render, not CGI.
Seedream 5.0 Pro
Copy
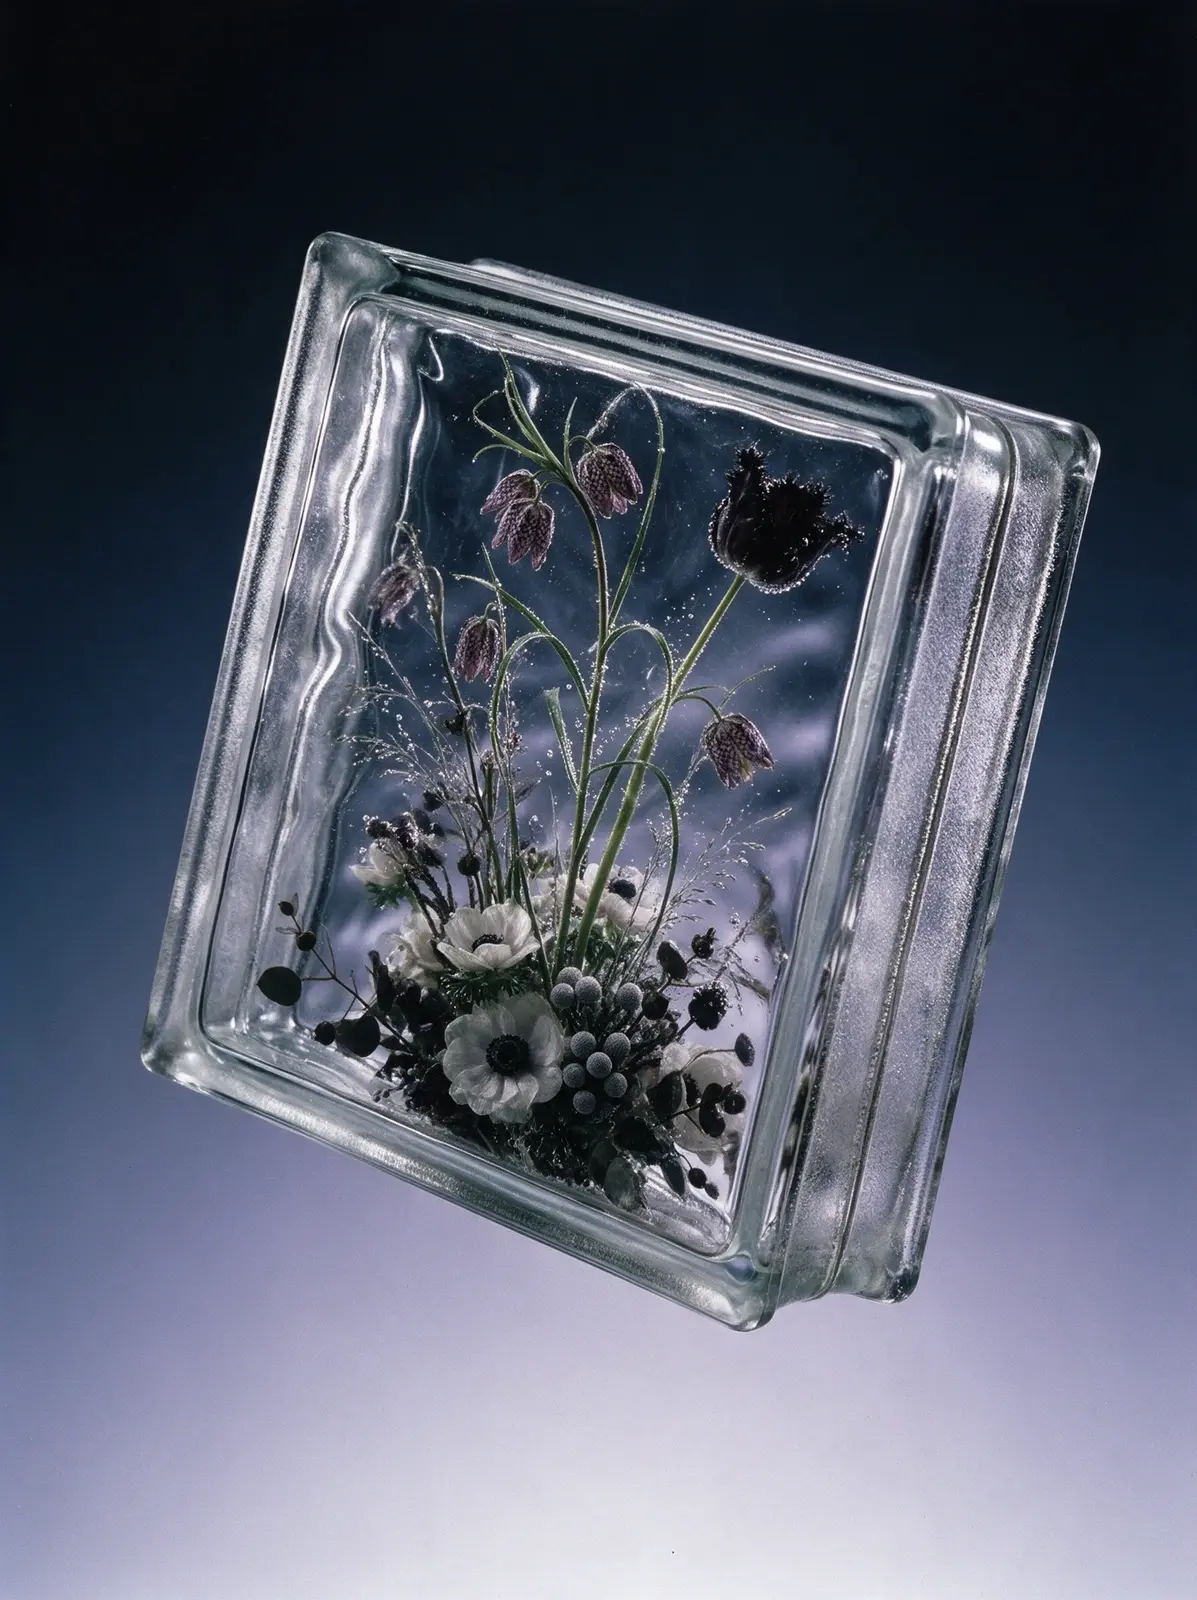
Real studio photograph, shot on medium format film. A classic Soviet glass building block from the 1970s hangs weightless in empty space, tilted steeply onto one corner with its front face and one narrow side visible. There is no floor, no ground, no surface anywhere and no shadow anywhere. Its exact recognizable shape: a square brick about twice as wide as it is thick, like 19 by 19 by 8 centimeters. Each square face has a narrow flat raised frame along its edges, then a small step down into a slightly recessed central field. The four narrow sides each have a shallow channel running along their middle with a rough frosted matte band and a fine fusion seam inside it, like the groove that holds the mortar. Softly rounded corners, thick heavy edges, typical mass-produced pressed glass. The block is SOLID glass all the way through, with no hollow, no inner chamber, no inner walls and no back panel. The flowers are cast directly into the glass mass, the way flowers are frozen inside a solid block of ice: glass touches every petal, thin silvery films of trapped air coat the petal surfaces, and clusters of tiny bubbles cling to stems and petal edges. The recessed front field is wavy, so everything inside sways as if seen under water: outlines wobble, petals stretch and squeeze, stems kink and jump sideways. Nothing inside is perfectly sharp; the deeper flowers turn soft, dark and murky in the thickness of the glass. The thick edges mirror the bouquet in stretched, broken reflections. The glass is clear and icy with only a cold silvery tint in the edges. Composition inside: a graphic vertical arrangement: tall thin stems shooting from the bottom to the very top of the block and cropped by the frame, carrying nodding checkered purple fritillaria bells and a single feathery near-black parrot tulip high up; at the base a dense dark cluster of white anemones with black centers, one pressed against the front face, silver brunia balls like beads, dark eucalyptus seeds and fine silvery grasses; the upper half airy with only stems and bells floating in the deep glass. Background: smooth seamless gradient from near-black midnight blue at the top to frosty silvery lilac at the bottom, pure empty color with no floor. Dramatic backlight and side light passing through the glass, the flowers glowing softly from within. Not a 3D render, not CGI.
Seedream 5.0 Pro
Copy
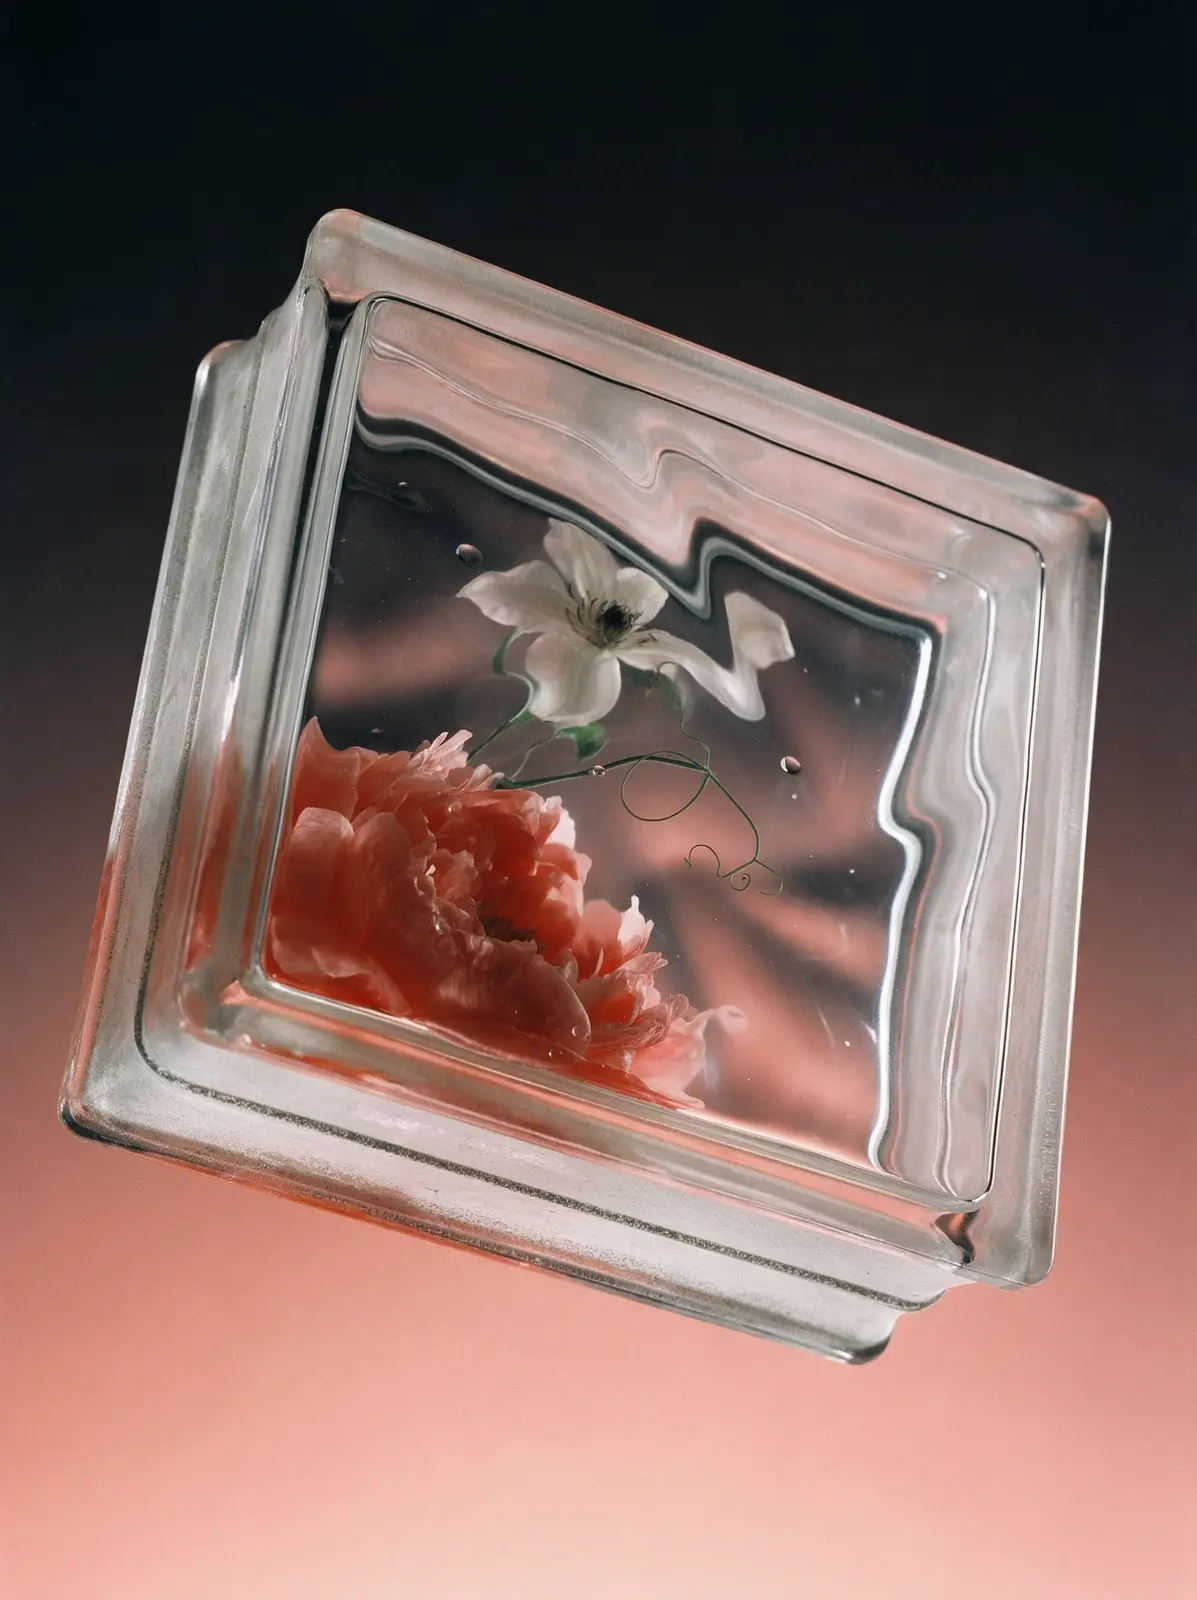
Real studio photograph, shot on medium format film. A classic Soviet glass building block hangs weightless in empty space, seen from below: tilted far back so its bottom narrow side with the frosted mortar channel faces the camera and the front face looms overhead in perspective. No floor, no surface, no shadow. Exact shape: a square brick about 19 by 19 by 8 centimeters, each square face with a narrow flat raised frame and a small step down into a slightly recessed wavy central field; the narrow sides each with a shallow channel holding a rough frosted matte band and a fine fusion seam; softly rounded corners. Solid glass all the way through. Everything is fully inside the block, nothing extends outside it. A minimal, graphic composition of only a few life-size elements, much larger than the small brick: one enormous ruffled blush-coral peony placed off-center in the lower corner and cut off by the frame, one white clematis with dark stamens higher up and deeper in the glass, and a single curling sweet pea tendril tracing a loose spiral across the open glass. The rest of the block is open glass. The peony's front petals are pressed flat against the inner surface of the glass, spread and slightly squashed, with soft silvery sheen and tiny bubbles where they touch. The wavy front field bends every outline as if under water. In the open glass, the background behind is visibly warped by the waves, and a few round bubbles float. At the step of the frame everything behind is sharply shifted and broken. The deeper parts turn soft and hazy. The thick edges carry stretched coral reflections of the peony. Faint pale pink glass. No smoke, no mist. Background: smooth seamless gradient from near-black at the top to soft peach-coral at the bottom. Strong backlight through the glass, soft side light. Not a 3D render, not CGI.
Seedream 5.0 Pro
Copy
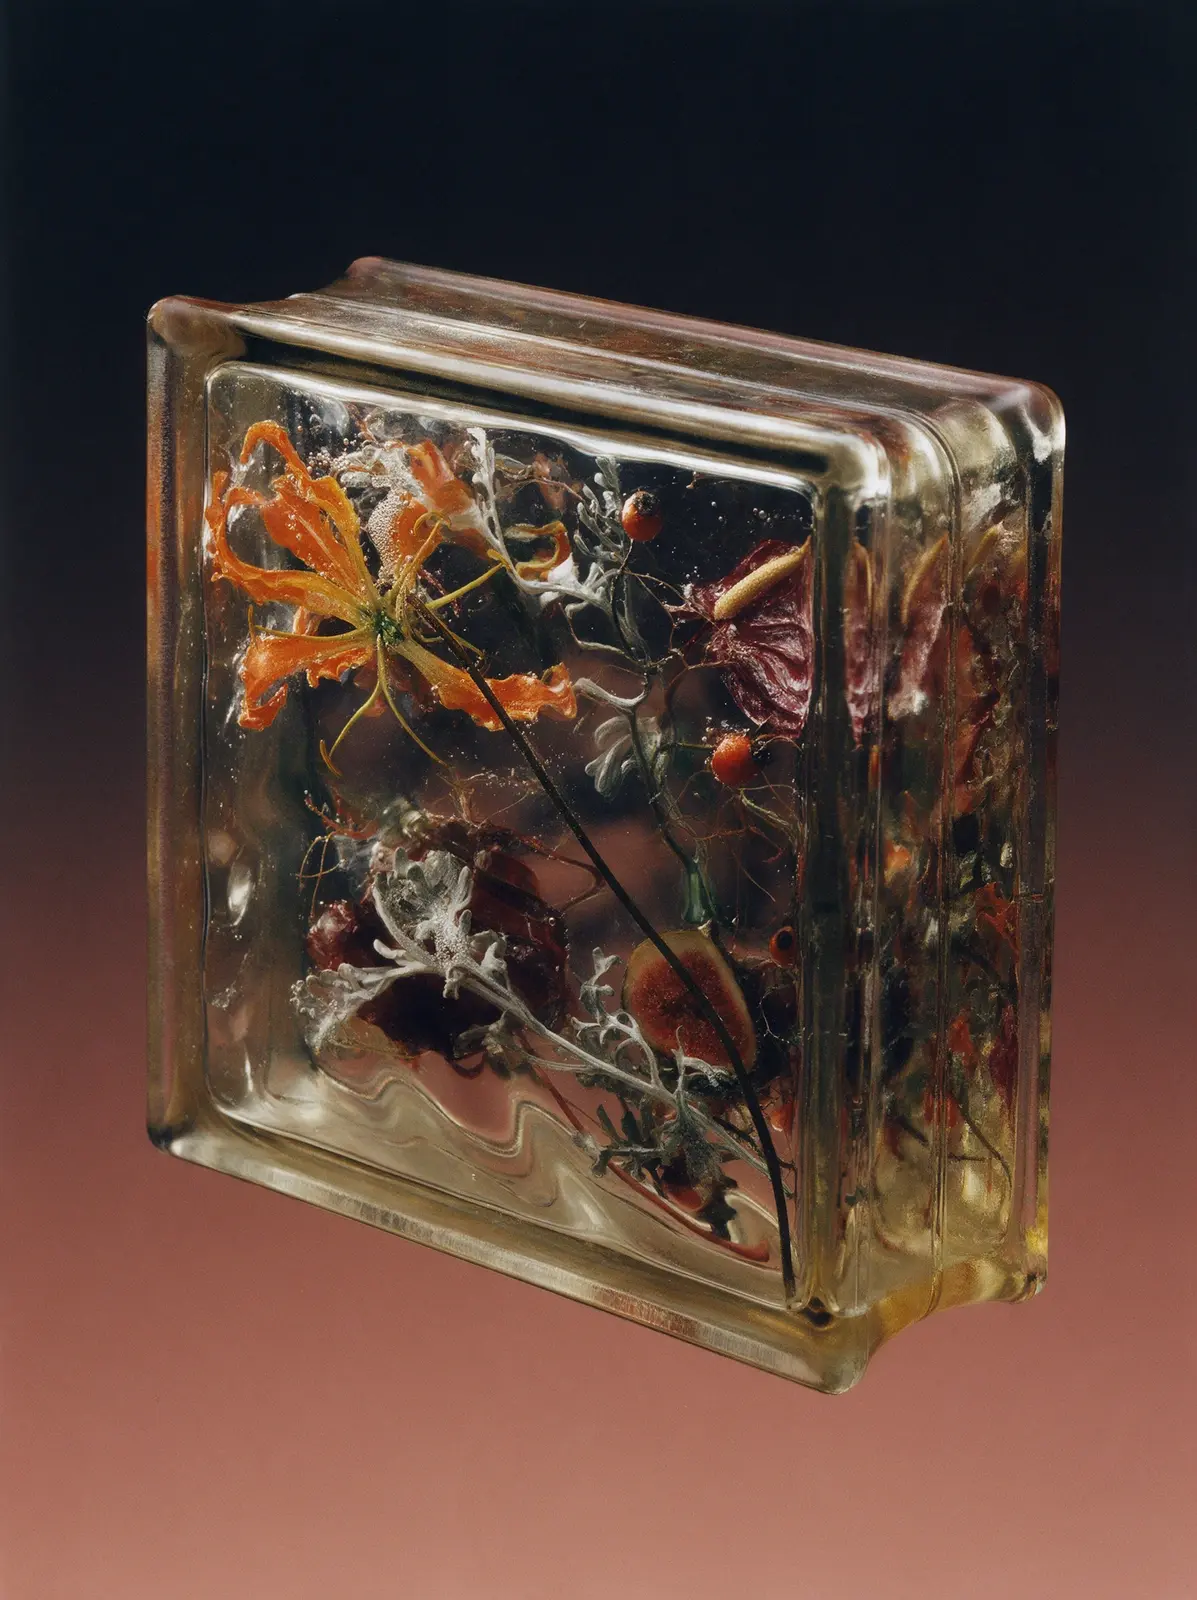
Real studio photograph, shot on medium format film. A Soviet glass brick — the classic 1970s square pressed-glass block with a flat rim around each face, softly rounded corners and a seam around its sides — hangs weightless in empty space, tilted at a three-quarter angle with its side and top visible. There is no floor, no ground, no surface anywhere and no shadow anywhere. The brick is SOLID glass all the way through, from the front face to the back face — no hollow inside, no inner chamber, no inner walls, no back panel. The flowers are cast directly into the glass mass, the way flowers are frozen inside a solid block of ice: glass touches every petal, thin silvery films of trapped air coat the petal surfaces, and clusters of tiny bubbles cling to stems and petal edges. The front face is wavy, so everything inside sways as if seen under water: outlines wobble, petals stretch and squeeze, stems kink and jump sideways. Nothing inside is perfectly sharp; the deeper flowers turn soft, dark and murky in the thickness of the glass. The thick side faces mirror the bouquet in stretched, broken reflections. The glass has a faint warm amber tint that deepens to honey in the edges. Composition inside: one oversized curling orange glory lily pressed flat against the front face and cropped by the rim, a long dark stem sweeping diagonally from corner to corner, a cut fig showing its red interior deep in the glass, burgundy anthurium half-hidden behind silvery dusty miller, scattered rose hips like small lanterns, and fine wiry tendrils filling the gaps — asymmetrical, layered front to back, packed edge to edge. Background: smooth seamless gradient from near-black at the top to dusty terracotta at the bottom, pure empty color with no floor. Dramatic backlight and side light passing through the glass, the flowers glowing softly from within. Not a 3D render, not CGI.
Seedream 5.0 Pro
Copy
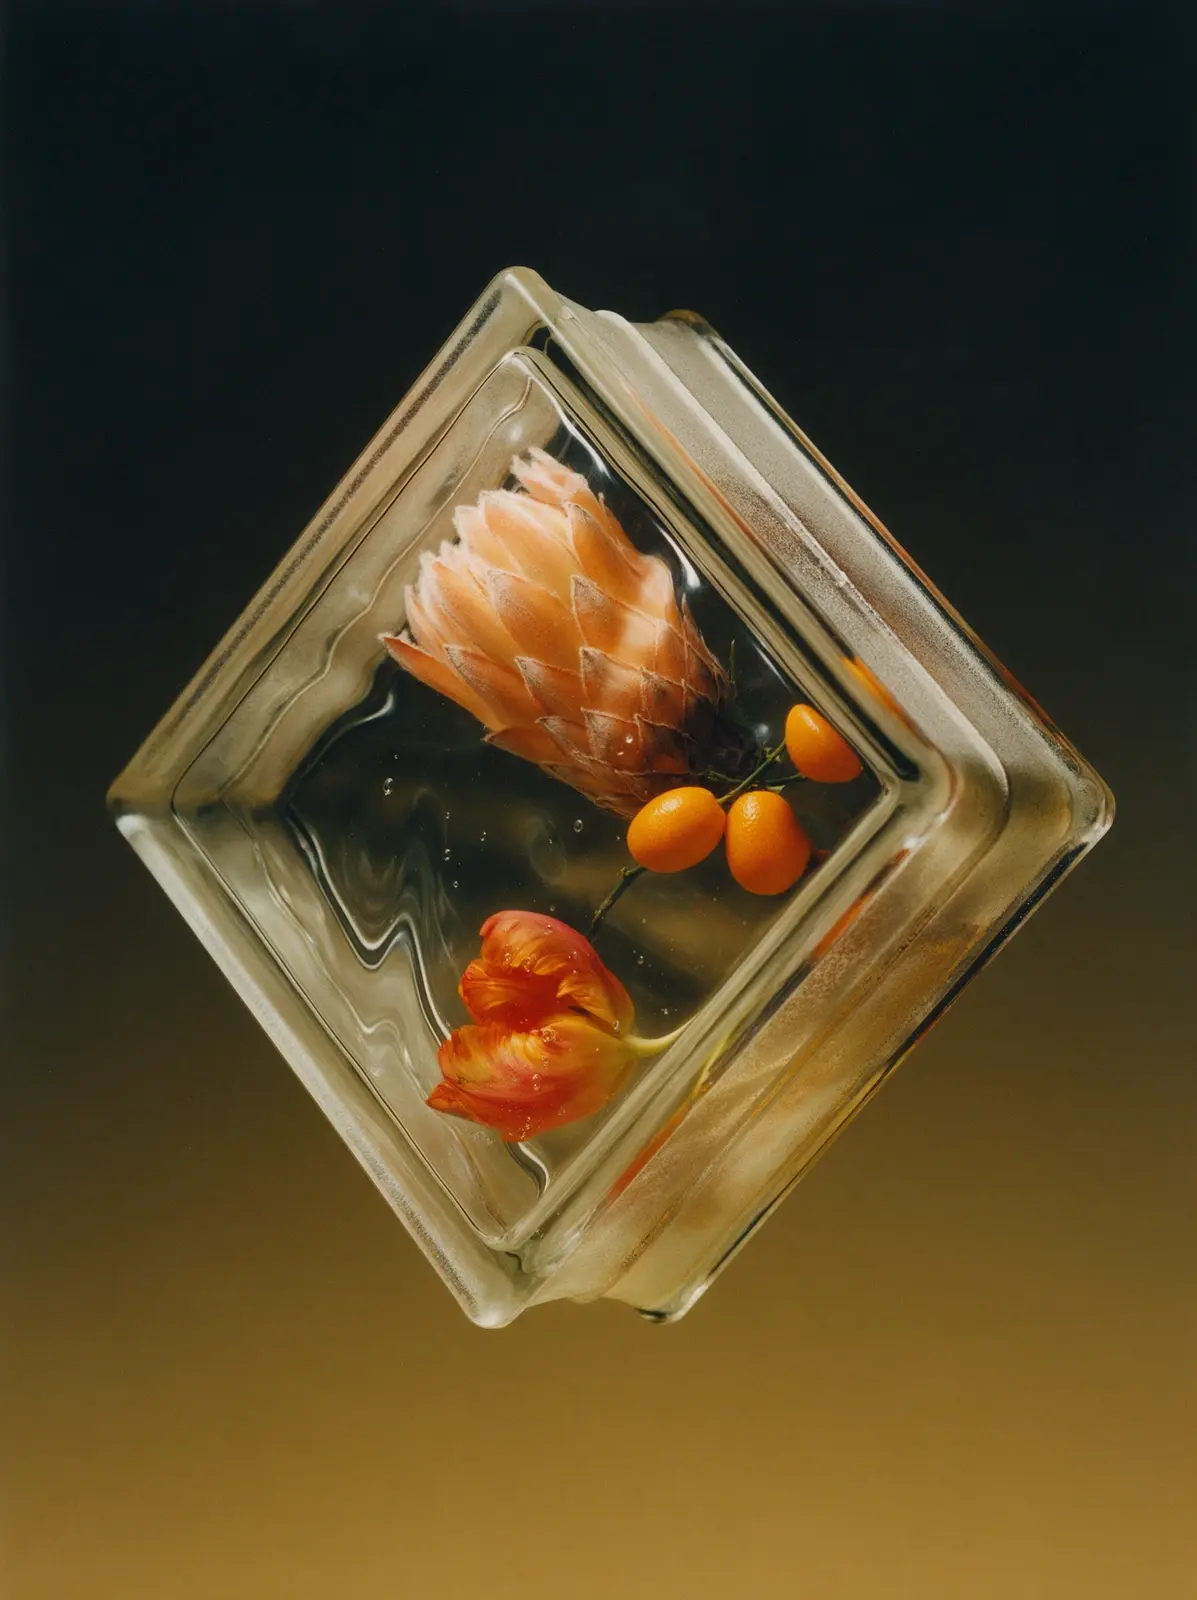
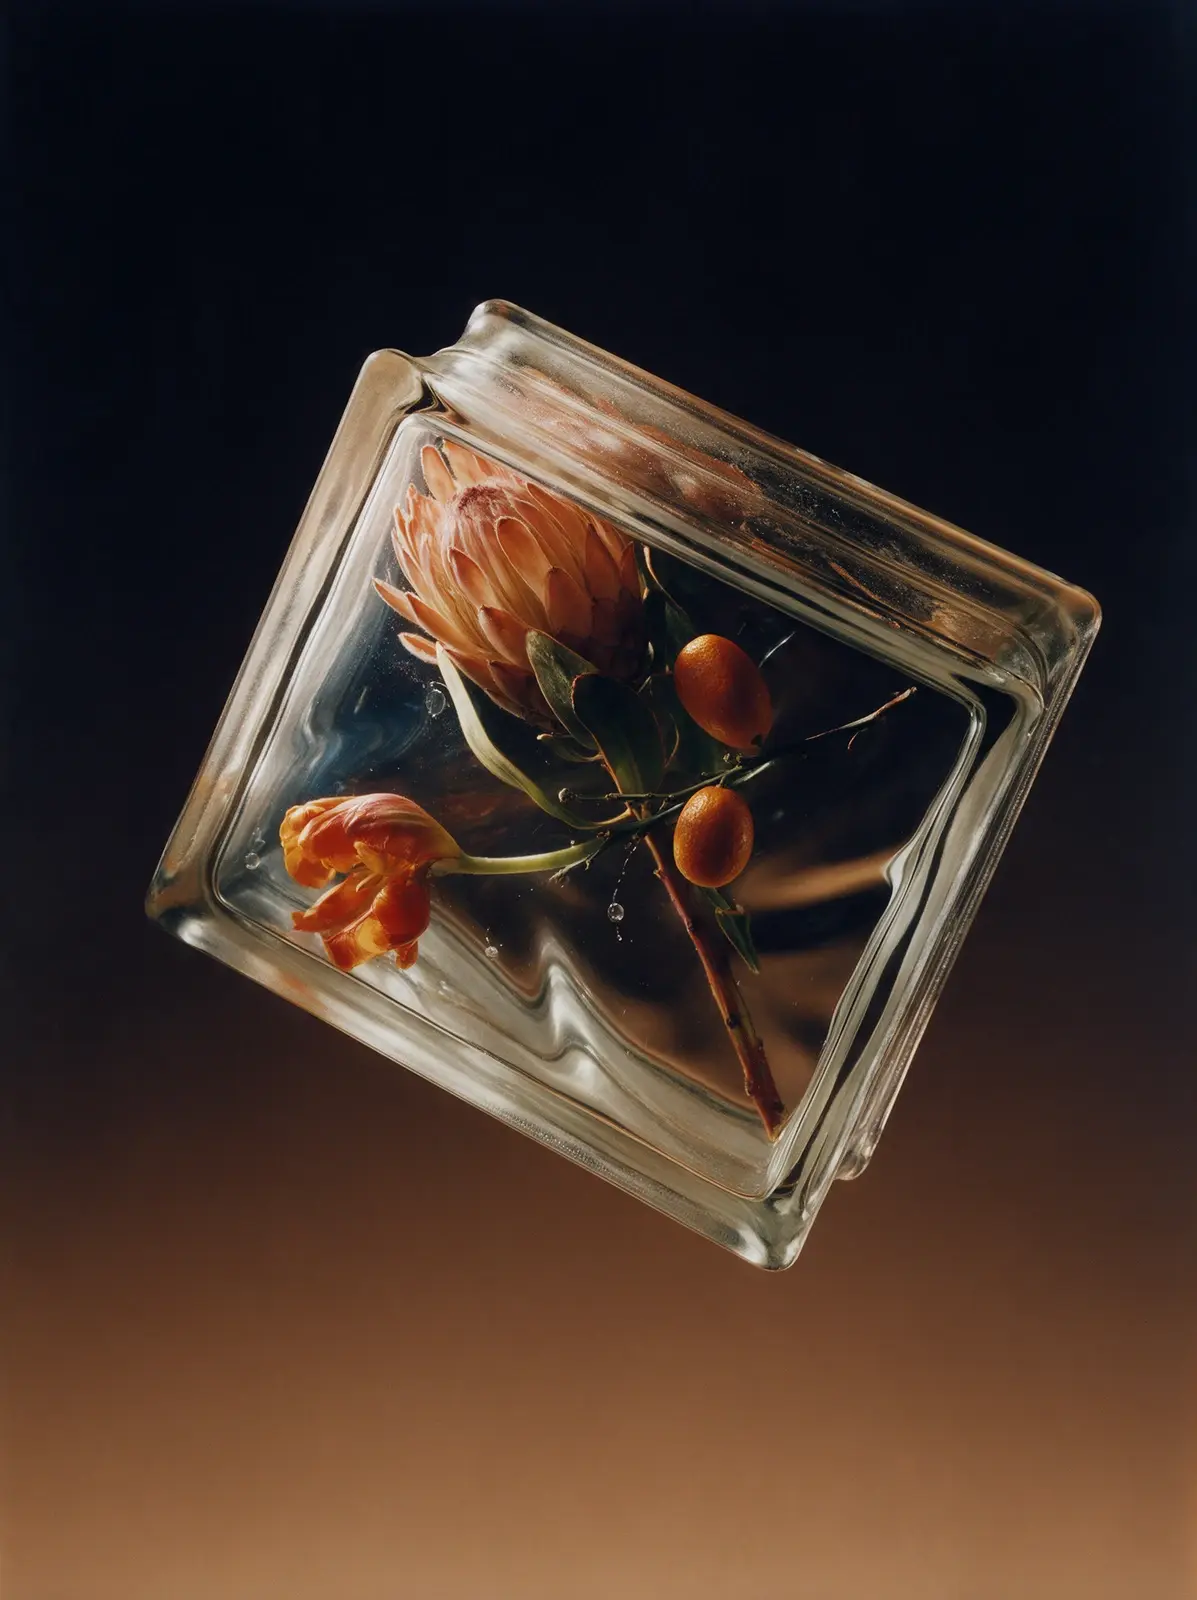
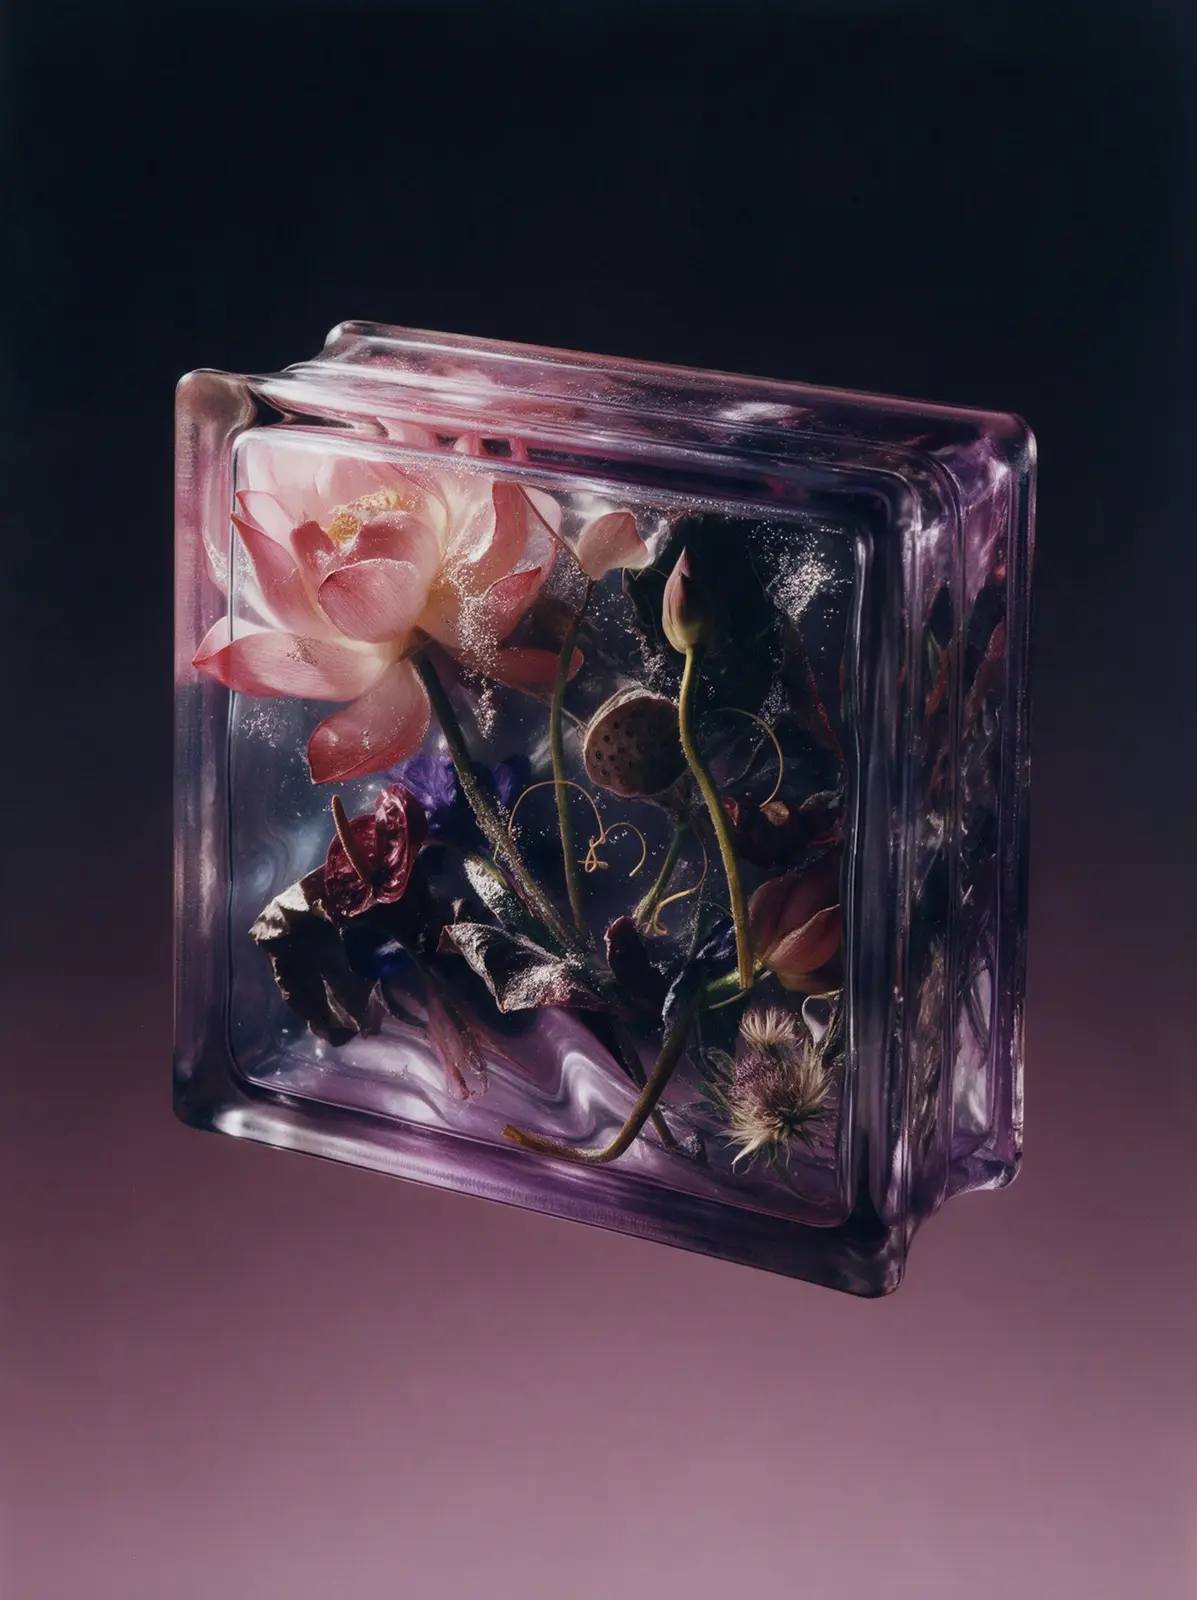
Real studio photograph, shot on medium format film. A classic Soviet glass building block hangs weightless in empty space, seen from above as it tumbles forward: its top narrow side with the frosted mortar channel is visible and the front face tips toward the camera at a sharp angle. No floor, no surface, no shadow. Exact shape: a square brick about 19 by 19 by 8 centimeters, each square face with a narrow flat raised frame and a small step down into a slightly recessed wavy central field; the narrow sides each with a shallow channel holding a rough frosted matte band and a fine fusion seam; softly rounded corners. Solid glass all the way through. Everything is sealed completely inside the glass. The block has a clean glass silhouette with nothing sticking out of it, and the space around it is pure empty background. Inside, a minimal graphic composition of only a few elements: one large apricot king protea placed off-center toward the upper corner, so big that its bracts press against the inner edge of the frame; one flamed orange parrot tulip leaning in from the opposite side; and a single thin branch with three glossy kumquats crossing the open glass diagonally. The rest of the block is open glass. The protea's front bracts and the tulip's petals are pressed flat against the inner surface of the glass, spread and slightly squashed, with soft silvery sheen and tiny bubbles where they touch. The wavy front field bends every outline as if under water. In the open glass, the background behind is visibly warped by the waves, and a few round bubbles float. At the step of the frame everything behind is sharply shifted and broken. The deeper parts turn soft and dark. The thick edges carry stretched amber reflections of the protea. Faint warm amber glass. No smoke, no mist. Background: smooth seamless gradient from near-black at the top to warm ochre at the bottom. Strong backlight through the glass, soft side light. Not a 3D render, not CGI.
Seedream 5.0 Pro
Copy
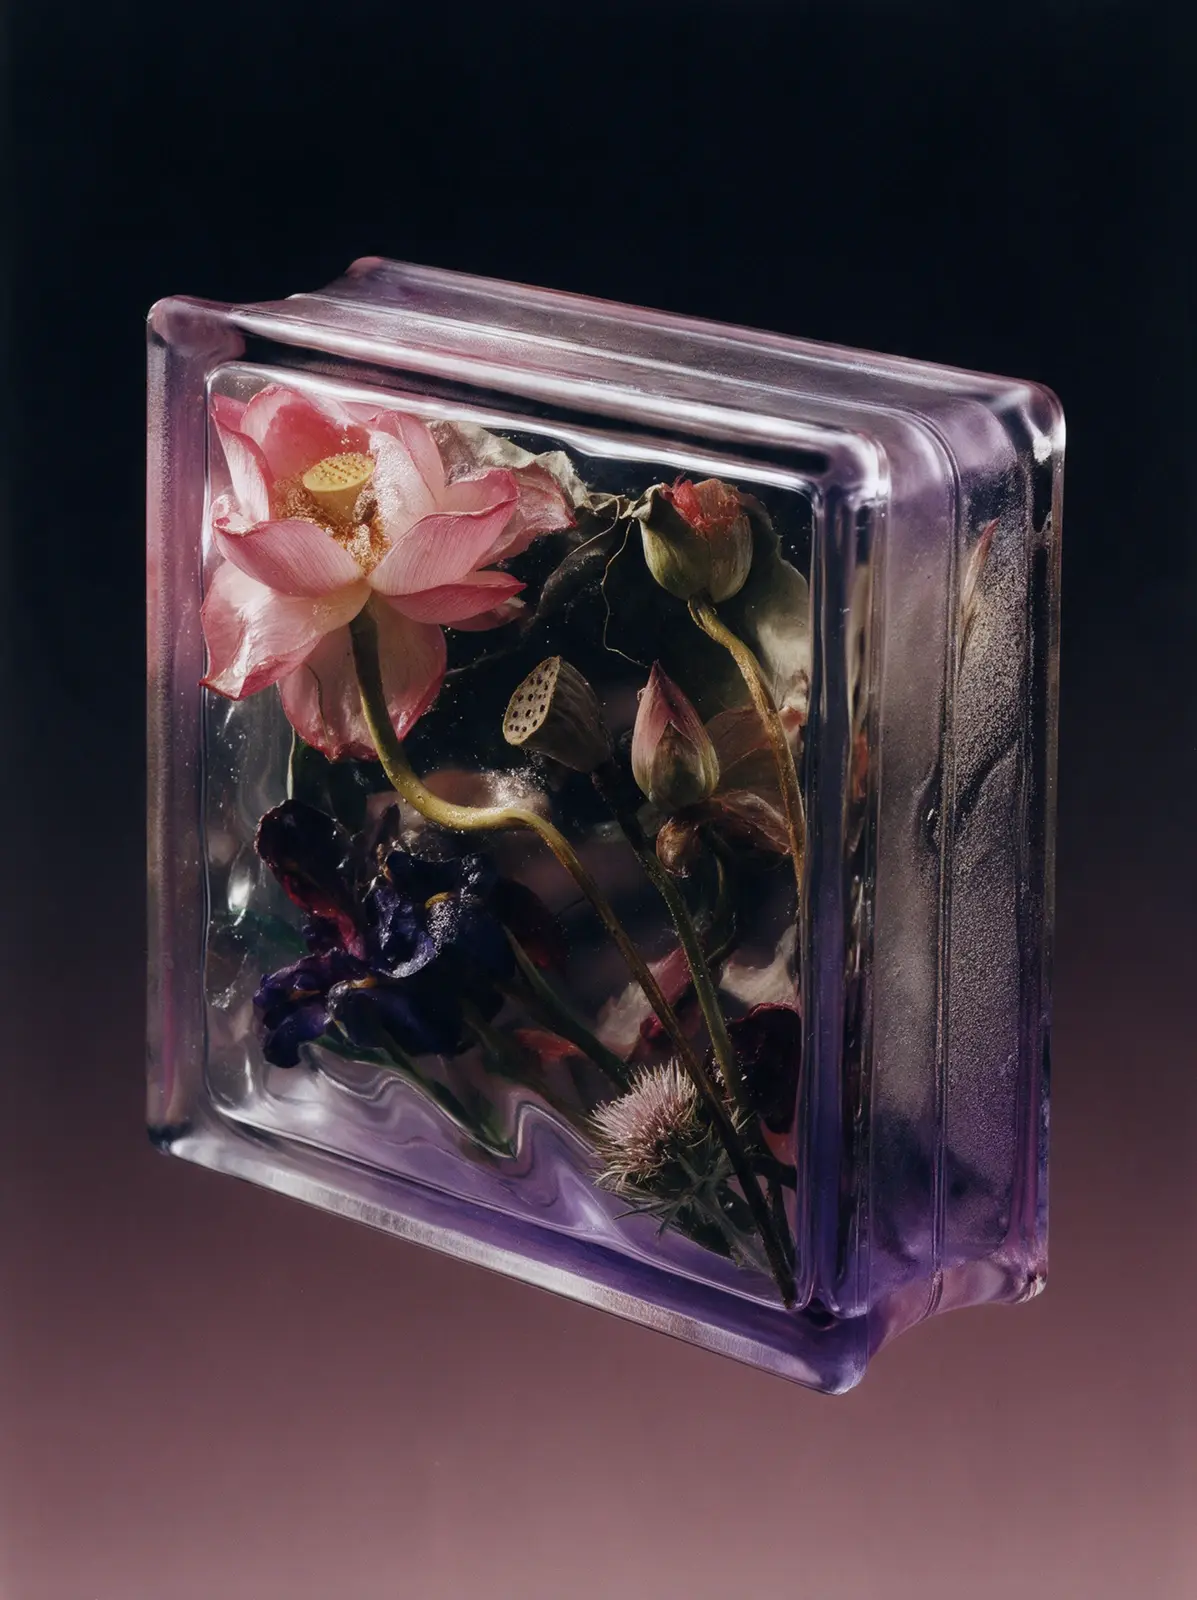
Real studio photograph, shot on medium format film. A classic Soviet glass building block from the 1970s hangs weightless in empty space, tilted at a three-quarter angle with its front face and one narrow side visible. There is no floor, no ground, no surface anywhere and no shadow anywhere. Its exact recognizable shape: a square brick about twice as wide as it is thick, like 19 by 19 by 8 centimeters. Each square face has a narrow flat raised frame along its edges, then a small step down into a slightly recessed central field. The four narrow sides each have a shallow channel running along their middle with a rough frosted matte band and a fine fusion seam inside it, like the groove that holds the mortar. Softly rounded corners, thick heavy edges, typical mass-produced pressed glass. The block is SOLID glass all the way through, with no hollow, no inner chamber, no inner walls and no back panel. The flowers are cast directly into the glass mass, the way flowers are frozen inside a solid block of ice: glass touches every petal, thin silvery films of trapped air coat the petal surfaces, and clusters of tiny bubbles cling to stems and petal edges. The recessed front field is wavy, so everything inside sways as if seen under water: outlines wobble, petals stretch and squeeze, stems kink and jump sideways. Nothing inside is perfectly sharp; the deeper flowers turn soft, dark and murky in the thickness of the glass. The thick edges mirror the bouquet in stretched, broken reflections. The glass has a faint lavender tint that deepens to violet in the edges. Composition inside: one huge open pink lotus pressed against the front face and cropped by the frame, a dried lotus seed pod turned sideways in the middle depth, a lotus leaf curling around the back like a dark wave, a single tall lotus bud on a long bending stem cutting diagonally across, a deep violet iris and burgundy anthurium sinking into the murky depth, a pale thistle and silvery dusty miller at the base, fine curling tendrils in the gaps. Asymmetrical, layered front to back, packed edge to edge. Background: smooth seamless gradient from near-black at the top to dusty mauve at the bottom, pure empty color with no floor. Dramatic backlight and side light passing through the glass, the flowers glowing softly from within. Not a 3D render, not CGI.
Seedream 5.0 Pro
Copy
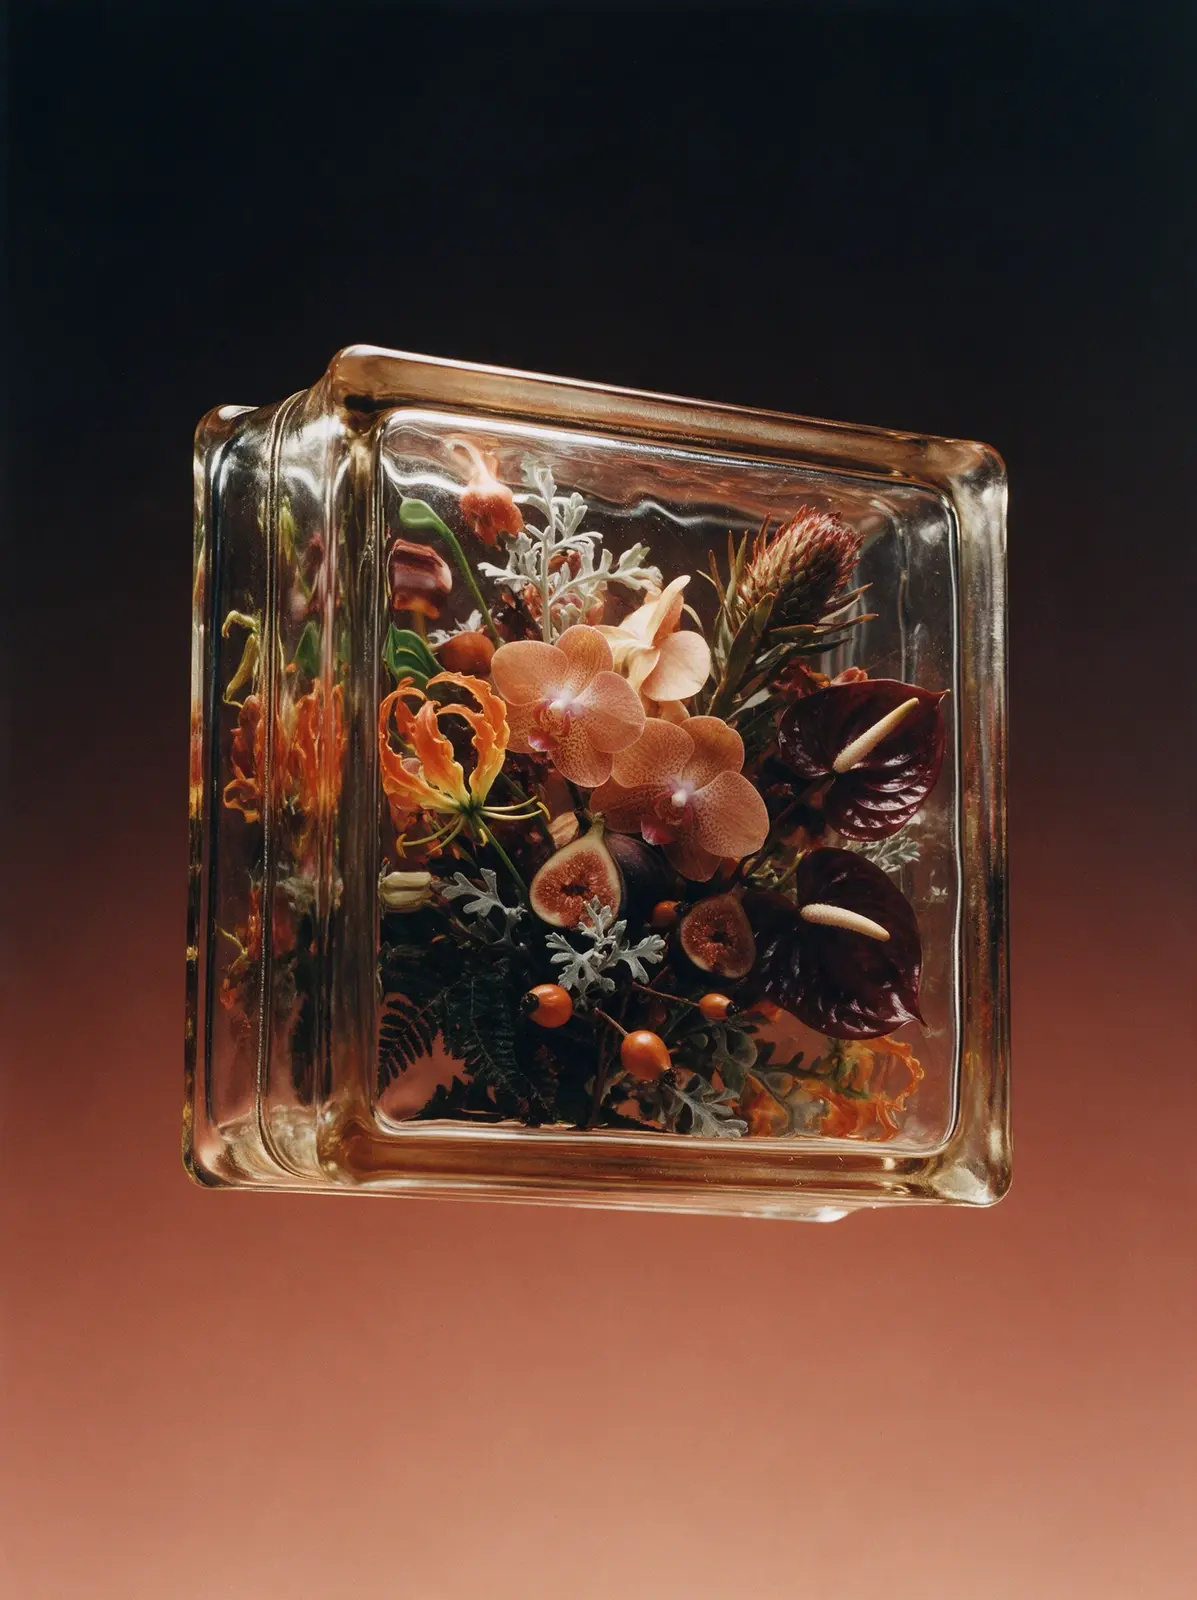
Real studio photograph, shot on medium format film. A thick Soviet glass block — the classic 1970s square pressed-glass brick with a flat rim around each face, softly rounded corners and a seam around its sides — floats in mid-air, tilted sideways at a three-quarter angle, its side and top faces visible. The glass itself is almost invisible: it shows only through thin bright highlights on its edges and rims, through a faint warm amber tint that deepens to honey brown in the thick edges and corners, and through the way it bends everything behind it. The front face is uneven, so the flowers inside look as if seen through moving water: their outlines wobble and smear, petals are stretched and squeezed in waves, stems kink and jump sideways. Nothing inside is perfectly sharp. The flowers closest to the front are only slightly warped, while the ones further back are softer, darker and murkier, losing contrast in the depth of the glass. The thick side faces act like mirrors, showing stretched, fragmented reflections of the flowers. Inside, a dense wild bouquet fills the entire block from wall to wall and corner to corner, with large blooms pressed against the inner faces and cropped by the edges, leaving almost no empty glass: a curling orange glory lily, peach phalaenopsis orchids, burgundy anthurium, dark ripe figs with one cut open, rose hips, a spiky protea bud, silvery dusty miller and dark fern, layered deep into the block. The flowers are lit only by light passing through the glass, so they glow softly from within. Background: a plain studio paper sweep in a smooth gradient from near-black at the top to dusty terracotta at the bottom. Dramatic backlight and side light. No glow, no halo, no shadow beneath. Not a 3D render, not CGI.
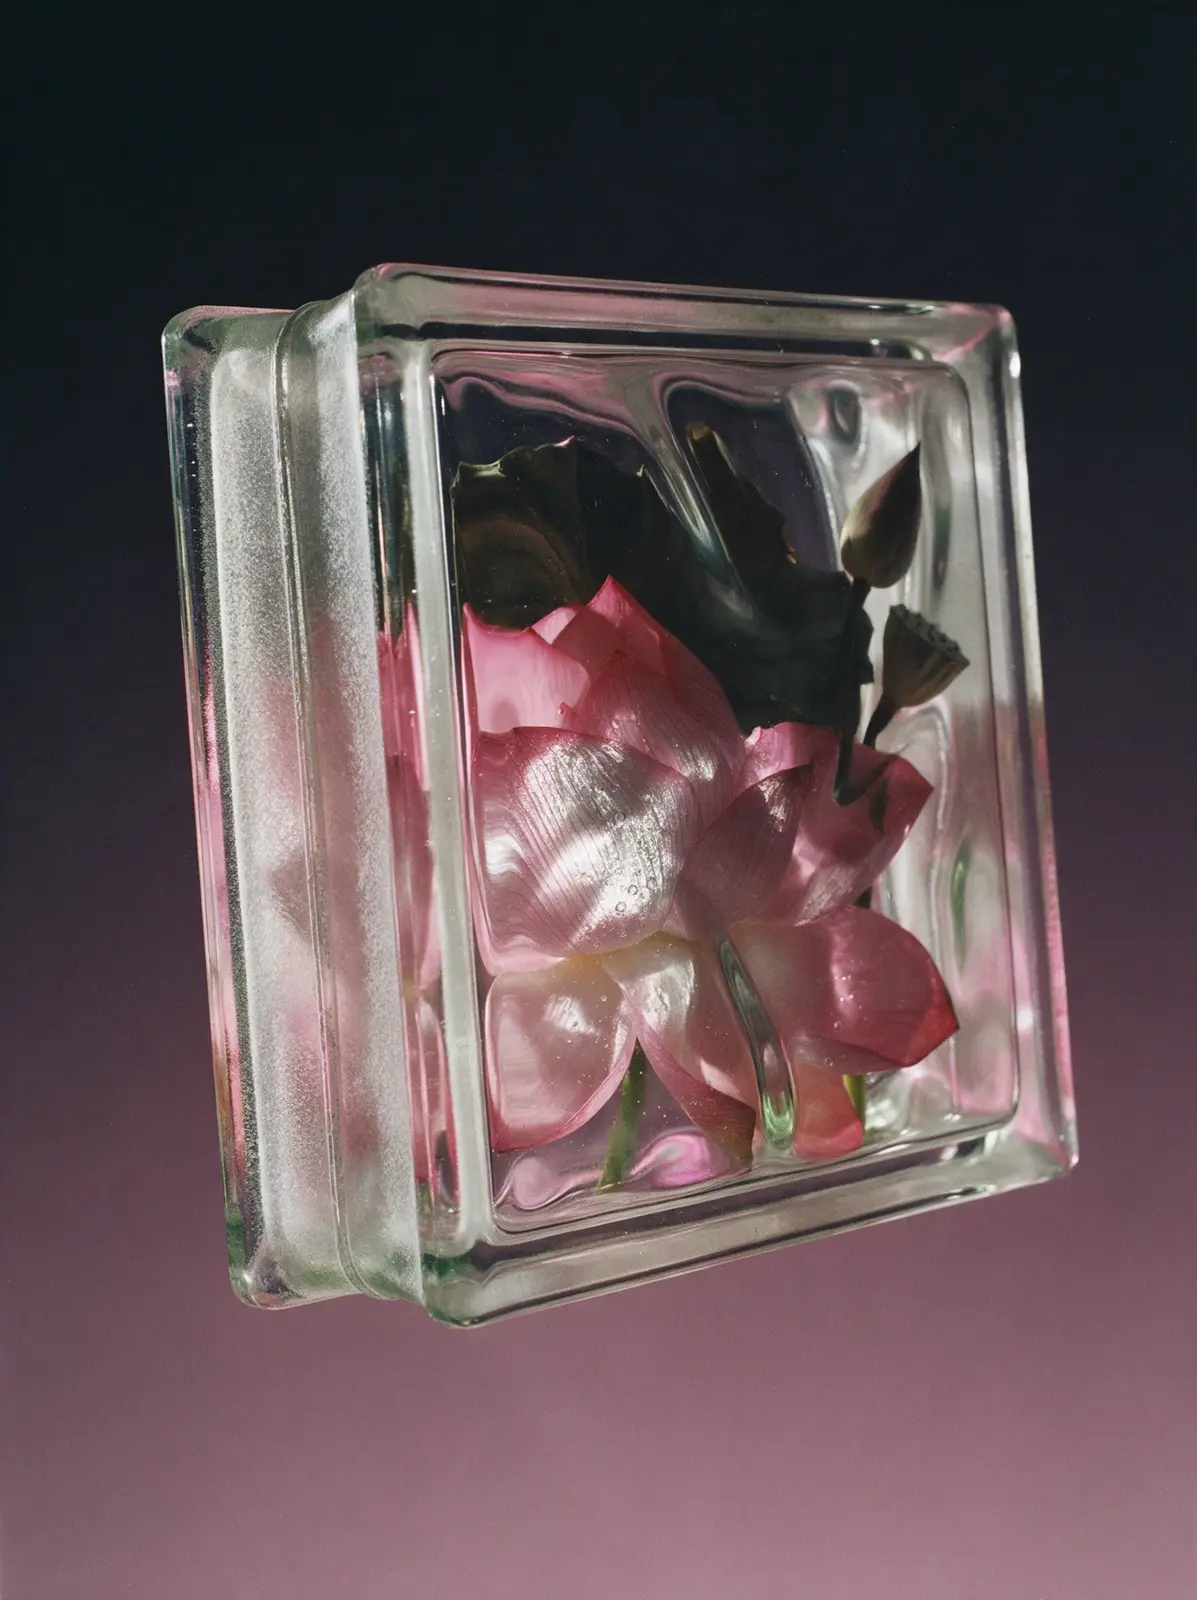
Seedream 5.0 Pro
Copy
Real studio photograph, shot on medium format film. A classic Soviet glass building block hangs weightless in empty space, turned sharply so the camera sees it almost edge-on: the thick narrow side with its frosted mortar channel and seam dominates the foreground, and the front face recedes in steep perspective. No floor, no surface, no shadow. Exact shape: a square brick about 19 by 19 by 8 centimeters, each square face with a narrow flat raised frame and a small step down into a slightly recessed wavy central field; the narrow sides each with a shallow channel holding a rough frosted matte band and a fine fusion seam; softly rounded corners; solid glass all the way through. The flowers are life-size, much bigger than the small brick, so only a close-up fragment of the arrangement fits inside, cut off on every side by the frame: one enormous pink lotus fills half of the face, its petals pressed flat against the inside of the glass, with a huge dark lotus leaf curling behind it and a dried seed pod and a tall bud pushing in from the edges. The flowers are fused with the glass: where petals touch the inner surface they flatten and turn silvery, tiny bubbles sit right on the petals, the wavy field bends their outlines, and at the step of the frame everything behind is sharply shifted and broken. The thick edges glow pink and green with the colors trapped inside, showing stretched reflections of the lotus. Faint lavender glass. Background: smooth seamless gradient from near-black at the top to dusty mauve at the bottom. Strong backlight through the glass, soft side light. Not a 3D render, not CGI.
Seedream 5.0 Pro
Copy
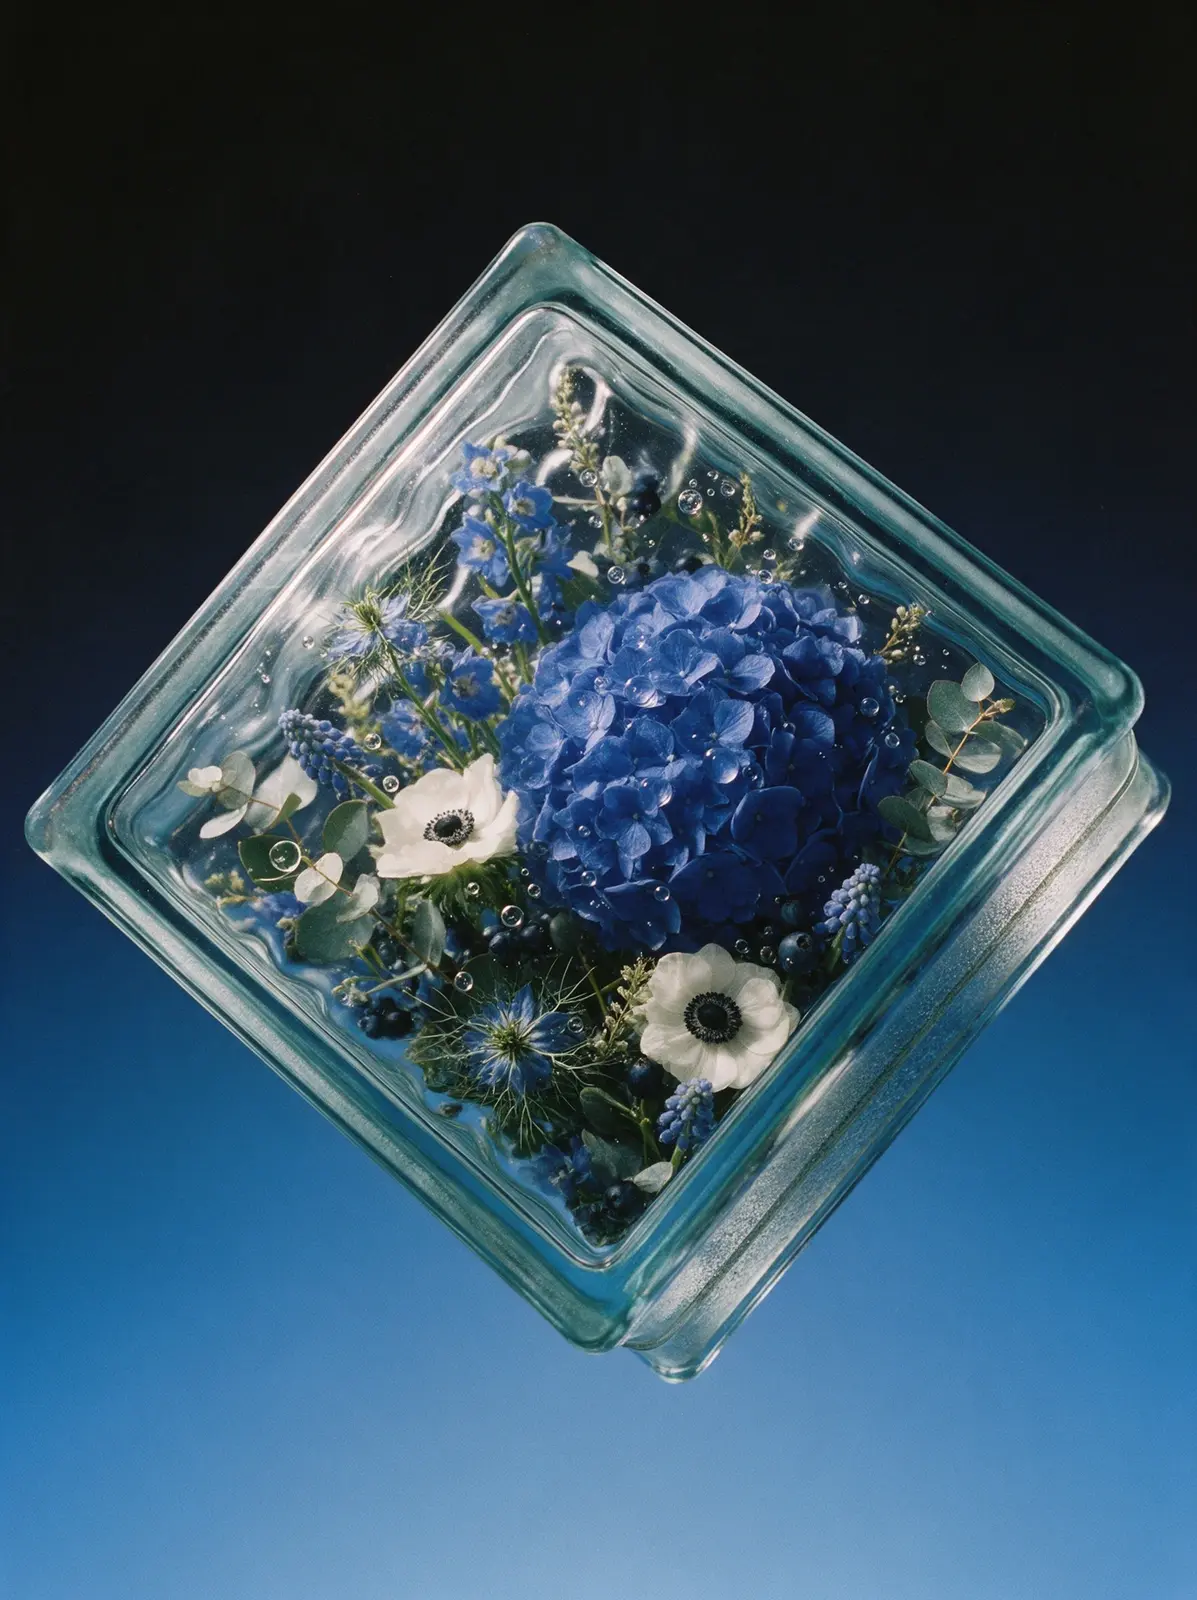
Real studio photograph, shot on medium format film. A classic Soviet glass building block hangs weightless in empty space, balanced on one corner like a diamond, its front face turned almost straight to the camera with a sliver of one narrow side visible. No floor, no surface, no shadow. Exact shape: a square brick about 19 by 19 by 8 centimeters, each square face with a narrow flat raised frame and a small step down into a slightly recessed wavy central field; the narrow sides each with a shallow channel holding a rough frosted matte band and a fine fusion seam; softly rounded corners. Solid glass all the way through. The flowers are life-size and the brick is small, so the block holds a tight close-up of a dense arrangement, filled edge to edge with no empty gaps and cut off by the frame on every side. Hero: one enormous deep blue hydrangea head taking up almost half the face. Secondary: two white anemones with black centers and one blue delphinium spike crossing diagonally. Filling every remaining space: grape hyacinths, blue nigella with its threadlike bracts, silver-dollar eucalyptus, dark blue berries and fine grasses. How the flowers behave in the glass: petals touching the inner surface are pressed flat against it and turn silvery where they touch; tiny seed bubbles cling to every petal and a few larger round bubbles float between the blooms; faint wavy striae in the glass are visible only by how they bend the stems. The wavy front field makes outlines sway as if under water. At the step of the frame everything behind is sharply shifted and broken in a band around the face. Deeper flowers are softer and darker. The thick edges glow cobalt with the colors trapped inside, showing stretched mirrored fragments of the hydrangea. Faint aqua-tinted glass. No smoke, no mist. Background: smooth seamless gradient from near-black at the top to cornflower blue at the bottom. Strong backlight through the glass so the flowers glow from within, soft side light. Not a 3D render, not CGI.
Seedream 5.0 Pro
Copy
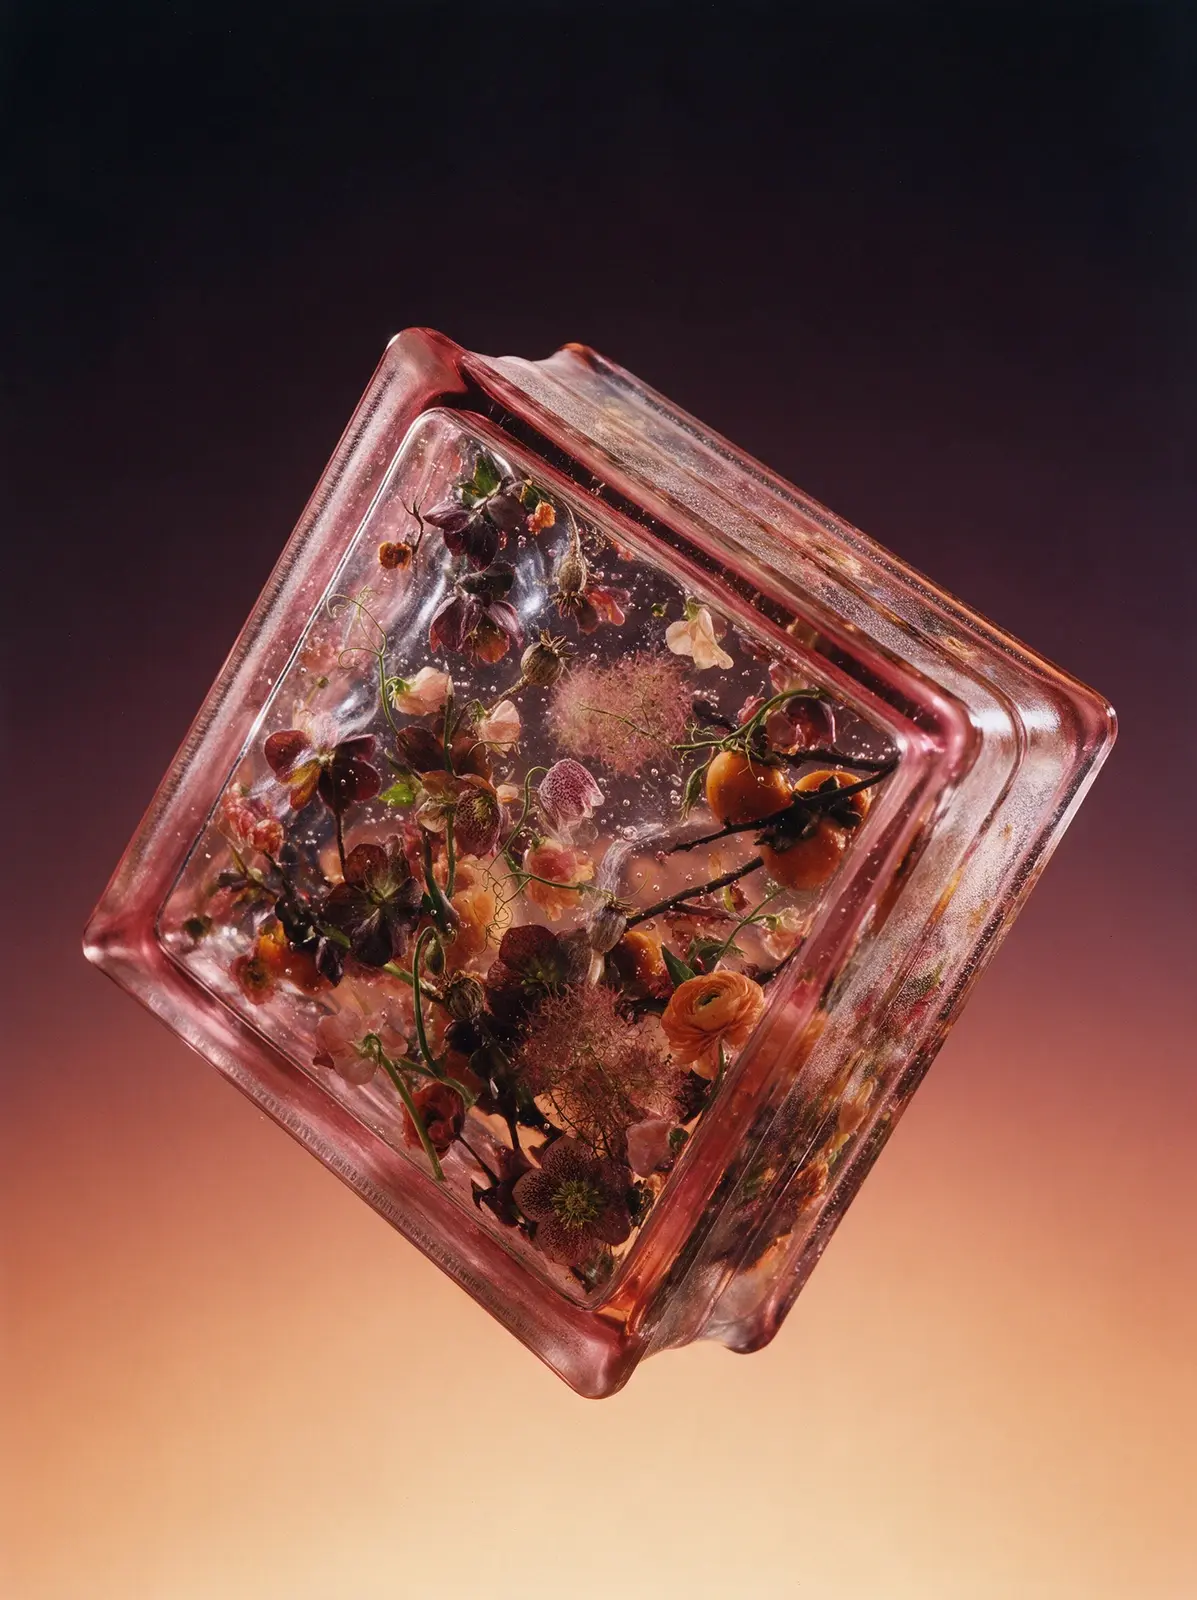
Real studio photograph, shot on medium format film. A classic Soviet glass building block from the 1970s hangs weightless in empty space, tilted onto one corner like a diamond, with its front face and one narrow side visible. No floor, no surface, no shadow anywhere. Exact recognizable shape: a square brick about twice as wide as it is thick, like 19 by 19 by 8 centimeters. Each square face has a narrow flat raised frame along its edges, then a small step down into a slightly recessed central field. The four narrow sides each have a shallow channel along their middle with a rough frosted matte band and a fine fusion seam inside it. Softly rounded corners, thick heavy edges, mass-produced pressed glass. The block is solid glass all the way through, no hollow inside. It is packed completely with flowers cast into the glass, so densely that no background shows through the front face at all — a solid wall of blooms, fruit, leaves and stems from frame to frame and from the front face deep to the back, cropped on every side: nodding dark plum and speckled hellebores, ruffled apricot ranunculus, orange persimmons on dark branches, dry poppy seed pods, smoky pink smoke-bush plumes, dusty sweet peas and curling tendrils, overlapping and tangled. The glass is clearly in front of the flowers: it is not perfectly clear but has faint milky veils, swirling cords and streaks from the casting, and thousands of tiny bubbles suspended throughout, hanging in front of the petals at every depth. The wavy front field makes everything sway and wobble as if under water. At the step between the frame and the recessed field, the flowers behind are sharply displaced, broken and compressed in a band running all around the face. The flowers look softened and slightly faded, seen through several centimeters of glass, with the deepest layers dissolving into dark murk. The thick edges mirror the flowers in stretched fragments. The glass has a faint blush-rose tint deepening to warm pink in the edges. Background: smooth seamless gradient from near-black plum at the top to warm glowing apricot at the bottom, pure empty color. Dramatic backlight and side light passing through the glass. Not a 3D render, not CGI.
Seedream 5.0 Pro
Copy
Real studio photograph, shot on medium format film. A classic Soviet glass building block hangs weightless in empty space, seen from above as it tumbles forward: its top narrow side with the frosted mortar channel is visible and the front face tips toward the camera at a sharp angle. No floor, no surface, no shadow. Exact shape: a square brick about 19 by 19 by 8 centimeters, each square face with a narrow flat raised frame and a small step down into a slightly recessed wavy central field; the narrow sides each with a shallow channel holding a rough frosted matte band and a fine fusion seam; softly rounded corners. Solid glass all the way through. Everything is sealed completely inside the glass. The block has a clean glass silhouette with nothing sticking out of it, and the space around it is pure empty background. Inside, a minimal graphic composition of only a few elements: one large apricot king protea placed off-center toward the upper corner, so big that its bracts press against the inner edge of the frame; one flamed orange parrot tulip leaning in from the opposite side; and a single thin branch with three glossy kumquats crossing the open glass diagonally. The rest of the block is open glass. The protea's front bracts and the tulip's petals are pressed flat against the inner surface of the glass, spread and slightly squashed, with soft silvery sheen and tiny bubbles where they touch. The wavy front field bends every outline as if under water. In the open glass, the background behind is visibly warped by the waves, and a few round bubbles float. At the step of the frame everything behind is sharply shifted and broken. The deeper parts turn soft and dark. The thick edges carry stretched amber reflections of the protea. Faint warm amber glass. No smoke, no mist. Background: smooth seamless gradient from near-black at the top to warm ochre at the bottom. Strong backlight through the glass, soft side light. Not a 3D render, not CGI.
Seedream 5.0 Pro
Copy
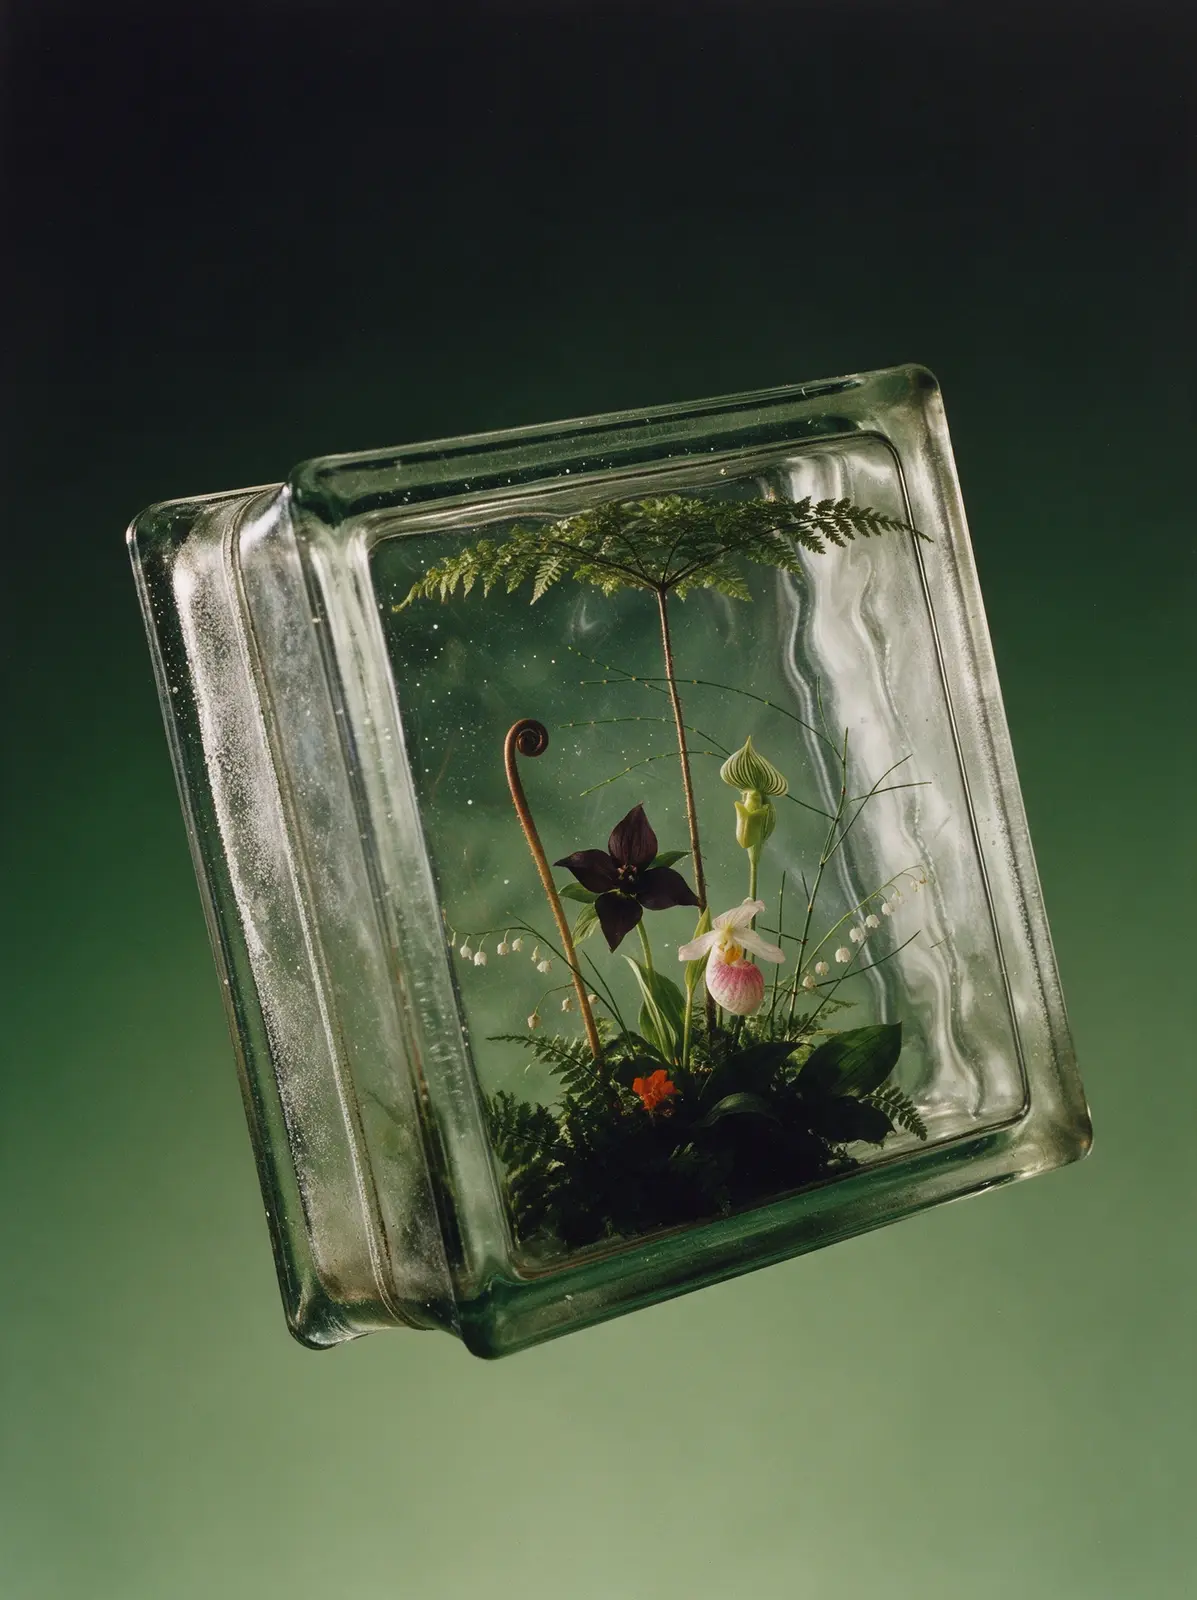
Real studio photograph, shot on medium format film. A classic Soviet glass building block from the 1970s hangs weightless in empty space, dramatically tilted on two axes as if tossed and frozen mid-air, its front face and one narrow side visible. No floor, no surface, no shadow anywhere. Exact recognizable shape: a square brick about twice as wide as it is thick, like 19 by 19 by 8 centimeters. Each square face has a narrow flat raised frame along its edges, then a small step down into a slightly recessed central field. The four narrow sides each have a shallow channel along their middle with a rough frosted matte band and a fine fusion seam inside it. Softly rounded corners, thick heavy edges, mass-produced pressed glass. Solid glass all the way through, no hollow inside. Cast inside the glass is a fragment of a sculptural ikebana arrangement with a clear hierarchy, as if the block cut a window out of a larger composition. The gesture: one tall bare stem rises and opens into a wide horizontal canopy of lacy fern at the top, cropped by the frame, while a single tall copper-brown fiddlehead curls up beside it in a long arc. The hero is one dark plum-black trillium with velvety petals, pressed against the front face. Secondary accents: a pink-and-white lady's slipper orchid and a pale green jack-in-the-pulpit. A dense dark base of fern fronds and broad leaves in the lower corner, with one small bright orange flower as a color spark. The middle stays open, crossed only by thin horsetail stems and arching strings of tiny white bells. The glass is clearly in front of everything: swirling cords and streaks from the casting, thousands of tiny bubbles at every depth, faint milky veils. The wavy front field makes the plants sway and wobble as if under water. At the step between the frame and the recessed field, everything behind is sharply displaced and broken in a band around the face. Deeper elements dissolve into soft murk. The open areas of glass are never empty: refracted streaks of the background color, cords and bubbles drift through them. The glass has a faint smoky sea-green tint deepening to bottle green in the edges. Background: smooth seamless gradient from near-black at the top to muted moss green at the bottom, pure empty color. Strong backlight through the glass so the plants glow from within, soft side light along the edges. Not a 3D render, not CGI.
Seedream 5.0 Pro
Copy
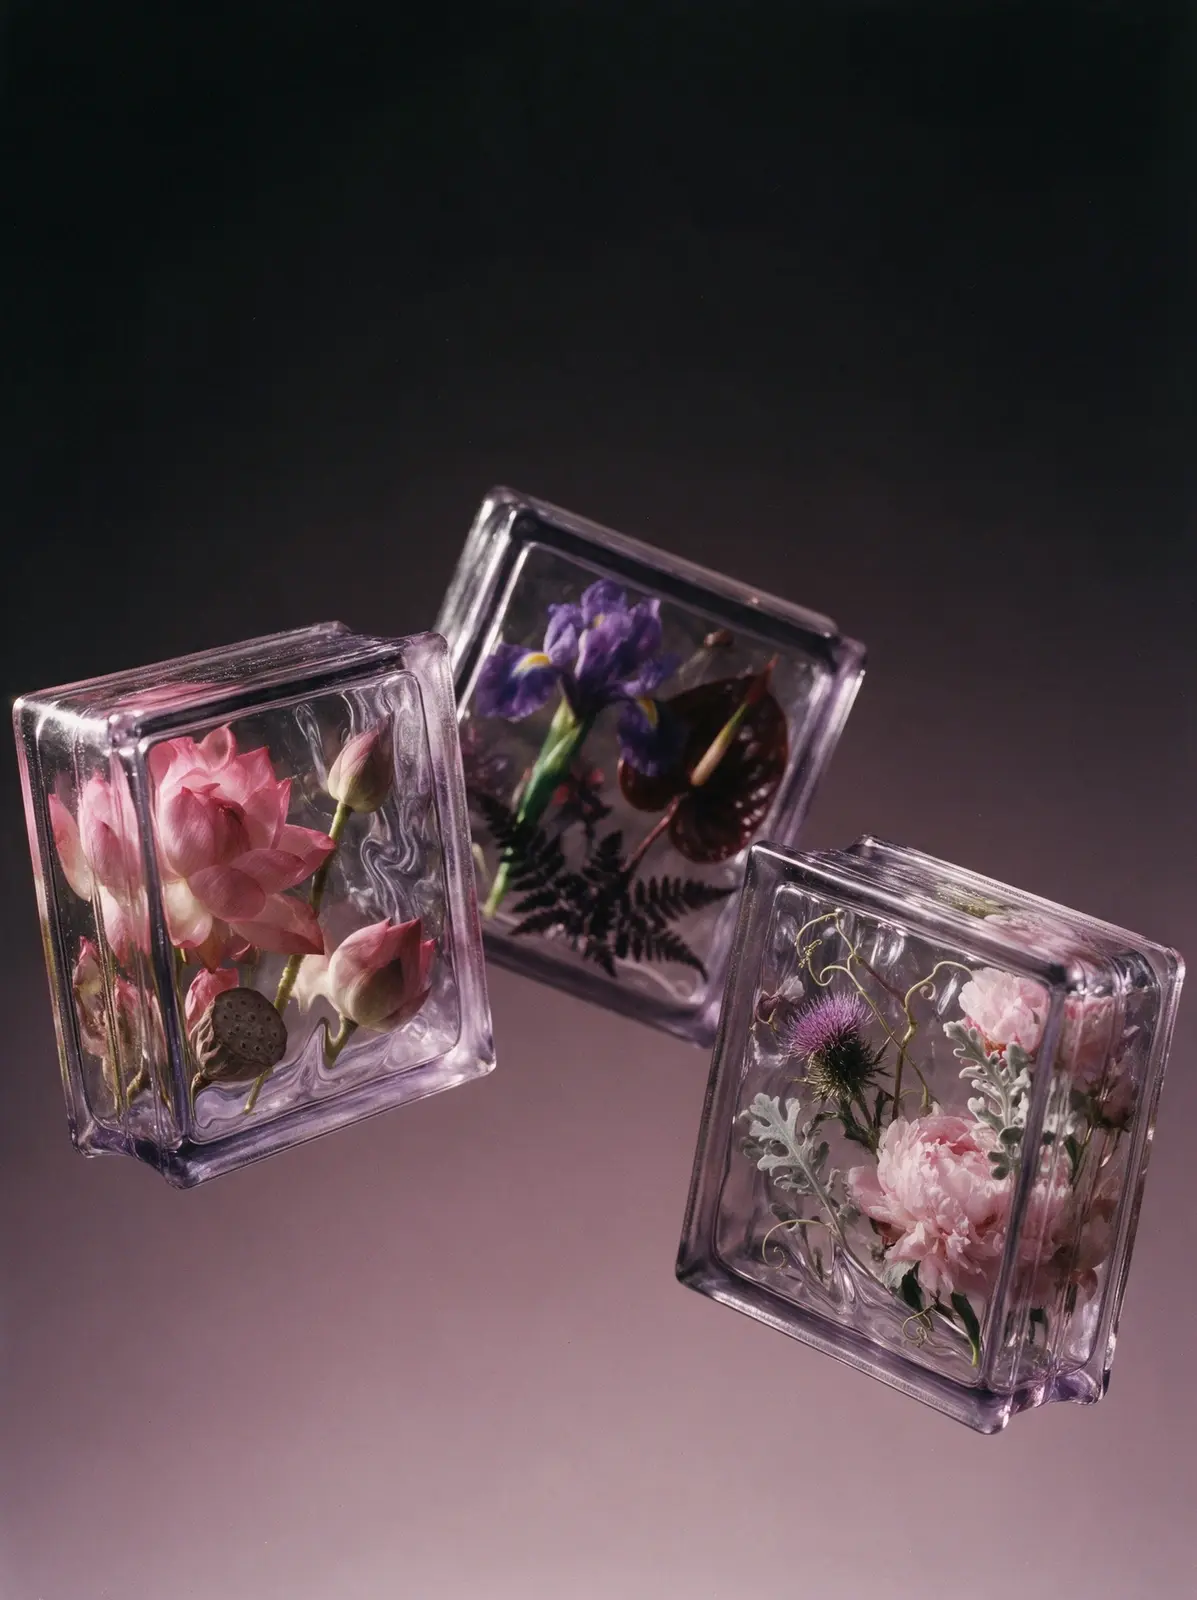
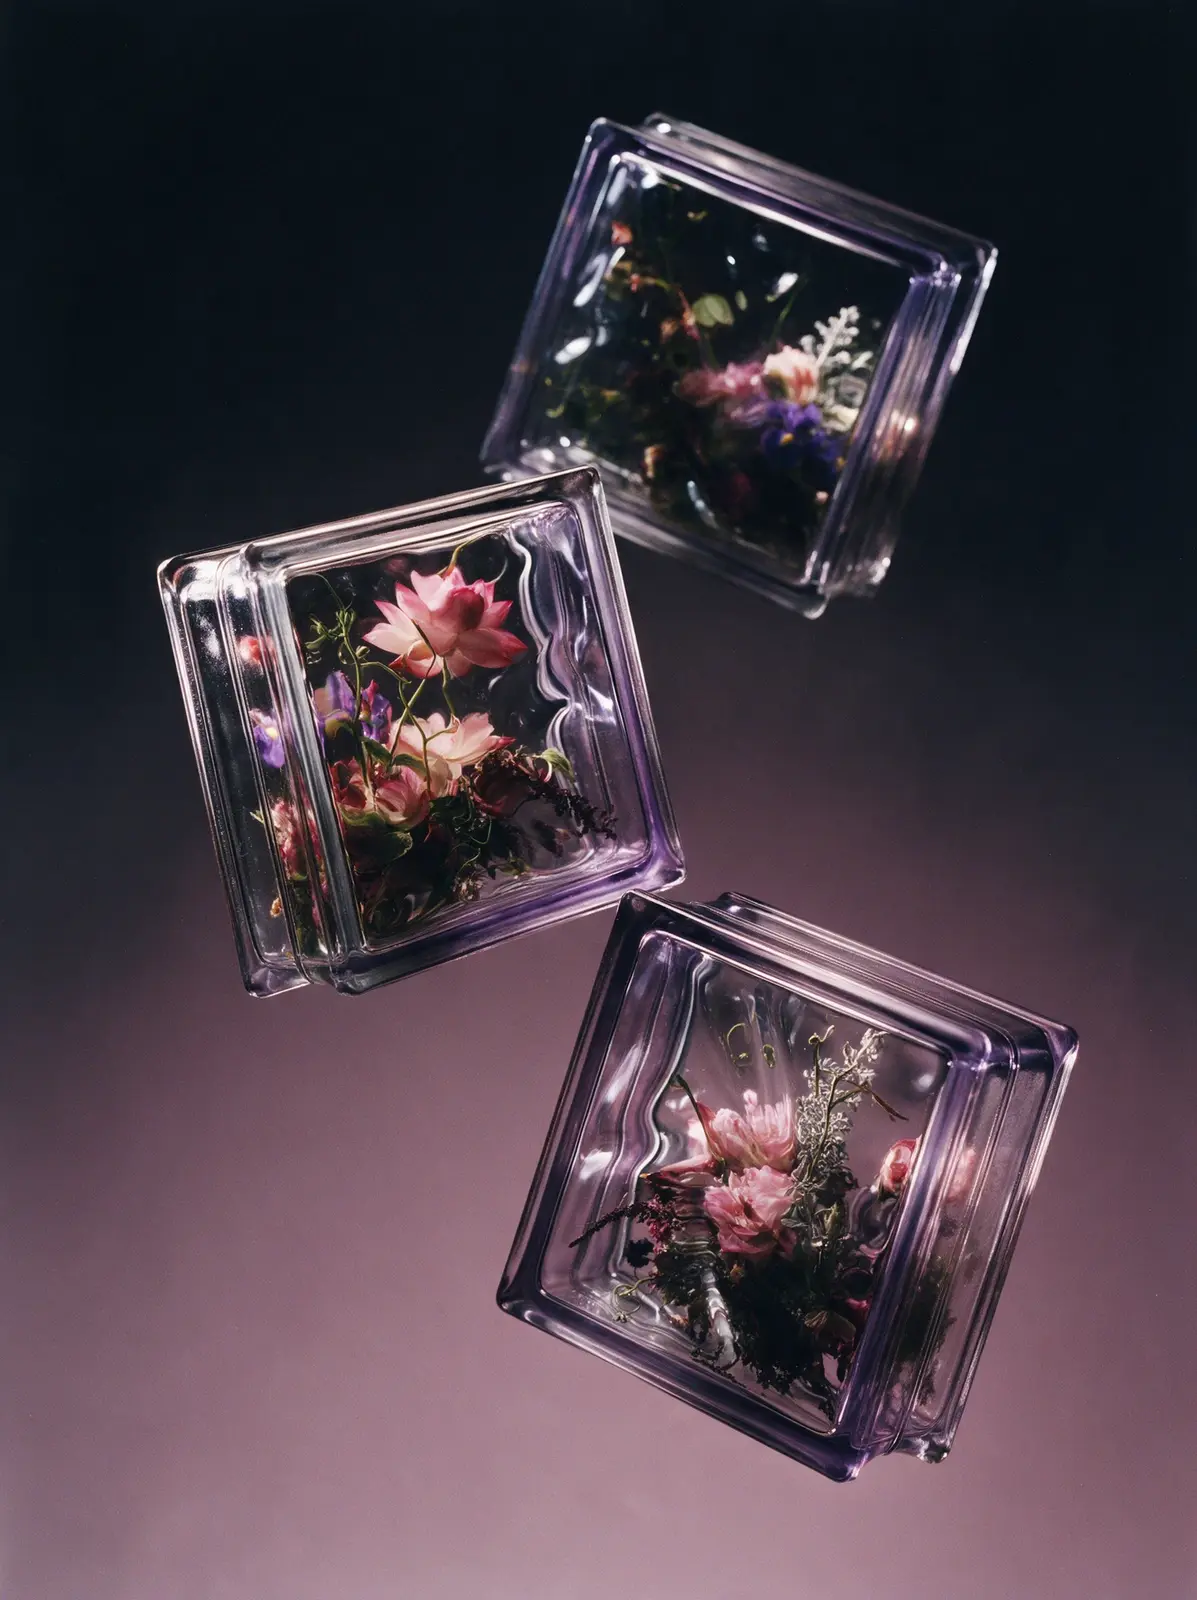
Real studio photograph, shot on medium format film. Three thick Soviet glass blocks — the classic 1970s square pressed-glass bricks with a flat rim around each face, softly rounded corners and a seam around their sides — float in mid-air at different heights and depths with generous space between them, each tilted at a different angle so their side, top or bottom faces are visible. The farthest one is slightly soft from depth of field. The glass itself is almost invisible: it shows only through thin bright highlights on the edges and rims, through a delicate pale lavender tint that deepens to soft violet in the thick edges and corners, and through the way it bends everything behind it. The front faces are uneven, so the flowers inside look as if seen through moving water: their outlines wobble and smear, petals are stretched and squeezed in waves, stems kink and jump sideways. Nothing inside is perfectly sharp. The flowers closest to the front are only slightly warped, while the ones further back are softer, darker and murkier. The thick side faces act like mirrors, showing stretched, fragmented reflections of the flowers. Each block is filled from wall to wall with a dense wild arrangement, large blooms pressed against the inner faces and cropped by the edges: the first with a large pink lotus, lotus buds and a lotus seed pod; the second with a deep violet iris, burgundy anthurium and dark fern; the third with pale pink peonies, a thistle, silvery dusty miller and curling tendrils. The flowers are lit only by light passing through the glass, so they glow softly from within. Background: a plain studio paper sweep in a smooth gradient from near-black at the top to dusty mauve at the bottom. Dramatic backlight and side light. No glow, no halo, no shadows beneath. Not a 3D render, not CGI.
Seedream 5.0 Pro
Copy
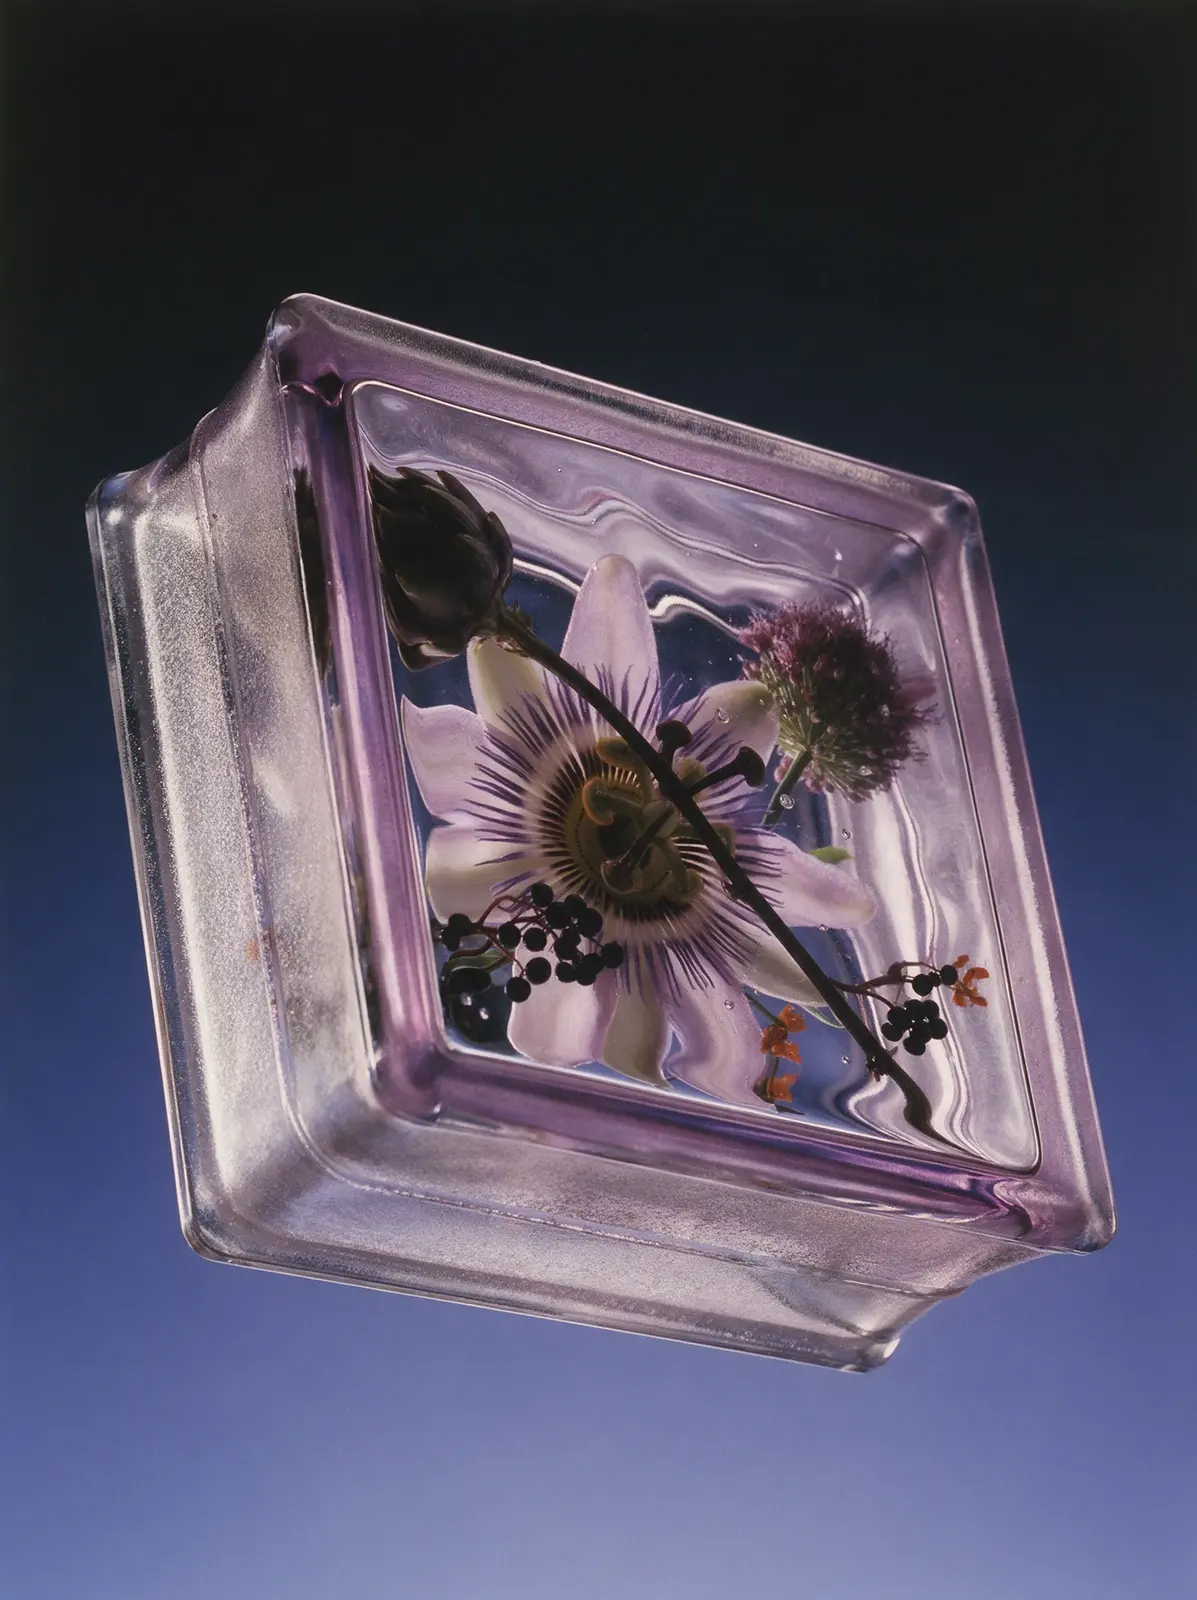
Real studio photograph, shot on medium format film. A classic Soviet glass building block hangs weightless in empty space, seen from below: it is tilted far back so its bottom narrow side with the frosted mortar channel faces the camera, and the front face looms overhead in perspective, as if floating above the viewer. No floor, no surface, no shadow. Exact shape: a square brick about 19 by 19 by 8 centimeters, each square face with a narrow flat raised frame and a small step down into a slightly recessed wavy central field; the narrow sides each with a shallow channel holding a rough frosted matte band and a fine fusion seam; softly rounded corners; solid glass all the way through. The flowers are life-size, much bigger than the small brick, so only a close-up fragment of the arrangement fits inside, cut off on every side by the frame: one enormous pale lilac passionflower fills half of the face, its striped crown of filaments pressed against the inside of the glass, a dark artichoke cut off by one corner, a purple allium sphere half outside the frame, and a dark vine stem crossing the whole block diagonally with clusters of black elderberries and a few tiny orange flowers. The flowers are fused with the glass: where petals touch the inner surface they flatten and turn silvery, tiny bubbles sit right on the petals, the wavy field bends their outlines, and at the step of the frame everything behind is sharply shifted and broken. The thick edges glow violet with the colors trapped inside, showing stretched reflections of the passionflower. Faint lavender glass. Background: smooth seamless gradient from near-black at the top to deep periwinkle blue at the bottom. Strong backlight through the glass, soft side light. Not a 3D render, not CGI.
Seedream 5.0 Pro
Copy
Real studio photograph, shot on medium format film. A Soviet glass brick — the classic 1970s square pressed-glass block with a flat rim around each face, softly rounded corners and a seam around its sides — hangs weightless in empty space, tilted at a three-quarter angle with its side and top visible. There is no floor, no ground, no surface anywhere and no shadow anywhere. The brick is SOLID glass all the way through, from the front face to the back face — no hollow inside, no inner chamber, no inner walls, no back panel. The flowers are cast directly into the glass mass, the way flowers are frozen inside a solid block of ice: glass touches every petal, thin silvery films of trapped air coat the petal surfaces, and clusters of tiny bubbles cling to stems and petal edges. The front face is wavy, so everything inside sways as if seen under water: outlines wobble, petals stretch and squeeze, stems kink and jump sideways. Nothing inside is perfectly sharp; the deeper flowers turn soft, dark and murky in the thickness of the glass. The thick side faces mirror the bouquet in stretched, broken reflections. The glass has a faint lavender tint that deepens to violet in the edges. Composition inside: one huge open pink lotus pressed against the front face and cropped by the rim, a dried lotus seed pod turned sideways in the middle depth, a lotus leaf curling around the back like a dark wave, a single tall lotus bud on a long bending stem cutting diagonally across, a deep violet iris and burgundy anthurium sinking into the murky depth, a pale thistle and silvery dusty miller at the base, fine curling tendrils in the gaps — asymmetrical, layered front to back, packed edge to edge. Background: smooth seamless gradient from near-black at the top to dusty mauve at the bottom, pure empty color with no floor. Dramatic backlight and side light passing through the glass, the flowers glowing softly from within. Not a 3D render, not CGI.
Seedream 5.0 Pro
Copy
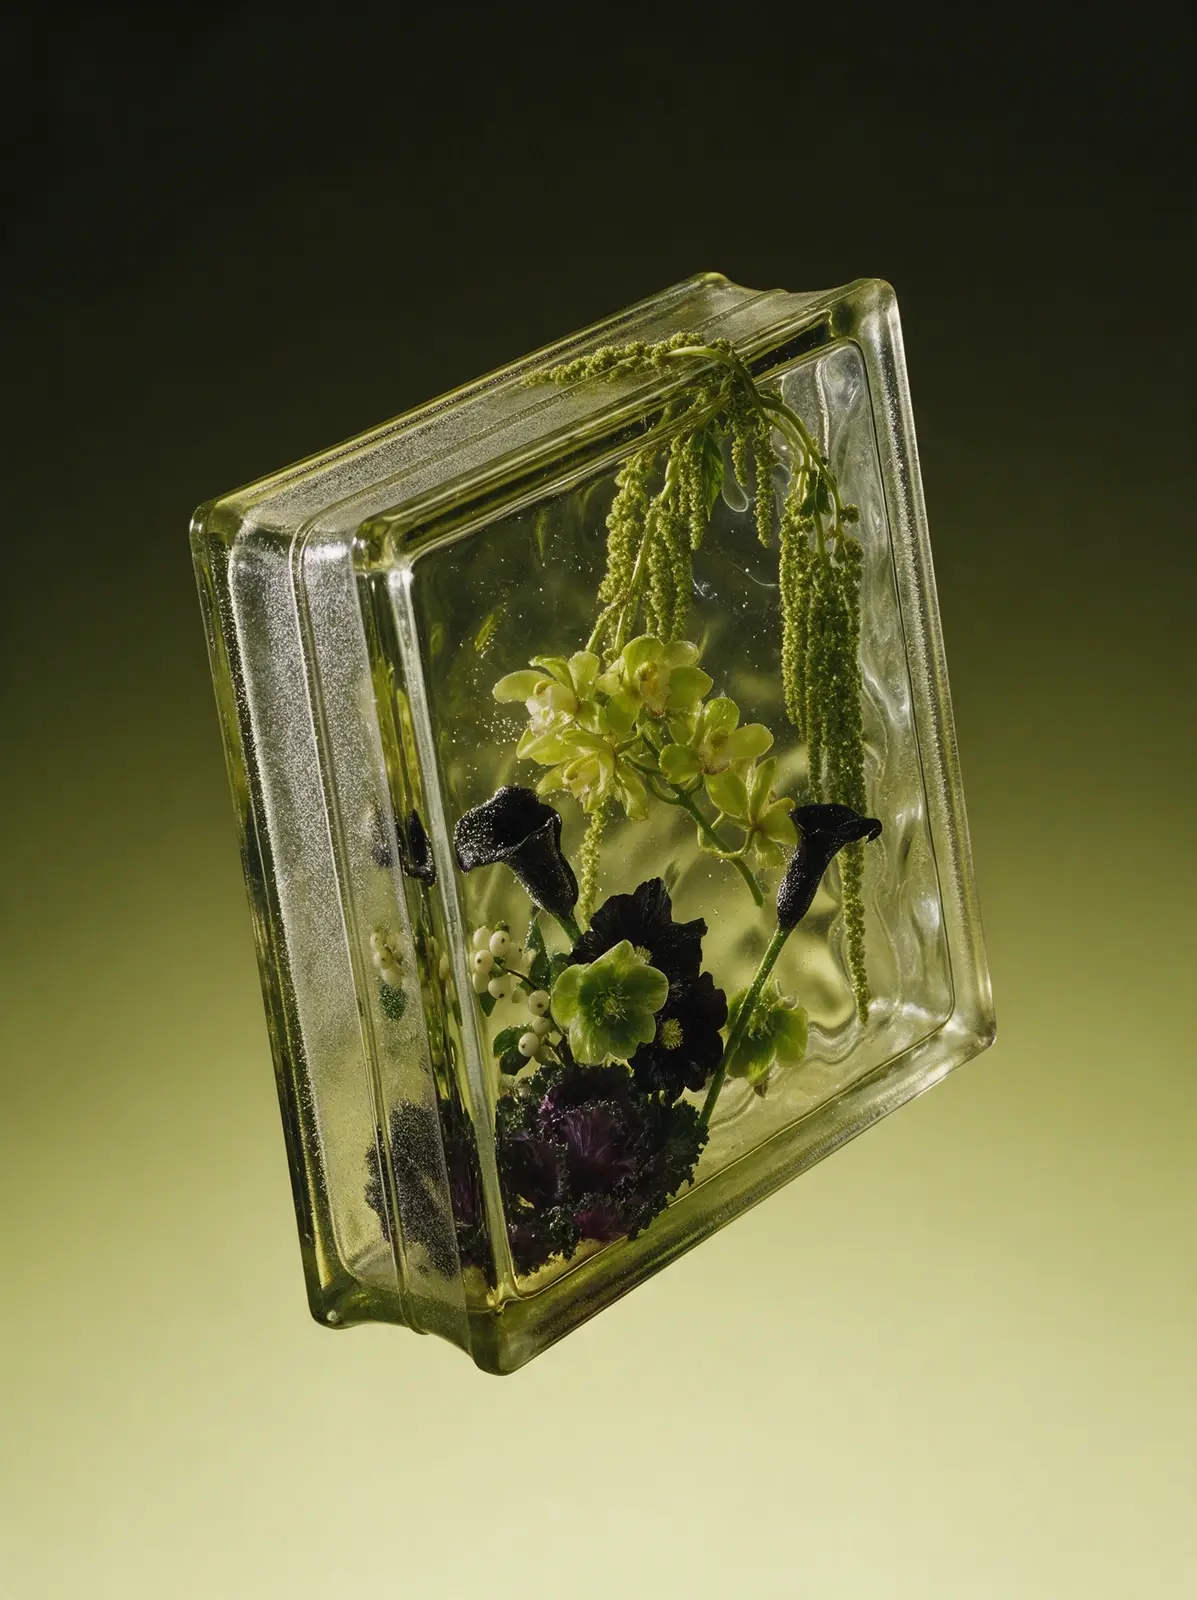
Real studio photograph, shot on medium format film. A classic Soviet glass building block from the 1970s hangs weightless in empty space, tilted backward at a three-quarter angle with its front face and one narrow side visible. There is no floor, no ground, no surface anywhere and no shadow anywhere. Its exact recognizable shape: a square brick about twice as wide as it is thick, like 19 by 19 by 8 centimeters. Each square face has a narrow flat raised frame along its edges, then a small step down into a slightly recessed central field. The four narrow sides each have a shallow channel running along their middle with a rough frosted matte band and a fine fusion seam inside it, like the groove that holds the mortar. Softly rounded corners, thick heavy edges, typical mass-produced pressed glass. The block is SOLID glass all the way through, with no hollow, no inner chamber, no inner walls and no back panel. The flowers are cast directly into the glass mass, the way flowers are frozen inside a solid block of ice: glass touches every petal, thin silvery films of trapped air coat the petal surfaces, and clusters of tiny bubbles cling to stems and petal edges. The recessed front field is wavy, so everything inside sways as if seen under water: outlines wobble, petals stretch and squeeze, stems kink and jump sideways. Nothing inside is perfectly sharp; the deeper flowers turn soft, dark and murky in the thickness of the glass. The thick edges mirror the arrangement in stretched, broken reflections. The glass has a faint pale golden-green tint that deepens to olive in the edges. Composition inside: a cascading arrangement: long ropes of hanging green amaranthus pouring down from the top corner through the whole height of the block, a lime-green cymbidium orchid spray arching across the middle and pressed against the front face, rising from the bottom toward them a near-black hollyhock and black calla lilies sinking into the murky depth, a pale green hellebore, white snowberries scattered like pearls, and a ruffled dark purple ornamental kale at the base, cropped by the frame. Background: smooth seamless gradient from near-black olive at the top to pale soft chartreuse at the bottom, pure empty color with no floor. Dramatic backlight and side light passing through the glass, the flowers glowing softly from within. Not a 3D render, not CGI.
Seedream 5.0 Pro
Copy
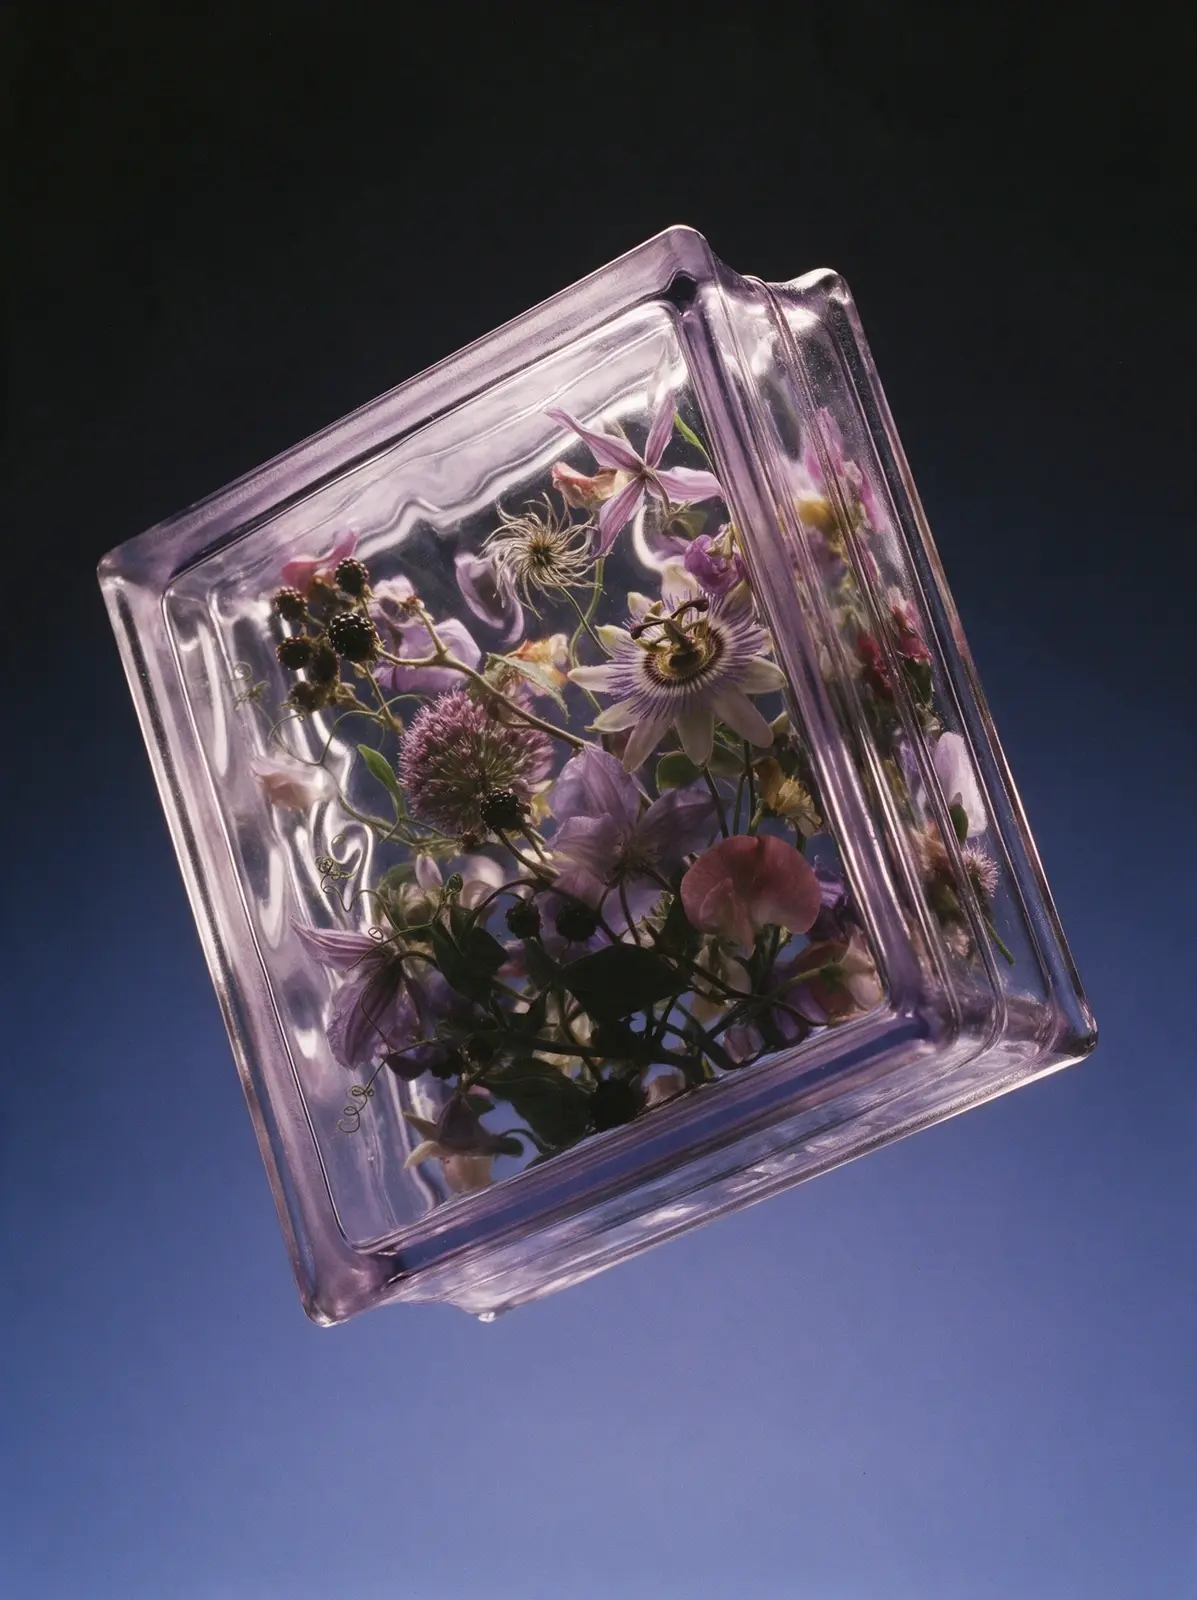
Real studio photograph, shot on medium format film. A thick Soviet glass block — the classic 1970s square pressed-glass brick with a flat rim around each face, softly rounded corners and a seam around its sides — floats in mid-air, tilted steeply onto one corner at a three-quarter angle, its side and bottom faces visible. The glass itself is almost invisible: it shows only through thin bright highlights on its edges and rims, through a delicate pale lavender tint that deepens to soft violet in the thick edges and corners, and through the way it bends everything behind it. The front face is uneven, so the flowers inside look as if seen through moving water: their outlines wobble and smear, petals are stretched and squeezed in waves, stems kink and jump sideways. Nothing inside is perfectly sharp. The flowers closest to the front are only slightly warped, while the ones further back are softer, darker and murkier, losing contrast in the depth of the glass. The thick side faces act like mirrors, showing stretched, fragmented reflections of the flowers. Inside, a dense wild bouquet fills the entire block from wall to wall and corner to corner, with large blooms pressed against the inner faces and cropped by the edges, leaving almost no empty glass: a pale lilac passionflower with its crown of filaments, a spherical purple allium head, lavender clematis, dark blackberries on their stems, a dusty-pink sweet pea, a wispy clematis seed head, spiraling tendrils and dark green leaves, layered deep into the block. The flowers are lit only by light passing through the glass, so they glow softly from within. Background: a plain studio paper sweep in a smooth gradient from near-black at the top to deep periwinkle blue at the bottom. Dramatic backlight and side light. No glow, no halo, no shadow beneath. Not a 3D render, not CGI.
Seedream 5.0 Pro
Copy
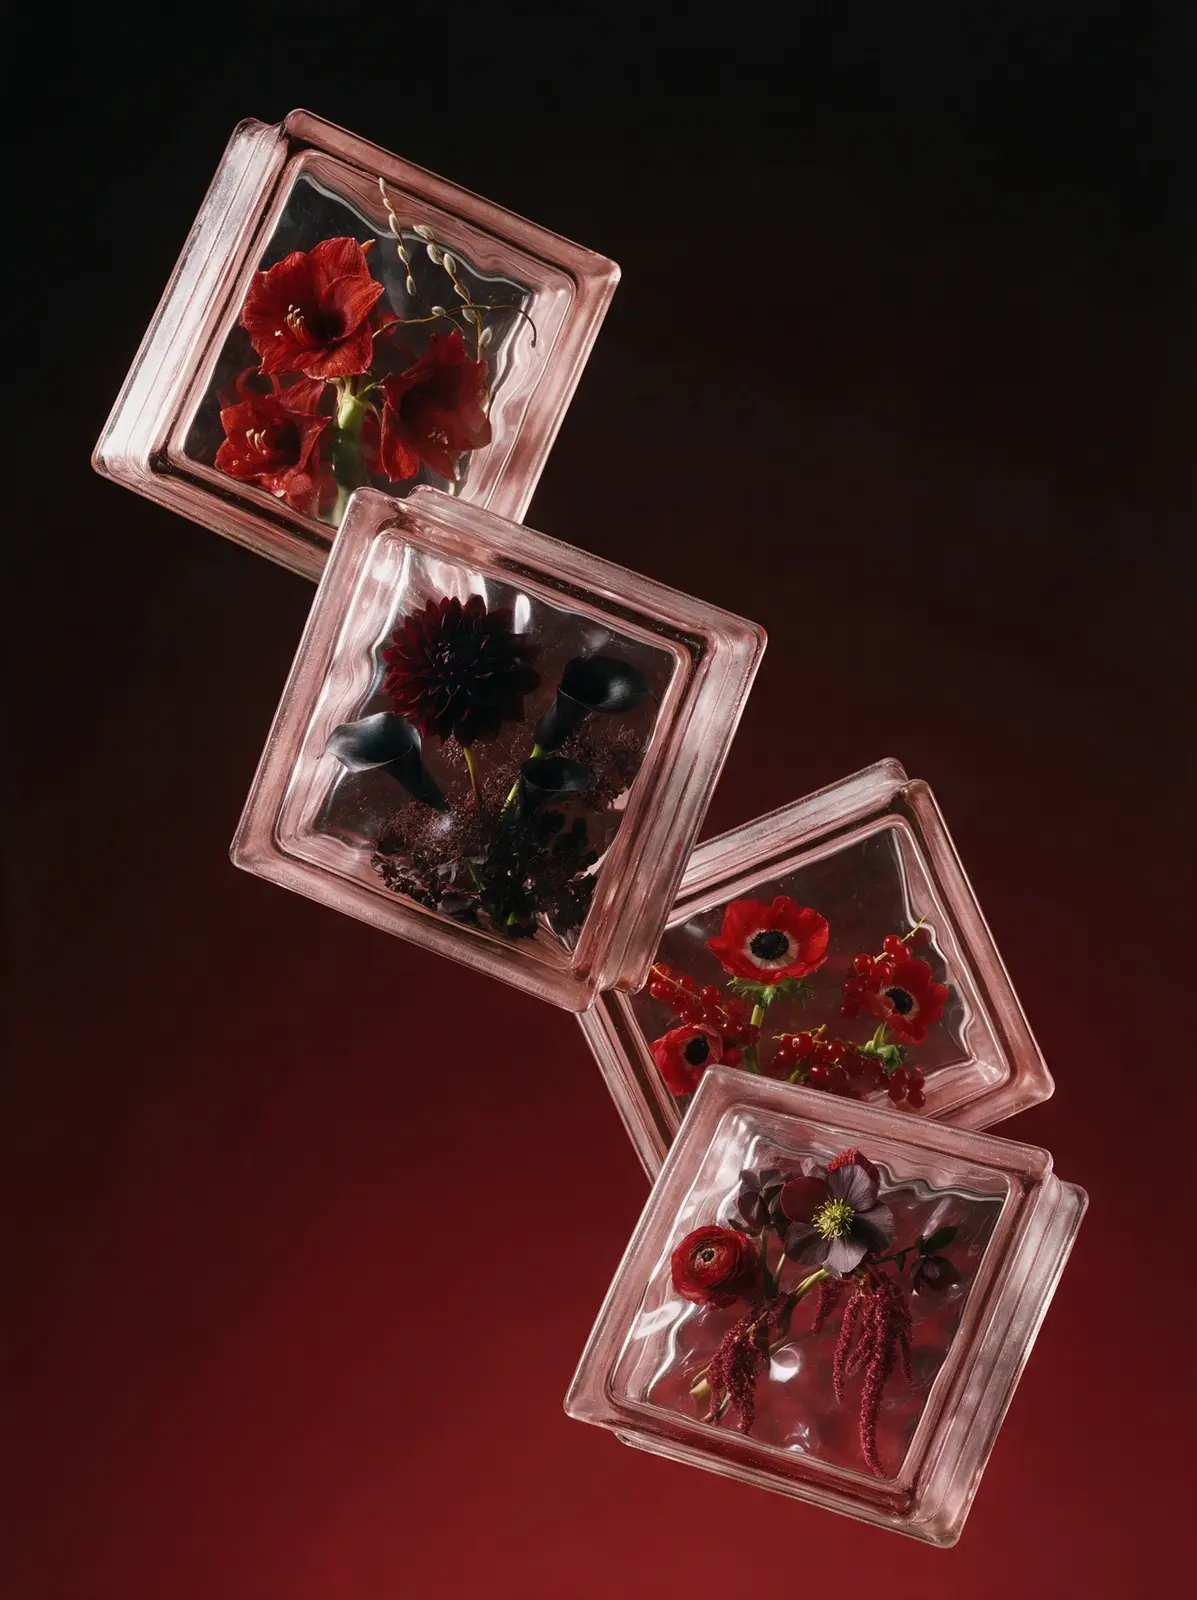
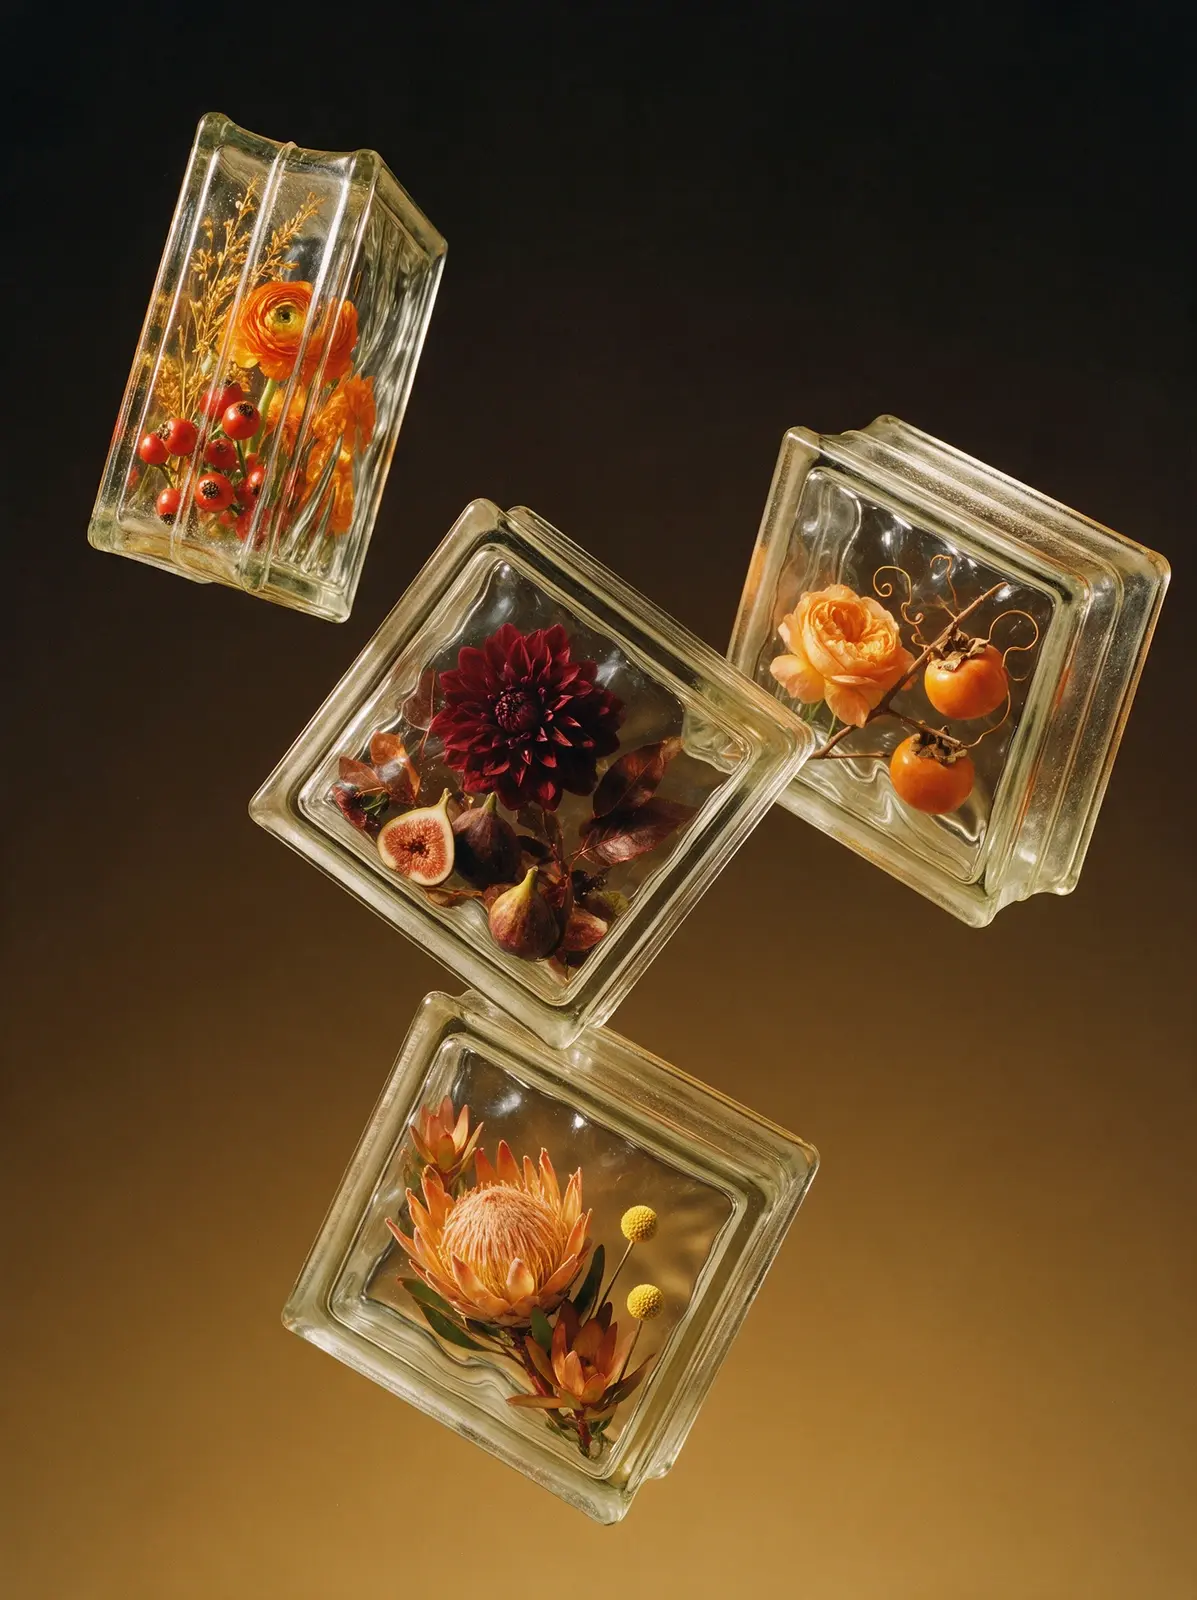
Real studio photograph, shot on medium format film. Four classic Soviet glass building blocks float weightless in empty space in a dynamic spiral, as if tossed into the air and frozen, at different heights and depths, each spinning at a different angle with front faces and narrow sides visible. No floor, no surface, no shadows. Each block has the exact recognizable shape: a perfectly square face about twice as wide as the block is thick, a narrow flat raised frame and a small step down into a recessed wavy central field, and narrow sides each with a shallow frosted mortar channel and fine fusion seam. Solid glass, with each arrangement cast inside; nothing sticks out of the blocks. Inside each block is a lush, layered floral arrangement that fills most of the face, with big flowers and rich detail. First: crimson amaryllis trumpets and a curling willow twig. Second: a velvety burgundy-black dahlia, black calla lilies and dark plum smoke-bush. Third: scarlet anemones with black centers and glossy red currants. Fourth: dark plum hellebores, red ranunculus and crimson amaranthus tassels. The glass lies over the flowers: petals touching the front surface are pressed flat with silvery sheen and tiny bubbles, the wavy field bends every outline as if under water, at the frame step everything behind is shifted and broken, deeper flowers turn soft and dark, and the thick edges carry stretched reflections of the flowers. Faint rose-tinted glass. No smoke, no mist. Background: smooth seamless gradient from near-black at the top to deep cherry red at the bottom. Strong backlight through the glass, soft side light. Not a 3D render, not CGI.
Seedream 5.0 Pro
Copy
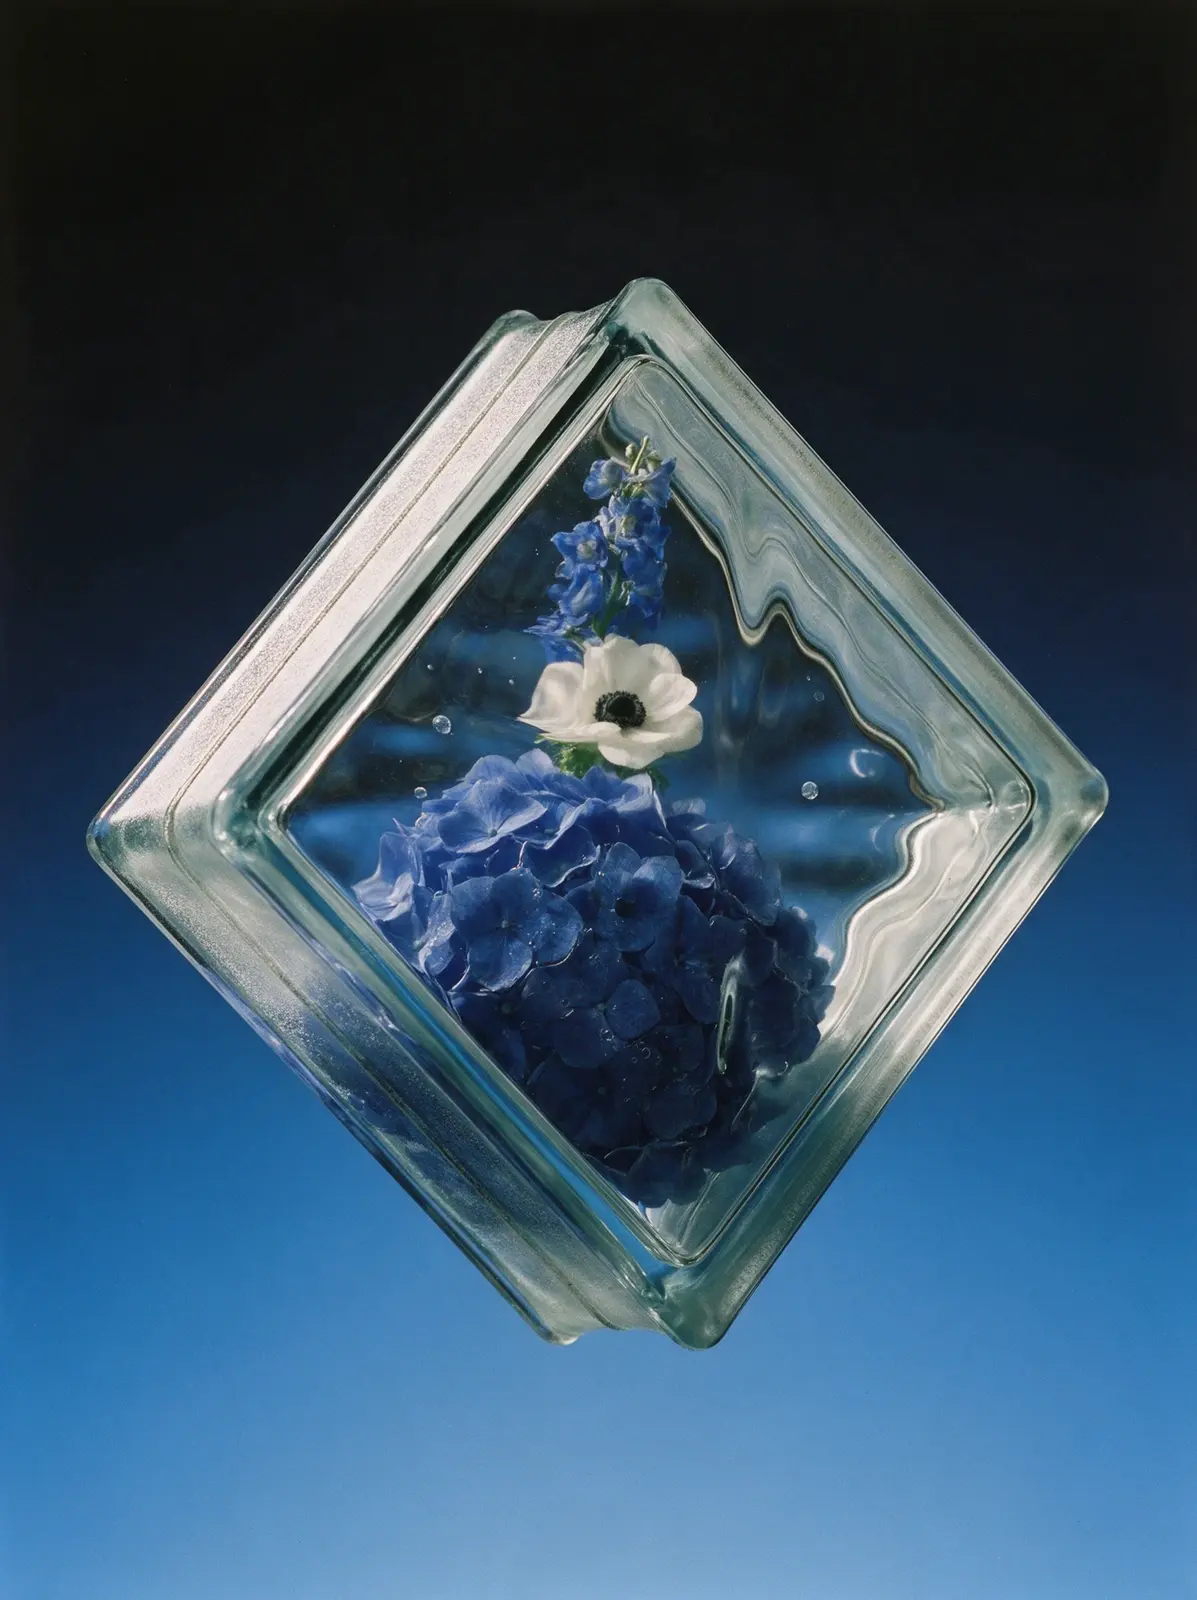
Real studio photograph, shot on medium format film. A classic Soviet glass building block hangs weightless in empty space, balanced on one corner like a diamond, its front face turned almost straight to the camera with a sliver of one narrow side visible. No floor, no surface, no shadow. Exact shape: a square brick about 19 by 19 by 8 centimeters, each square face with a narrow flat raised frame and a small step down into a slightly recessed wavy central field; the narrow sides each with a shallow channel holding a rough frosted matte band and a fine fusion seam; softly rounded corners. Solid glass all the way through. Everything is fully inside the block, nothing extends outside it. A minimal, graphic composition of only a few life-size elements, much larger than the small brick: one enormous deep blue hydrangea head filling the lower half of the diamond and cut off by two sides of the frame, one white anemone with a black center floating higher up and deeper in the glass, and a single tall blue delphinium spike rising toward the top corner. The rest of the block is open glass. The hydrangea's front florets are pressed flat against the inner surface of the glass, spread and slightly squashed, with soft silvery sheen and tiny bubbles where they touch. The wavy front field bends every outline as if under water. In the open glass, the background behind is visibly warped by the waves, and a few round bubbles float. At the step of the frame everything behind is sharply shifted and broken. The deeper parts turn soft and dark. The thick edges carry stretched cobalt reflections of the hydrangea. Faint aqua-tinted glass. No smoke, no mist. Background: smooth seamless gradient from near-black at the top to cornflower blue at the bottom. Strong backlight through the glass, soft side light. Not a 3D render, not CGI.
Seedream 5.0 Pro
Copy
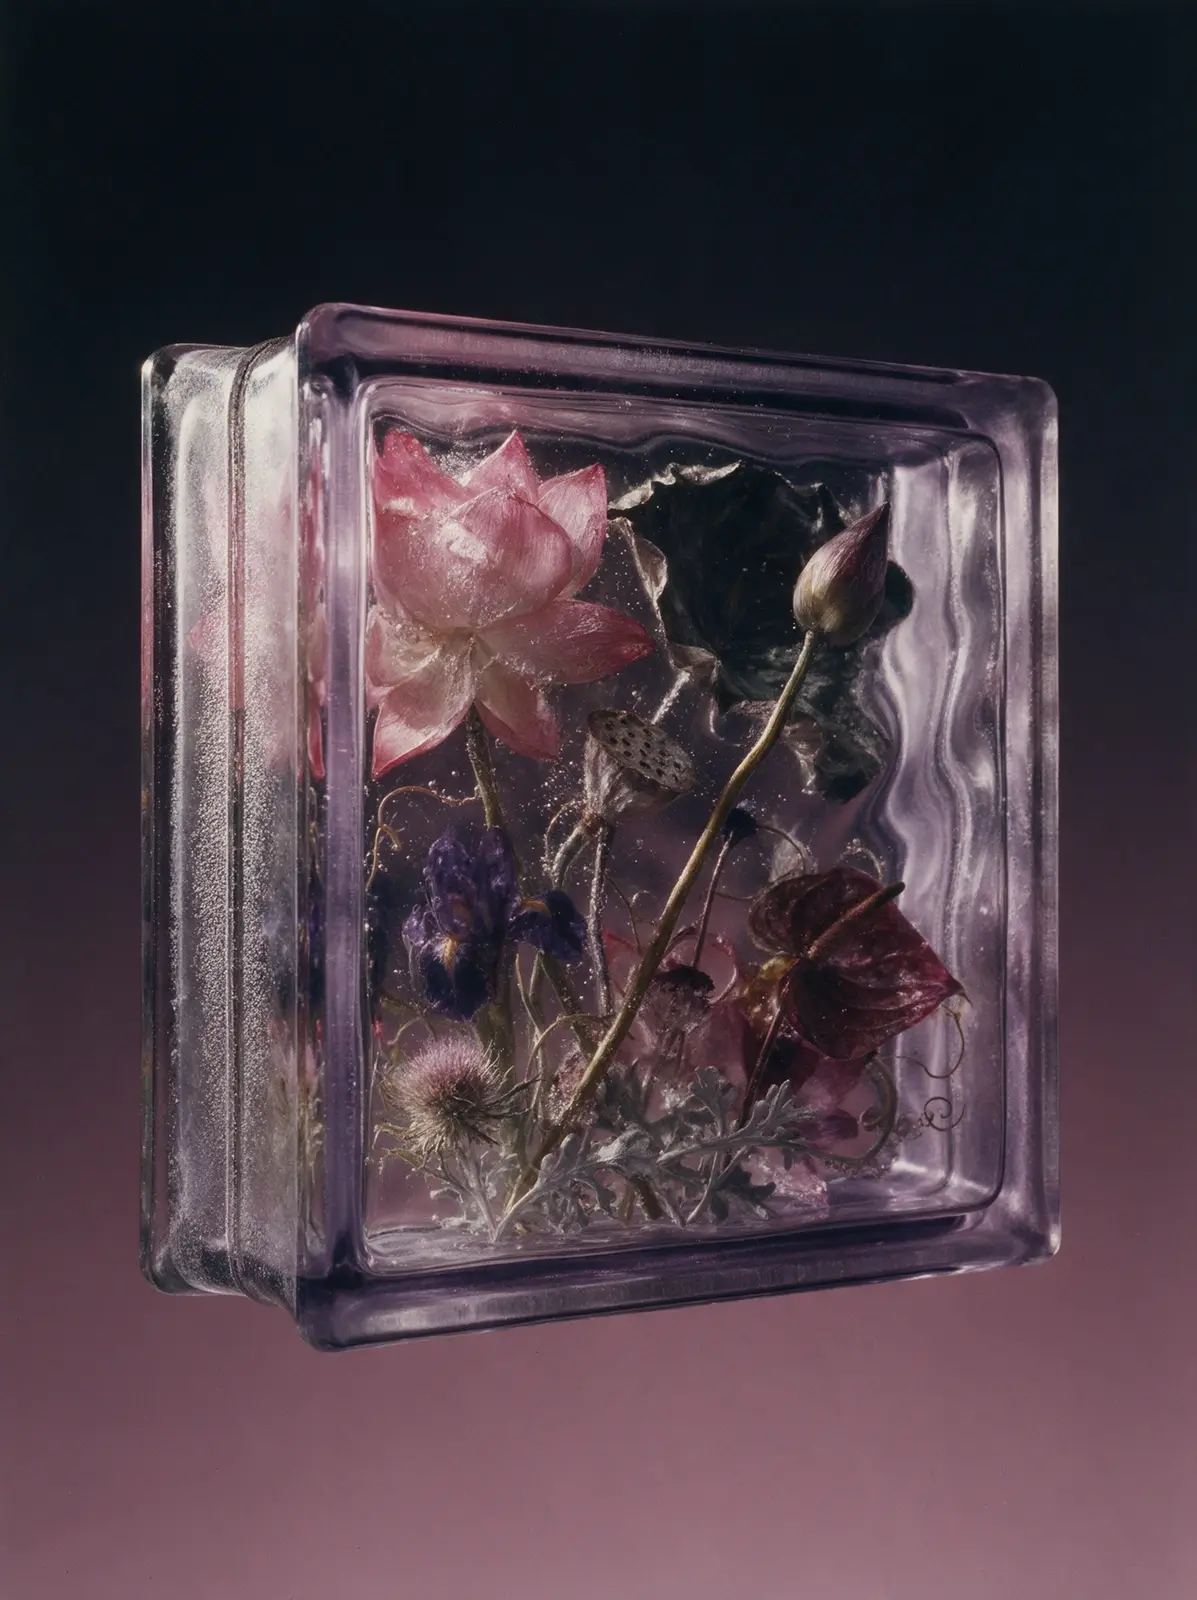
Real studio photograph, shot on medium format film. A classic Soviet glass building block from the 1970s hangs weightless in empty space, tilted at a three-quarter angle with its front face and one narrow side visible. There is no floor, no ground, no surface anywhere and no shadow anywhere. Its exact recognizable shape: a square brick about twice as wide as it is thick, like 19 by 19 by 8 centimeters. Each square face has a narrow flat raised frame along its edges, then a small step down into a slightly recessed central field. The four narrow sides each have a shallow channel running along their middle with a rough frosted matte band and a fine fusion seam inside it, like the groove that holds the mortar. Softly rounded corners, thick heavy edges, typical mass-produced pressed glass. The block is SOLID glass all the way through, with no hollow, no inner chamber, no inner walls and no back panel. The flowers are cast directly into the glass mass, the way flowers are frozen inside a solid block of ice: glass touches every petal, thin silvery films of trapped air coat the petal surfaces, and clusters of tiny bubbles cling to stems and petal edges. The recessed front field is wavy, so everything inside sways as if seen under water: outlines wobble, petals stretch and squeeze, stems kink and jump sideways. Nothing inside is perfectly sharp; the deeper flowers turn soft, dark and murky in the thickness of the glass. The thick edges mirror the bouquet in stretched, broken reflections. The glass has a faint lavender tint that deepens to violet in the edges. Composition inside: one huge open pink lotus pressed against the front face and cropped by the frame, a dried lotus seed pod turned sideways in the middle depth, a lotus leaf curling around the back like a dark wave, a single tall lotus bud on a long bending stem cutting diagonally across, a deep violet iris and burgundy anthurium sinking into the murky depth, a pale thistle and silvery dusty miller at the base, fine curling tendrils in the gaps. Asymmetrical, layered front to back, packed edge to edge. Background: smooth seamless gradient from near-black at the top to dusty mauve at the bottom, pure empty color with no floor. Dramatic backlight and side light passing through the glass, the flowers glowing softly from within. Not a 3D render, not CGI.
Seedream 5.0 Pro
Copy
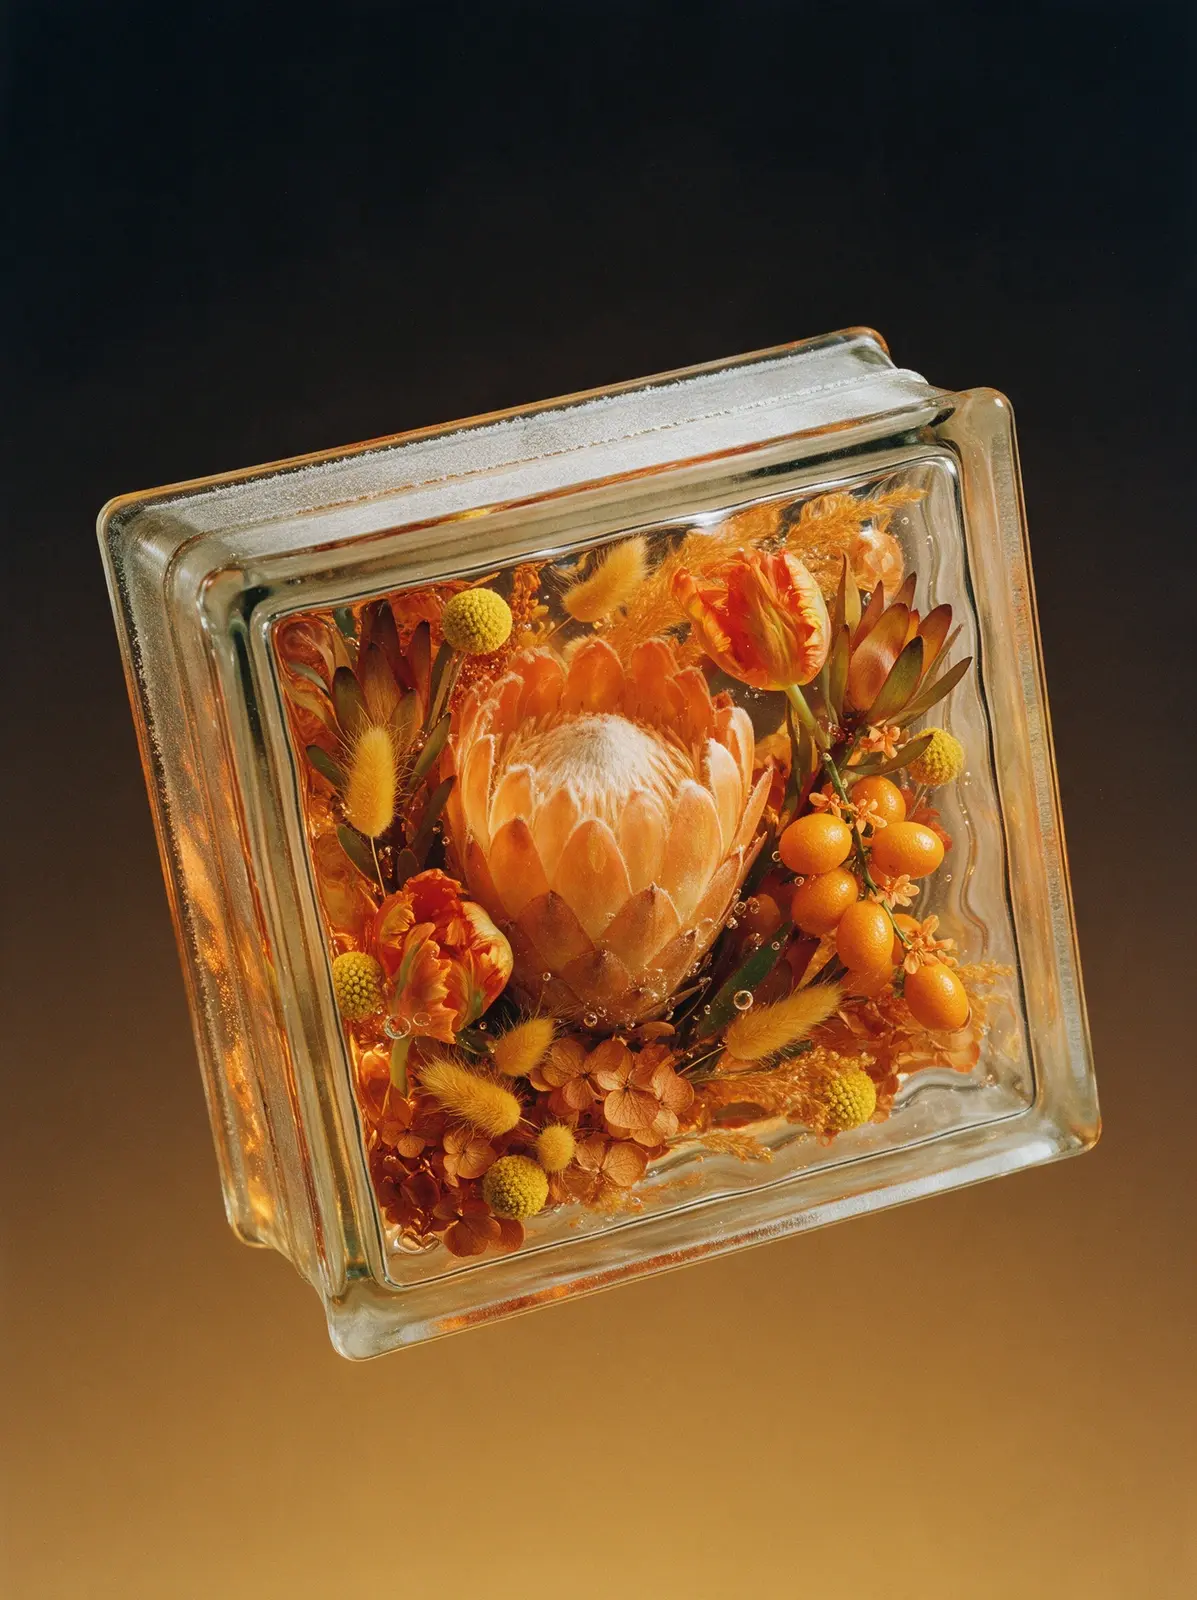
Real studio photograph, shot on medium format film. A classic Soviet glass building block hangs weightless in empty space, seen from above as it tumbles forward: its top narrow side with the frosted mortar channel is visible and the front face tips toward the camera at a sharp angle. No floor, no surface, no shadow. Exact shape: a square brick about 19 by 19 by 8 centimeters, each square face with a narrow flat raised frame and a small step down into a slightly recessed wavy central field; the narrow sides each with a shallow channel holding a rough frosted matte band and a fine fusion seam; softly rounded corners. Solid glass all the way through. The flowers are life-size and the brick is small, so the block holds a tight close-up of a dense arrangement, filled edge to edge with no empty gaps and cut off by the frame on every side. Hero: one enormous apricot king protea taking up almost half the face. Secondary: two flamed orange parrot tulips and a branch of glossy kumquats. Filling every remaining space: yellow craspedia balls, golden bunny-tail grass, rust-colored dried hydrangea, bronze leucadendron and amber grasses. How the flowers behave in the glass: petals touching the inner surface are pressed flat against it and turn silvery where they touch; tiny seed bubbles cling to every petal and a few larger round bubbles float between the blooms; faint wavy striae in the glass are visible only by how they bend the stems. The wavy front field makes outlines sway as if under water. At the step of the frame everything behind is sharply shifted and broken in a band around the face. Deeper flowers are softer and darker. The thick edges glow amber and orange with the colors trapped inside, showing stretched mirrored fragments of the protea. Faint warm amber glass. No smoke, no mist. Background: smooth seamless gradient from near-black at the top to warm ochre at the bottom. Strong backlight through the glass so the flowers glow from within, soft side light. Not a 3D render, not CGI.
Seedream 5.0 Pro
Copy
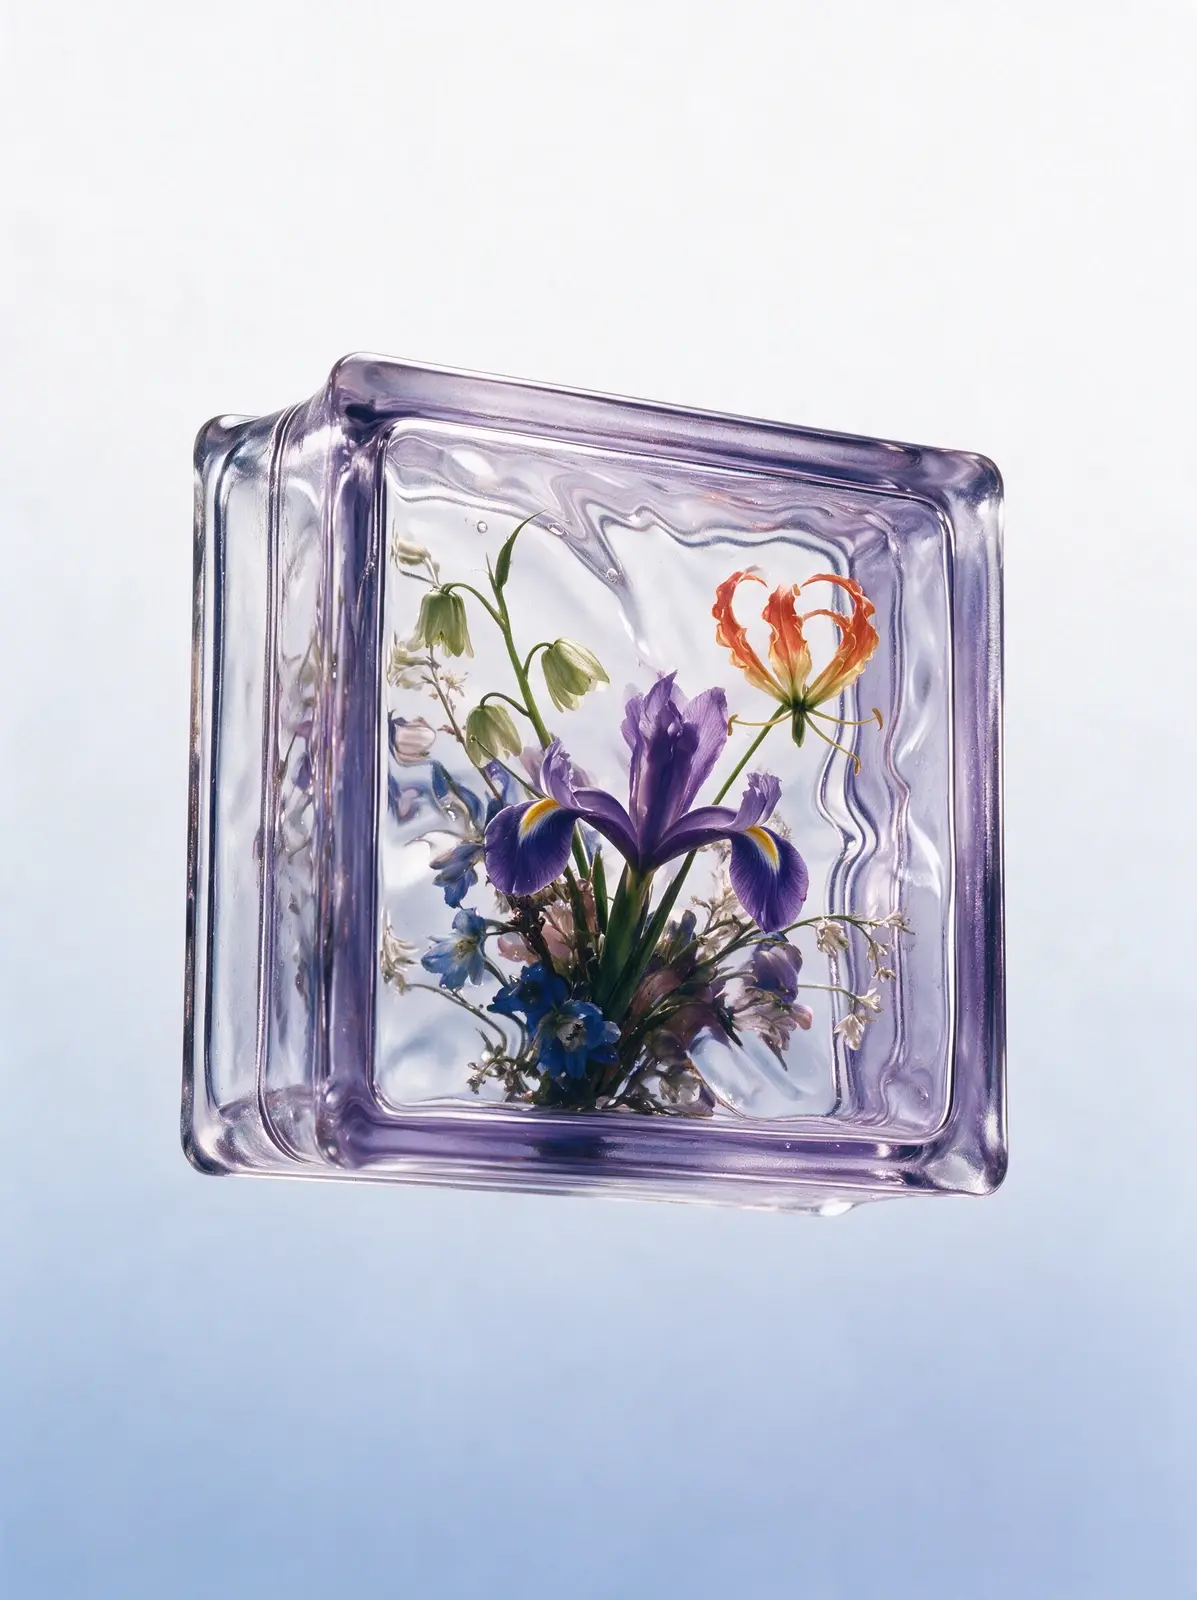
A sophisticated floating Soviet pressed-glass block presented as a premium design object, captured in a graceful hero-angle levitation with the front face dominant, a visible side thickness, a subtle elegant tilt and plenty of negative space around it. The object is a true vintage Soviet architectural glass brick with heavy square proportions, thick molded glass, rounded corners, tactile surface relief and a cool pale lavender clarity. Inside the block is one compact but highly refined botanical sculpture with a shared intertwined base and a clear sculptural hierarchy, combining a dramatic violet iris, a luminous coral gloriosa, hanging pale green fritillaria, vivid blue delphiniums and small airy ivory florets into one cohesive asymmetrical floral organism. The arrangement is elegant, intentional and three-dimensional, with a strong main gesture, secondary arcs, layered spacing and visible depth. The flowers are fully embedded in solid cast glass, with no hollow cavity, and the glass visibly occupies the entire interior volume. The front surface texture remains clearly readable across the flowers themselves, with pressed-glass relief, optical waviness, delicate refraction, trapped bubbles, glossy highlights and internal distortions partially bending and obscuring petals and stems. The background is a perfectly clean seamless studio gradient from soft luminous white at the top into pale powder blue and very light periwinkle at the bottom, smooth, fresh and expensive-looking. Premium studio lighting reveals the relief of the front glass while keeping the composition bright, crisp and visually beautiful. Contemporary collectible glass sculpture, elegant levitation, luxury still life, refined material realism, 8k. The center of the front face must remain materially active, with visible pressed-glass relief and refractive distortion crossing directly over the central flowers, so the object reads as a solid glass mass rather than a hollow transparent container. The floral arrangement must read as one connected sculptural organism with a shared base and internal hierarchy, not as separate flowers placed side by side.
Seedream 5.0 Pro
Copy
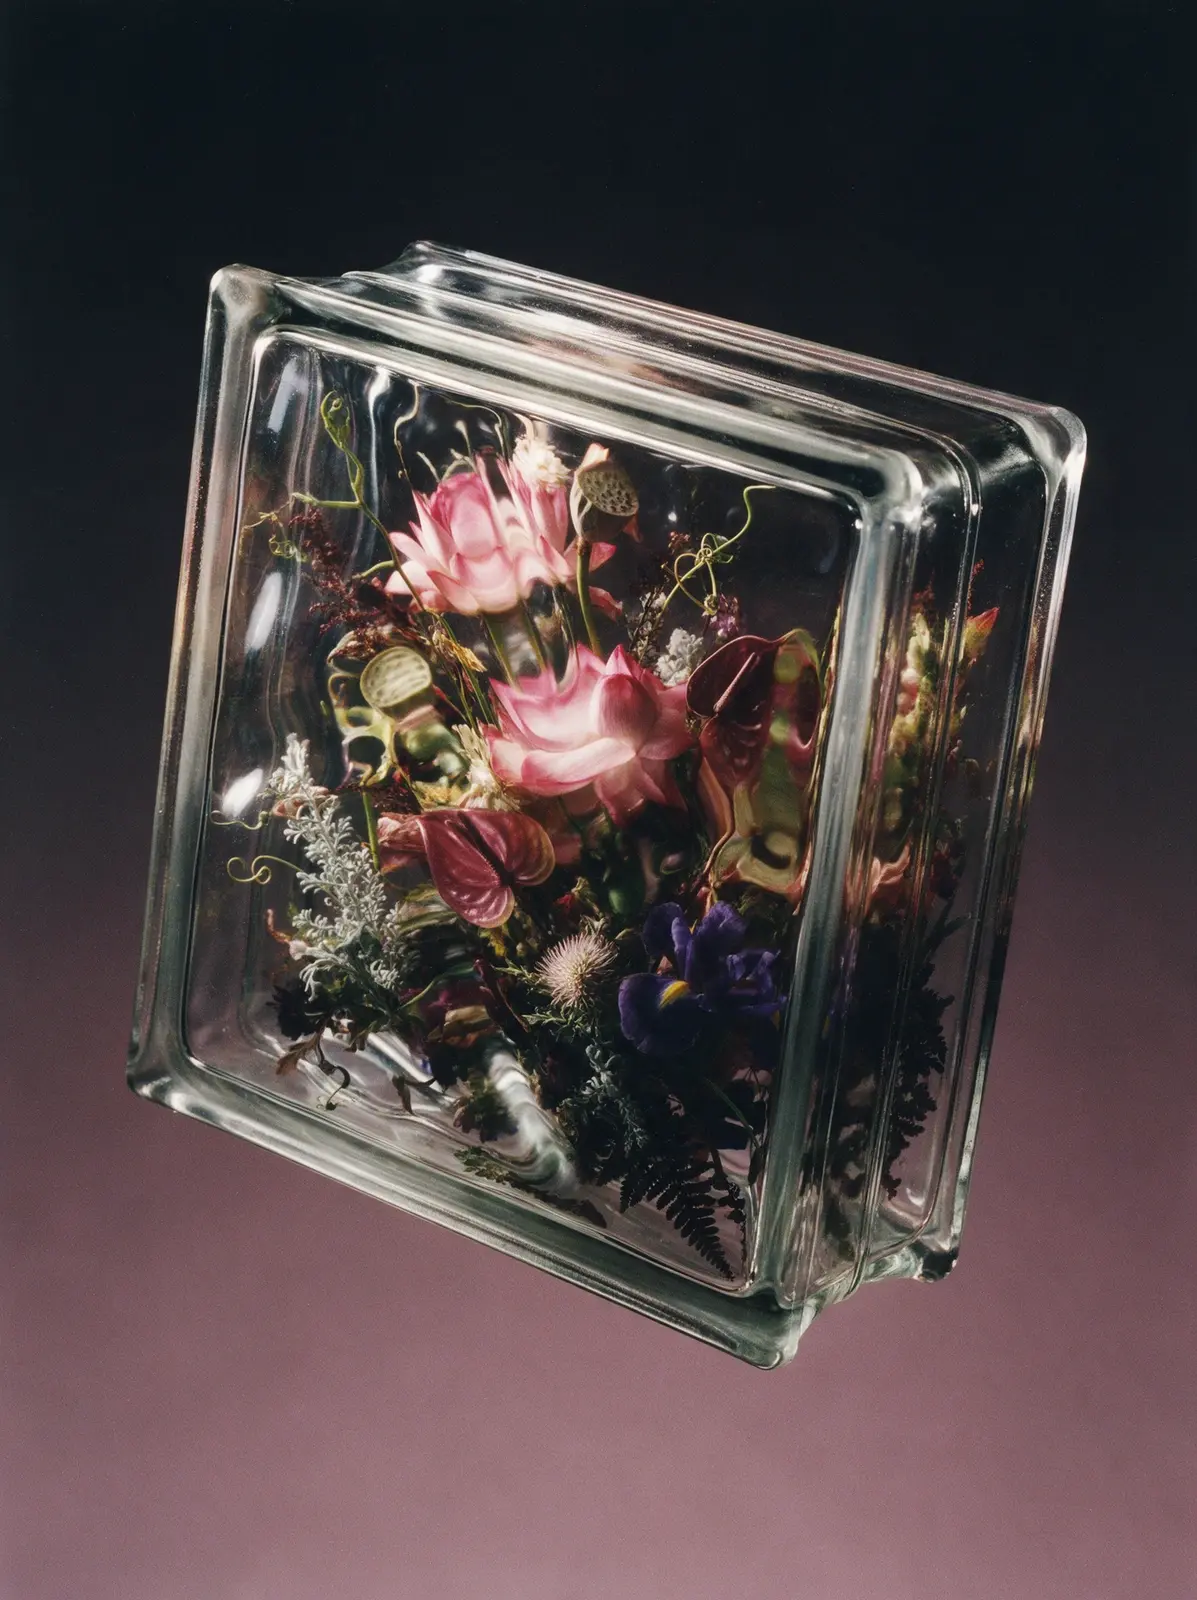
Real studio photograph, shot on medium format film. A thick Soviet glass block — the classic 1970s square pressed-glass brick with a flat rim around each face, softly rounded corners and a seam around its sides — floats tilted in mid-air at a three-quarter angle, its side and top visible. The glass itself is almost invisible: it shows only through thin bright highlights on its edges and rims, and through the way it bends everything behind it. The front face is uneven, so the flowers inside look as if seen through moving water: their outlines wobble and smear, petals are stretched and squeezed in waves, stems kink and jump sideways. Nothing inside is perfectly sharp. The flowers closest to the front are only slightly warped, while the ones further back are softer, darker and murkier, losing contrast in the depth of the glass. The thick side faces act like mirrors, showing stretched, fragmented reflections of the flowers. Where nothing is behind the glass, it looks dark and clear, with only faint wavering streaks of light. Inside, a dense wild bouquet fills the block edge to edge and is cropped by its walls: a large pink lotus, a lotus seed pod, burgundy anthurium, a deep violet iris, a pale thistle, silvery dusty miller, dark fern and curling tendrils, layered deep into the block. The flowers are lit only by light passing through the glass, so they glow softly from within rather than looking lit from the front. Background: a plain studio paper sweep in a smooth gradient from near-black at the top to dusty mauve at the bottom. Dramatic backlight and side light. No glow, no halo, no shadow beneath. Not a 3D render, not CGI.
Seedream 5.0 Pro
Copy
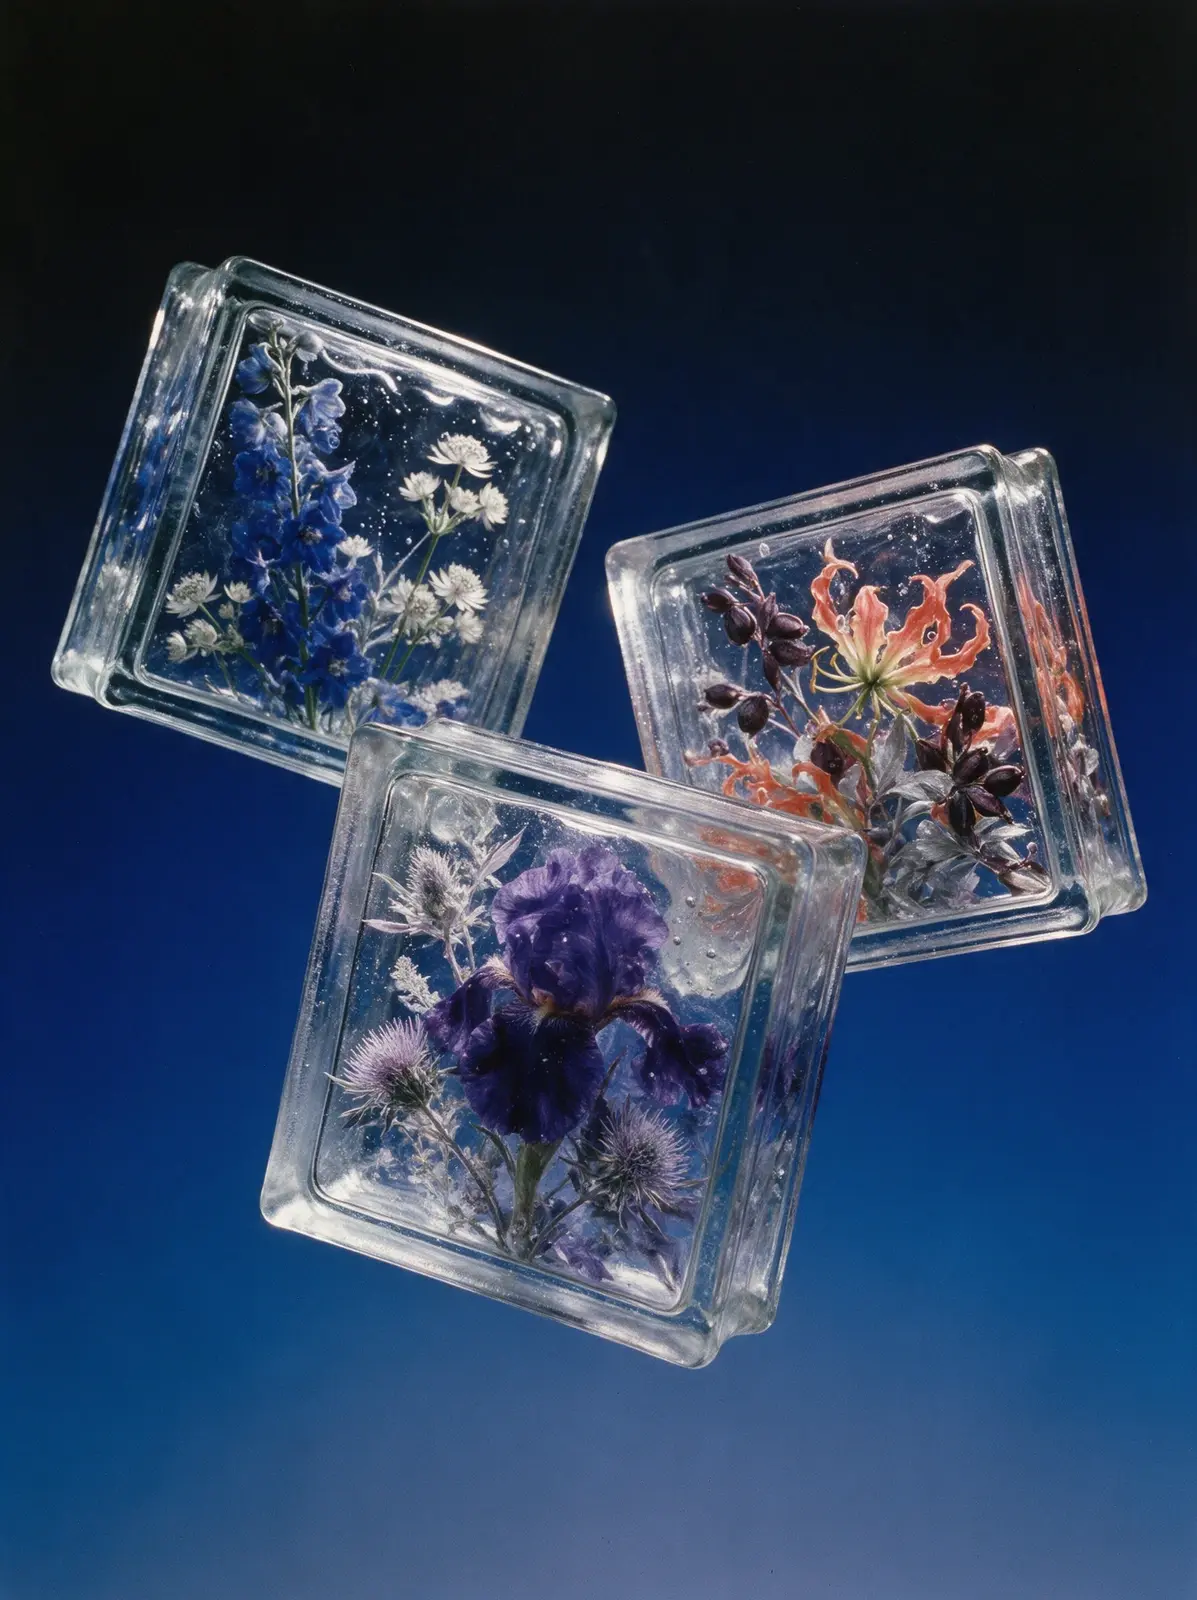
Real studio photograph, shot on medium format film. Three authentic Soviet architectural glass blocks float in open space in a refined triangular arrangement with one block closer to camera and two receding behind it, all gently tilted at elegant oblique angles, showing front face, thickness and a sliver of top surface. No floor, no surface, no shadow. The blocks are thick square pressed-glass Soviet bricks with a raised flat rim, shallow recessed center, frosted side seams, rounded corners and solid heavy glass construction. The glass is completely solid, with no hollow cavity, and each block is densely filled with a different blue-forward floral composition: one with a large deep violet iris and pale thistle, one with cobalt delphinium and airy white astrantia, and one with coral gloriosa lily woven with dark plum seed pods and silver foliage. The arrangements are densely layered and edge-to-edge, with strong front-to-back depth. The glass is visibly active across all flowers, with waviness, suspended bubbles, milky films, swirling casting cords and soft murky attenuation into deeper layers. Thick edges create broken elongated reflections of petals and stems. Background: seamless clean gradient from near-black midnight blue at the top to saturated deep cobalt and a cooler smoky blue lower down. Strong backlight and edge light give the inclusions a luminous inner glow. Not CGI.
Seedream 5.0 Pro
Copy
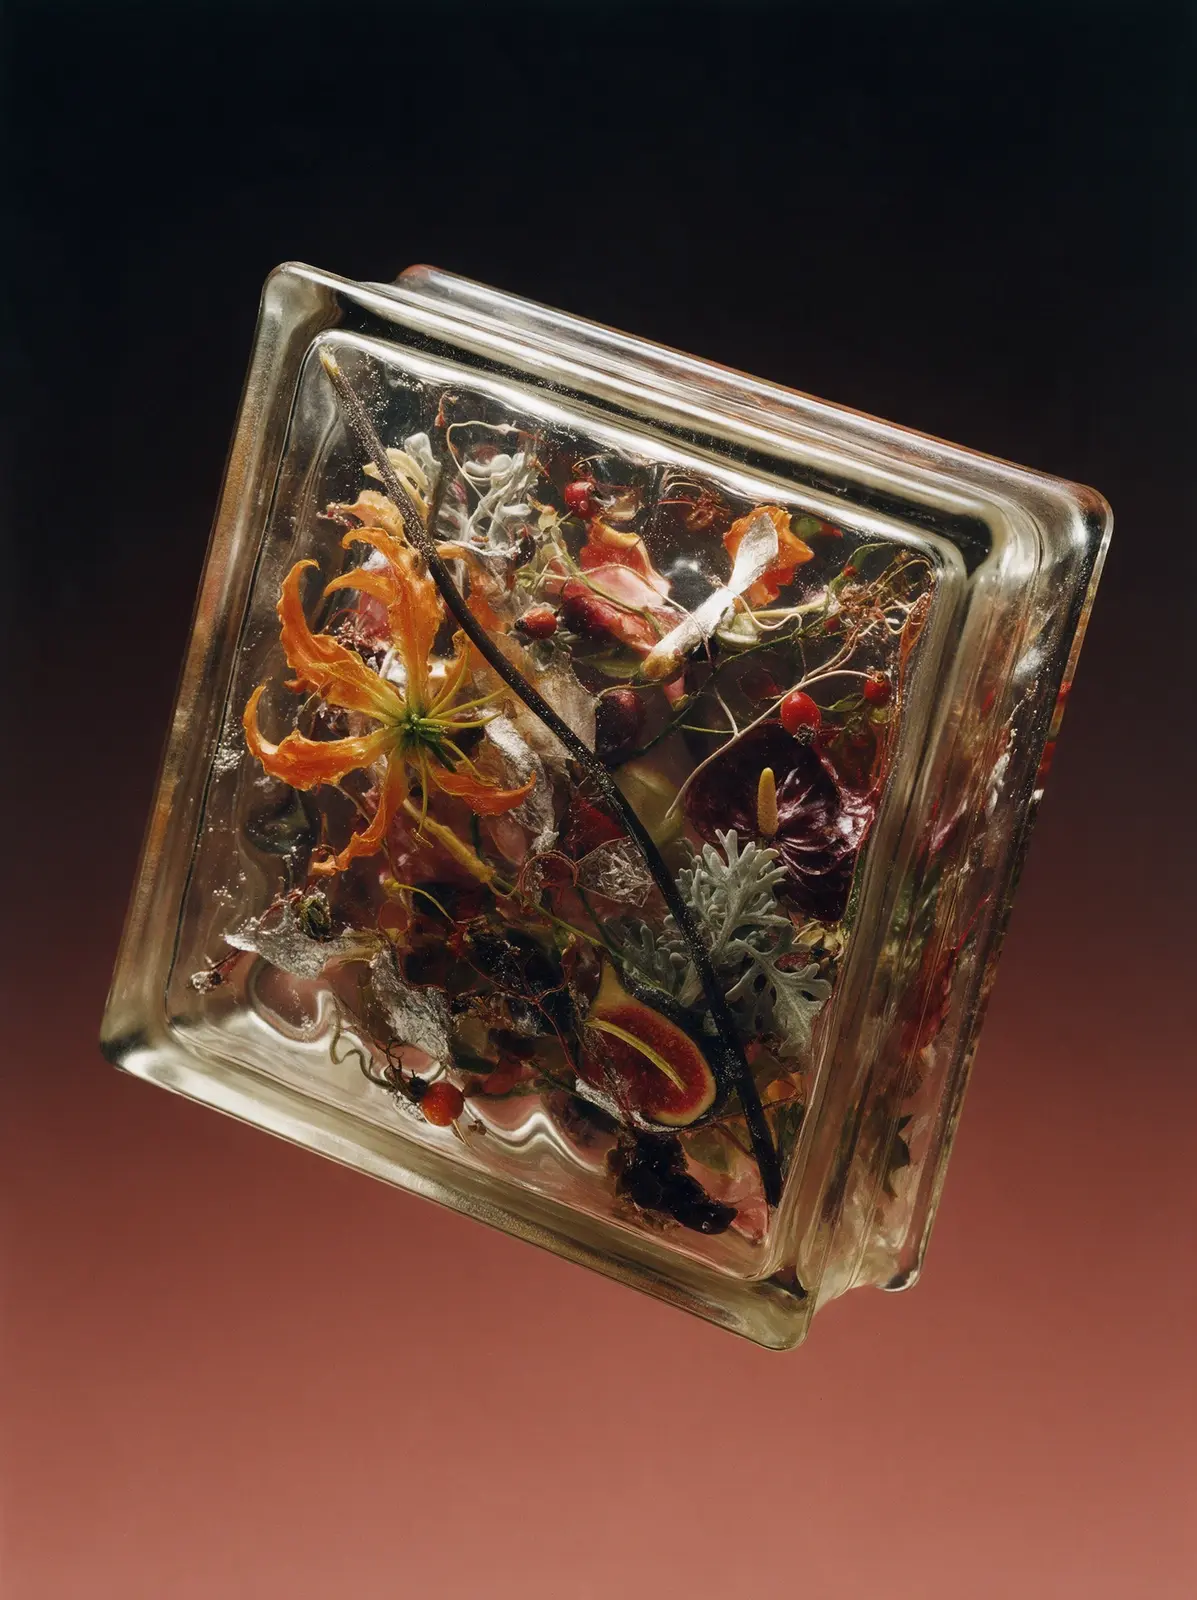
Real studio photograph, shot on medium format film. A Soviet glass brick, the recognizable 1970s square pressed-glass block with a flat raised rim around each face, softly rounded corners and a seam around its narrow sides, floats weightlessly in empty space, tilted at a dynamic three-quarter angle with its side and top visible. No floor, no ground, no surface and no cast shadow. The brick is completely solid glass all the way through, monolithic from front to back, with no hollow interior, no inner chamber and no internal walls. The flowers are cast directly into the glass mass as if frozen inside solid ice: glass presses against every petal, leaf and stem, thin silvery films of trapped air coat the floral surfaces, and clusters of tiny bubbles cling to petal edges and branch joints. The wavy front face makes everything inside sway and distort as if under water: contours wobble, petals stretch and squeeze, stems bend and jump sideways. Nothing inside is perfectly sharp, and the deeper layers become softer, darker and murkier within the thickness of the glass. The thick side faces mirror the bouquet in elongated broken reflections. The glass carries a faint warm amber tint that deepens to rich honey at the edges. Inside, the floral composition is asymmetrical, dense and layered through depth: one oversized curling orange glory lily presses flat against the front face and is cropped by the rim, a long dark stem sweeps diagonally from corner to corner, a cut fig with a vivid red interior sits deeper in the glass, a glossy burgundy anthurium is half-hidden behind silvery dusty miller, scattered rose hips glow like tiny lanterns, and fine wiry tendrils weave through the gaps. Everything is packed edge to edge and reads as one dense embedded botanical structure. Background: a seamless smooth gradient from near-black at the top to dusty terracotta at the bottom, pure empty color with no floor. Strong backlight and soft edge light pass through the glass so the flowers glow from within and the glass thickness becomes luminous. Photographic realism, tactile glass optics, not CGI.
Seedream 5.0 Pro
Copy
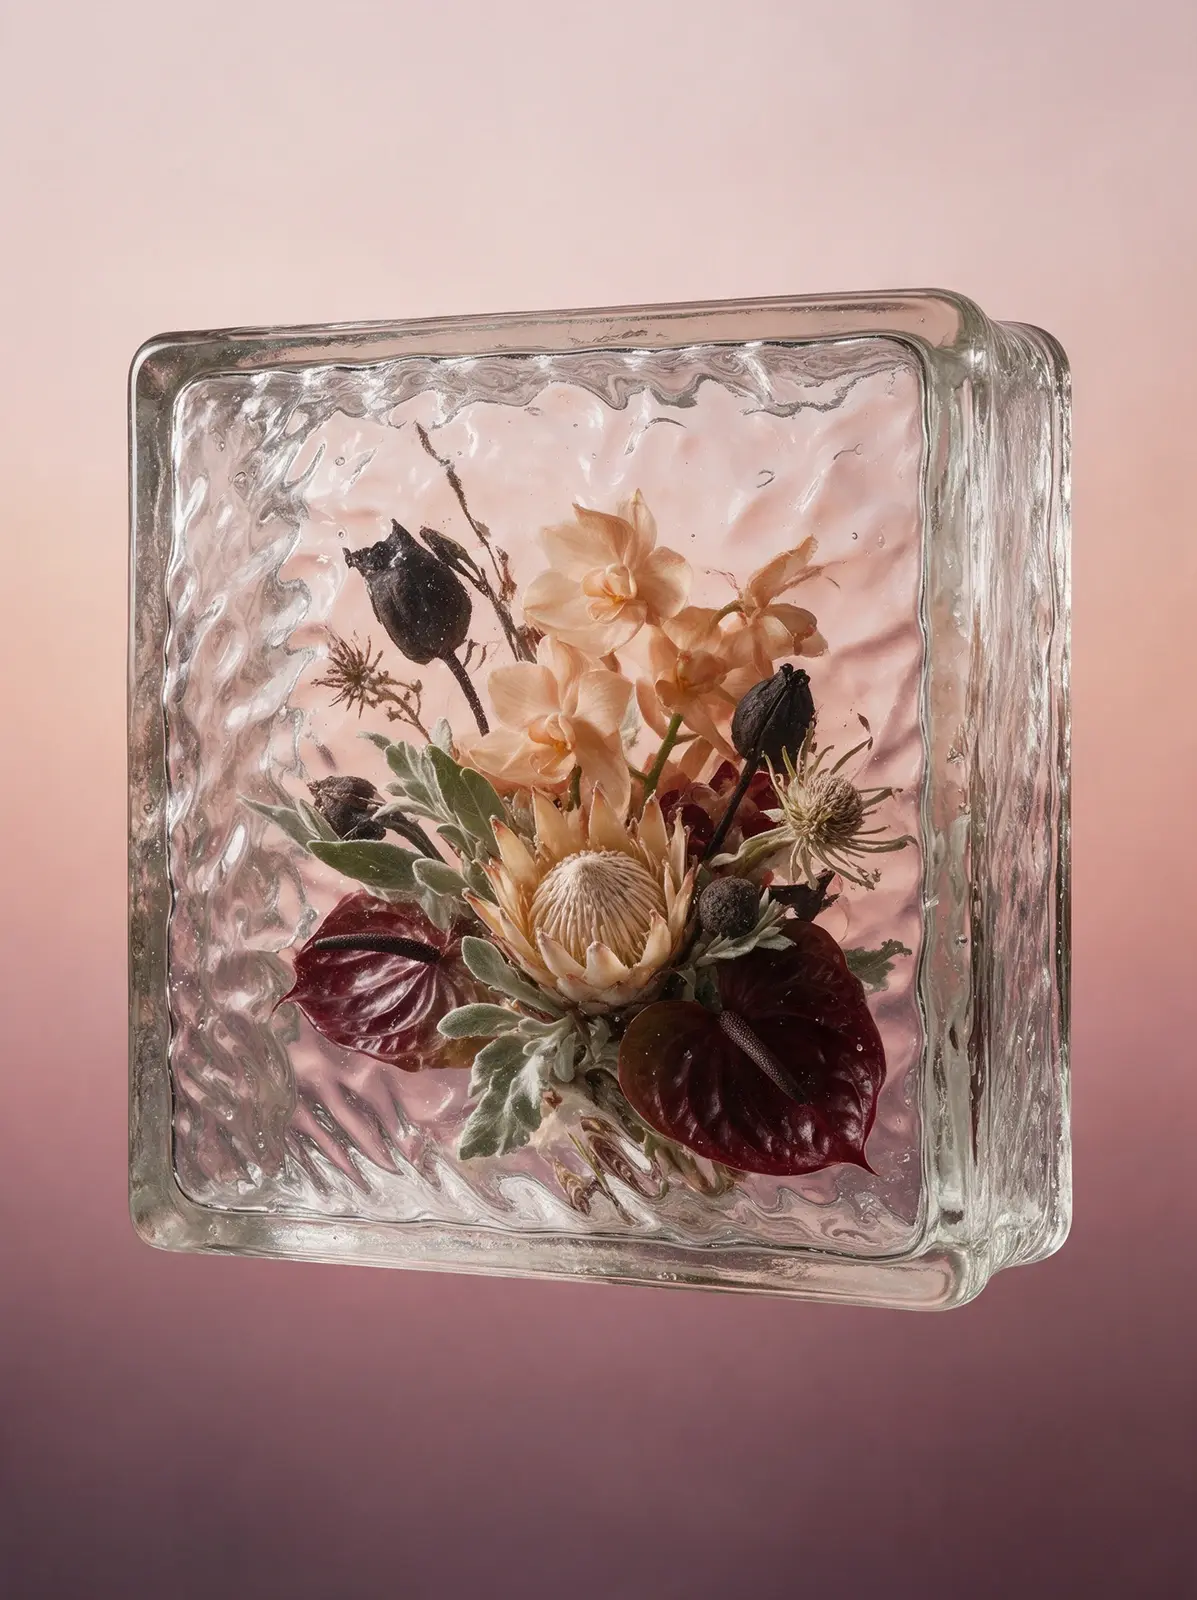
A floating square Soviet pressed-glass architectural block, viewed nearly straight-on, with the front glass plane clearly visible as the dominant foreground element. Thick cast glass, rippled and uneven, with tactile molded texture, rounded corners, optical waviness, tiny imperfections, trapped bubbles, and glossy highlights across the entire front surface. Deep behind this textured front layer, a compact sculptural floral arrangement is sealed inside the glass mass, as if embedded during casting. The flowers are elegant and unusual: pale apricot orchids, ivory protea, deep wine anthuriums, dark seed pods, silver-green foliage, and delicate spiky botanical details. The composition is refined, asymmetrical, and highly curated. The key visual effect is that the flowers are clearly behind the glass: the front surface distorts them, slightly blurs selected contours, bends stems, creates refractive overlap, optical waviness, and layered reflections, so the floral arrangement feels trapped behind a substantial textured glass membrane rather than directly visible in open air. The glass layer must be unmistakable and visually present over the flowers. The background is a pristine seamless luxury gradient from soft blush and pale peach into mauve and deep plum, smooth and clean, with no vignette, no smoky dirt, and no muddy radial texture. Premium studio lighting, contemporary art-object photography, strong material realism, elegant composition, 8k.
Nano Banana 2.1
Copy
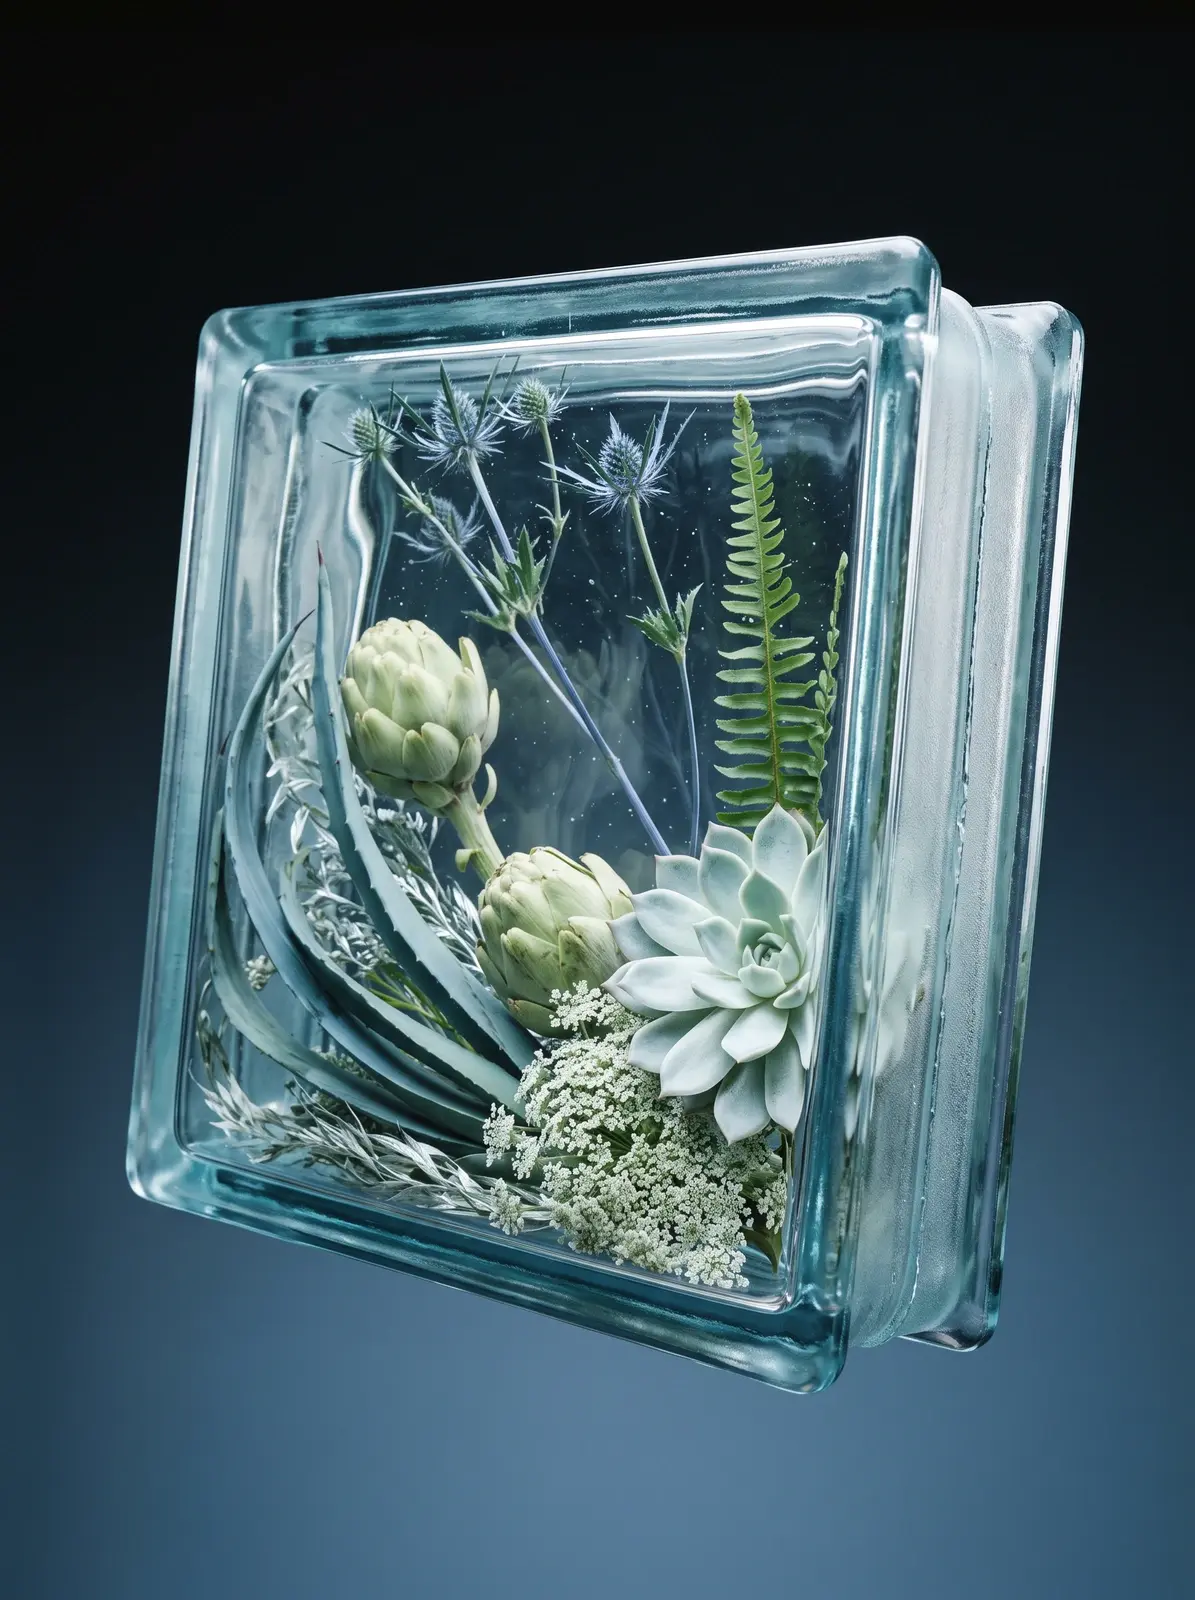
Real studio photograph, shot on medium format film. A classic Soviet glass building block from the 1970s hangs weightless in empty space, dramatically tilted on two axes as if tossed and frozen mid-air, its front face and one narrow side visible. No floor, no surface, no shadow anywhere. Exact recognizable shape: a square brick about twice as wide as it is thick, like 19 by 19 by 8 centimeters. Each square face has a narrow flat raised frame along its edges, then a small step down into a slightly recessed central field. The four narrow sides each have a shallow channel along their middle with a rough frosted matte band and a fine fusion seam inside it. Softly rounded corners, thick heavy edges, mass-produced pressed glass. Solid glass all the way through, no hollow inside. Cast inside the glass is a fragment of a sculptural ikebana arrangement with a clear hierarchy, as if the block cut a window out of a larger composition. The gesture: long curved blue-grey agave leaves sweep in a fan from the lower corner and arc out past the frame. The hero is one large pale silvery-mint echeveria rosette pressed against the front face, crisp geometric petals, cropped by the frame. Secondary accents: two pale green artichokes at different depths. A dense base of lacy white Queen Anne's lace and silvery grasses in the lower corner. The upper part stays open, crossed only by a few tall thin steel-blue sea holly stems with spiky heads and one upright green fern spear. The glass is clearly in front of everything: swirling cords and streaks from the casting, thousands of tiny bubbles at every depth, faint milky veils. The wavy front field makes the plants sway and wobble as if under water. At the step between the frame and the recessed field, everything behind is sharply displaced and broken in a band around the face. Deeper elements dissolve into soft murk. The open areas of glass are never empty: refracted streaks of the background color, cords and bubbles drift through them. The glass has a faint icy aqua tint deepening to steel blue in the edges. Background: smooth seamless gradient from near-black at the top to deep steel blue at the bottom, pure empty color. Strong backlight through the glass so the plants glow from within, soft side light along the edges. Not a 3D render, not CGI.
Seedream 5.0 Pro
Copy
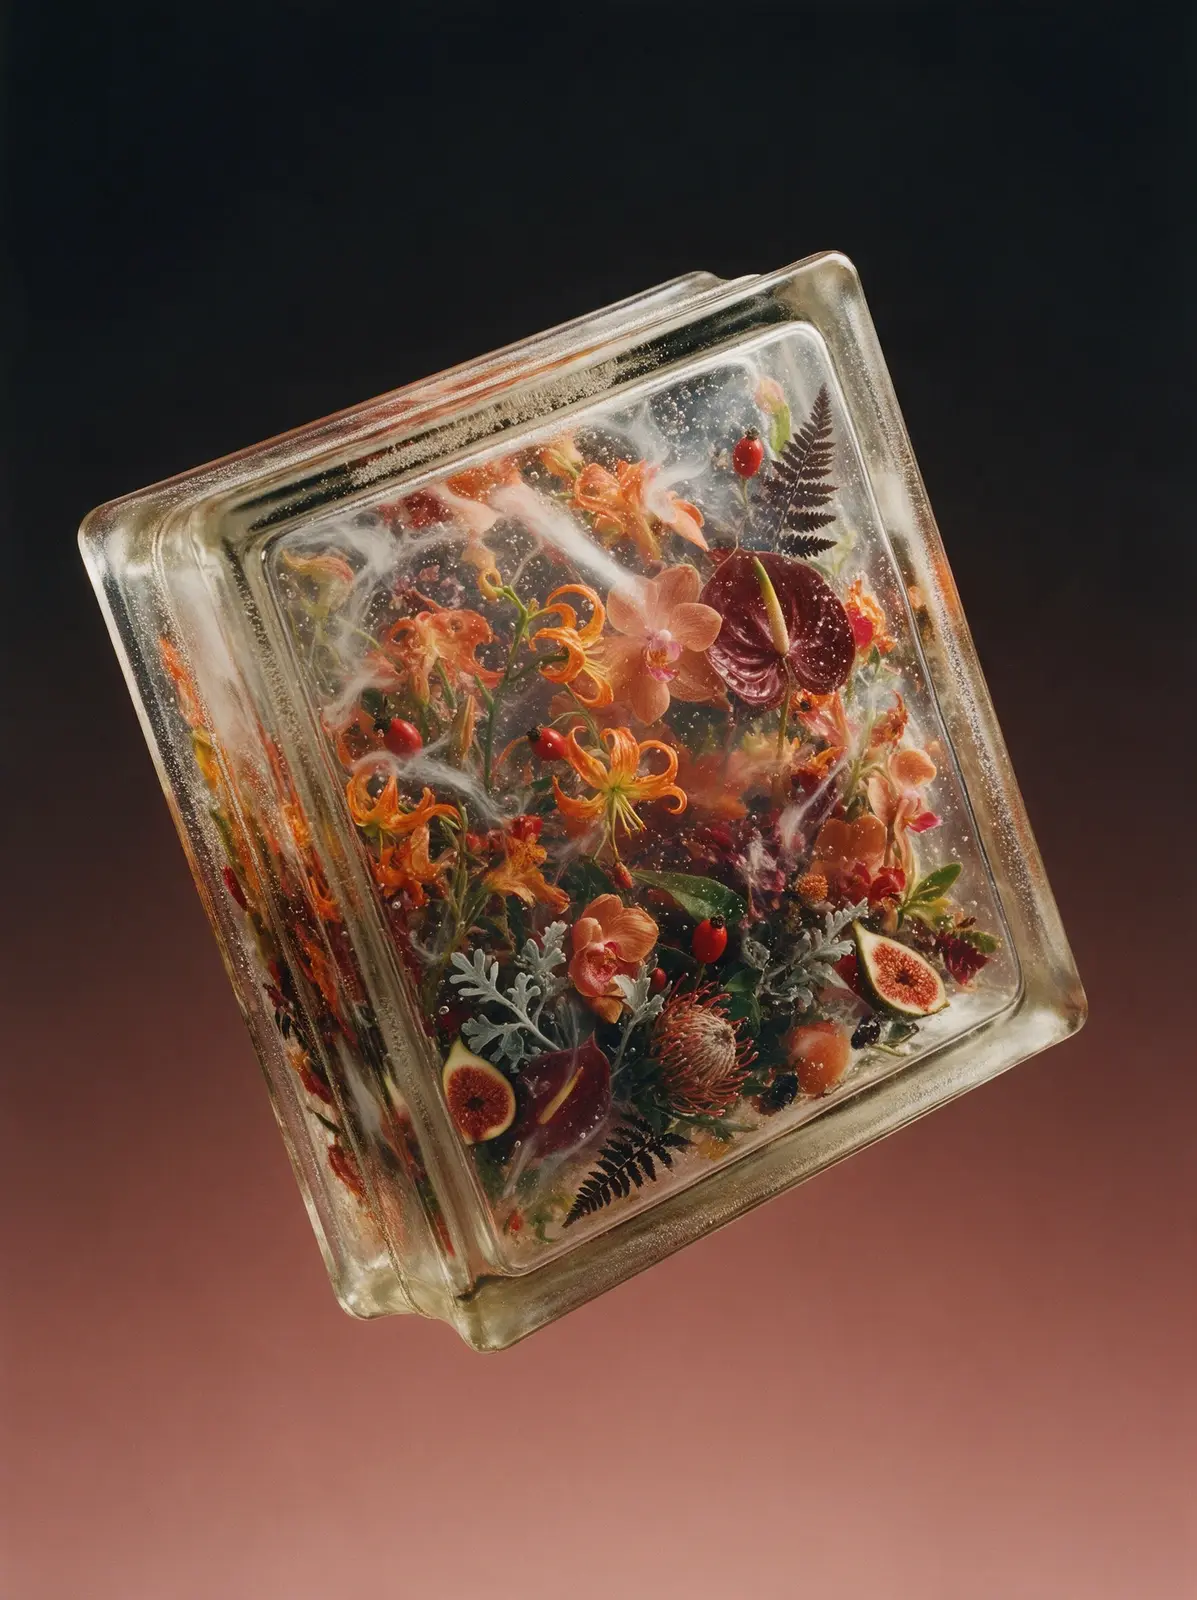
Real studio photograph, shot on medium format film. A classic Soviet glass building block from the 1970s hangs weightless in empty space, dramatically tilted on two axes as if tossed and frozen mid-air, its front face, one narrow side and a top edge visible. No floor, no surface, no shadow anywhere. Exact recognizable shape: a square brick about twice as wide as it is thick, like 19 by 19 by 8 centimeters. Each square face has a narrow flat raised frame along its edges, then a small step down into a slightly recessed central field. The four narrow sides each have a shallow channel along their middle with a rough frosted matte band and a fine fusion seam inside it. Softly rounded corners, thick heavy edges, mass-produced pressed glass. The block is solid glass all the way through, no hollow inside. It is packed completely with fresh, juicy, vividly colored flowers and fruit cast into the glass, so densely that no background and no empty gaps show through the front face — a solid wall of blooms, leaves and stems from frame to frame and from the front face deep to the back, cropped on every side: curling orange glory lilies, peach orchids, glossy burgundy anthurium, ripe figs cut open to their red interior, bright red rose hips, a spiky protea, silvery dusty miller and dark fern, overlapping and tangled at different depths and angles. The glass is clearly in front of every flower, including the closest ones: faint milky veils, swirling cords and streaks from the casting, and thousands of tiny bubbles suspended throughout, hanging in front of the petals at every depth. The wavy front field makes everything sway and wobble as if under water, even the petals touching the glass. At the step between the frame and the recessed field, the flowers behind are sharply displaced, broken and compressed in a band running all around the face. The deepest layers dissolve into soft murk. The thick edges mirror the flowers in stretched fragments. The glass has a faint warm amber tint deepening to honey in the edges. Background: smooth seamless gradient from near-black at the top to dusty terracotta at the bottom, pure empty color. Strong backlight shining through the glass so the flowers glow from within, plus a soft side light along the edges. Not a 3D render, not CGI.
Seedream 5.0 Pro
Copy
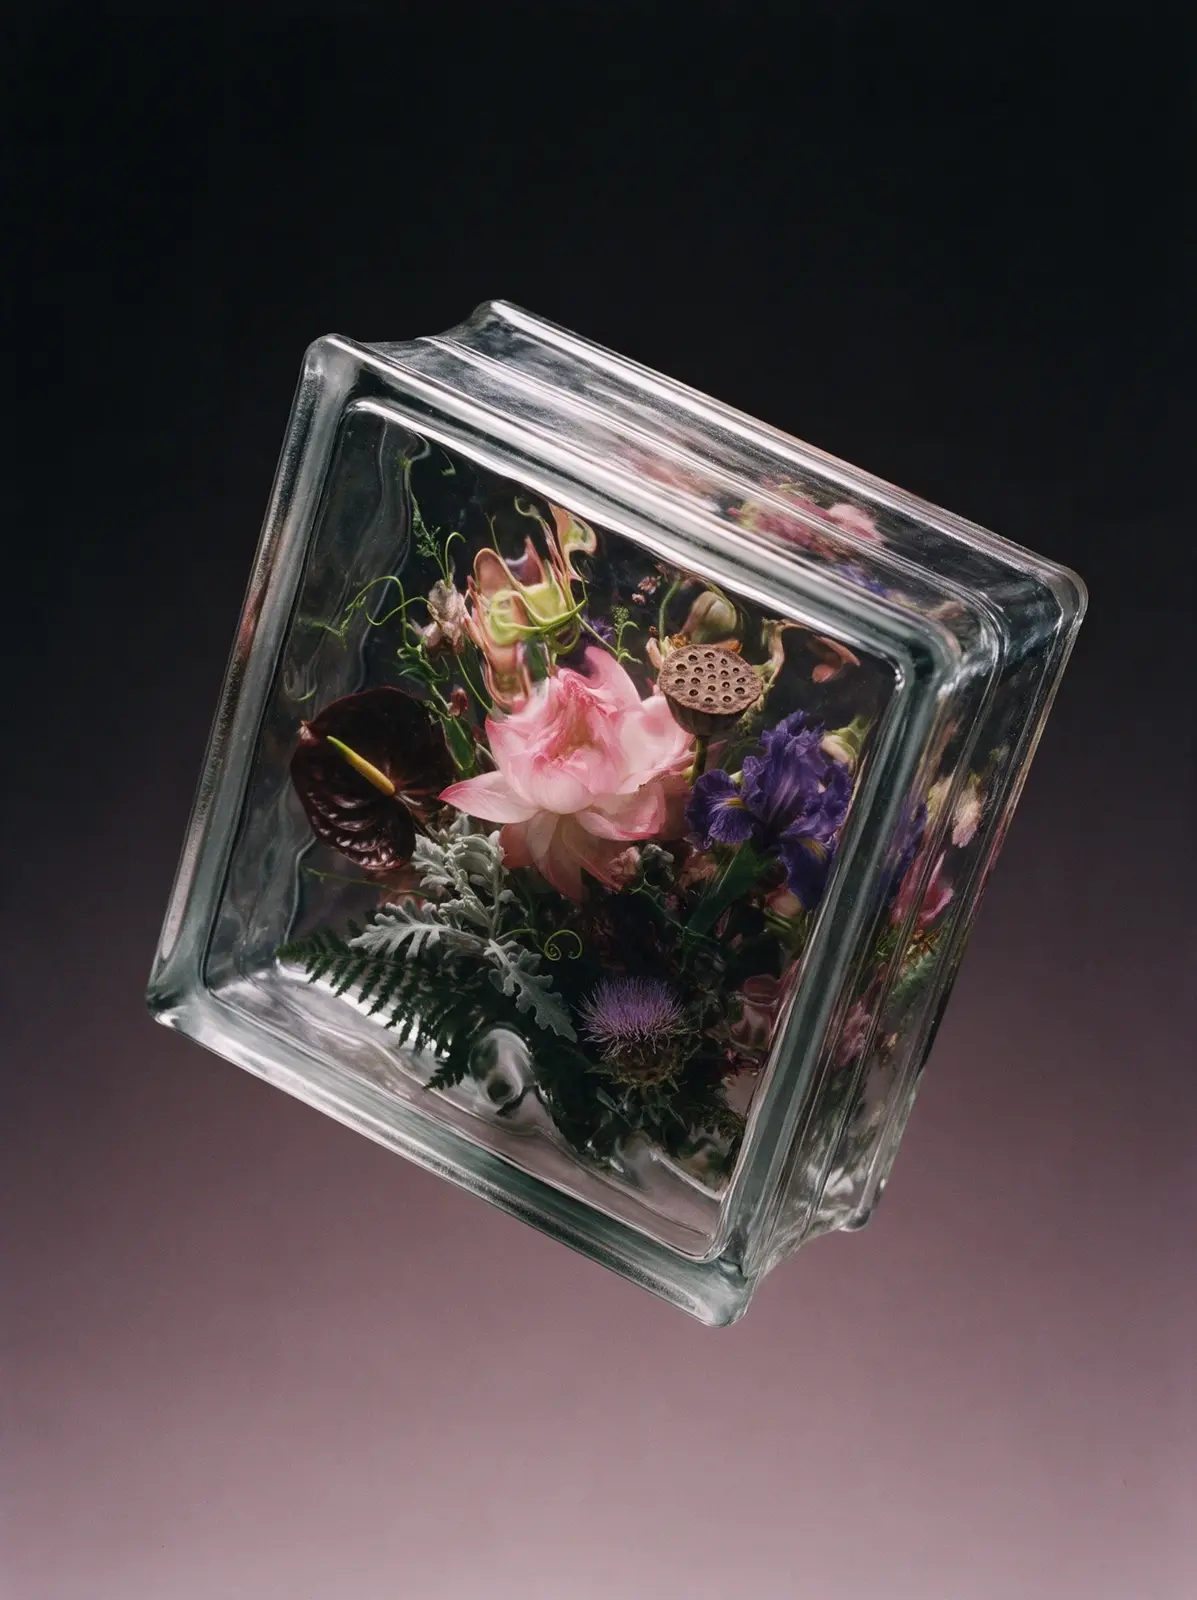
Real studio photograph, shot on medium format film. A thick Soviet glass block — the classic 1970s square pressed-glass brick with a flat rim around each face, softly rounded corners and a seam around its sides — floats tilted in mid-air at a three-quarter angle, its side and top visible. The glass itself is almost invisible: it shows only through thin bright highlights on its edges and rims, and through the way it bends everything behind it. The front face is uneven, so the flowers inside look as if seen through moving water: their outlines wobble and smear, petals are stretched and squeezed in waves, stems kink and jump sideways. Nothing inside is perfectly sharp. The flowers closest to the front are only slightly warped, while the ones further back are softer, darker and murkier, losing contrast in the depth of the glass. The thick side faces act like mirrors, showing stretched, fragmented reflections of the flowers. Where nothing is behind the glass, it looks dark and clear, with only faint wavering streaks of light. Inside, a dense wild bouquet fills the block edge to edge and is cropped by its walls: a large pink lotus, a lotus seed pod, burgundy anthurium, a deep violet iris, a pale thistle, silvery dusty miller, dark fern and curling tendrils, layered deep into the block. The flowers are lit only by light passing through the glass, so they glow softly from within rather than looking lit from the front. Background: a plain studio paper sweep in a smooth gradient from near-black at the top to dusty mauve at the bottom. Dramatic backlight and side light. No glow, no halo, no shadow beneath. Not a 3D render, not CGI.
Seedream 5.0 Pro
Copy
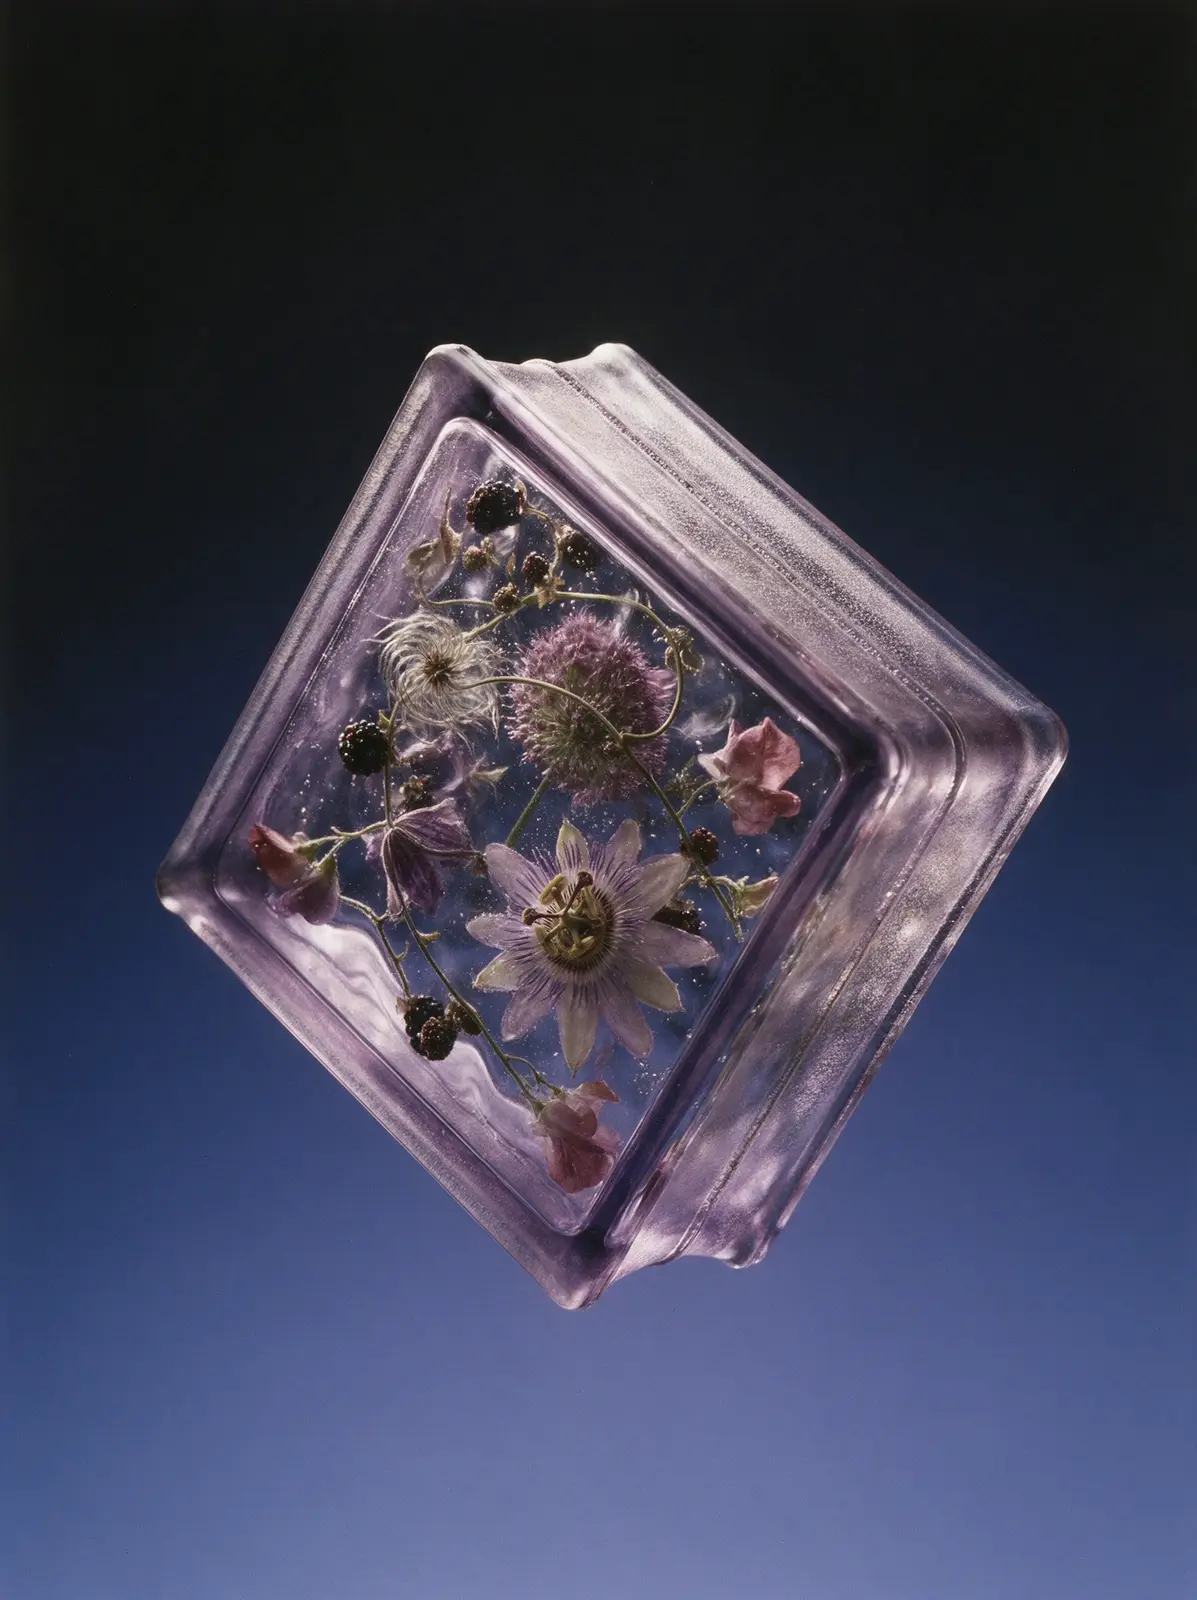
Real studio photograph, shot on medium format film. A classic Soviet glass building block from the 1970s hangs weightless in empty space, tilted onto one corner like a diamond, with its front face and one narrow side visible. There is no floor, no ground, no surface anywhere and no shadow anywhere. Its exact recognizable shape: a square brick about twice as wide as it is thick, like 19 by 19 by 8 centimeters. Each square face has a narrow flat raised frame along its edges, then a small step down into a slightly recessed central field. The four narrow sides each have a shallow channel running along their middle with a rough frosted matte band and a fine fusion seam inside it, like the groove that holds the mortar. Softly rounded corners, thick heavy edges, typical mass-produced pressed glass. The block is SOLID glass all the way through, with no hollow, no inner chamber, no inner walls and no back panel. The flowers are cast directly into the glass mass, the way flowers are frozen inside a solid block of ice: glass touches every petal, thin silvery films of trapped air coat the petal surfaces, and clusters of tiny bubbles cling to stems and petal edges. The recessed front field is wavy, so everything inside sways as if seen under water: outlines wobble, petals stretch and squeeze, stems kink and jump sideways. Nothing inside is perfectly sharp; the deeper flowers turn soft, dark and murky in the thickness of the glass. The thick edges mirror the bouquet in stretched, broken reflections. The glass has a faint lavender tint that deepens to violet in the edges. Composition inside: one large pale lilac passionflower pressed against the front face, its crown of filaments wobbling through the waves, a spherical purple allium as a second focal point deep in the glass, a single long clematis vine spiraling around both, dark blackberries scattered like beads at different depths, a wispy silver clematis seed head catching the light, and dusty-pink sweet peas tucked into the corners. Rhythmic, asymmetrical, packed edge to edge. Background: smooth seamless gradient from near-black at the top to deep periwinkle blue at the bottom, pure empty color with no floor. Dramatic backlight and side light passing through the glass, the flowers glowing softly from within. Not a 3D render, not CGI.
Seedream 5.0 Pro
Copy
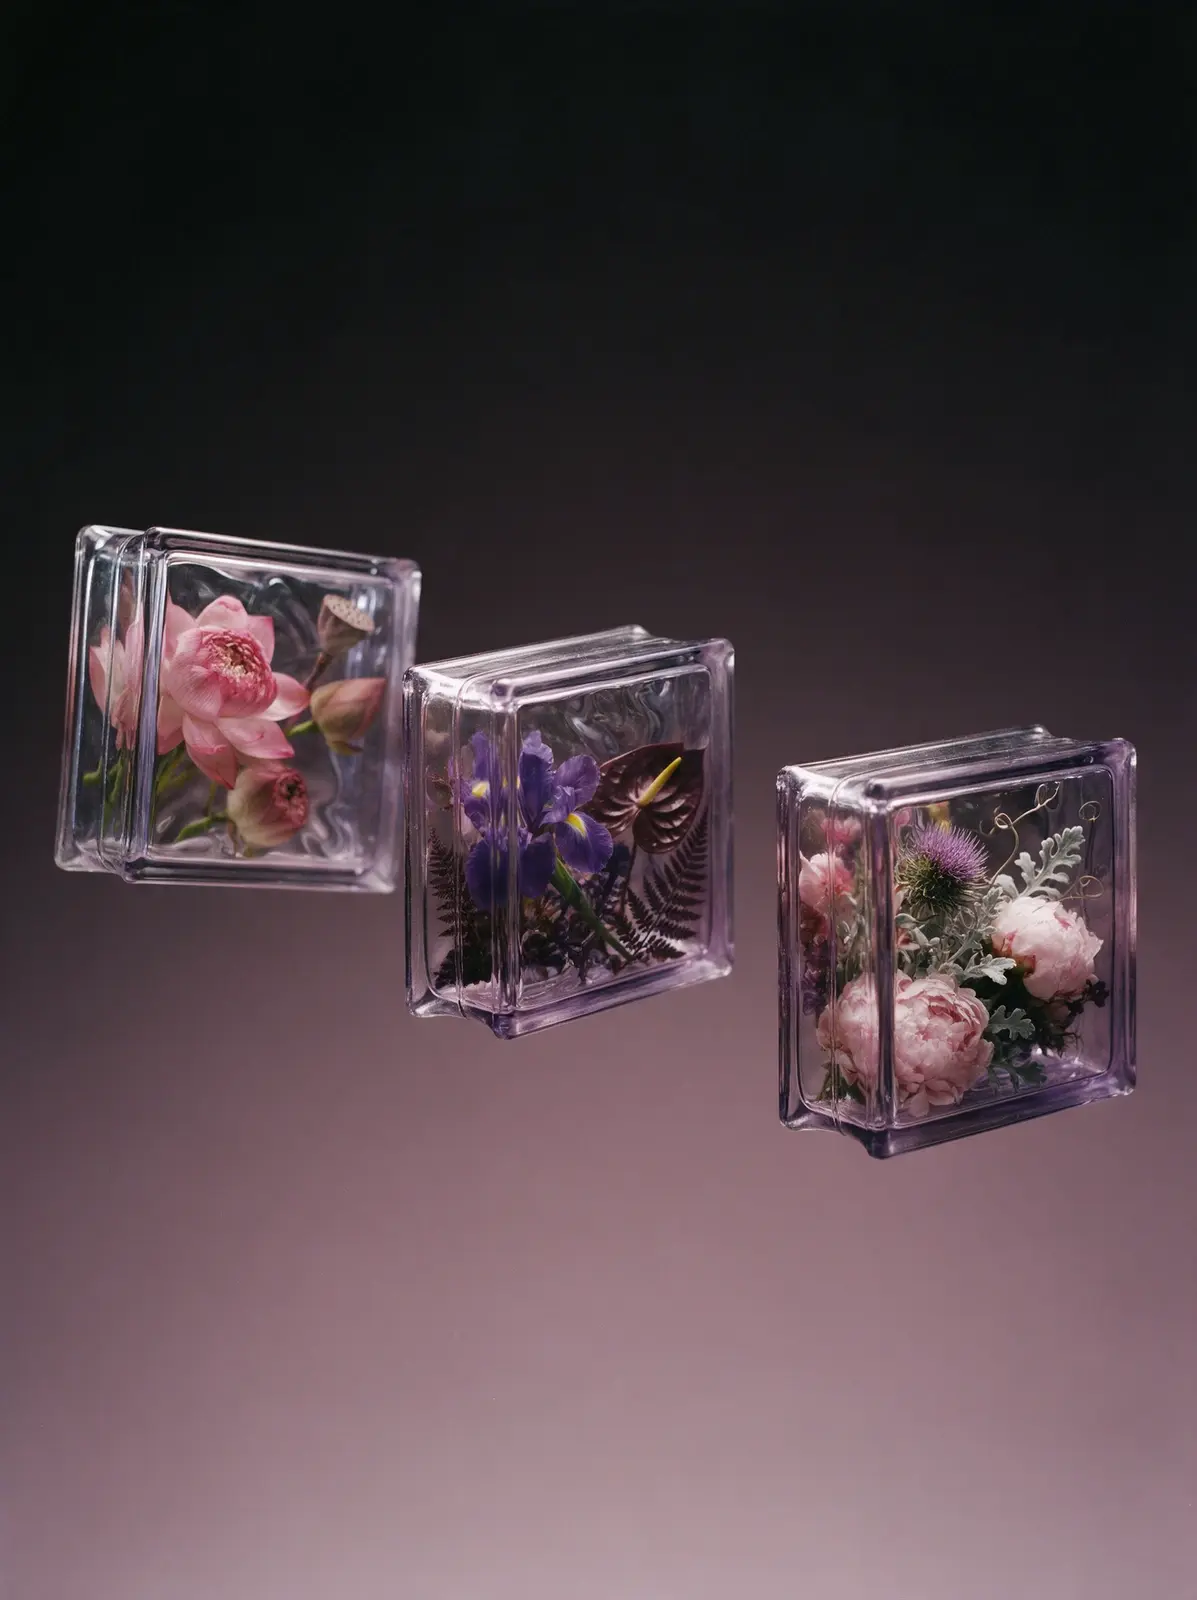
Real studio photograph, shot on medium format film. Three thick Soviet glass blocks — the classic 1970s square pressed-glass bricks with a flat rim around each face, softly rounded corners and a seam around their sides — float in mid-air at different heights and depths with generous space between them, each tilted at a different angle so their side, top or bottom faces are visible. The farthest one is slightly soft from depth of field. The glass itself is almost invisible: it shows only through thin bright highlights on the edges and rims, through a delicate pale lavender tint that deepens to soft violet in the thick edges and corners, and through the way it bends everything behind it. The front faces are uneven, so the flowers inside look as if seen through moving water: their outlines wobble and smear, petals are stretched and squeezed in waves, stems kink and jump sideways. Nothing inside is perfectly sharp. The flowers closest to the front are only slightly warped, while the ones further back are softer, darker and murkier. The thick side faces act like mirrors, showing stretched, fragmented reflections of the flowers. Each block is filled from wall to wall with a dense wild arrangement, large blooms pressed against the inner faces and cropped by the edges: the first with a large pink lotus, lotus buds and a lotus seed pod; the second with a deep violet iris, burgundy anthurium and dark fern; the third with pale pink peonies, a thistle, silvery dusty miller and curling tendrils. The flowers are lit only by light passing through the glass, so they glow softly from within. Background: a plain studio paper sweep in a smooth gradient from near-black at the top to dusty mauve at the bottom. Dramatic backlight and side light. No glow, no halo, no shadows beneath. Not a 3D render, not CGI.
Seedream 5.0 Pro
Copy
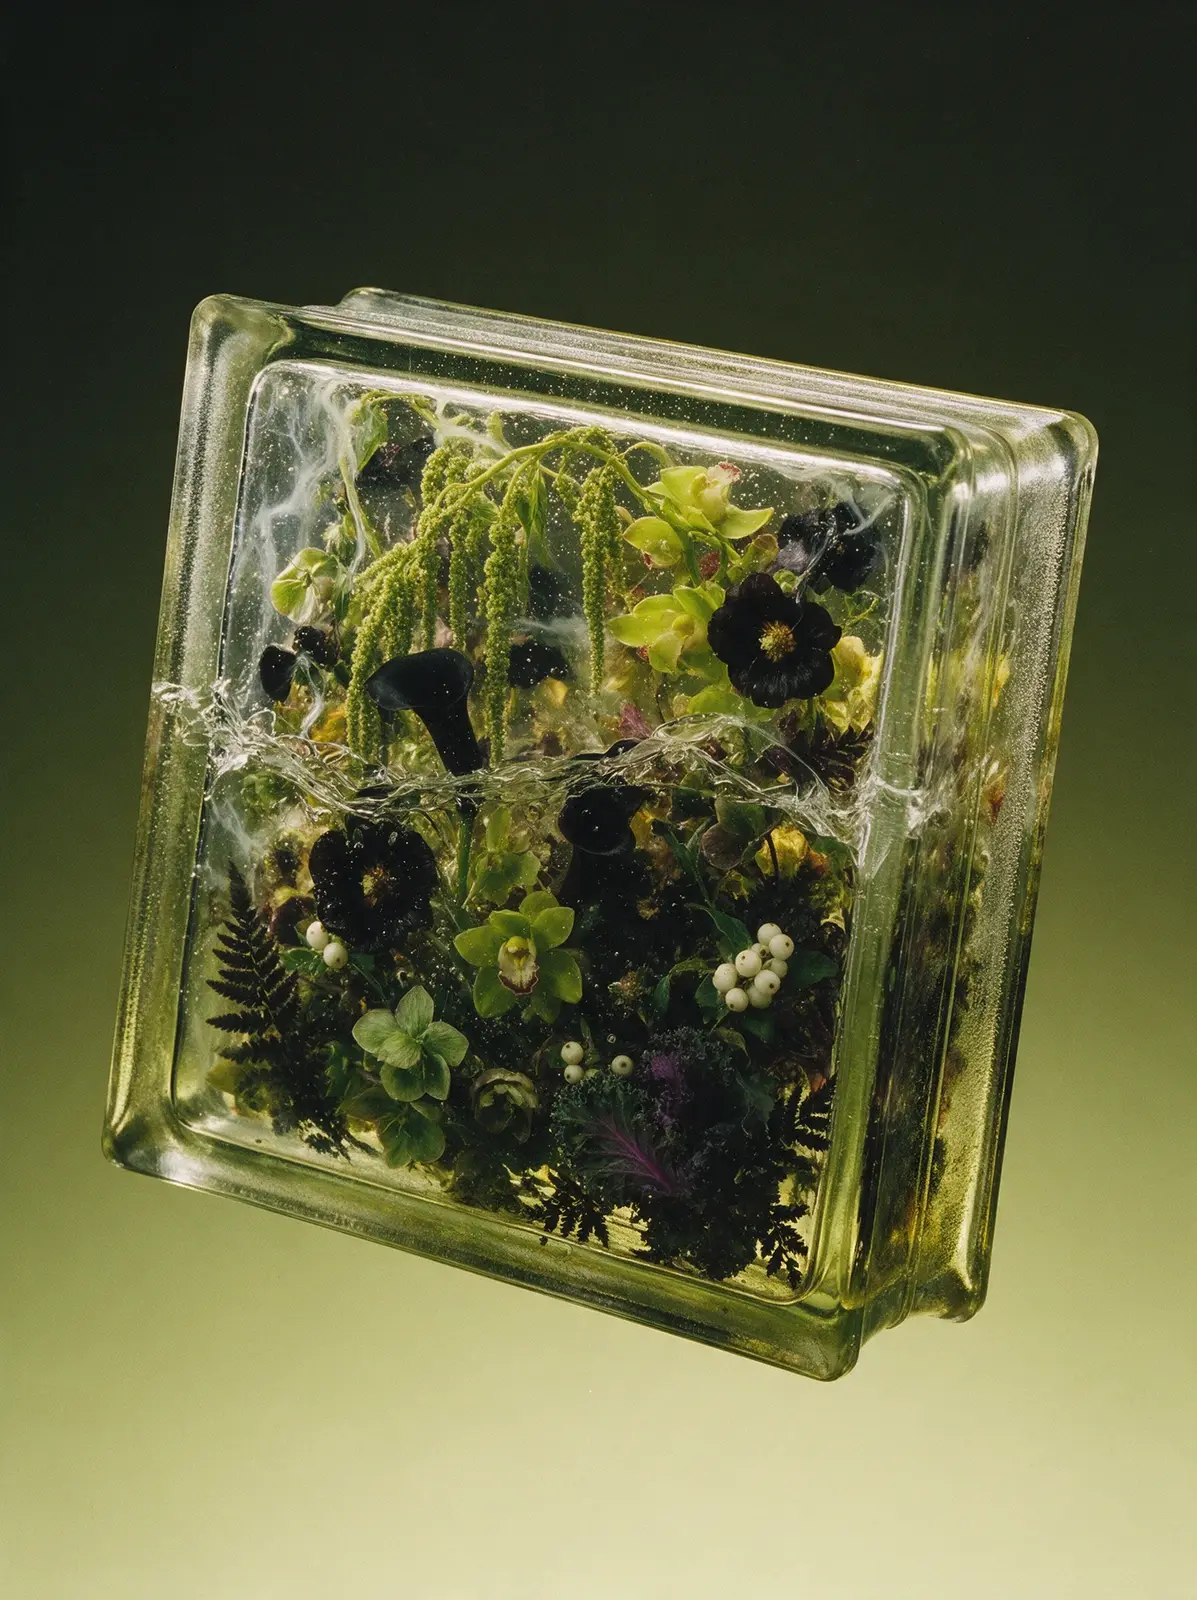
Real studio photograph, shot on medium format film. A classic Soviet glass building block from the 1970s hangs weightless in empty space, tilted backward at a three-quarter angle with its front face and one narrow side visible. No floor, no surface, no shadow anywhere. Exact recognizable shape: a square brick about twice as wide as it is thick, like 19 by 19 by 8 centimeters. Each square face has a narrow flat raised frame along its edges, then a small step down into a slightly recessed central field. The four narrow sides each have a shallow channel along their middle with a rough frosted matte band and a fine fusion seam inside it. Softly rounded corners, thick heavy edges, mass-produced pressed glass. The block is solid glass all the way through, no hollow inside. It is packed completely with flowers cast into the glass, so densely that no background shows through the front face at all — a solid wall of blooms, leaves and stems from frame to frame and from the front face deep to the back, cropped on every side: ropes of hanging green amaranthus, lime-green cymbidium orchids, near-black hollyhocks, black calla lilies, pale green hellebores, white snowberries, ruffled dark purple ornamental kale and dark ferns, overlapping and tangled. The glass is clearly in front of the flowers: it is not perfectly clear but has faint milky veils, swirling cords and streaks from the casting, and thousands of tiny bubbles suspended throughout, hanging in front of the petals at every depth. The wavy front field makes everything sway and wobble as if under water. At the step between the frame and the recessed field, the flowers behind are sharply displaced, broken and compressed in a band running all around the face. The flowers look softened and slightly faded, seen through several centimeters of glass, with the deepest layers dissolving into dark murk. The thick edges mirror the flowers in stretched fragments. The glass has a faint golden-green tint deepening to olive in the edges. Background: smooth seamless gradient from near-black olive at the top to pale soft chartreuse at the bottom, pure empty color. Dramatic backlight and side light passing through the glass. Not a 3D render, not CGI.
Seedream 5.0 Pro
Copy
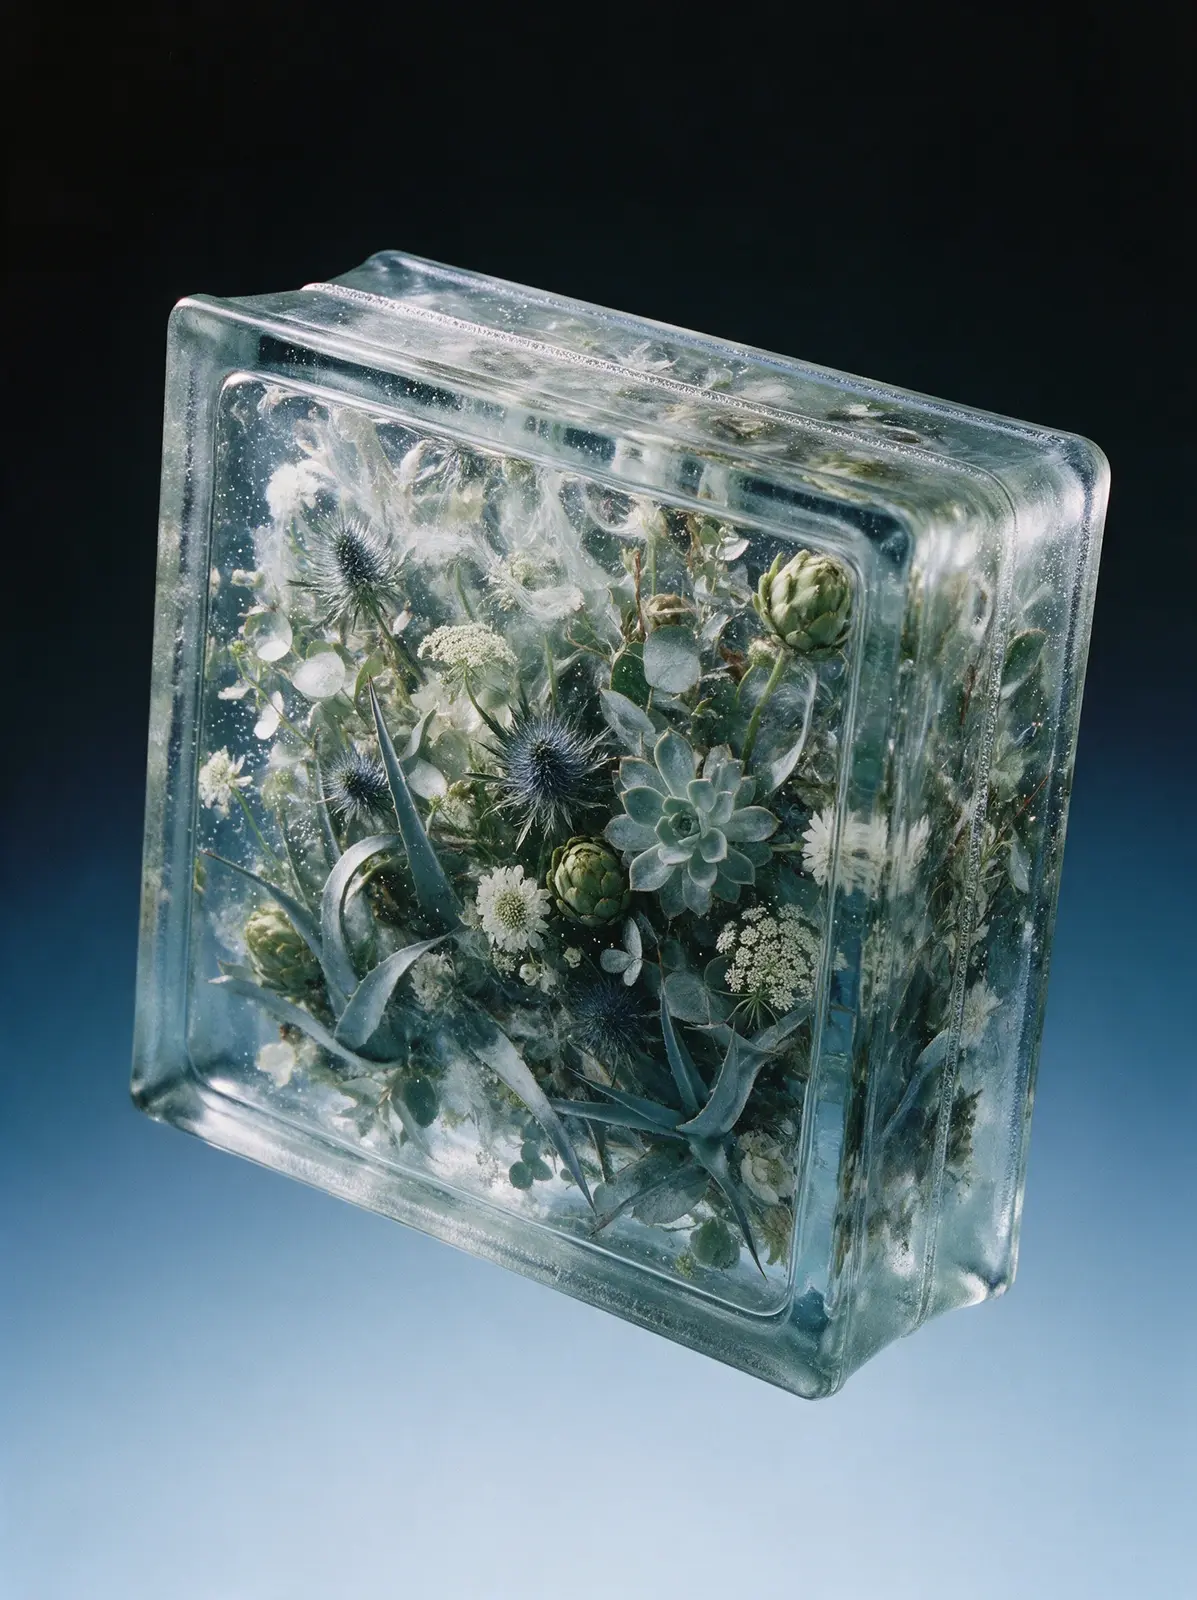
Real studio photograph, shot on medium format film. A classic Soviet glass building block from the 1970s hangs weightless in empty space, tilted at a three-quarter angle with its front face and one narrow side visible. No floor, no surface, no shadow anywhere. Exact recognizable shape: a square brick about twice as wide as it is thick, like 19 by 19 by 8 centimeters. Each square face has a narrow flat raised frame along its edges, then a small step down into a slightly recessed central field. The four narrow sides each have a shallow channel along their middle with a rough frosted matte band and a fine fusion seam inside it. Softly rounded corners, thick heavy edges, mass-produced pressed glass. The block is solid glass all the way through, no hollow inside. It is packed completely with plants cast into the glass, so densely that no background shows through the front face at all — a solid wall of blooms, leaves and stems from frame to frame and from the front face deep to the back, cropped on every side: spiky steel-blue sea holly, silvery echeveria rosettes, small green artichokes, lacy white Queen Anne's lace, curved blue-grey agave leaves, white scabiosa and frosty eucalyptus, overlapping and tangled. The glass is clearly in front of the plants: it is not perfectly clear but has faint milky veils, swirling cords and streaks from the casting, and thousands of tiny bubbles suspended throughout, hanging in front of the leaves and petals at every depth. The wavy front field makes everything sway and wobble as if under water. At the step between the frame and the recessed field, the plants behind are sharply displaced, broken and compressed in a band running all around the face. The plants look softened and slightly faded, seen through several centimeters of glass, with the deepest layers dissolving into dark murk. The thick edges mirror the plants in stretched fragments. The glass has a faint icy aqua tint deepening to steel blue in the edges. Background: smooth seamless gradient from near-black at the top to icy powder blue at the bottom, pure empty color. Dramatic backlight and side light passing through the glass. Not a 3D render, not CGI.
Seedream 5.0 Pro
Copy
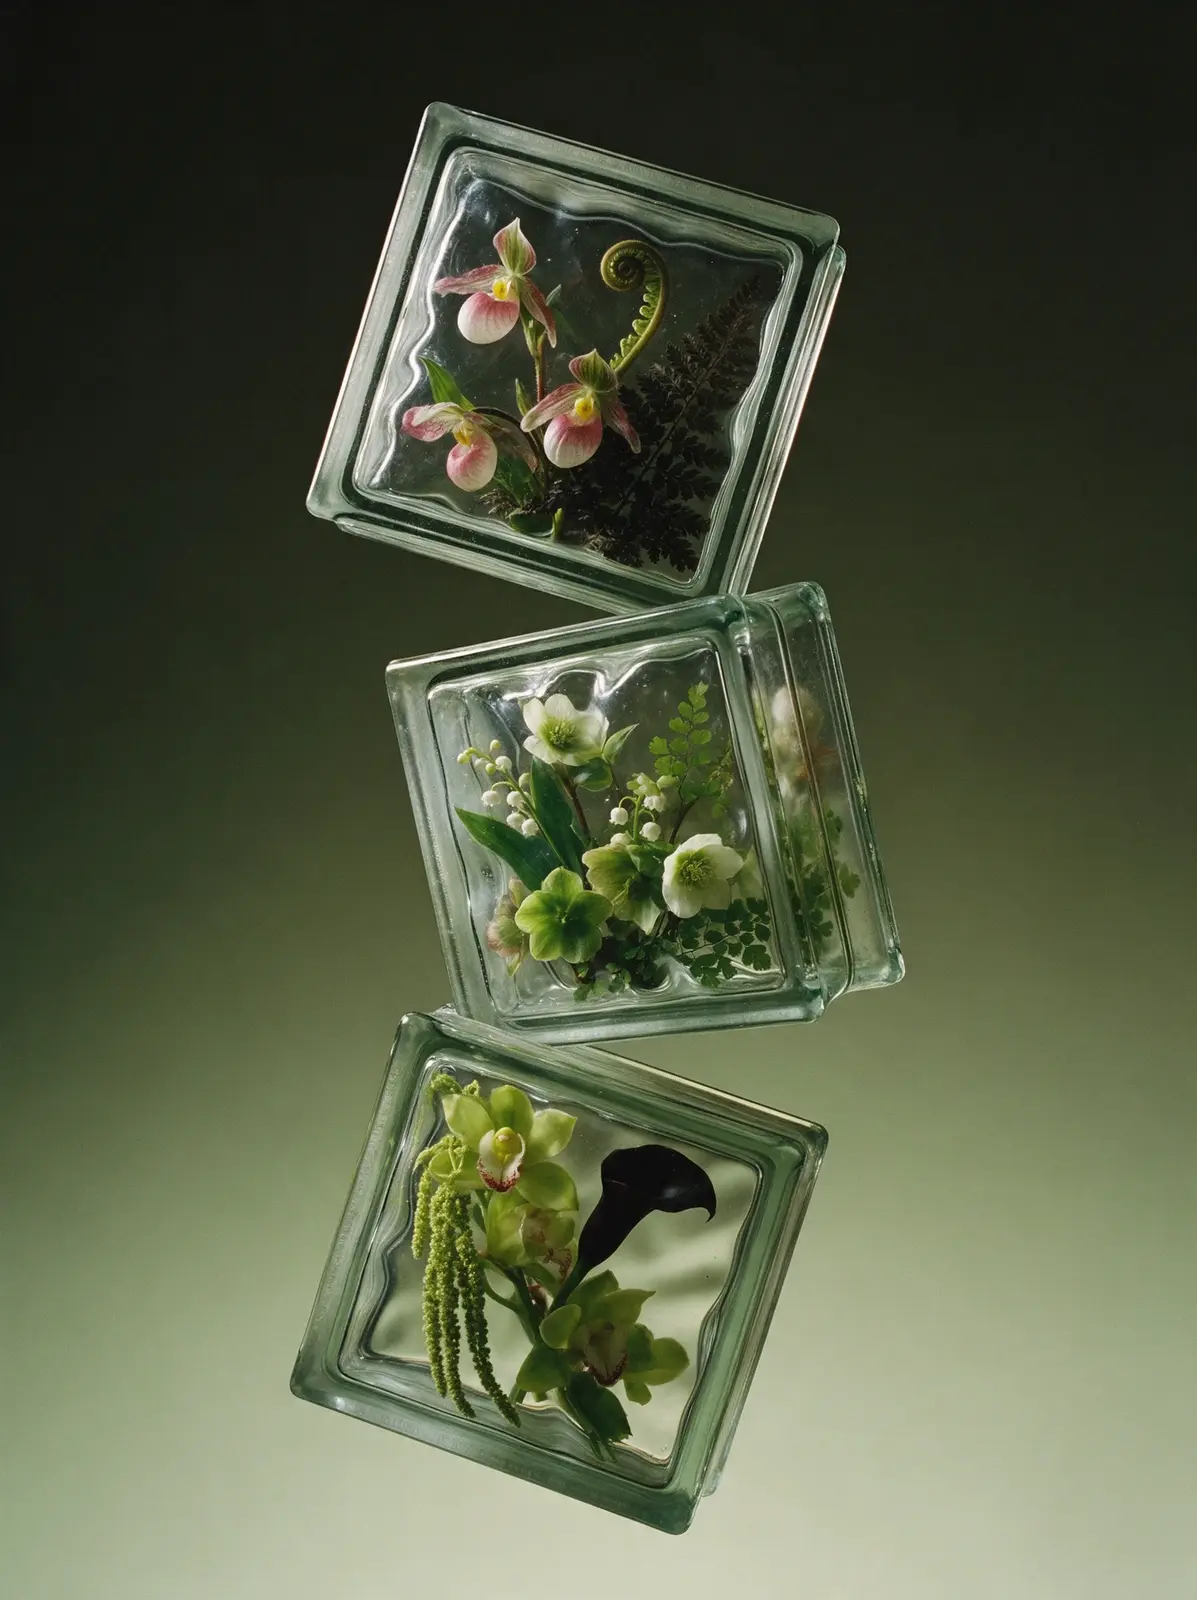
Real studio photograph, shot on medium format film. Three classic Soviet glass building blocks float weightless in empty space in a staggered vertical column, overlapping slightly in depth, each rotated differently — the top one tilted back, the middle one turned edge-on, the bottom one balanced on a corner. No floor, no surface, no shadows. Each block has the exact recognizable shape: a perfectly square face about twice as wide as the block is thick, a narrow flat raised frame and a small step down into a recessed wavy central field, and narrow sides each with a shallow frosted mortar channel and fine fusion seam. Solid glass, with each arrangement cast inside; nothing sticks out of the blocks. Inside each block is a lush, layered arrangement that fills most of the face, with big flowers and rich detail. Top block: pink-and-white lady's slipper orchids, a curling fern fiddlehead and dark lacy fern. Middle block: white and pale green hellebores, lily of the valley and maidenhair fern. Bottom block: lime-green cymbidium orchids, hanging green amaranthus and a near-black calla lily. The glass lies over the flowers: petals touching the front surface are pressed flat with silvery sheen and tiny bubbles, the wavy field bends every outline as if under water, at the frame step everything behind is shifted and broken, deeper flowers turn soft and dark, and the thick edges carry stretched reflections of the flowers. Faint smoky sea-green glass. No smoke, no mist. Background: smooth seamless gradient from near-black olive at the top to pale sage green at the bottom. Strong backlight through the glass, soft side light. Not a 3D render, not CGI.
Seedream 5.0 Pro
Copy
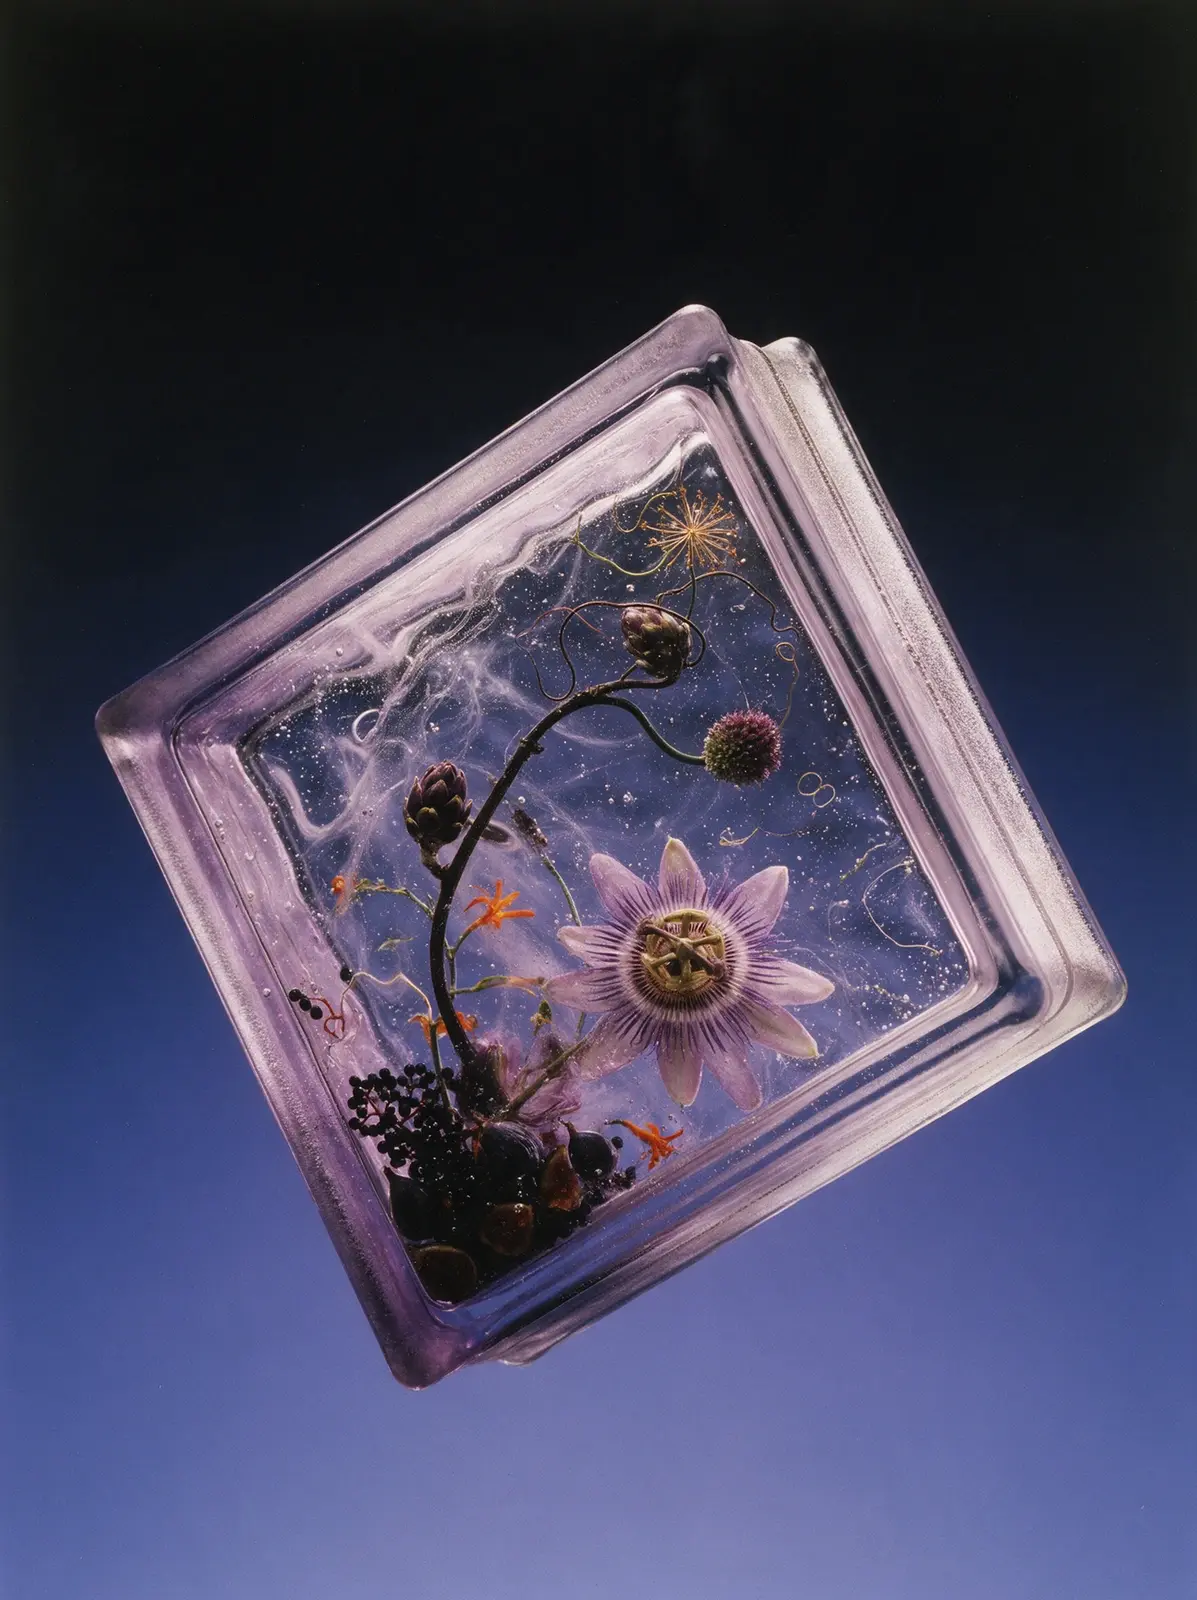
Real studio photograph, shot on medium format film. A classic Soviet glass building block from the 1970s hangs weightless in empty space, dramatically tilted on two axes as if tossed and frozen mid-air, its front face and one narrow side visible. No floor, no surface, no shadow anywhere. Exact recognizable shape: a square brick about twice as wide as it is thick, like 19 by 19 by 8 centimeters. Each square face has a narrow flat raised frame along its edges, then a small step down into a slightly recessed central field. The four narrow sides each have a shallow channel along their middle with a rough frosted matte band and a fine fusion seam inside it. Softly rounded corners, thick heavy edges, mass-produced pressed glass. Solid glass all the way through, no hollow inside. Cast inside the glass is a fragment of a sculptural ikebana arrangement with a clear hierarchy, as if the block cut a window out of a larger composition. One strong S-shaped gesture: a dark vine stem rises from the lower corner and curves across the block to the opposite upper corner. The hero is one huge pale lilac passionflower with its striped crown of filaments, pressed against the front face and cropped by the frame. Secondary accents: one dark purple artichoke and one spherical purple allium along the curve. A dense dark base of black elderberry clusters and glossy dark figs sits in the lower corner. The opposite upper corner stays open, crossed only by fine curling tendrils and one golden starburst seed head. Small bright orange lily flowers flicker as color accents. The glass is clearly in front of everything: swirling cords and streaks from the casting, thousands of tiny bubbles at every depth, faint milky veils. The wavy front field makes the flowers sway and wobble as if under water. At the step between the frame and the recessed field, everything behind is sharply displaced and broken in a band around the face. Deeper elements dissolve into soft murk. The open areas of glass are never empty: refracted streaks of the background color, cords and bubbles drift through them. The glass has a faint lavender tint deepening to violet in the edges. Background: smooth seamless gradient from near-black at the top to deep periwinkle blue at the bottom, pure empty color. Strong backlight through the glass so the flowers glow from within, soft side light along the edges. Not a 3D render, not CGI.
Seedream 5.0 Pro
Copy
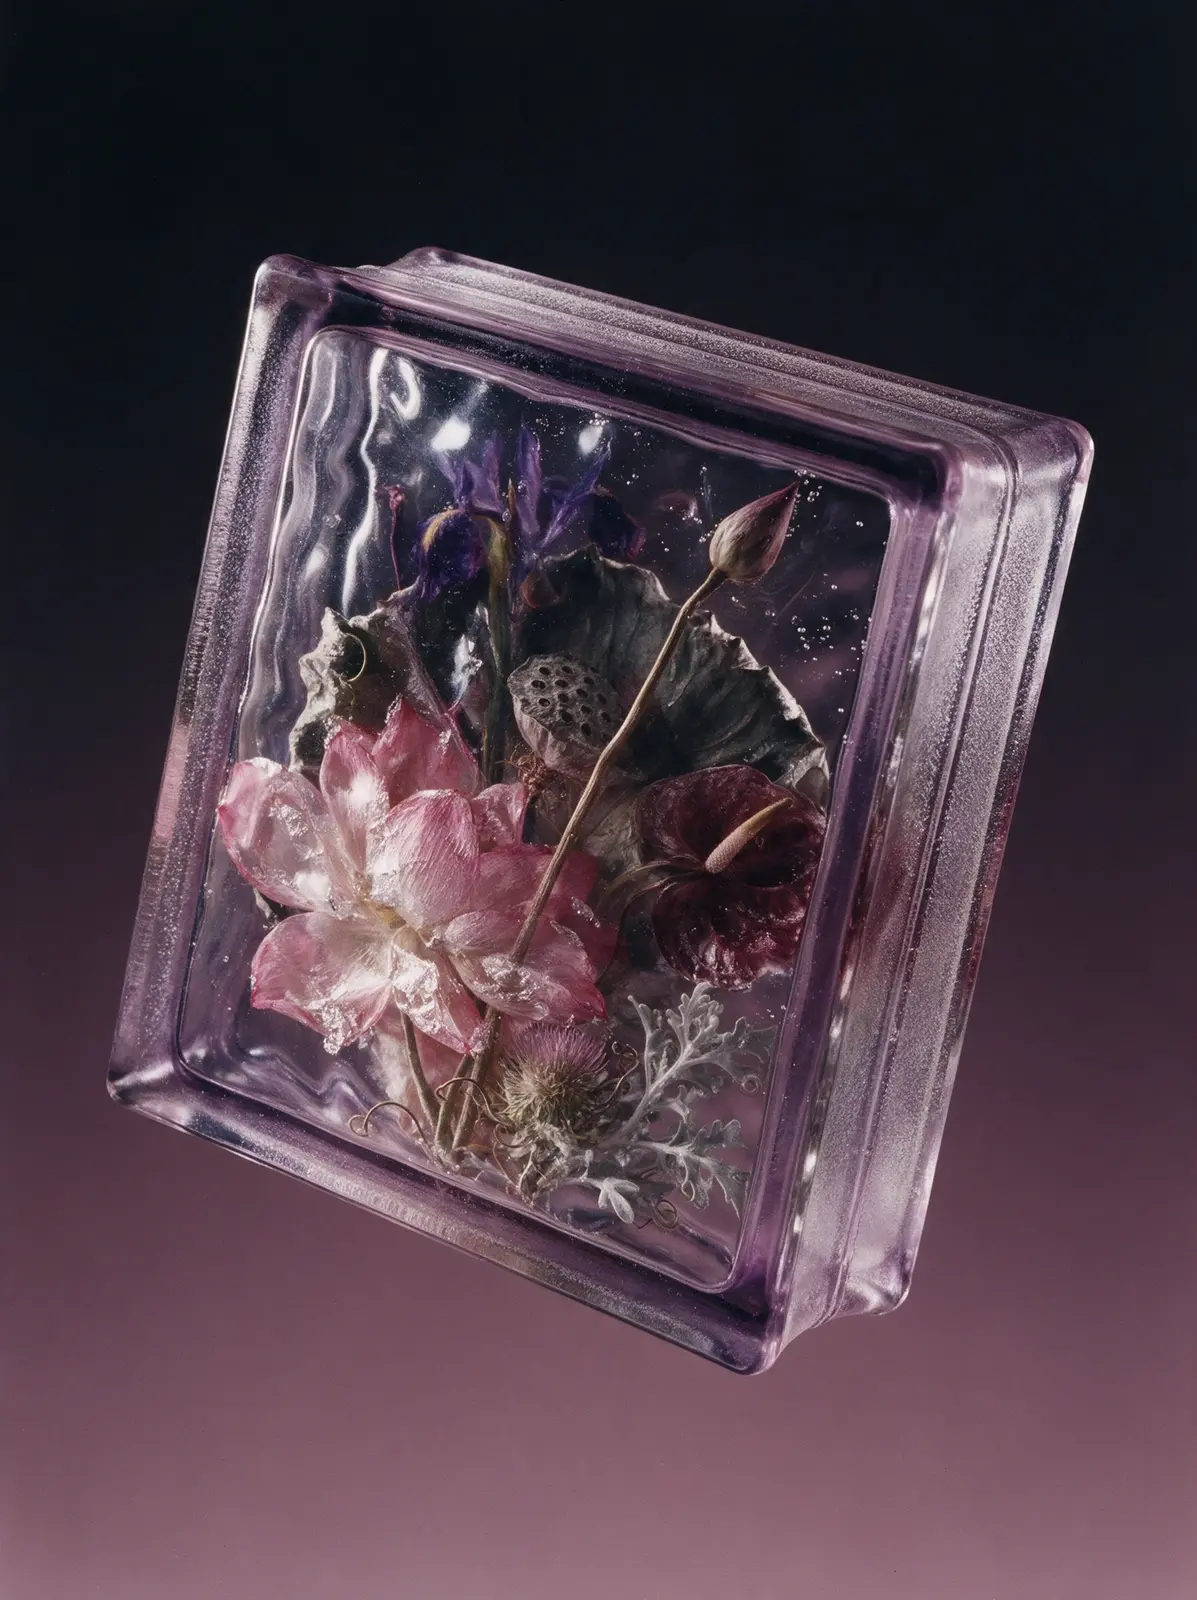
Real studio photograph, shot on medium format film. A classic Soviet glass building block from the 1970s hangs weightless in empty space, tilted at a three-quarter angle with its front face and one narrow side visible. There is no floor, no ground, no surface anywhere and no shadow anywhere. Its exact recognizable shape: a square brick about twice as wide as it is thick, like 19 by 19 by 8 centimeters. Each square face has a narrow flat raised frame along its edges, then a small step down into a slightly recessed central field. The four narrow sides each have a shallow channel running along their middle with a rough frosted matte band and a fine fusion seam inside it, like the groove that holds the mortar. Softly rounded corners, thick heavy edges, typical mass-produced pressed glass. The block is SOLID glass all the way through, with no hollow, no inner chamber, no inner walls and no back panel. The flowers are cast directly into the glass mass, the way flowers are frozen inside a solid block of ice: glass touches every petal, thin silvery films of trapped air coat the petal surfaces, and clusters of tiny bubbles cling to stems and petal edges. The recessed front field is wavy, so everything inside sways as if seen under water: outlines wobble, petals stretch and squeeze, stems kink and jump sideways. Nothing inside is perfectly sharp; the deeper flowers turn soft, dark and murky in the thickness of the glass. The thick edges mirror the bouquet in stretched, broken reflections. The glass has a faint lavender tint that deepens to violet in the edges. Composition inside: one huge open pink lotus pressed against the front face and cropped by the frame, a dried lotus seed pod turned sideways in the middle depth, a lotus leaf curling around the back like a dark wave, a single tall lotus bud on a long bending stem cutting diagonally across, a deep violet iris and burgundy anthurium sinking into the murky depth, a pale thistle and silvery dusty miller at the base, fine curling tendrils in the gaps. Asymmetrical, layered front to back, packed edge to edge. Background: smooth seamless gradient from near-black at the top to dusty mauve at the bottom, pure empty color with no floor. Dramatic backlight and side light passing through the glass, the flowers glowing softly from within. Not a 3D render, not CGI.
Seedream 5.0 Pro
Copy
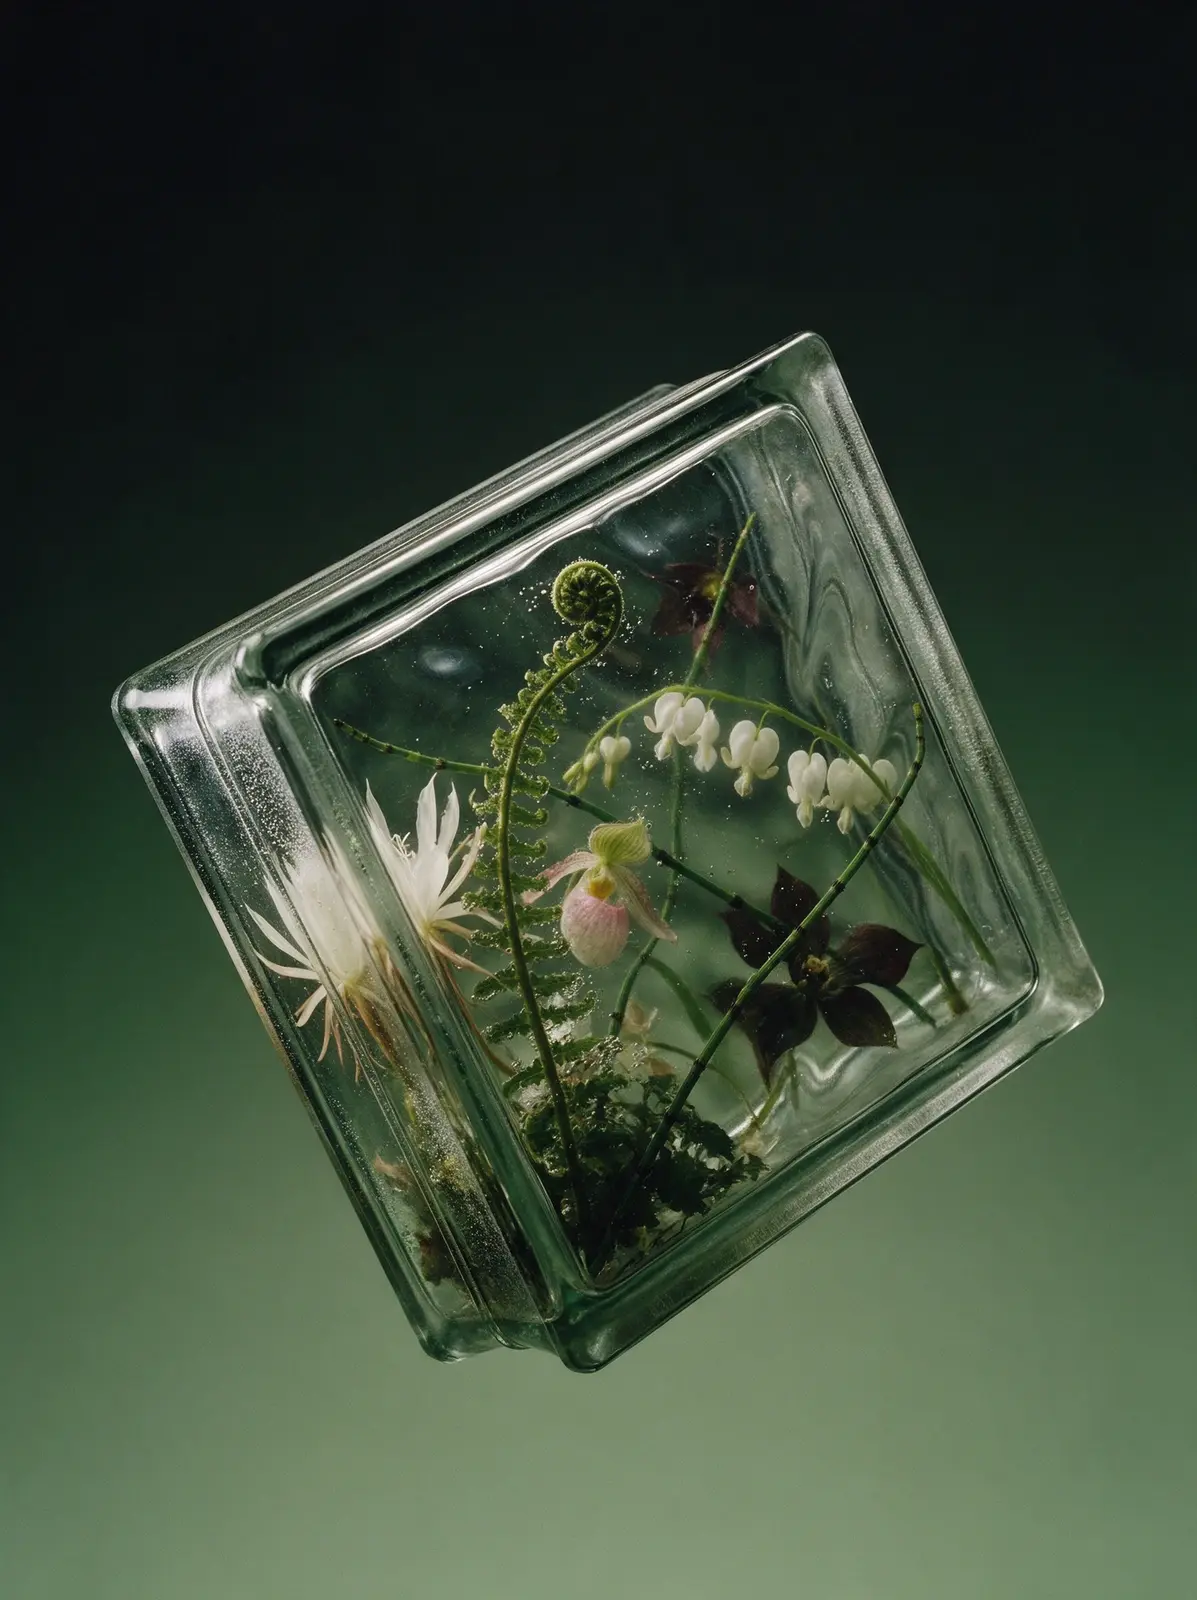
Real studio photograph, shot on medium format film. A classic Soviet glass building block from the 1970s hangs weightless in empty space, tilted steeply onto one corner with its front face and one narrow side visible. There is no floor, no ground, no surface anywhere and no shadow anywhere. Its exact recognizable shape: a square brick about twice as wide as it is thick, like 19 by 19 by 8 centimeters. Each square face has a narrow flat raised frame along its edges, then a small step down into a slightly recessed central field. The four narrow sides each have a shallow channel running along their middle with a rough frosted matte band and a fine fusion seam inside it, like the groove that holds the mortar. Softly rounded corners, thick heavy edges, typical mass-produced pressed glass. The block is SOLID glass all the way through, with no hollow, no inner chamber, no inner walls and no back panel. The flowers are cast directly into the glass mass, the way flowers are frozen inside a solid block of ice: glass touches every petal, thin silvery films of trapped air coat the petal surfaces, and clusters of tiny bubbles cling to stems and petal edges. The recessed front field is wavy, so everything inside sways as if seen under water: outlines wobble, petals stretch and squeeze, stems kink and jump sideways. Nothing inside is perfectly sharp; the deeper flowers turn soft, dark and murky in the thickness of the glass. The thick edges mirror the arrangement in stretched, broken reflections. The glass has a faint smoky sea-green tint that deepens to bottle green in the edges. Composition inside: a tall unfurling fern fiddlehead spiraling up through the whole height of the block as the main line, one white night-blooming cereus with long spidery petals pressed against the front face and cropped by the frame, a pale pink lady's slipper orchid floating in the middle depth, a dark plum trillium sinking into the murky back, strings of white bleeding hearts arching across, and thin horsetail stems crossing diagonally. Airy at the top, dense dark greenery at the base. Background: smooth seamless gradient from near-black at the top to muted moss green at the bottom, pure empty color with no floor. Dramatic backlight and side light passing through the glass, the flowers glowing softly from within. Not a 3D render, not CGI.
Seedream 5.0 Pro
Copy
Real studio photograph, shot on medium format film. Four classic Soviet glass building blocks float weightless in empty space, scattered in a loose tumbling cluster at different heights and depths, each turned at a different angle — one almost edge-on, one on its corner like a diamond, one tilted back, one tipped forward. No floor, no surface, no shadows. Each block has the exact recognizable shape: a perfectly square face about twice as wide as the block is thick, a narrow flat raised frame and a small step down into a recessed wavy central field, and narrow sides each with a shallow frosted mortar channel and fine fusion seam. Solid glass, with each arrangement cast inside; nothing sticks out of the blocks. Inside each block is a lush, layered floral arrangement that fills most of the face, with big flowers and rich detail. First: orange ranunculus, bright red rose hips and golden grasses. Second: a burgundy dahlia, ripe figs with one cut open and dark copper leaves. Third: an apricot king protea, bronze leucadendron and yellow craspedia balls. Fourth: apricot garden roses, a persimmon twig with two orange fruits and curling dry tendrils. The glass lies over the flowers: petals touching the front surface are pressed flat with silvery sheen and tiny bubbles, the wavy field bends every outline as if under water, at the frame step everything behind is shifted and broken, deeper flowers turn soft and dark, and the thick edges carry stretched reflections of the flowers. Faint warm amber glass. No smoke, no mist. Background: smooth seamless gradient from near-black brown at the top to warm ochre at the bottom. Strong backlight through the glass, soft side light. Not a 3D render, not CGI.
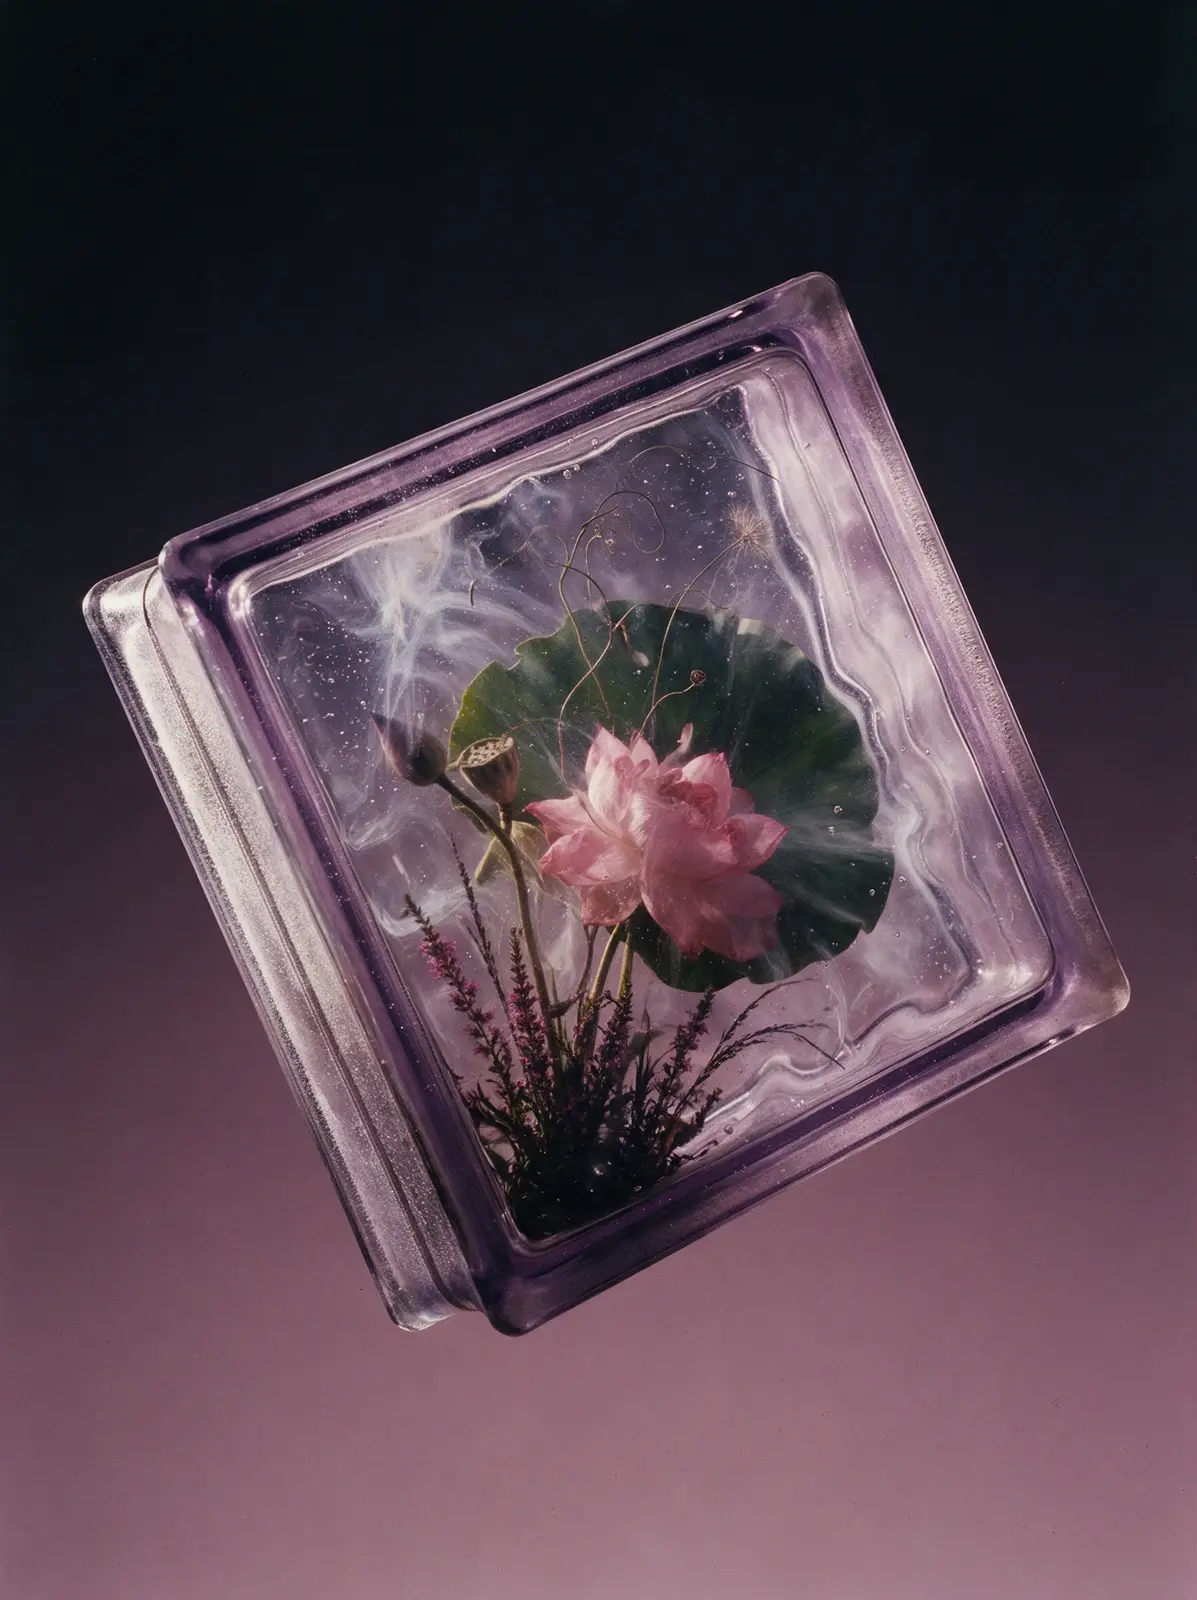
Seedream 5.0 Pro
Copy
Real studio photograph, shot on medium format film. A classic Soviet glass building block from the 1970s hangs weightless in empty space, dramatically tilted on two axes as if tossed and frozen mid-air, its front face and one narrow side visible. No floor, no surface, no shadow anywhere. Exact recognizable shape: a square brick about twice as wide as it is thick, like 19 by 19 by 8 centimeters. Each square face has a narrow flat raised frame along its edges, then a small step down into a slightly recessed central field. The four narrow sides each have a shallow channel along their middle with a rough frosted matte band and a fine fusion seam inside it. Softly rounded corners, thick heavy edges, mass-produced pressed glass. Solid glass all the way through, no hollow inside. Cast inside the glass is a fragment of a sculptural ikebana arrangement with a clear hierarchy, as if the block cut a window out of a larger composition. The gesture: one huge round dark-green lotus leaf curls diagonally behind everything like a wave, cropped by the frame. The hero is one large open soft-pink lotus flower in front of the leaf, pressed against the front face. Secondary accents: a dried lotus seed pod turned sideways and a tall closed lotus bud on a long bending stem. A dense base of slender purple loosestrife spikes and dark grasses in the lower corner. The upper corner stays open, crossed only by fine wiry curling stems and one fluffy dandelion-like seed head. The glass is clearly in front of everything: swirling cords and streaks from the casting, thousands of tiny bubbles at every depth, faint milky veils. The wavy front field makes the flowers sway and wobble as if under water. At the step between the frame and the recessed field, everything behind is sharply displaced and broken in a band around the face. Deeper elements dissolve into soft murk. The open areas of glass are never empty: refracted streaks of the background color, cords and bubbles drift through them. The glass has a faint lavender tint deepening to violet in the edges. Background: smooth seamless gradient from near-black at the top to dusty mauve at the bottom, pure empty color. Strong backlight through the glass so the flowers glow from within, soft side light along the edges. Not a 3D render, not CGI.
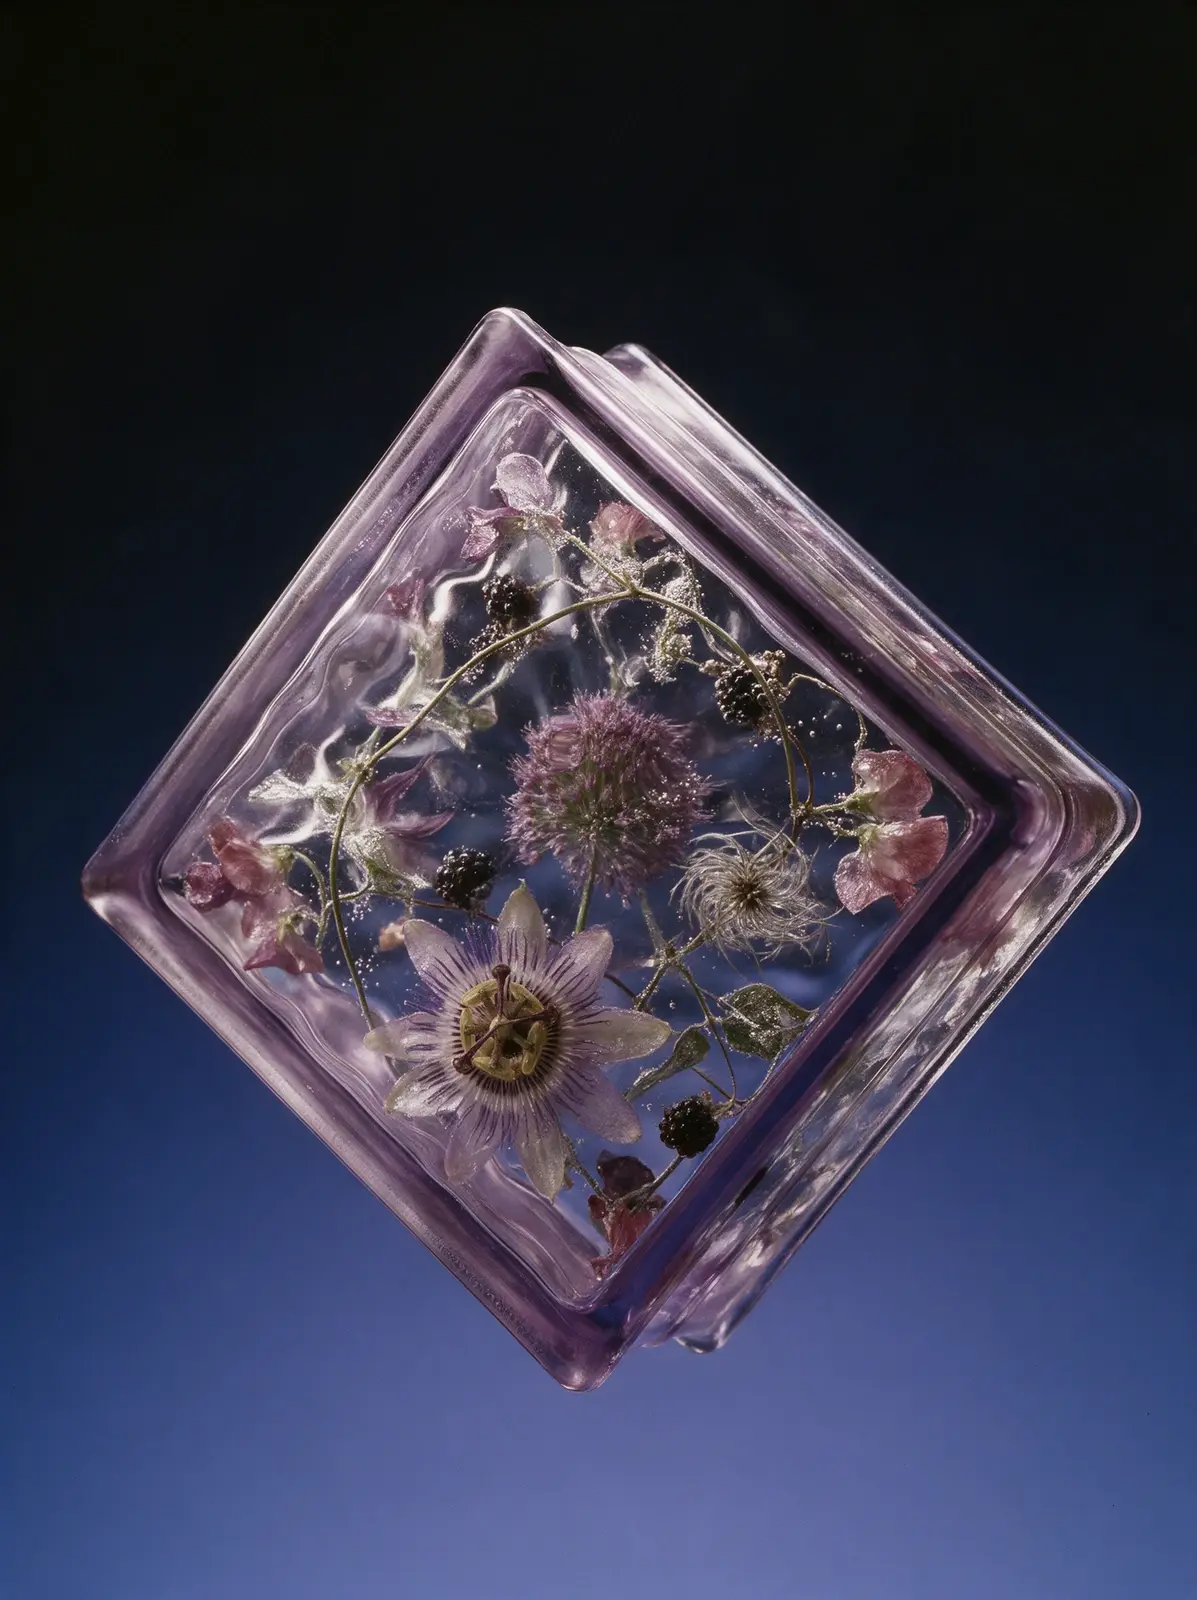
Seedream 5.0 Pro
Copy
Real studio photograph, shot on medium format film. A Soviet glass brick — the classic 1970s square pressed-glass block with a flat rim around each face, softly rounded corners and a seam around its sides — hangs weightless in empty space, tilted onto one corner like a diamond, with its side and top visible. There is no floor, no ground, no surface anywhere and no shadow anywhere. The brick is SOLID glass all the way through, from the front face to the back face — no hollow inside, no inner chamber, no inner walls, no back panel. The flowers are cast directly into the glass mass, the way flowers are frozen inside a solid block of ice: glass touches every petal, thin silvery films of trapped air coat the petal surfaces, and clusters of tiny bubbles cling to stems and petal edges. The front face is wavy, so everything inside sways as if seen under water: outlines wobble, petals stretch and squeeze, stems kink and jump sideways. Nothing inside is perfectly sharp; the deeper flowers turn soft, dark and murky in the thickness of the glass. The thick side faces mirror the bouquet in stretched, broken reflections. The glass has a faint lavender tint that deepens to violet in the edges. Composition inside: one large pale lilac passionflower pressed against the front face, its crown of filaments wobbling through the waves, a spherical purple allium as a second focal point deep in the glass, a single long clematis vine spiraling around both, dark blackberries scattered like beads at different depths, a wispy silver clematis seed head catching the light, and dusty-pink sweet peas tucked into the corners — rhythmic, asymmetrical, packed edge to edge. Background: smooth seamless gradient from near-black at the top to deep periwinkle blue at the bottom, pure empty color with no floor. Dramatic backlight and side light passing through the glass, the flowers glowing softly from within. Not a 3D render, not CGI.
Seedream 5.0 Pro
Copy
Real studio photograph, shot on medium format film. A Soviet glass brick — the classic 1970s square pressed-glass block with a flat rim around each face, softly rounded corners and a seam around its sides — hangs weightless in empty space, tilted at a three-quarter angle with its side and top visible. There is no floor, no ground, no surface anywhere and no shadow anywhere. The brick is SOLID glass all the way through, from the front face to the back face — no hollow inside, no inner chamber, no inner walls, no back panel. The flowers are cast directly into the glass mass, the way flowers are frozen inside a solid block of ice: glass touches every petal, thin silvery films of trapped air coat the petal surfaces, and clusters of tiny bubbles cling to stems and petal edges. The front face is wavy, so everything inside sways as if seen under water: outlines wobble, petals stretch and squeeze, stems kink and jump sideways. Nothing inside is perfectly sharp; the deeper flowers turn soft, dark and murky in the thickness of the glass. The thick side faces mirror the bouquet in stretched, broken reflections. The glass has a faint lavender tint that deepens to violet in the edges. Composition inside: one huge open pink lotus pressed against the front face and cropped by the rim, a dried lotus seed pod turned sideways in the middle depth, a lotus leaf curling around the back like a dark wave, a single tall lotus bud on a long bending stem cutting diagonally across, a deep violet iris and burgundy anthurium sinking into the murky depth, a pale thistle and silvery dusty miller at the base, fine curling tendrils in the gaps — asymmetrical, layered front to back, packed edge to edge. Background: smooth seamless gradient from near-black at the top to dusty mauve at the bottom, pure empty color with no floor. Dramatic backlight and side light passing through the glass, the flowers glowing softly from within. Not a 3D render, not CGI.
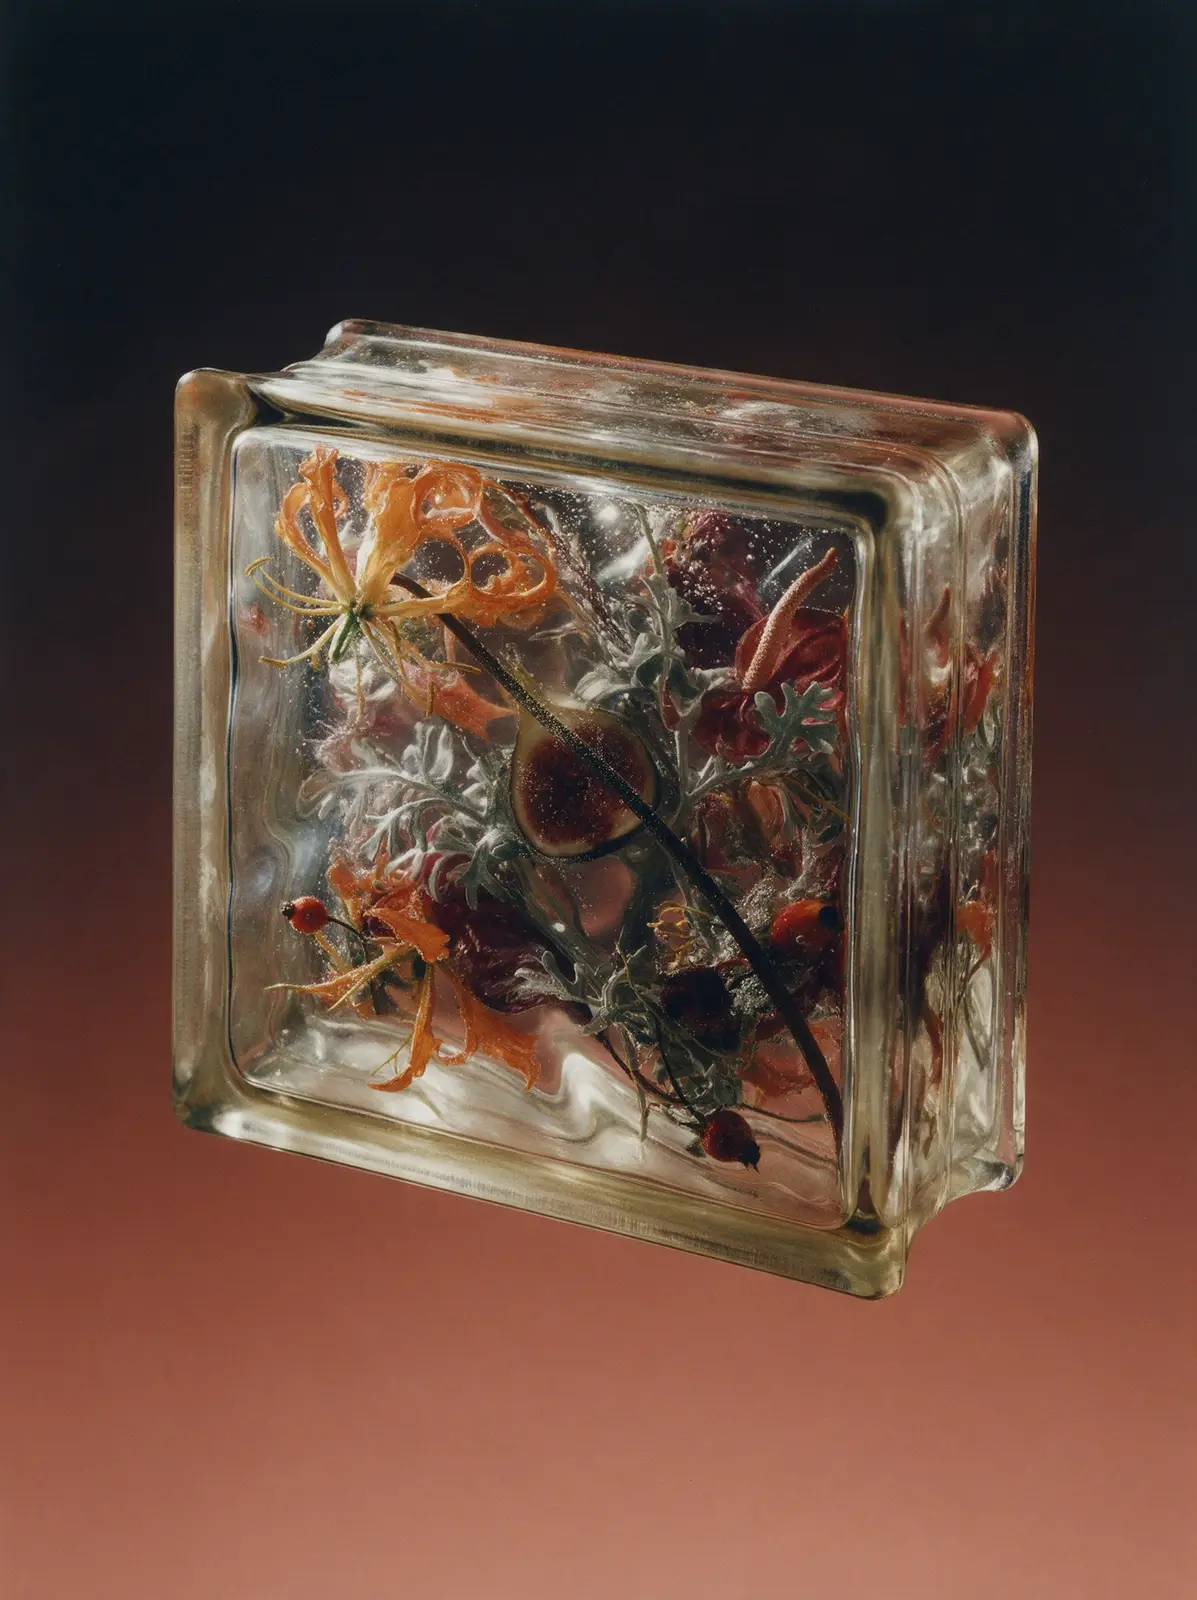
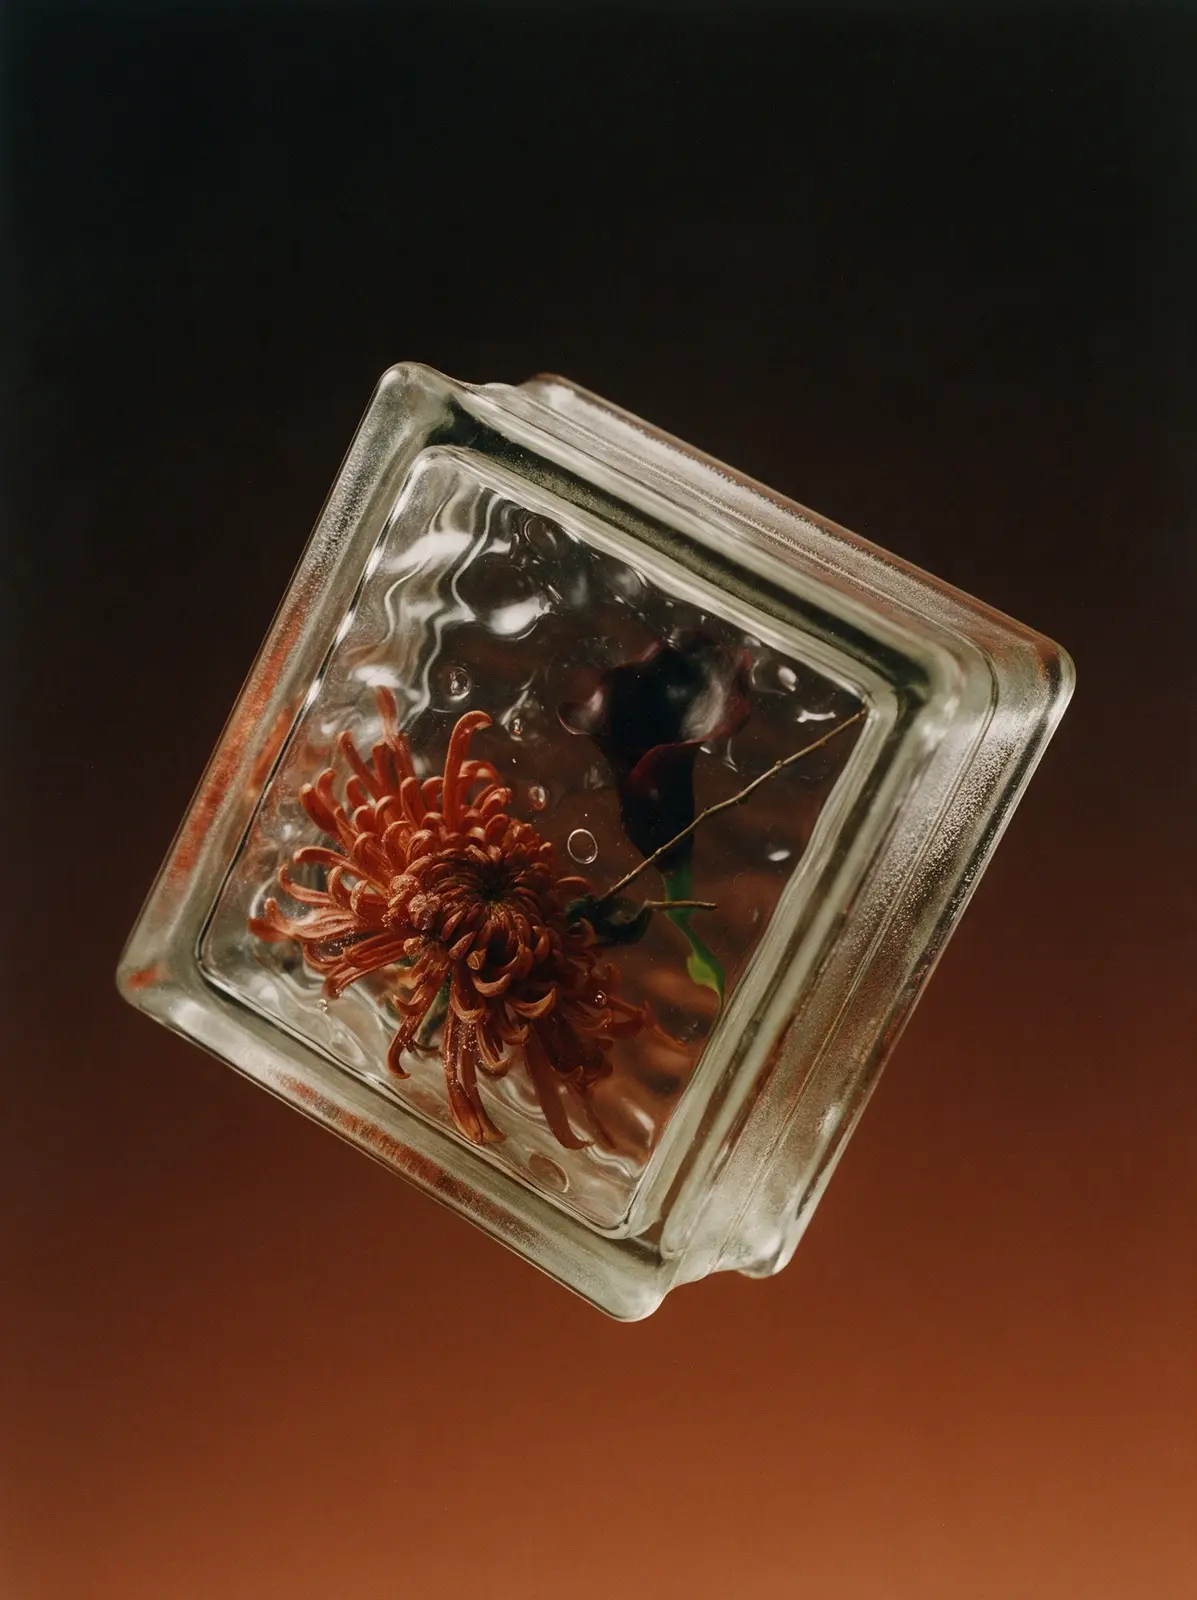
Seedream 5.0 Pro
Copy
Real studio photograph, shot on medium format film. A classic Soviet glass building block hangs weightless in empty space, balanced on one corner like a diamond and turned slightly away, its front face and a narrow side with the frosted mortar channel visible. No floor, no surface, no shadow. Exact shape: a square brick about 19 by 19 by 8 centimeters, each square face with a narrow flat raised frame and a small step down into a slightly recessed wavy central field; the narrow sides each with a shallow channel holding a rough frosted matte band and a fine fusion seam; softly rounded corners. Solid glass all the way through. Everything is sealed completely inside the glass. The block has a clean glass silhouette with nothing sticking out of it, and the space around it is pure empty background. Inside, a minimal graphic composition of only a few elements: one large rust-orange spider chrysanthemum with long curling tubular petals placed off-center, so big that its petal tips press against the inner edge of the frame; one dark aubergine calla lily deeper in the glass; and a single thin bare twig crossing the open glass diagonally. The rest of the block is open glass. The chrysanthemum's front petals are pressed flat against the inner surface of the glass, spread and slightly squashed, with soft silvery sheen and tiny bubbles where they touch. The wavy front field bends every outline as if under water. In the open glass, the background behind is visibly warped by the waves, and a few round bubbles float. At the step of the frame everything behind is sharply shifted and broken. The deeper parts turn soft and dark. The thick edges carry stretched rust reflections of the chrysanthemum. Faint smoky amber glass. No smoke, no mist. Background: smooth seamless gradient from near-black brown at the top to burnt sienna at the bottom. Strong backlight through the glass, soft side light. Not a 3D render, not CGI.
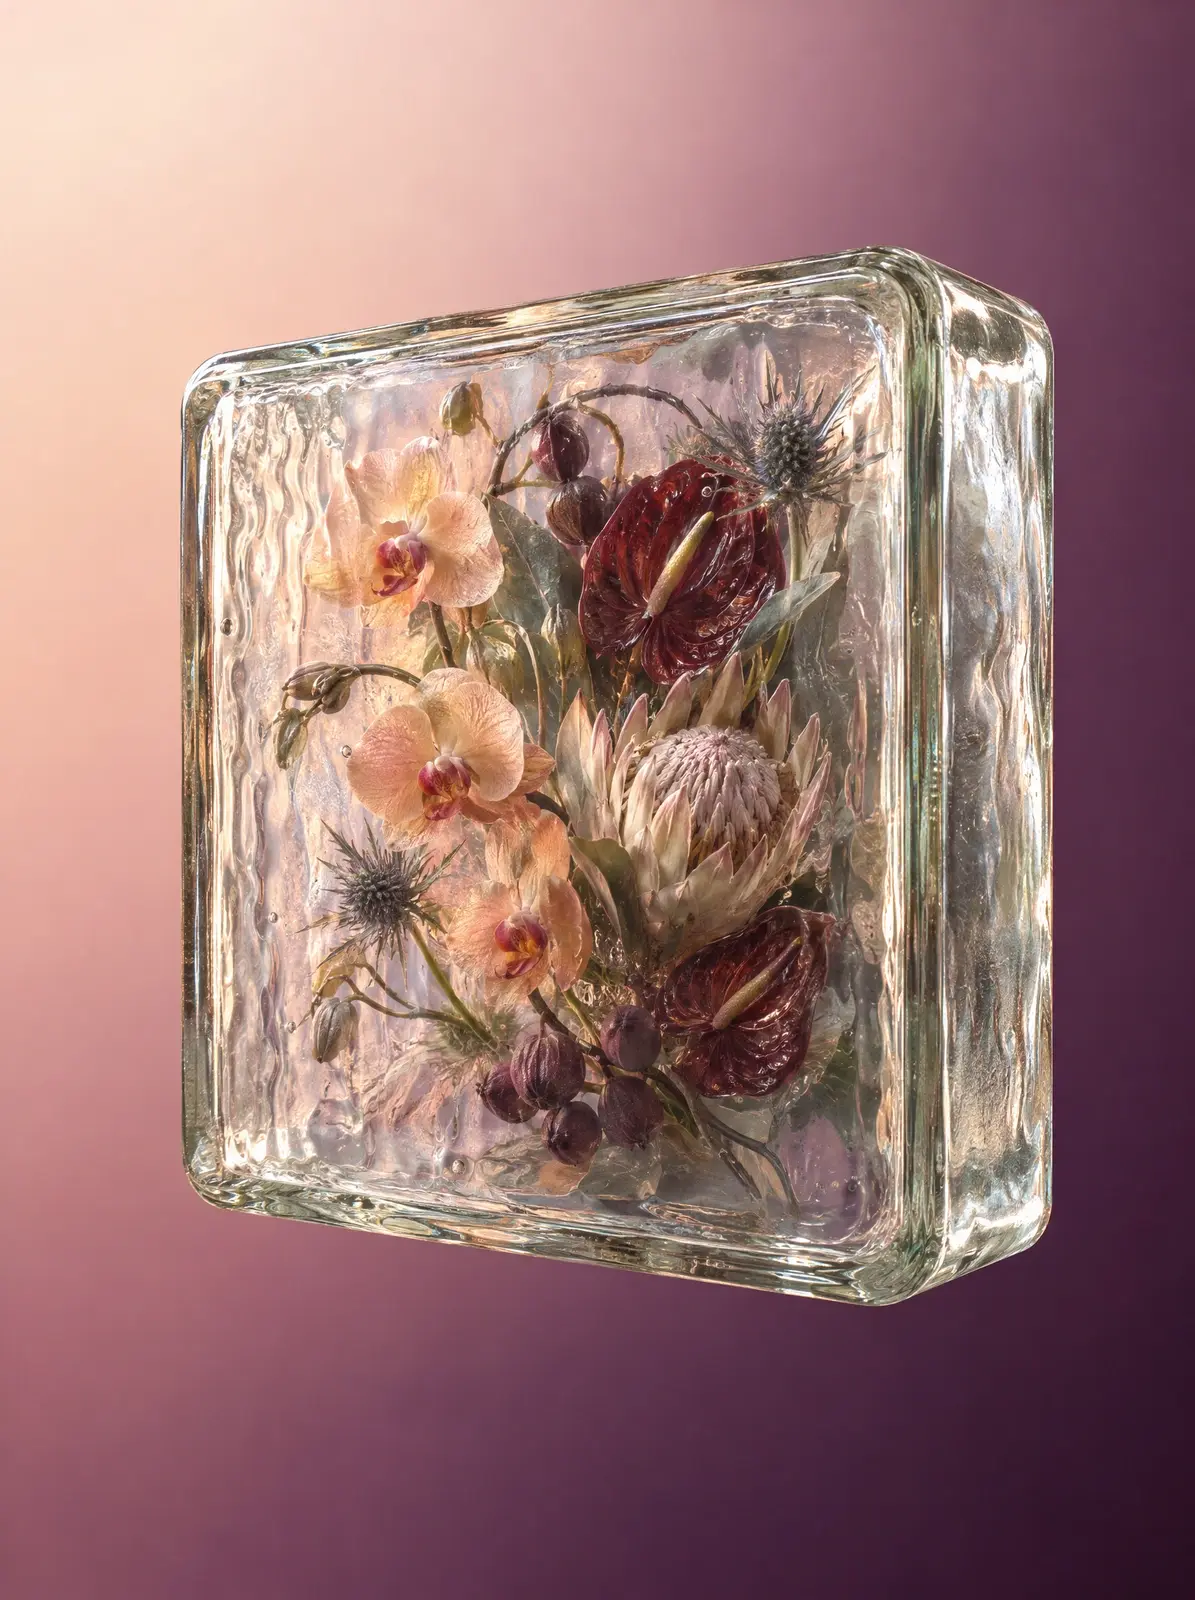
GPT Image 2.5 Flare
Copy
Create a refined surreal art object: a single vintage Soviet architectural glass block floating weightlessly in space, shown at a beautiful elegant three-quarter angle with a sense of air and negative space around it. The object must be clearly recognizable as an authentic Soviet pressed-glass building block, with a thick square form, substantial cast-glass mass, rounded corners, tactile rippled texture, molded relief, slight optical irregularities, and visible material imperfections such as tiny trapped bubbles and subtle waviness. The glass block must feel solid, heavy, and sculptural, yet levitating gracefully in open space. Inside the block, recessed deep within the glass mass and permanently sealed as if embedded during casting, is a highly art-directed botanical sculpture: a compact but expressive asymmetrical floral composition made of pale apricot orchids, ivory protea-like petals, deep burgundy anthuriums, plum seed pods, silver-green foliage, and a few elegant spiky thistle accents. The floral arrangement should feel sophisticated, sculptural, and beautifully composed, with refined internal rhythm, graceful curved stems, intentional negative space, and strong visual balance. The crucial effect is that the viewer sees the flowers through the front layer of textured glass, not directly: the front glass plane must visibly overlap the composition, creating optical separation, watery distortion, refracted contours, localized blur, subtle magnification, internal reflections, and slight bending of petals and stems through the pressed-glass texture, so it is obvious that the glass exists in front of the flowers. The angle should be dynamic and elegant rather than flat, showing both the front face and the thickness of the block, while preserving the readability of the textured glass surface. The object floats freely in space with generous breathing room around it, no support, no floor, and no cast shadow. Background is a perfectly clean seamless luxury gradient with smooth airy transitions from soft blush and pale apricot into dusty mauve and deep plum, with no dirty vignette, no muddy radial texture, and no smoky noise. Sophisticated studio lighting with crisp highlights on the glass, luminous edges, controlled reflections, and premium editorial still-life art direction. Museum-quality contemporary object photography, exquisite glass optics, beautiful levitation, strong composition, realistic material depth, elegant negative space, 8k.
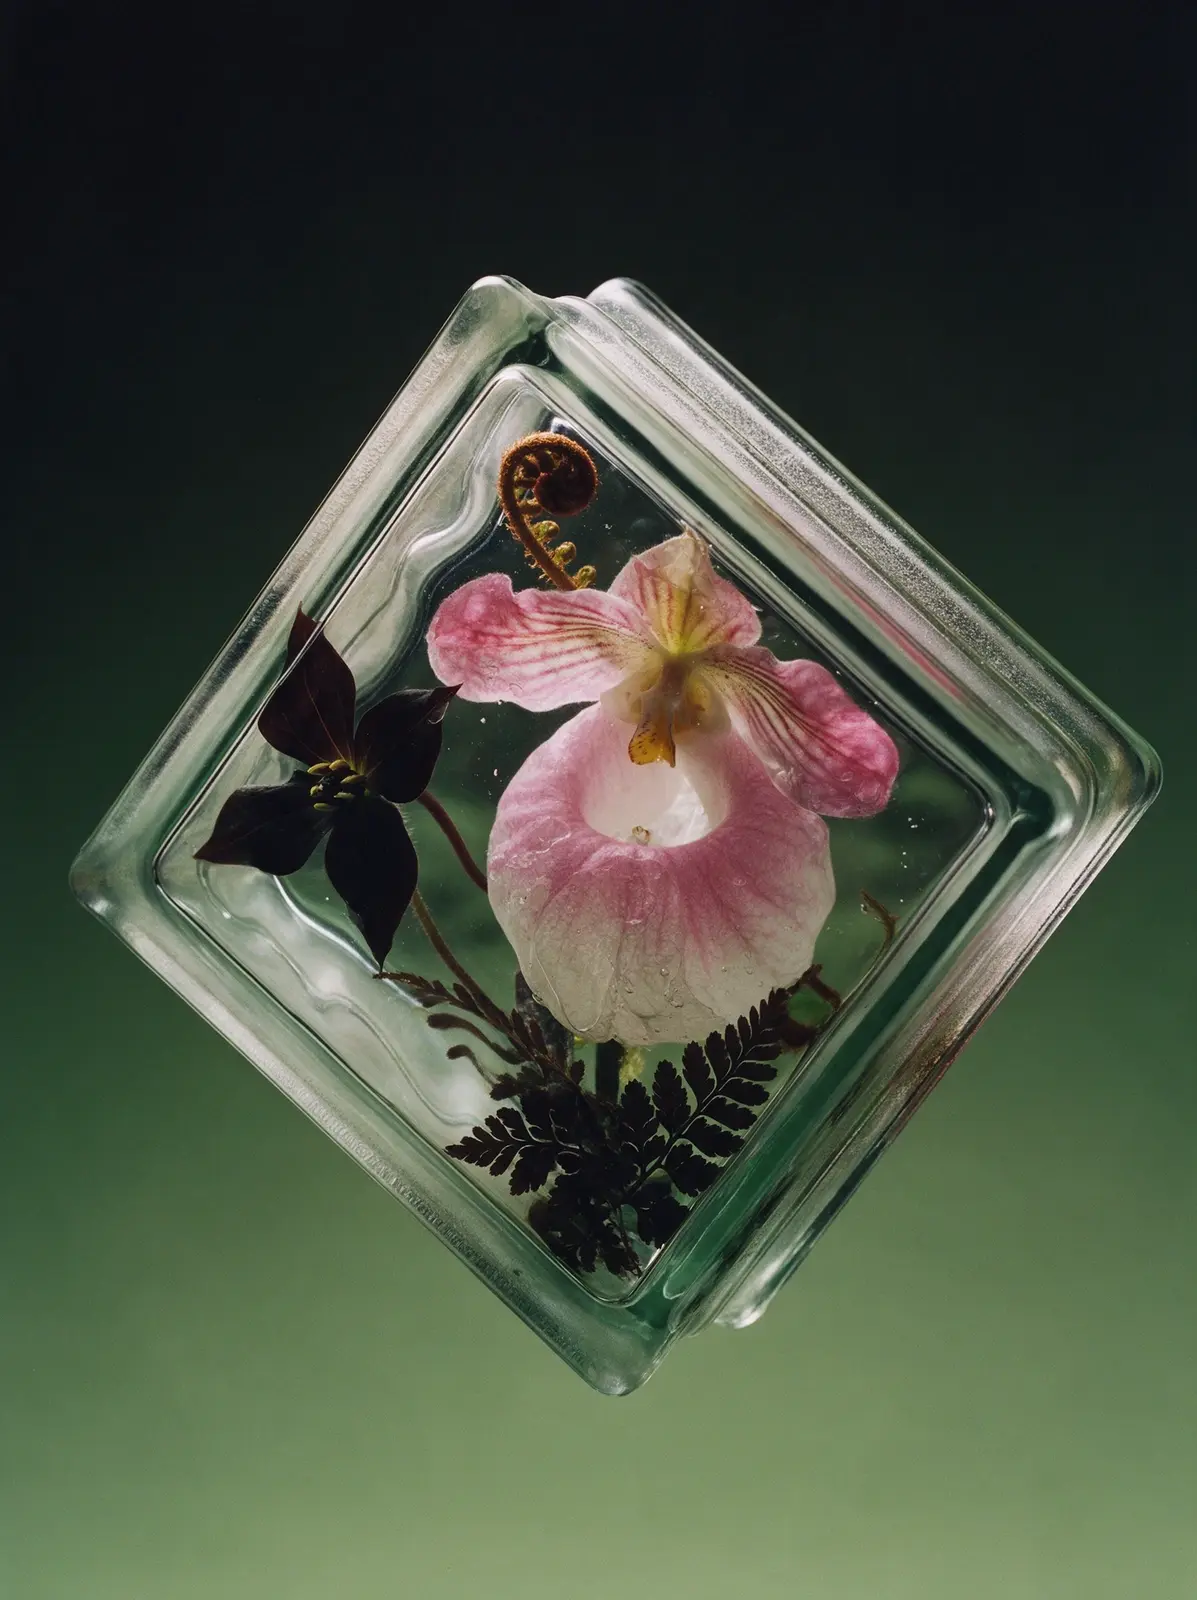
Seedream 5.0 Pro
Copy
Real studio photograph, shot on medium format film. A classic Soviet glass building block hangs weightless in empty space, balanced on one corner like a diamond, its front face turned almost straight to the camera with just a sliver of one narrow side visible. No floor, no surface, no shadow. Exact shape: a square brick about 19 by 19 by 8 centimeters, each square face with a narrow flat raised frame and a small step down into a slightly recessed wavy central field; the narrow sides each with a shallow channel holding a rough frosted matte band and a fine fusion seam; softly rounded corners; solid glass all the way through. The plants are life-size, much bigger than the small brick, so only a close-up fragment of the arrangement fits inside, cut off on every side by the frame: one enormous pink-and-white lady's slipper orchid fills the center with its swollen pouch pressed against the inside of the glass, a velvety near-black trillium cut off by the left corner, a copper fern fiddlehead curling in from the top corner, and dark lacy fern fronds filling the bottom corner. The plants are fused with the glass: where petals touch the inner surface they flatten and turn silvery, tiny bubbles sit right on the petals, the wavy field bends their outlines, and at the step of the frame everything behind is sharply shifted and broken. The thick edges glow green and plum with the colors trapped inside, showing stretched reflections of the orchid. Faint smoky sea-green glass. Background: smooth seamless gradient from near-black at the top to muted moss green at the bottom. Strong backlight through the glass, soft side light. Not a 3D render, not CGI.
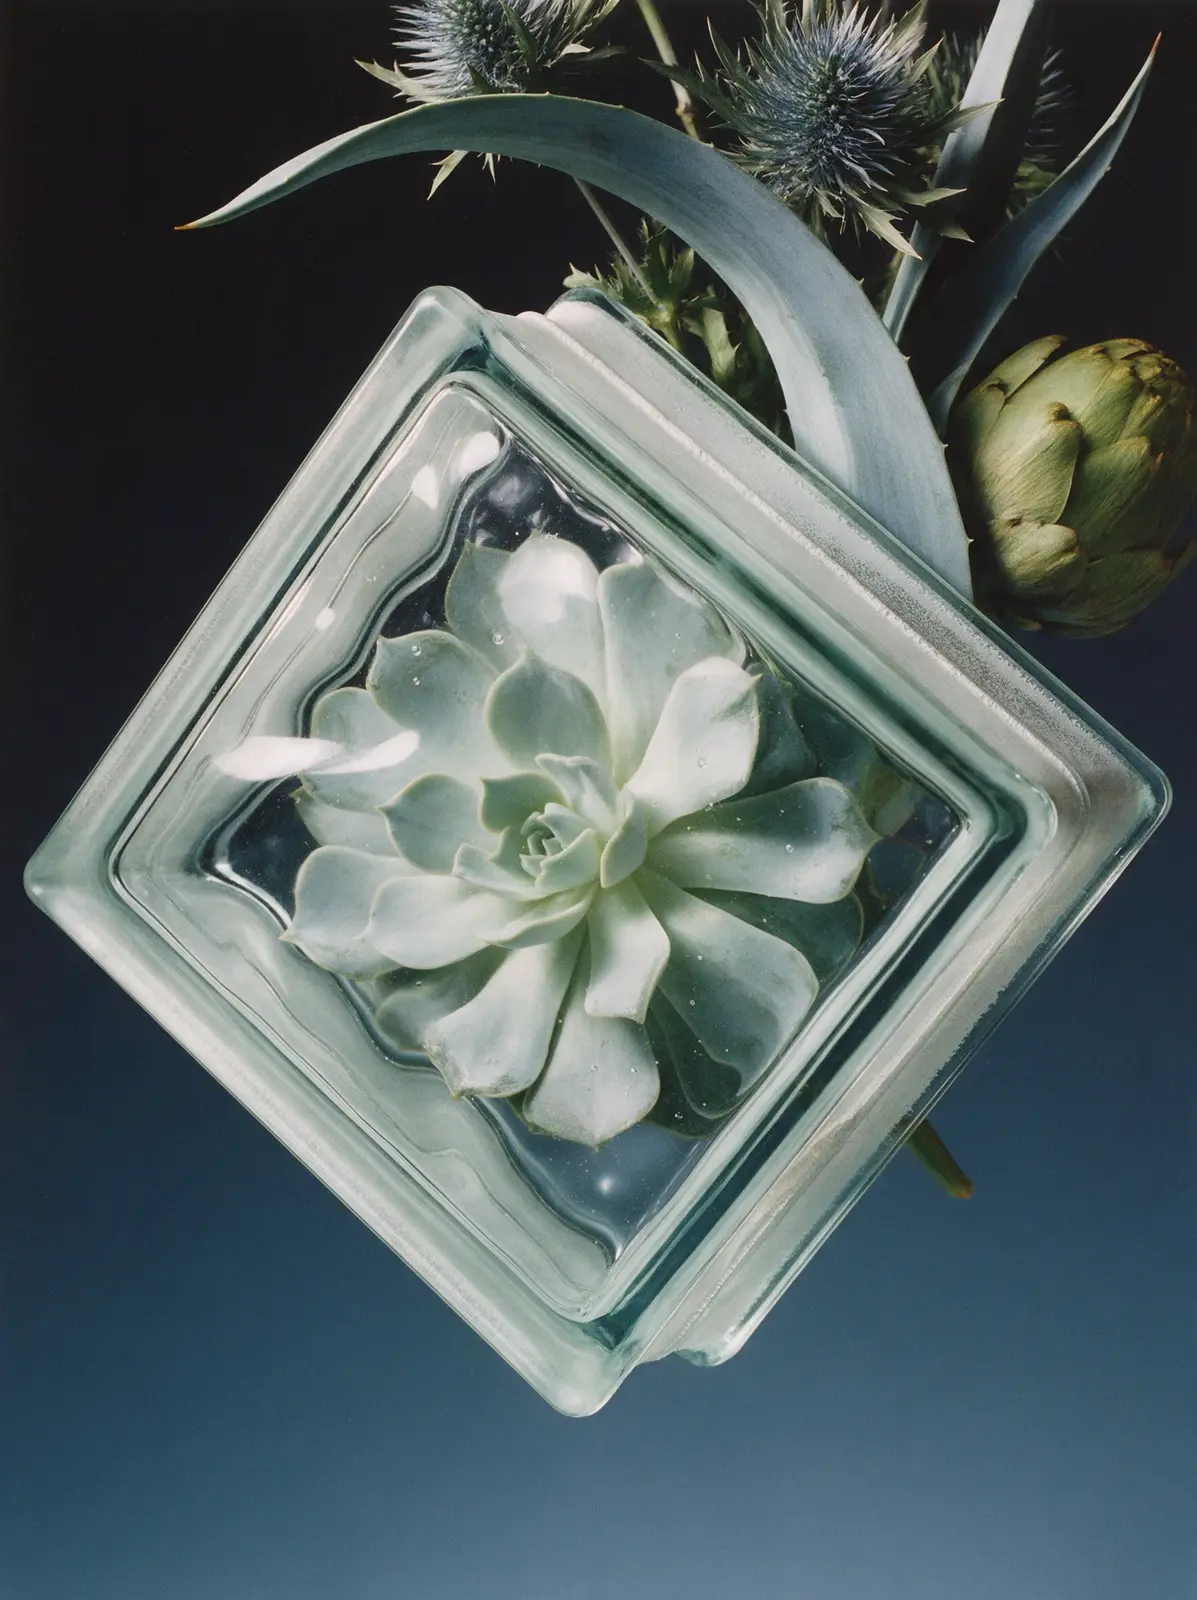
Seedream 5.0 Pro
Copy
Real studio photograph, shot on medium format film. A classic Soviet glass building block hangs weightless in empty space, seen from above as it tumbles forward: its top narrow side with the frosted mortar channel is visible and the front face tips toward the camera at a sharp angle. No floor, no surface, no shadow. Exact shape: a square brick about 19 by 19 by 8 centimeters, each square face with a narrow flat raised frame and a small step down into a slightly recessed wavy central field; the narrow sides each with a shallow channel holding a rough frosted matte band and a fine fusion seam; softly rounded corners; solid glass all the way through. The plants are life-size, much bigger than the small brick, so only a close-up fragment of the arrangement fits inside, cut off on every side by the frame: one enormous pale silvery-mint echeveria rosette fills half of the face, its fleshy leaves pressed flat against the inside of the glass, a long curved blue-grey agave leaf sweeping across the whole block and out of the frame, spiky steel-blue sea holly heads cut off at the top edge, and a green artichoke pushing in from one corner. The plants are fused with the glass: where leaves touch the inner surface they flatten and turn silvery, tiny bubbles sit right on the leaves, the wavy field bends their outlines, and at the step of the frame everything behind is sharply shifted and broken. The thick edges glow mint and steel blue with the colors trapped inside, showing stretched reflections of the rosette. Faint icy aqua glass. Background: smooth seamless gradient from near-black at the top to deep steel blue at the bottom. Strong backlight through the glass, soft side light. Not a 3D render, not CGI.
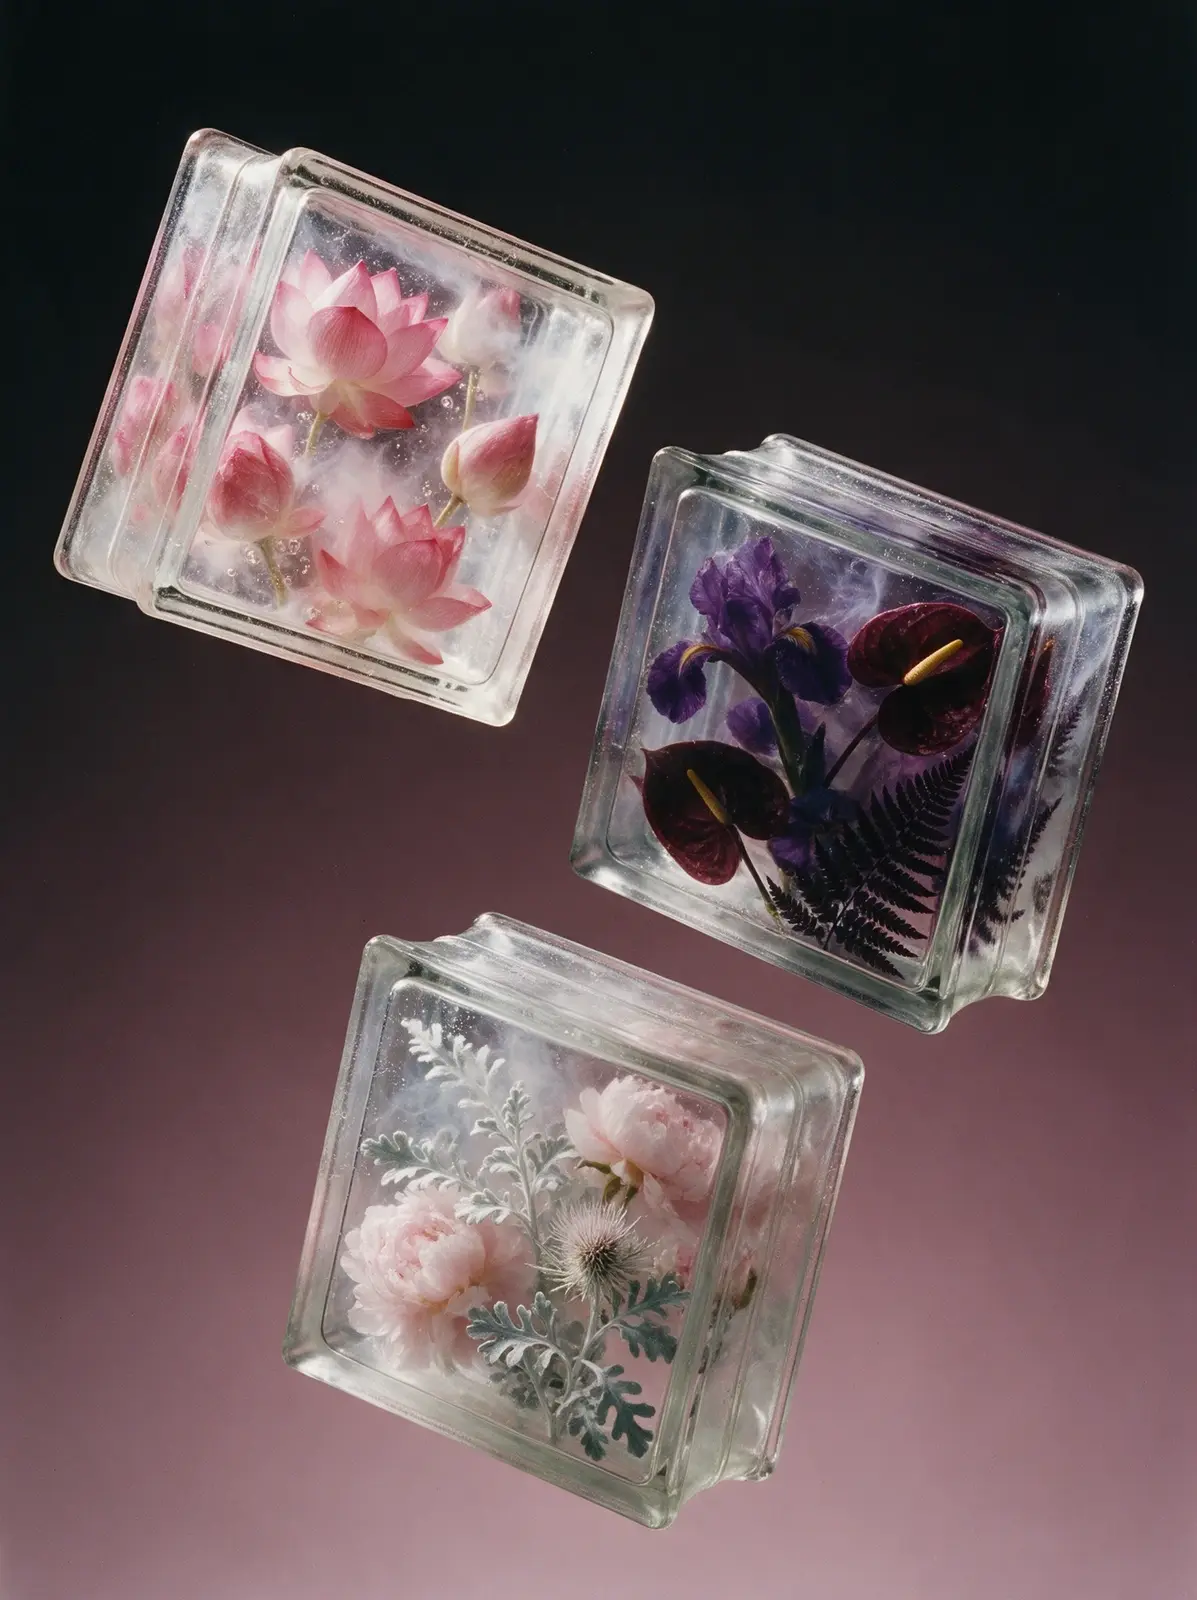
Seedream 5.0 Pro
Copy
Real studio photograph, shot on medium format film. Three classic Soviet pressed-glass building blocks from the 1970s float weightlessly in open space, arranged in a refined asymmetrical composition with generous air between them, each block tilted differently at a beautiful three-quarter hero angle so their front face, one narrow side and a hint of the top edge are visible. No floor, no surface, no cast shadows. Each block has the exact recognizable shape of a square Soviet glass brick, approximately 19 by 19 by 8 centimeters, with a narrow raised flat rim around the face, a slight step down into a recessed central field, shallow channels along the narrow sides with a frosted matte band and visible fusion seam, softly rounded corners and thick heavy mass-produced pressed glass. The glass is solid all the way through, never hollow, with flowers fully cast into the glass mass so glass touches every petal and stem. The three blocks contain different but visually harmonious floral inclusions: one filled with layered pink lotus blossoms and lotus buds, one with deep violet iris, burgundy anthurium and dark fern, and one with pale pink peonies, silvery dusty miller and a pale thistle. The flowers are dense and sculptural, filling each block edge to edge and front to back, with no empty gaps. The glass is visibly present in front of every flower, with faint milky veils, suspended bubbles, casting streaks, watery waviness and broken reflections in the thick edges. The deepest layers sink into soft murky depth. Background: a seamless clean gradient from near-black at the top to dusty mauve and muted rose toward the bottom. Strong transmitted backlight makes the flowers glow softly from within, with subtle side light along the glass edges. Not CGI, not 3D render.
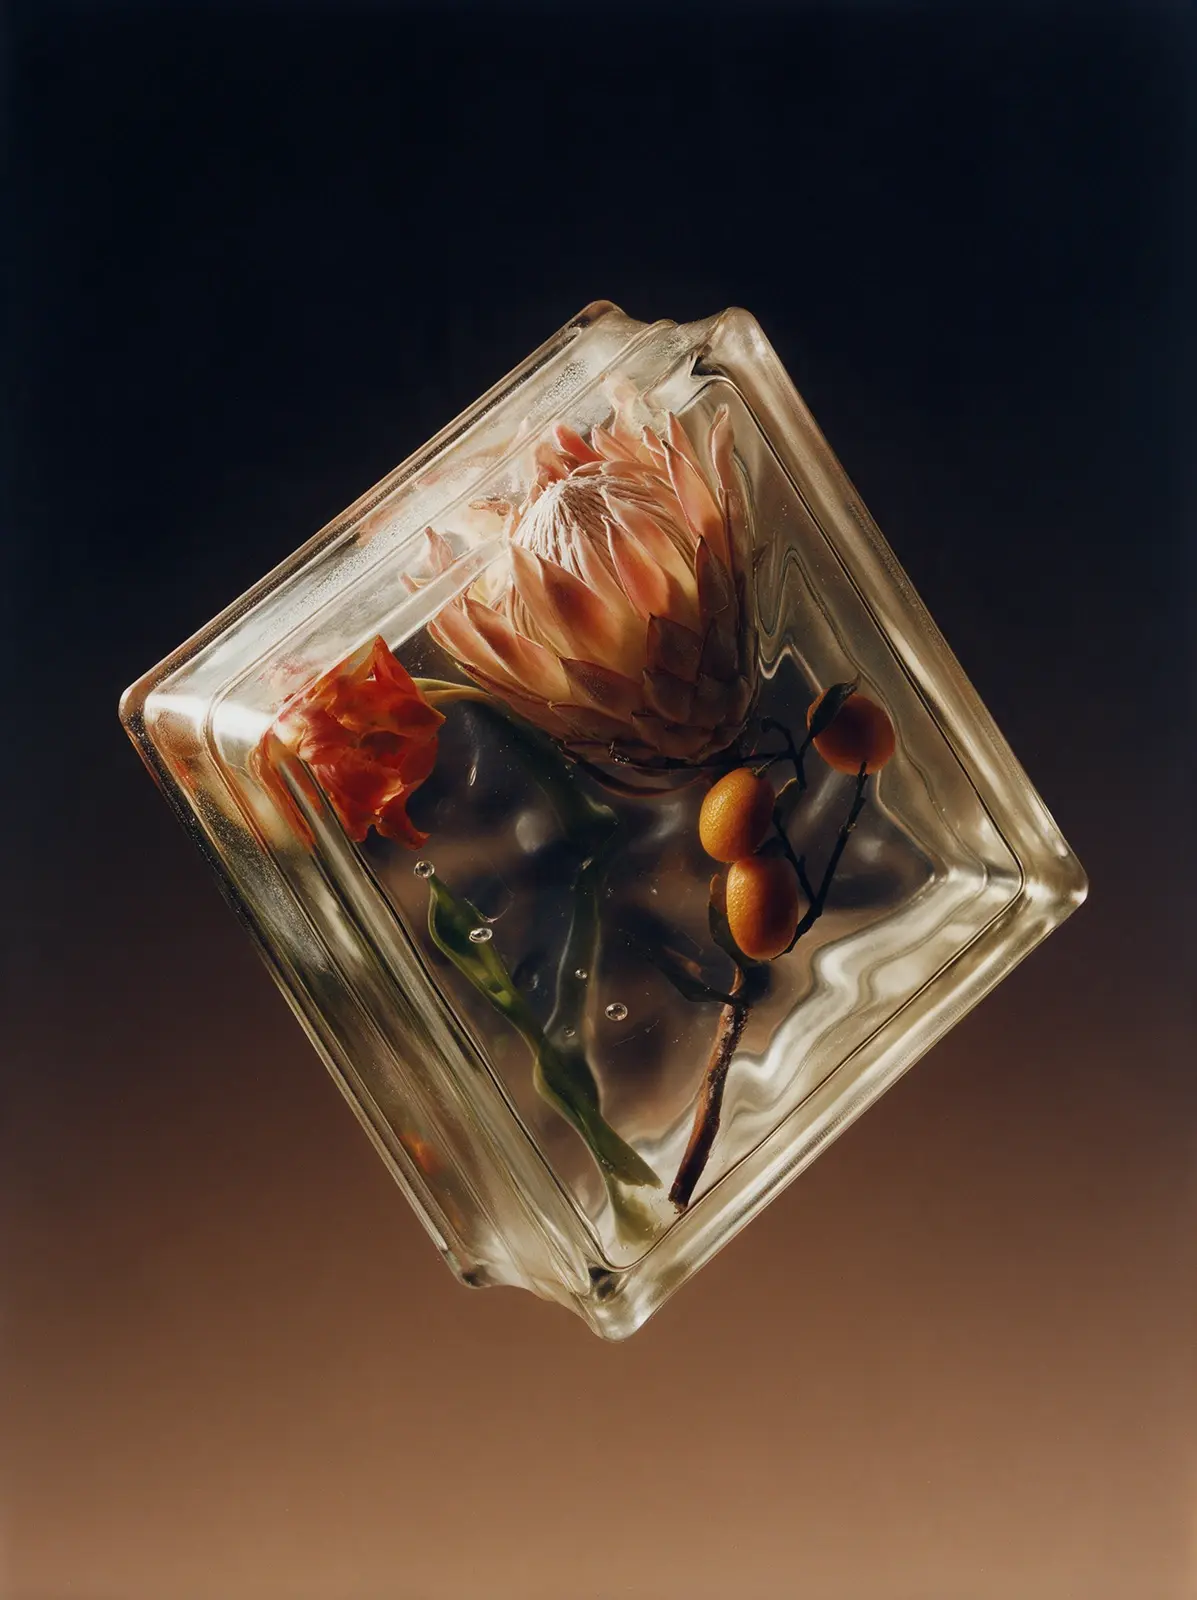
Seedream 5.0 Pro
Copy
Real studio photograph, shot on medium format film. A classic Soviet glass building block hangs weightless in empty space, seen from above as it tumbles forward: its top narrow side with the frosted mortar channel is visible and the front face tips toward the camera at a sharp angle. No floor, no surface, no shadow. Exact shape: a square brick about 19 by 19 by 8 centimeters, each square face with a narrow flat raised frame and a small step down into a slightly recessed wavy central field; the narrow sides each with a shallow channel holding a rough frosted matte band and a fine fusion seam; softly rounded corners. Solid glass all the way through. Everything is sealed completely inside the glass. The block has a clean glass silhouette with nothing sticking out of it, and the space around it is pure empty background. Inside, a minimal graphic composition of only a few elements: one large apricot king protea placed off-center toward the upper corner, so big that its bracts press against the inner edge of the frame; one flamed orange parrot tulip leaning in from the opposite side; and a single thin branch with three glossy kumquats crossing the open glass diagonally. The rest of the block is open glass. The protea's front bracts and the tulip's petals are pressed flat against the inner surface of the glass, spread and slightly squashed, with soft silvery sheen and tiny bubbles where they touch. The wavy front field bends every outline as if under water. In the open glass, the background behind is visibly warped by the waves, and a few round bubbles float. At the step of the frame everything behind is sharply shifted and broken. The deeper parts turn soft and dark. The thick edges carry stretched amber reflections of the protea. Faint warm amber glass. No smoke, no mist. Background: smooth seamless gradient from near-black at the top to warm ochre at the bottom. Strong backlight through the glass, soft side light. Not a 3D render, not CGI.
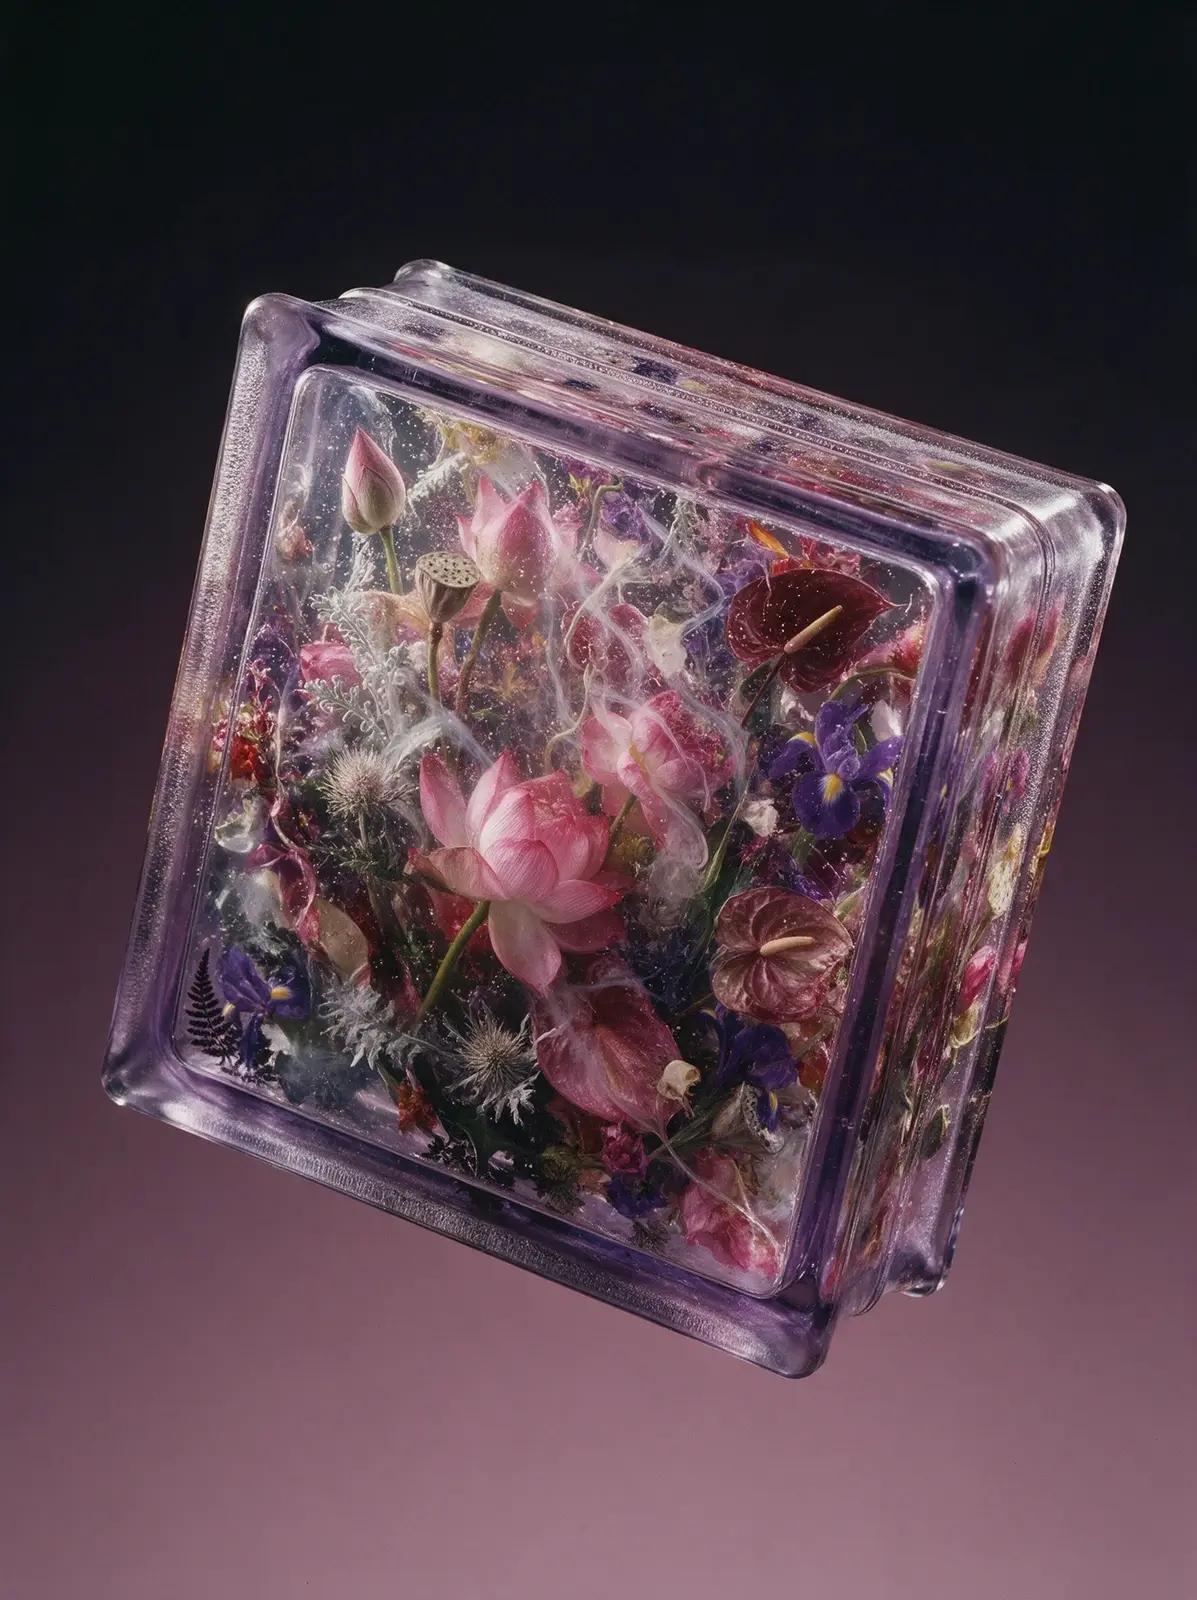
Seedream 5.0 Pro
Copy
Real studio photograph, shot on medium format film. A classic Soviet glass building block from the 1970s hangs weightless in empty space, dramatically tilted on two axes as if tossed and frozen mid-air, its front face, one narrow side and a top edge visible. No floor, no surface, no shadow anywhere. Exact recognizable shape: a square brick about twice as wide as it is thick, like 19 by 19 by 8 centimeters. Each square face has a narrow flat raised frame along its edges, then a small step down into a slightly recessed central field. The four narrow sides each have a shallow channel along their middle with a rough frosted matte band and a fine fusion seam inside it. Softly rounded corners, thick heavy edges, mass-produced pressed glass. The block is solid glass all the way through, no hollow inside. It is packed completely with fresh, juicy, vividly colored flowers cast into the glass, so densely that no background and no empty dark gaps show through the front face — a solid wall of blooms, leaves and stems from frame to frame and from the front face deep to the back, cropped on every side: large pink lotus flowers, lotus buds, dried lotus seed pods, curling lotus leaves, deep violet irises, burgundy anthurium, pale thistles, silvery dusty miller and dark ferns, overlapping and tangled at different depths and angles. The glass is clearly in front of every flower, including the closest ones: faint milky veils, swirling cords and streaks from the casting, and thousands of tiny bubbles suspended throughout, hanging in front of the petals at every depth. The wavy front field makes everything sway and wobble as if under water, even the petals touching the glass. At the step between the frame and the recessed field, the flowers behind are sharply displaced, broken and compressed in a band running all around the face. The deepest layers dissolve into soft murk. The thick edges mirror the flowers in stretched fragments. The glass has a faint lavender tint deepening to violet in the edges. Background: smooth seamless gradient from near-black at the top to dusty mauve at the bottom, pure empty color. Strong backlight shining through the glass so the flowers glow from within, plus a soft side light along the edges. Not a 3D render, not CGI.
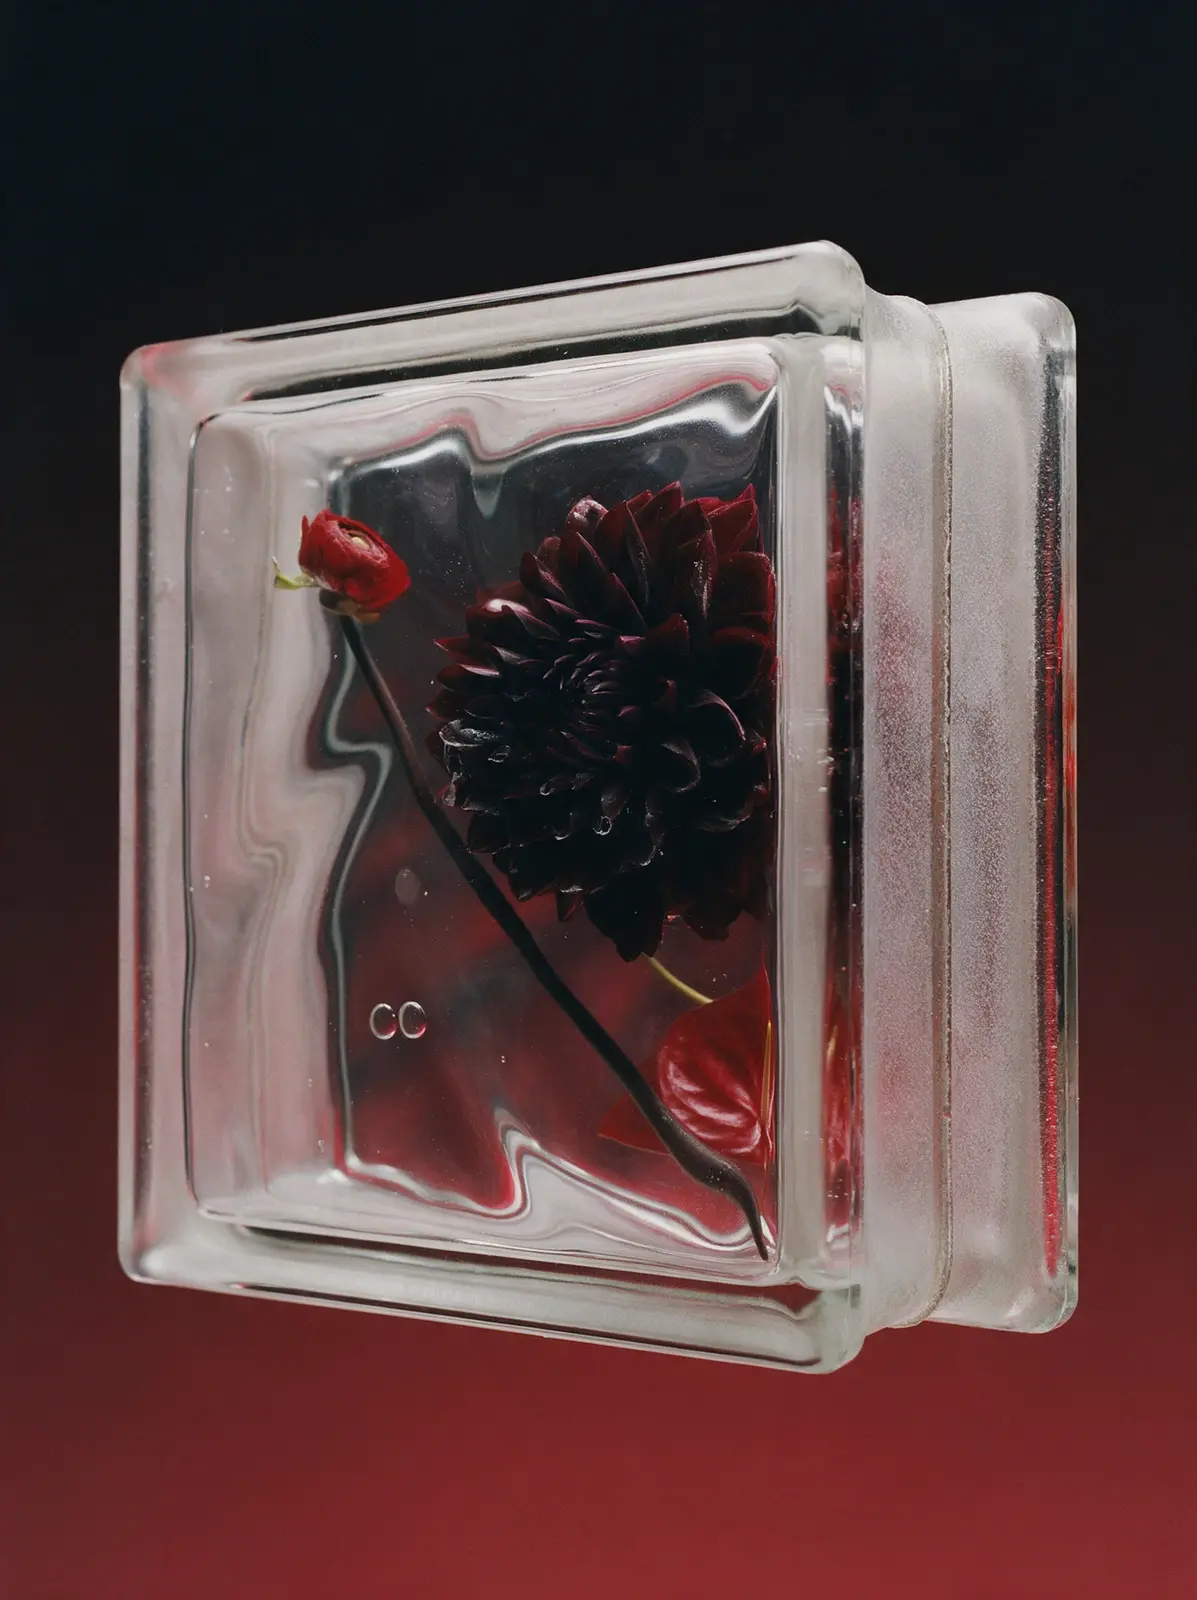
Seedream 5.0 Pro
Copy
Real studio photograph, shot on medium format film. A classic Soviet glass building block hangs weightless in empty space, turned sharply so the camera sees it almost edge-on from the right: the thick narrow side with its frosted mortar channel and seam fills the foreground and the front face recedes in steep perspective. No floor, no surface, no shadow. Exact shape: a square brick about 19 by 19 by 8 centimeters, each square face with a narrow flat raised frame and a small step down into a slightly recessed wavy central field; the narrow sides each with a shallow channel holding a rough frosted matte band and a fine fusion seam; softly rounded corners. Solid glass all the way through. Everything is sealed completely inside the glass. The block has a clean glass silhouette with nothing sticking out of it, and the space around it is pure empty background. Inside, a minimal graphic composition of only a few elements: one large velvety burgundy-black dahlia placed off-center, so big that its petals press against the inner edge of the frame on one side; a single dark stem with one scarlet ranunculus bud crossing diagonally; and one glossy red anthurium leaf deep in the back. The rest of the block is open glass. The dahlia's front petals are pressed flat against the inner surface of the glass, spread and slightly squashed, with soft silvery sheen and tiny bubbles where they touch. The wavy front field bends every outline as if under water. In the open glass, the background behind is visibly warped by the waves, and a few round bubbles float. At the step of the frame everything behind is sharply shifted and broken. The deeper parts turn soft and dark. The thick edges carry stretched red reflections of the dahlia. Faint rose-tinted glass. No smoke, no mist. Background: smooth seamless gradient from near-black at the top to deep cherry red at the bottom. Strong backlight through the glass, soft side light. Not a 3D render, not CGI.
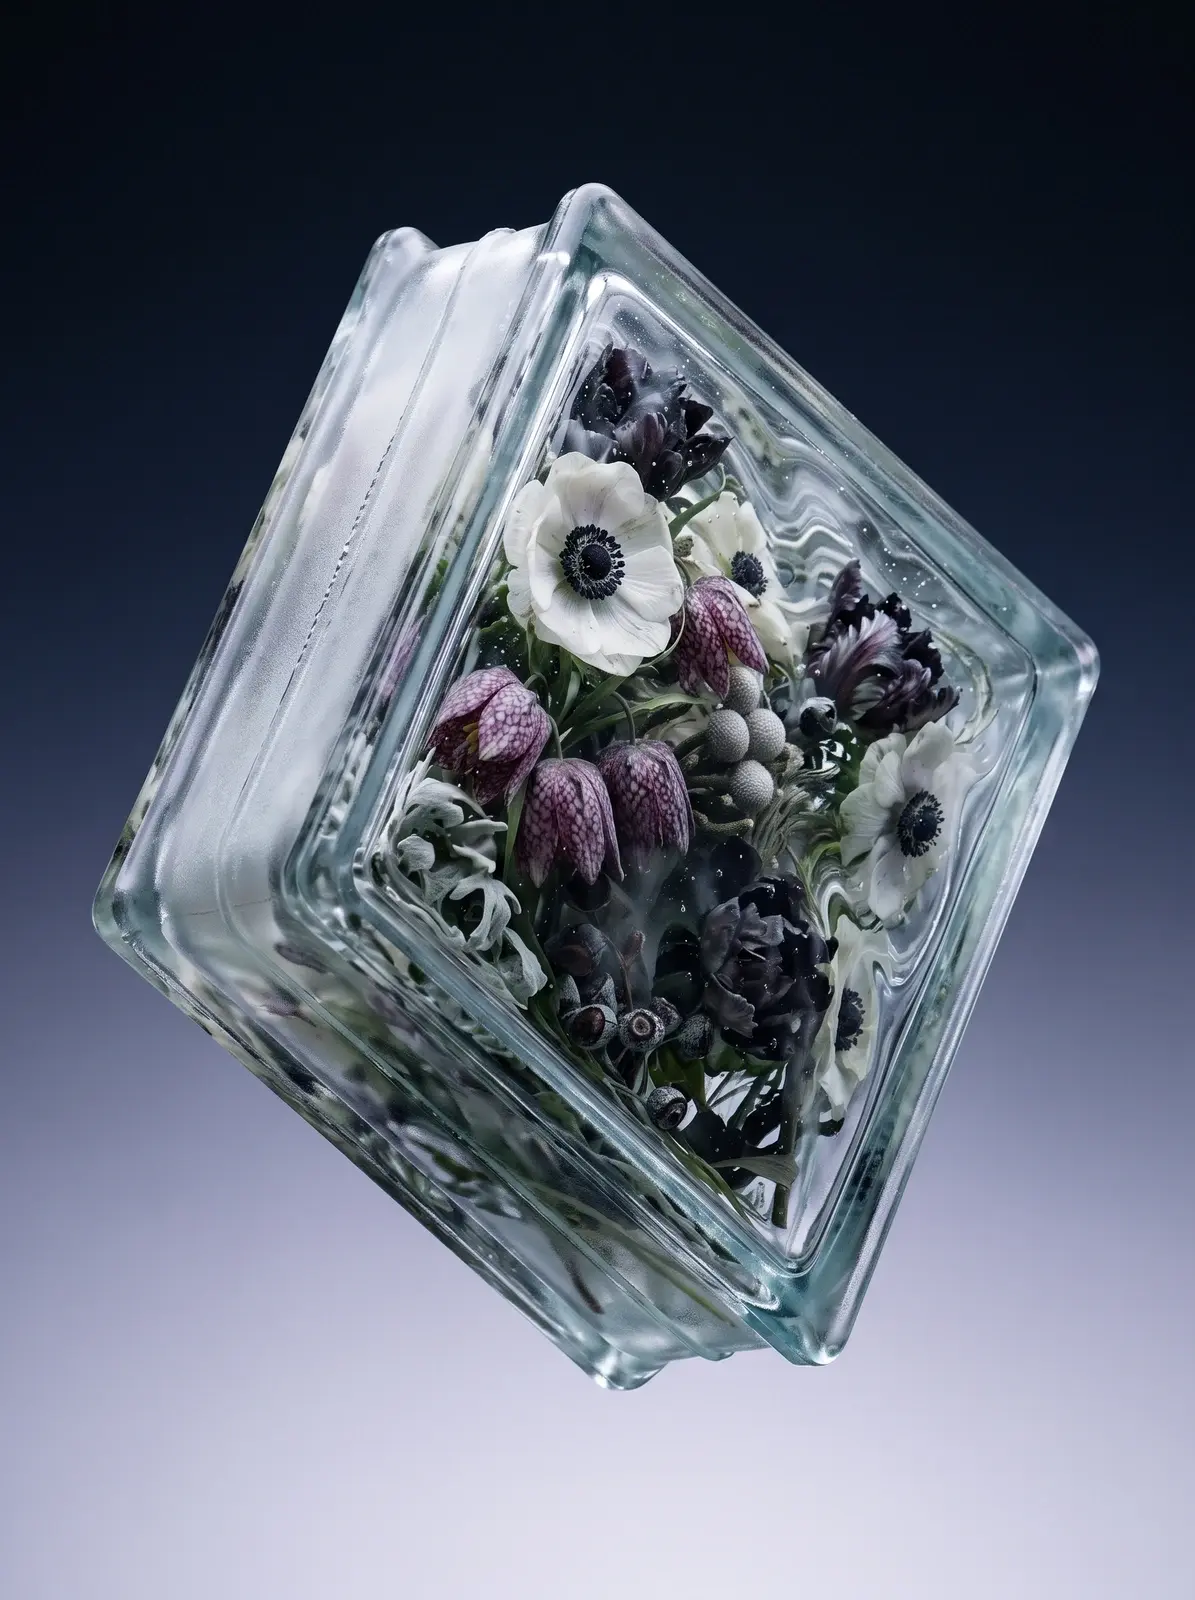
Nano Banana 2.1
Copy
Real studio photograph, shot on medium format film. A classic Soviet glass building block from the 1970s hangs weightless in empty space, tilted steeply onto one corner with its front face and one narrow side visible. No floor, no surface, no shadow anywhere. Exact recognizable shape: a square brick about twice as wide as it is thick, like 19 by 19 by 8 centimeters. Each square face has a narrow flat raised frame along its edges, then a small step down into a slightly recessed central field. The four narrow sides each have a shallow channel along their middle with a rough frosted matte band and a fine fusion seam inside it. Softly rounded corners, thick heavy edges, mass-produced pressed glass. The block is solid glass all the way through, no hollow inside. It is packed completely with flowers cast into the glass, so densely that no background shows through the front face at all — a solid wall of blooms, leaves and stems from frame to frame and from the front face deep to the back, cropped on every side: white anemones with black centers, checkered purple fritillaria bells, feathery near-black parrot tulips, silver brunia balls, dark eucalyptus seeds, dusty miller and fine silvery grasses, overlapping and tangled. The glass is clearly in front of the flowers: it is not perfectly clear but has faint milky veils, swirling cords and streaks from the casting, and thousands of tiny bubbles suspended throughout, hanging in front of the petals at every depth. The wavy front field makes everything sway and wobble as if under water. At the step between the frame and the recessed field, the flowers behind are sharply displaced, broken and compressed in a band running all around the face. The flowers look softened and slightly faded, seen through several centimeters of glass, with the deepest layers dissolving into dark murk. The thick edges mirror the flowers in stretched fragments. The glass is clear with a cold silvery tint in the edges. Background: smooth seamless gradient from near-black midnight blue at the top to frosty silvery lilac at the bottom, pure empty color. Dramatic backlight and side light passing through the glass. Not a 3D render, not CGI.
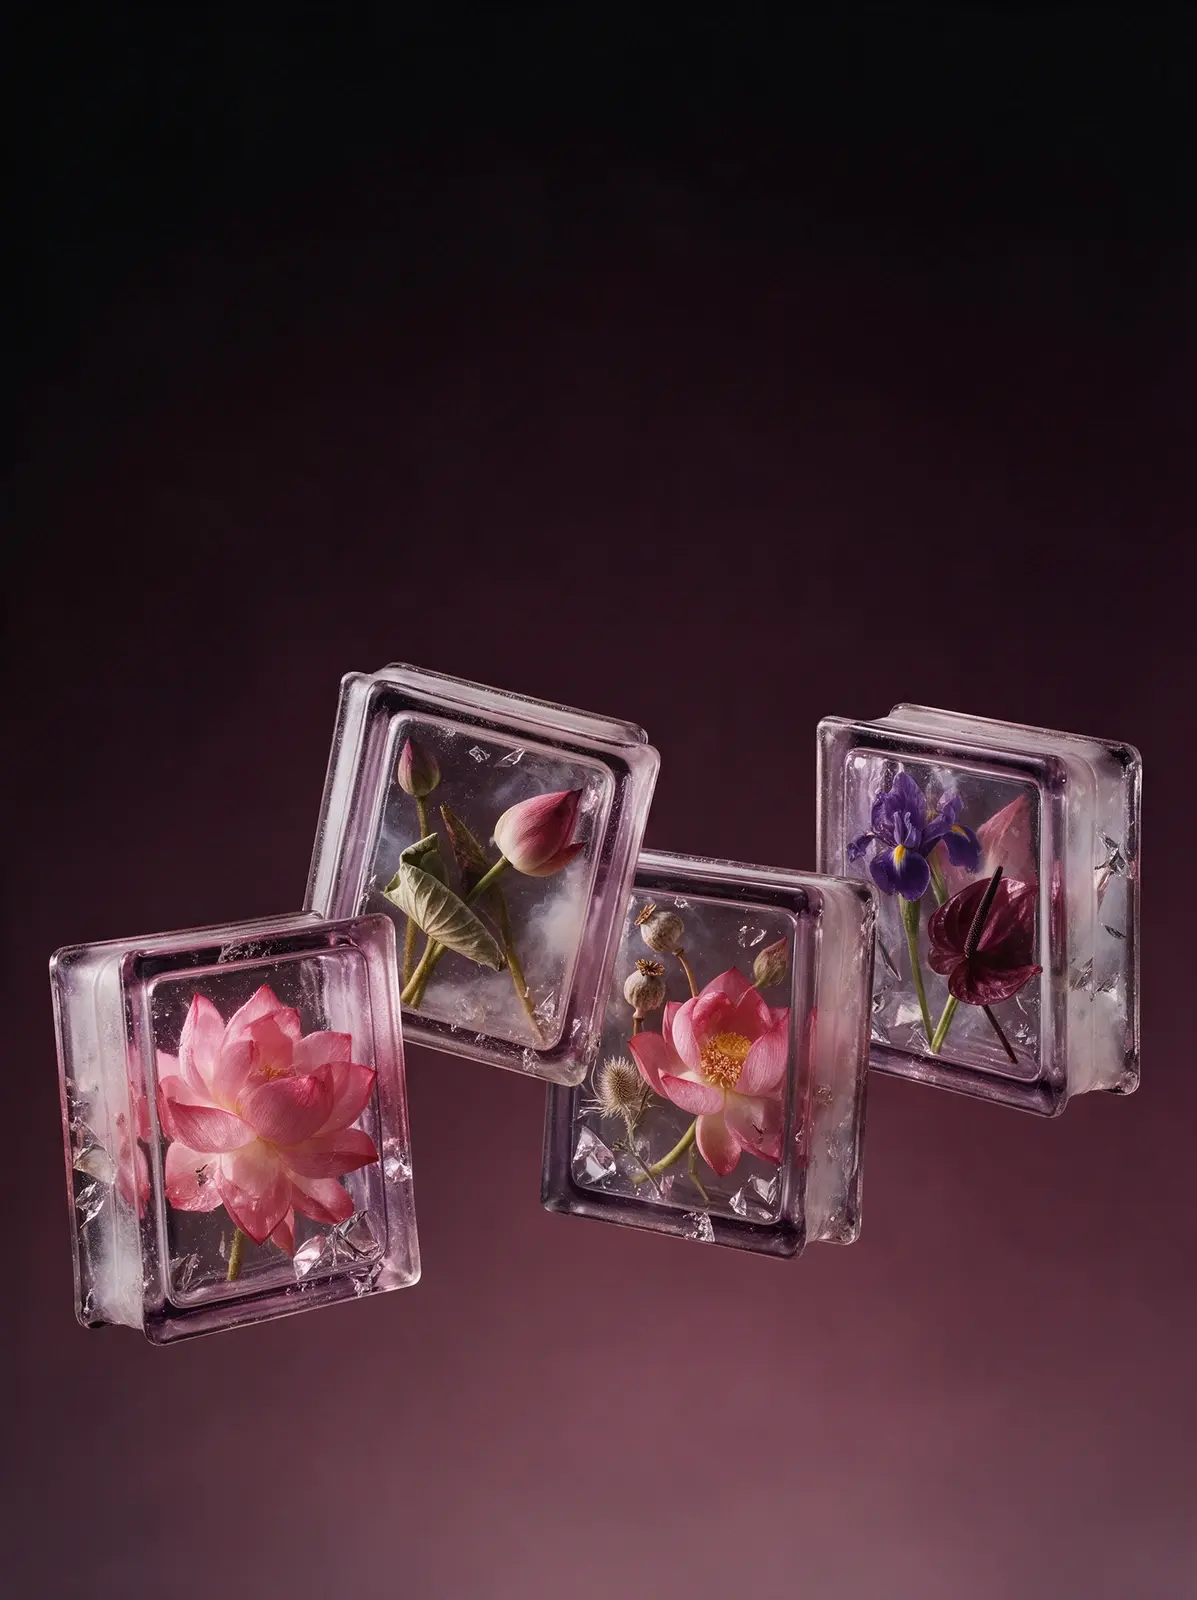
Seedream 5.0 Pro
Copy
Real studio photograph, shot on medium format film. Four levitating Soviet pressed-glass blocks float in a luxurious editorial composition with strong air and elegant spacing, arranged loosely in an arc with varied heights and subtle differences in rotation, all captured from beautiful three-quarter hero angles. No floor, no pedestal, no shadow. Each block is a classic square Soviet glass brick with recognizable raised rim, recessed central field, thick rounded edges, frosted side seams and faint lavender tint deepening in the edges. The glass is monolithic and solid through the entire volume. The series is lotus-led but varied: one block features a huge open pink lotus pressed close to the front field, one contains lotus buds and a curled lotus leaf, one mixes lotus with a dried lotus seed pod and pale thistle, and one pairs lotus with a deep violet iris and burgundy anthurium. Each composition is asymmetrical, layered and dense, with stems and petals crossing in depth. The glass is clearly in front of the flowers everywhere, including the center, with soft milky veils, optical murk, tiny bubbles, casting swirls and broken mirrored fragments along the thick edges. Background: an immaculate seamless gradient from near-black aubergine at the top to deep plum and smoky mauve toward the bottom. Dramatic backlight makes the pink lotus petals glow from within the dense glass. Not a render.
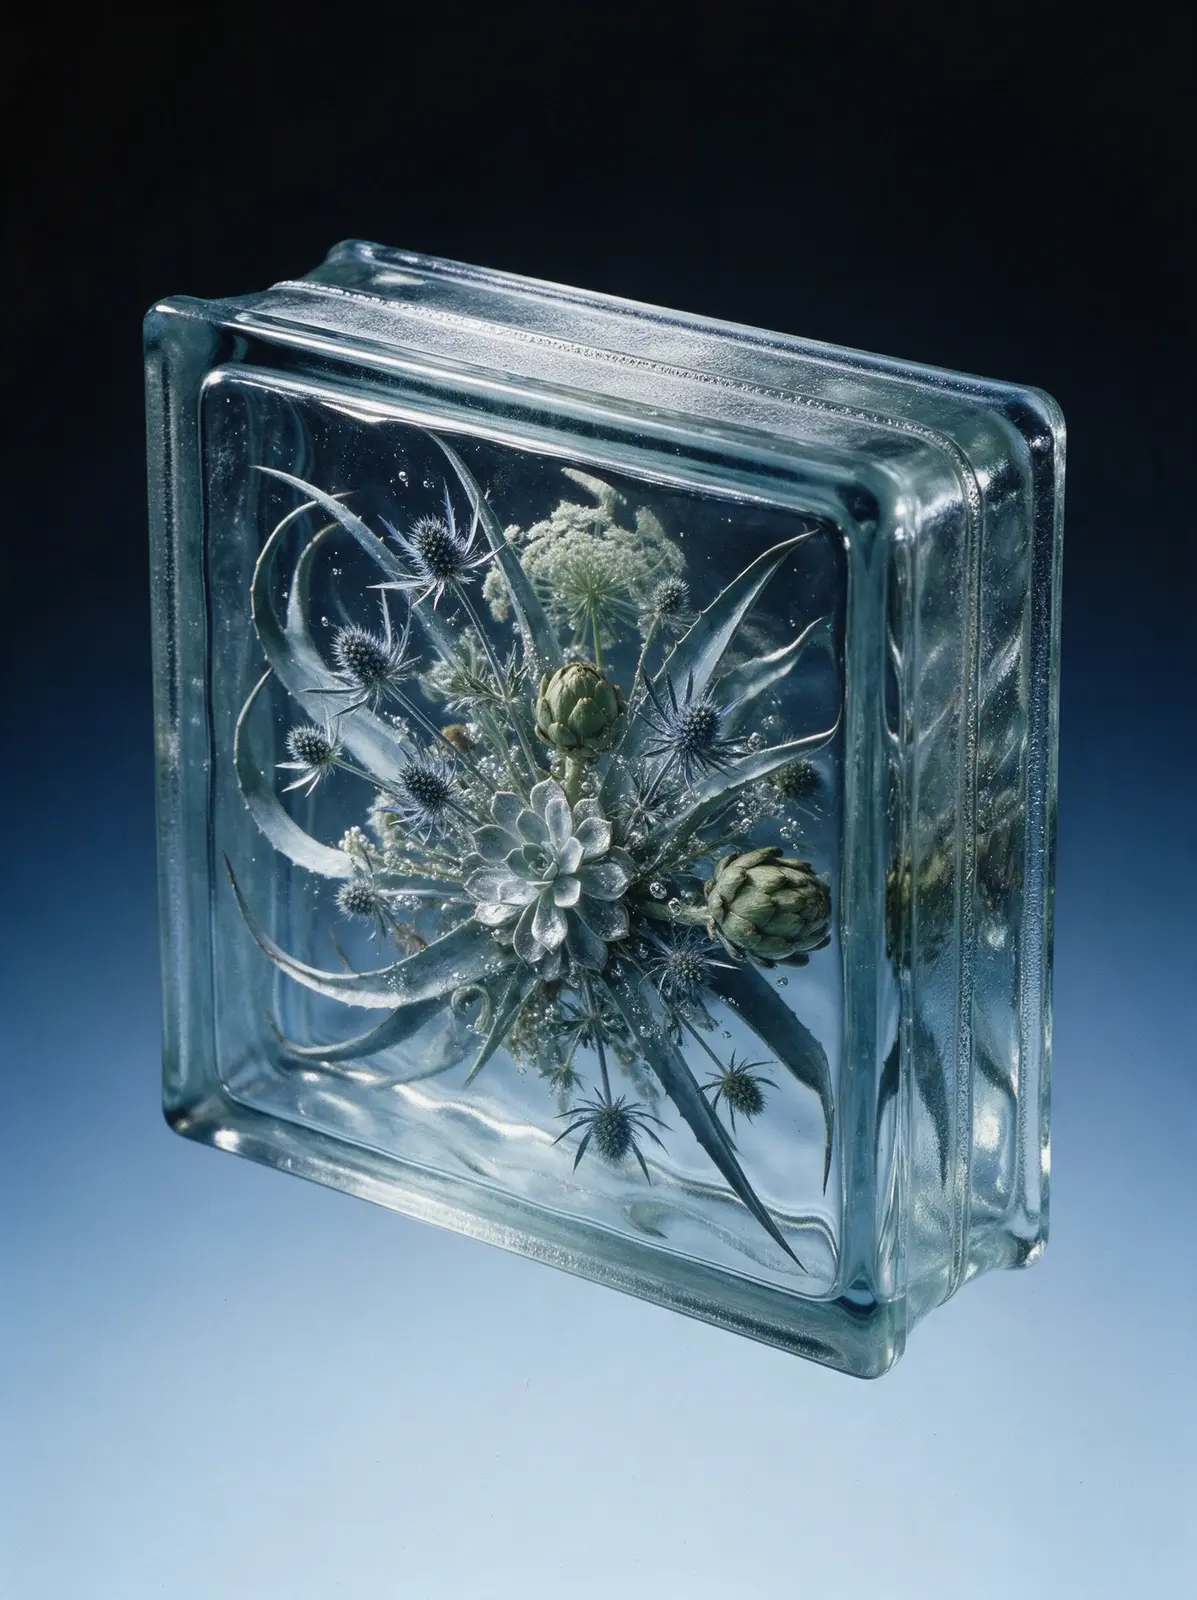
Seedream 5.0 Pro
Copy
Real studio photograph, shot on medium format film. A classic Soviet glass building block from the 1970s hangs weightless in empty space, tilted at a three-quarter angle with its front face and one narrow side visible. There is no floor, no ground, no surface anywhere and no shadow anywhere. Its exact recognizable shape: a square brick about twice as wide as it is thick, like 19 by 19 by 8 centimeters. Each square face has a narrow flat raised frame along its edges, then a small step down into a slightly recessed central field. The four narrow sides each have a shallow channel running along their middle with a rough frosted matte band and a fine fusion seam inside it, like the groove that holds the mortar. Softly rounded corners, thick heavy edges, typical mass-produced pressed glass. The block is SOLID glass all the way through, with no hollow, no inner chamber, no inner walls and no back panel. The plants are cast directly into the glass mass, the way flowers are frozen inside a solid block of ice: glass touches every petal, thin silvery films of trapped air coat the surfaces, and clusters of tiny bubbles cling to stems and edges. The recessed front field is wavy, so everything inside sways as if seen under water: outlines wobble, petals stretch and squeeze, stems kink and jump sideways. Nothing inside is perfectly sharp; the deeper plants turn soft, dark and murky in the thickness of the glass. The thick edges mirror the arrangement in stretched, broken reflections. The glass has a faint icy aqua tint that deepens to steel blue in the edges. Composition inside: an explosive radial arrangement bursting from the center: spiky steel-blue sea holly heads flying outward in all directions on thin stems, a pale silvery echeveria rosette pressed against the front face as the calm center, two small green artichokes at different depths, a lacy white cloud of Queen Anne's lace sinking into the back, and long curved blue-grey agave leaves sweeping around the edges like a frame, cropped by the walls. Background: smooth seamless gradient from near-black at the top to icy powder blue at the bottom, pure empty color with no floor. Dramatic backlight and side light passing through the glass, the plants glowing softly from within. Not a 3D render, not CGI.
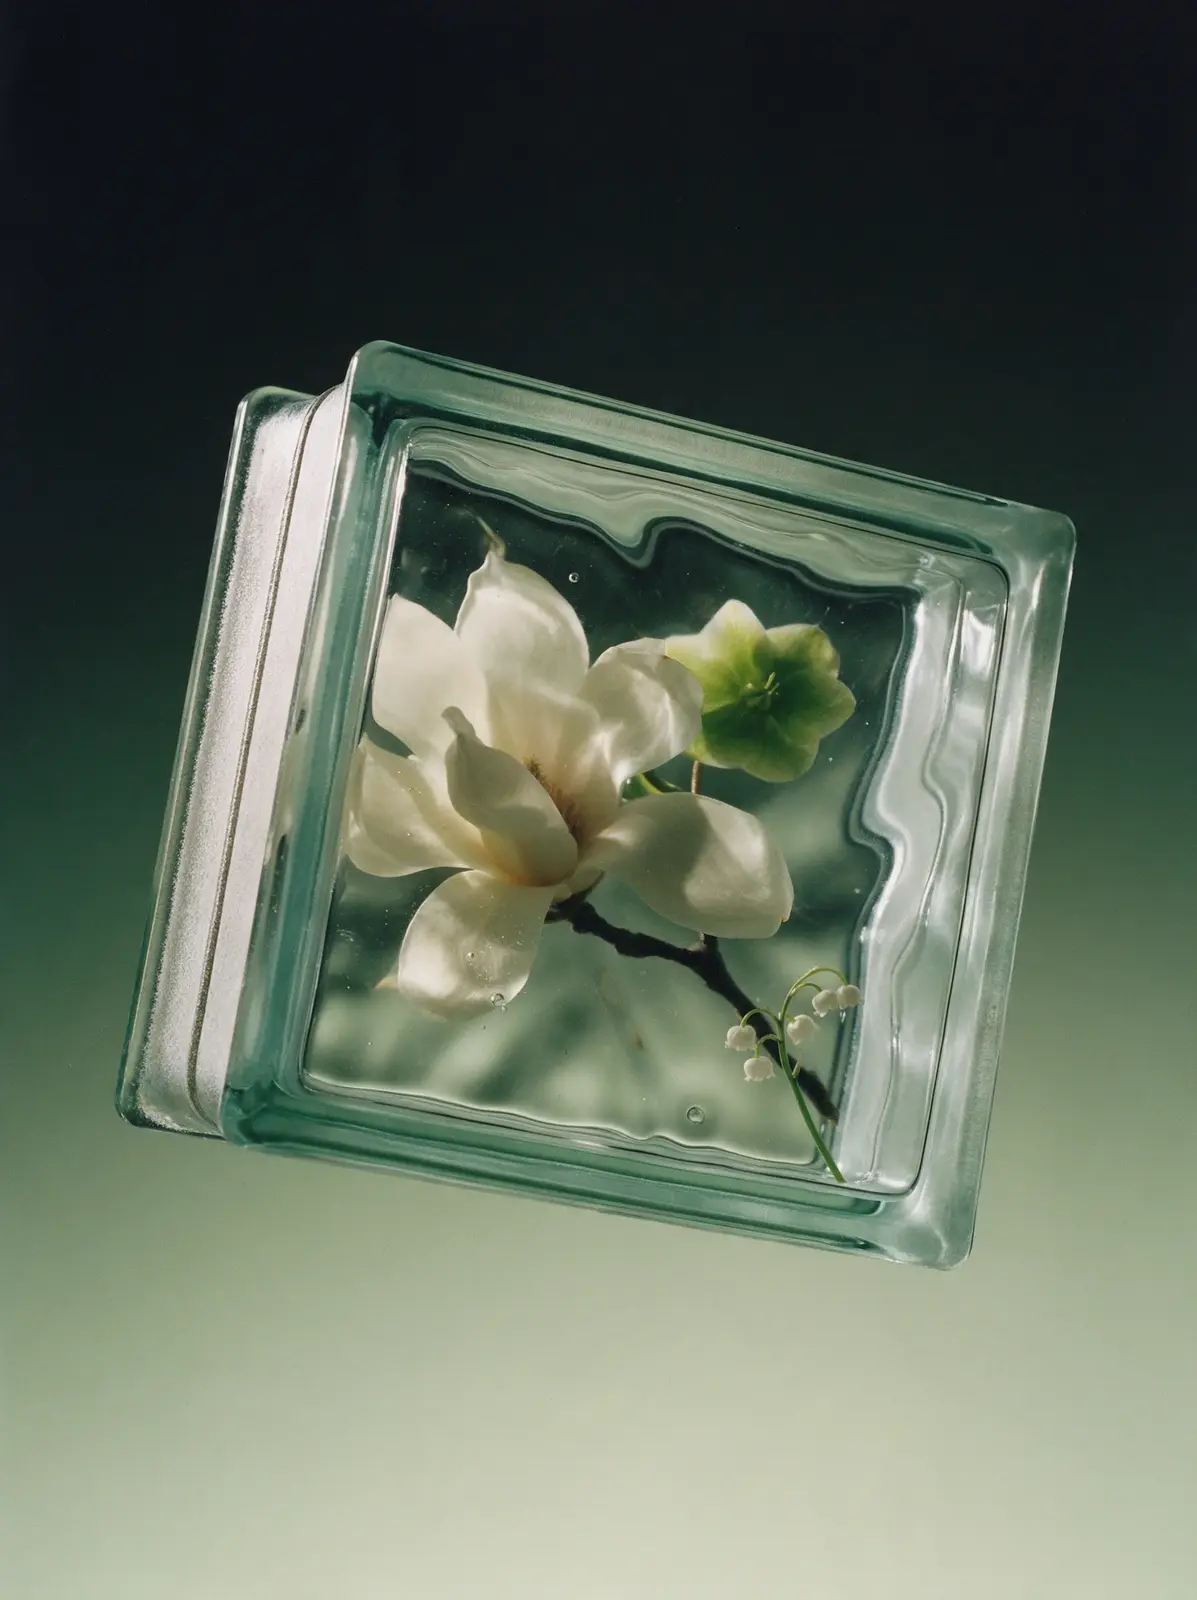
Seedream 5.0 Pro
Copy
Real studio photograph, shot on medium format film. A classic Soviet glass building block hangs weightless in empty space, tilted to the left at a three-quarter angle and rotated slightly away, its front face and left narrow side with the frosted mortar channel visible. No floor, no surface, no shadow. Exact shape: a square brick about 19 by 19 by 8 centimeters, each square face with a narrow flat raised frame and a small step down into a slightly recessed wavy central field; the narrow sides each with a shallow channel holding a rough frosted matte band and a fine fusion seam; softly rounded corners. Solid glass all the way through. Everything is fully inside the block, nothing extends outside it. A minimal, graphic composition of only a few life-size elements, much larger than the small brick: one enormous creamy white magnolia blossom placed off-center and cut off by the frame on one side, its dark woody branch running across the block, one pale green hellebore deeper in the glass, and a single arching stem of lily of the valley in the open corner. The rest of the block is open glass. The magnolia's front petals are pressed flat against the inner surface of the glass, spread and slightly squashed, with soft silvery sheen and tiny bubbles where they touch. The wavy front field bends every outline as if under water. In the open glass, the background behind is visibly warped by the waves, and a few round bubbles float. At the step of the frame everything behind is sharply shifted and broken. The deeper parts turn soft and hazy. The thick edges carry stretched creamy reflections of the magnolia. Faint sea-green glass. No smoke, no mist. Background: smooth seamless gradient from near-black at the top to pale sage green at the bottom. Strong backlight through the glass, soft side light. Not a 3D render, not CGI.
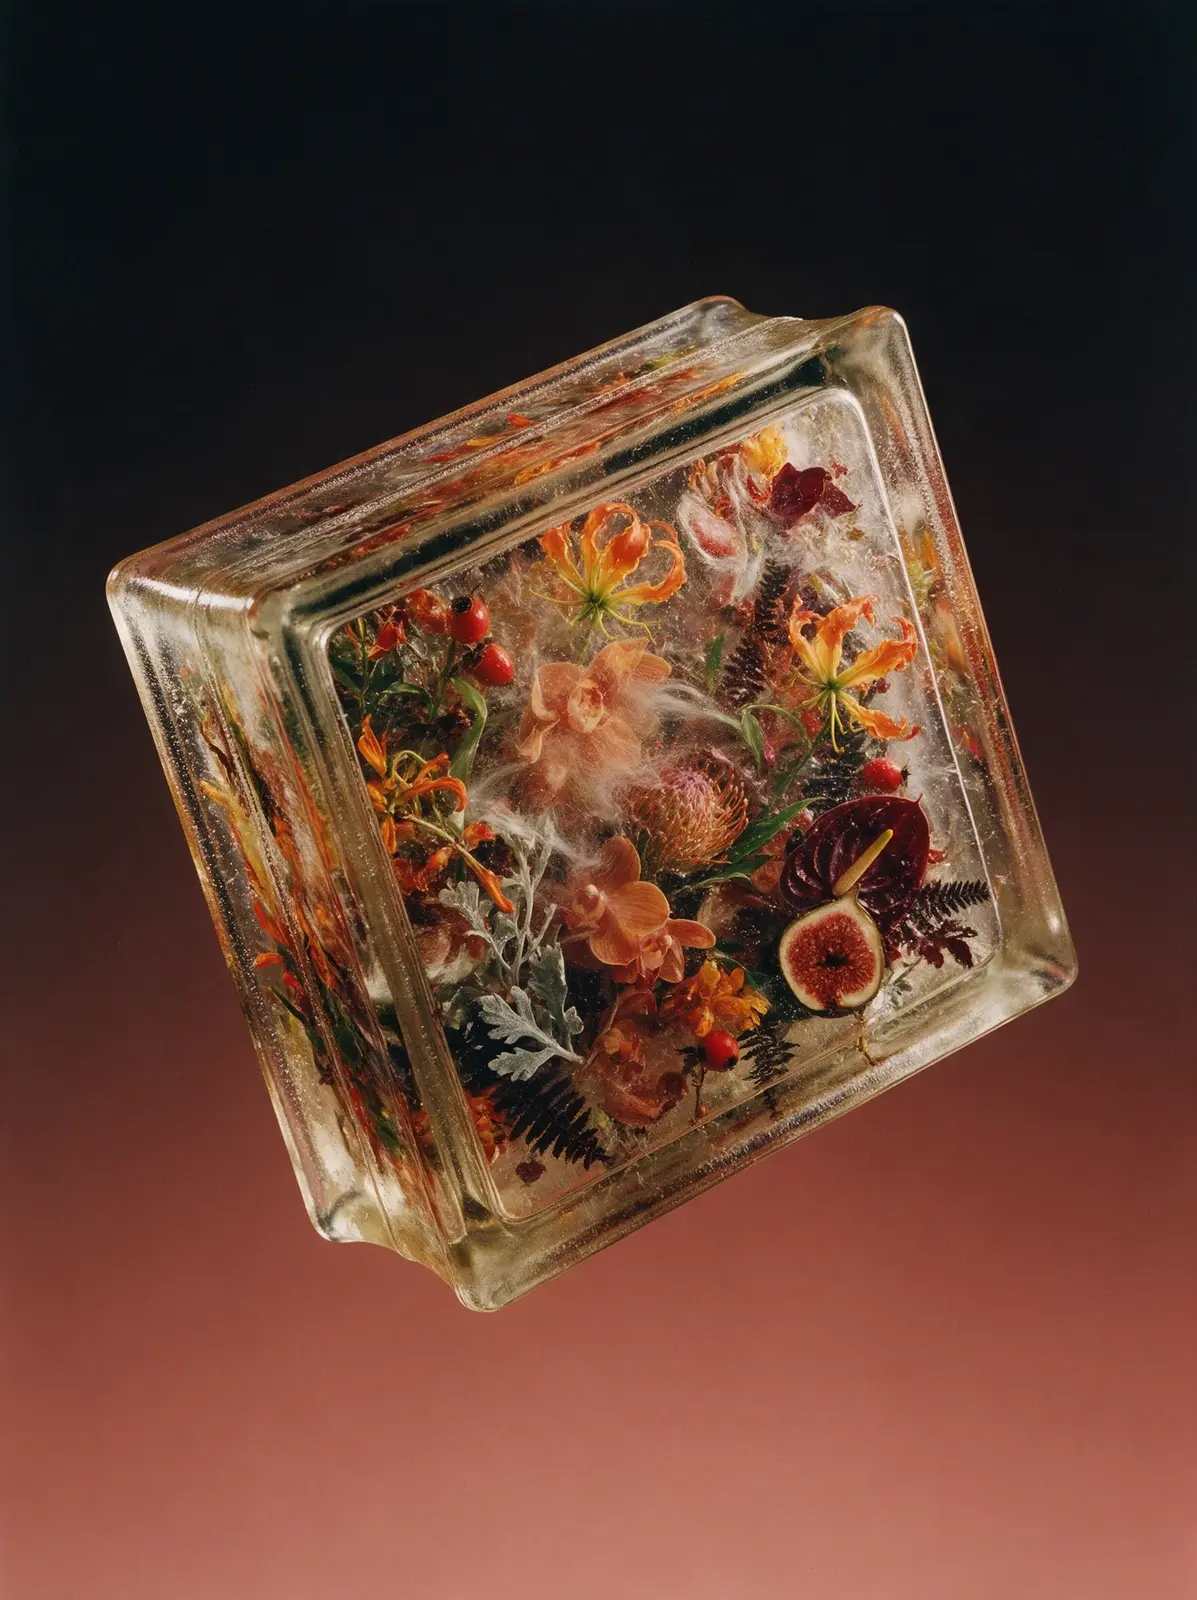
Seedream 5.0 Pro
Copy
Real studio photograph, shot on medium format film. A classic Soviet glass building block from the 1970s hangs weightless in empty space, dramatically tilted on two axes as if tossed and frozen mid-air, with its front face, one narrow side and a top edge clearly visible. No floor, no surface, no cast shadow, only open air around the object. The block has the exact recognizable proportions of a vintage Soviet pressed-glass brick, approximately 19 by 19 by 8 centimeters, square and heavy, about twice as wide as it is thick. Each square face has a narrow flat raised rim around the edges, then a slight step down into a recessed central field. The four narrow sides each show a shallow central channel with a rough frosted matte band and a fine fusion seam within it. Corners are softly rounded, edges thick and heavy, clearly mass-produced pressed glass. The brick is solid glass all the way through, completely monolithic, with no hollow interior. It is densely packed with fresh vivid flowers, leaves, stems and fruit fully cast into the glass mass, so densely that no empty gaps and no clear background show through the front face. The whole face reads as a compact wall of botanical matter, cropped on every side and extending from the front surface deep into the back of the block: curling orange glory lilies, peach orchids, glossy burgundy anthuriums, ripe figs cut open to their deep red interiors, bright red rose hips, a spiky protea, silvery dusty miller and dark fern, all overlapping, tangled and layered at different depths and angles. The glass is visibly in front of every flower, including the closest ones: faint milky veils, swirling casting cords, suspended streaks and thousands of tiny bubbles drift throughout the material, hanging in front of petals at every depth. The wavy recessed front field makes the whole composition sway and wobble as if seen under water, even where petals press against the glass. At the step between the raised rim and the recessed field, the flowers behind become abruptly displaced, compressed and fractured in a visible band running all around the face. The deepest layers dissolve into soft murky depth. The thick edges mirror the flowers in stretched broken fragments. The glass carries a faint warm amber tint that deepens to honey at the edges. Background: a smooth seamless gradient from near-black at the top to dusty terracotta at the bottom, pure empty color. Strong backlight glows through the glass so the flowers shine from within, with a soft side light tracing the edges. Photographic realism, tactile material depth, not CGI.
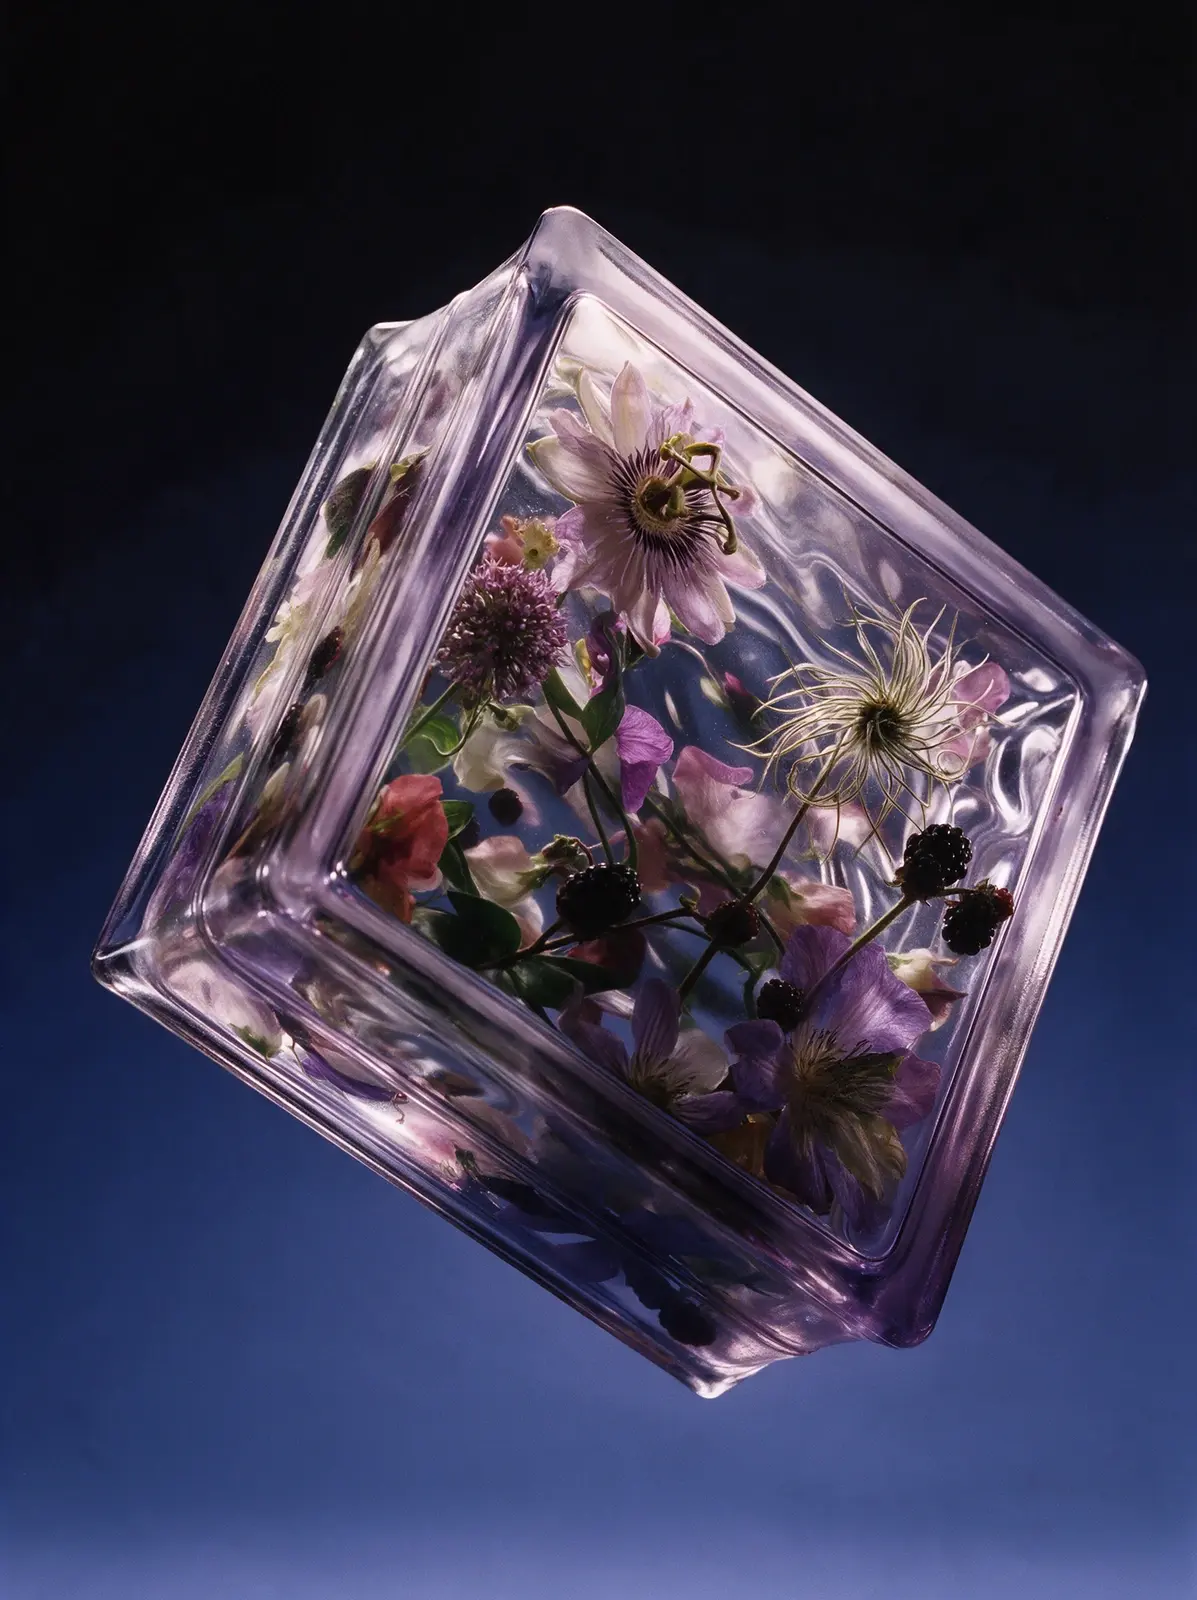
Seedream 5.0 Pro
Copy
Real studio photograph, shot on medium format film. A thick Soviet glass block — the classic 1970s square pressed-glass brick with a flat rim around each face, softly rounded corners and a seam around its sides — floats in mid-air, tilted steeply onto one corner at a three-quarter angle, its side and bottom faces visible. The glass itself is almost invisible: it shows only through thin bright highlights on its edges and rims, through a delicate pale lavender tint that deepens to soft violet in the thick edges and corners, and through the way it bends everything behind it. The front face is uneven, so the flowers inside look as if seen through moving water: their outlines wobble and smear, petals are stretched and squeezed in waves, stems kink and jump sideways. Nothing inside is perfectly sharp. The flowers closest to the front are only slightly warped, while the ones further back are softer, darker and murkier, losing contrast in the depth of the glass. The thick side faces act like mirrors, showing stretched, fragmented reflections of the flowers. Inside, a dense wild bouquet fills the entire block from wall to wall and corner to corner, with large blooms pressed against the inner faces and cropped by the edges, leaving almost no empty glass: a pale lilac passionflower with its crown of filaments, a spherical purple allium head, lavender clematis, dark blackberries on their stems, a dusty-pink sweet pea, a wispy clematis seed head, spiraling tendrils and dark green leaves, layered deep into the block. The flowers are lit only by light passing through the glass, so they glow softly from within. Background: a plain studio paper sweep in a smooth gradient from near-black at the top to deep periwinkle blue at the bottom. Dramatic backlight and side light. No glow, no halo, no shadow beneath. Not a 3D render, not CGI.
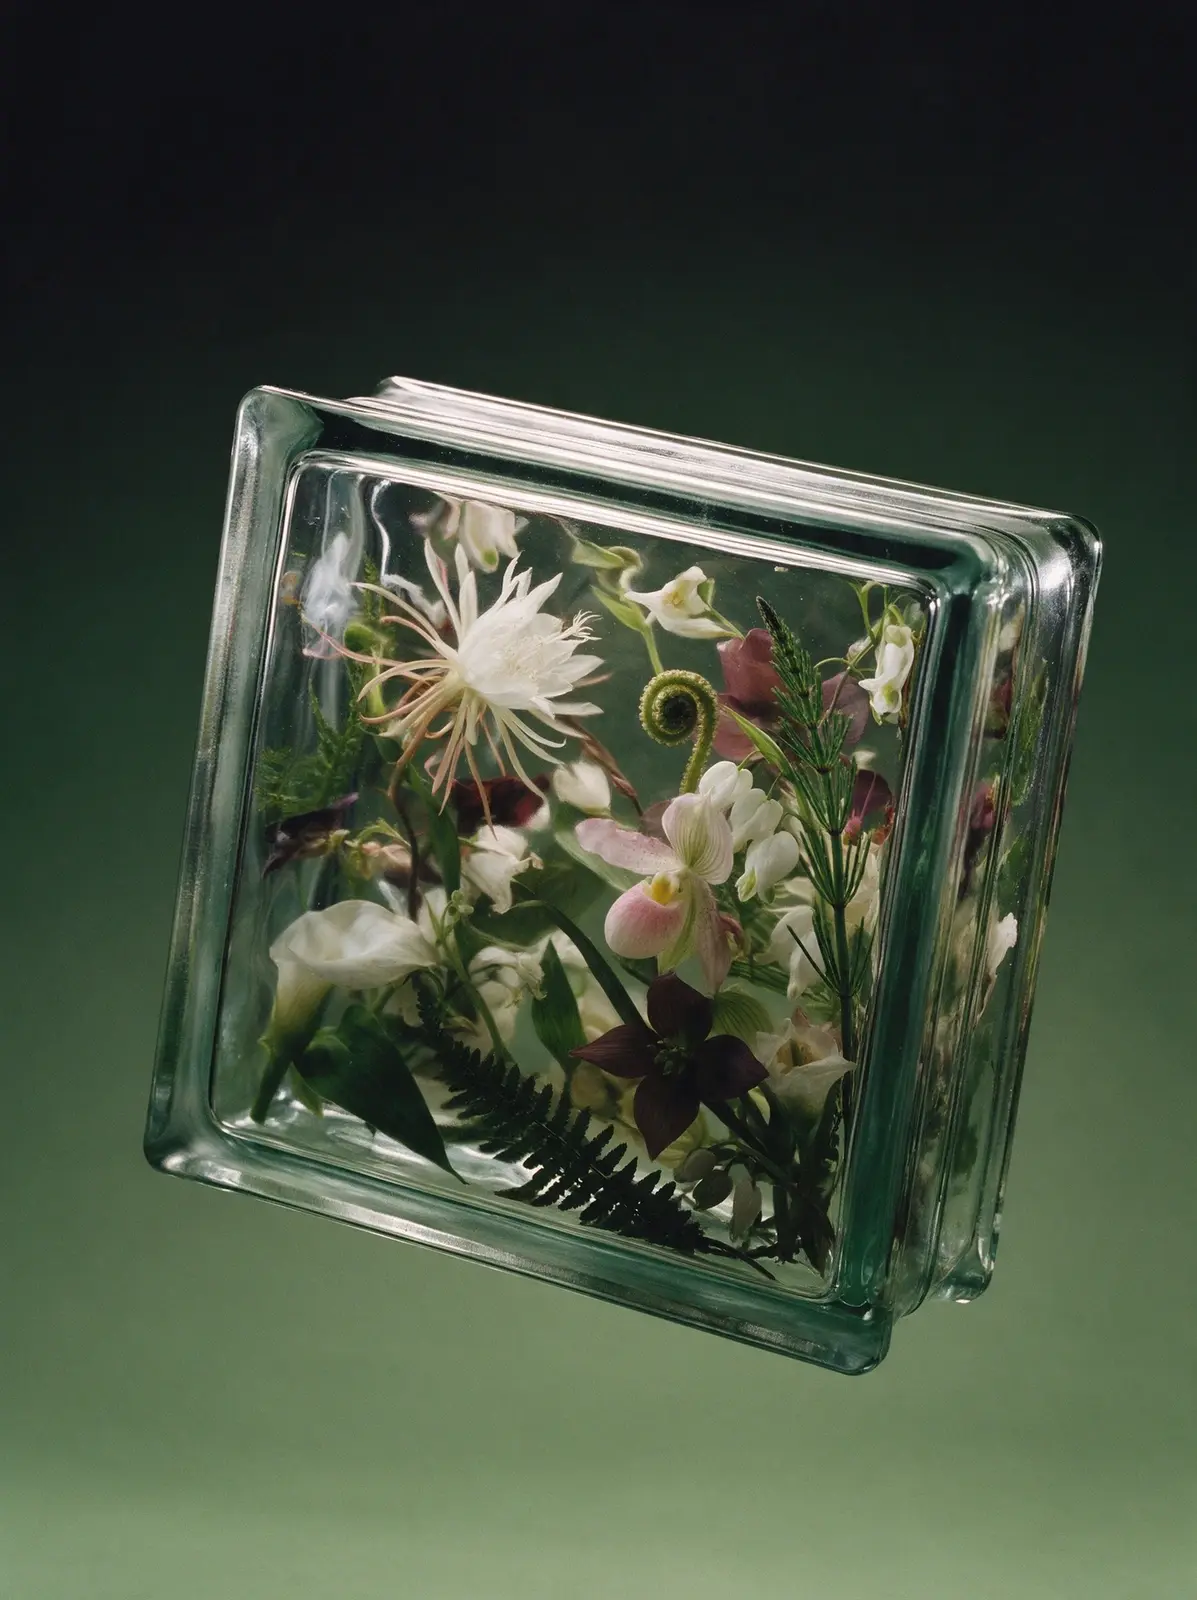
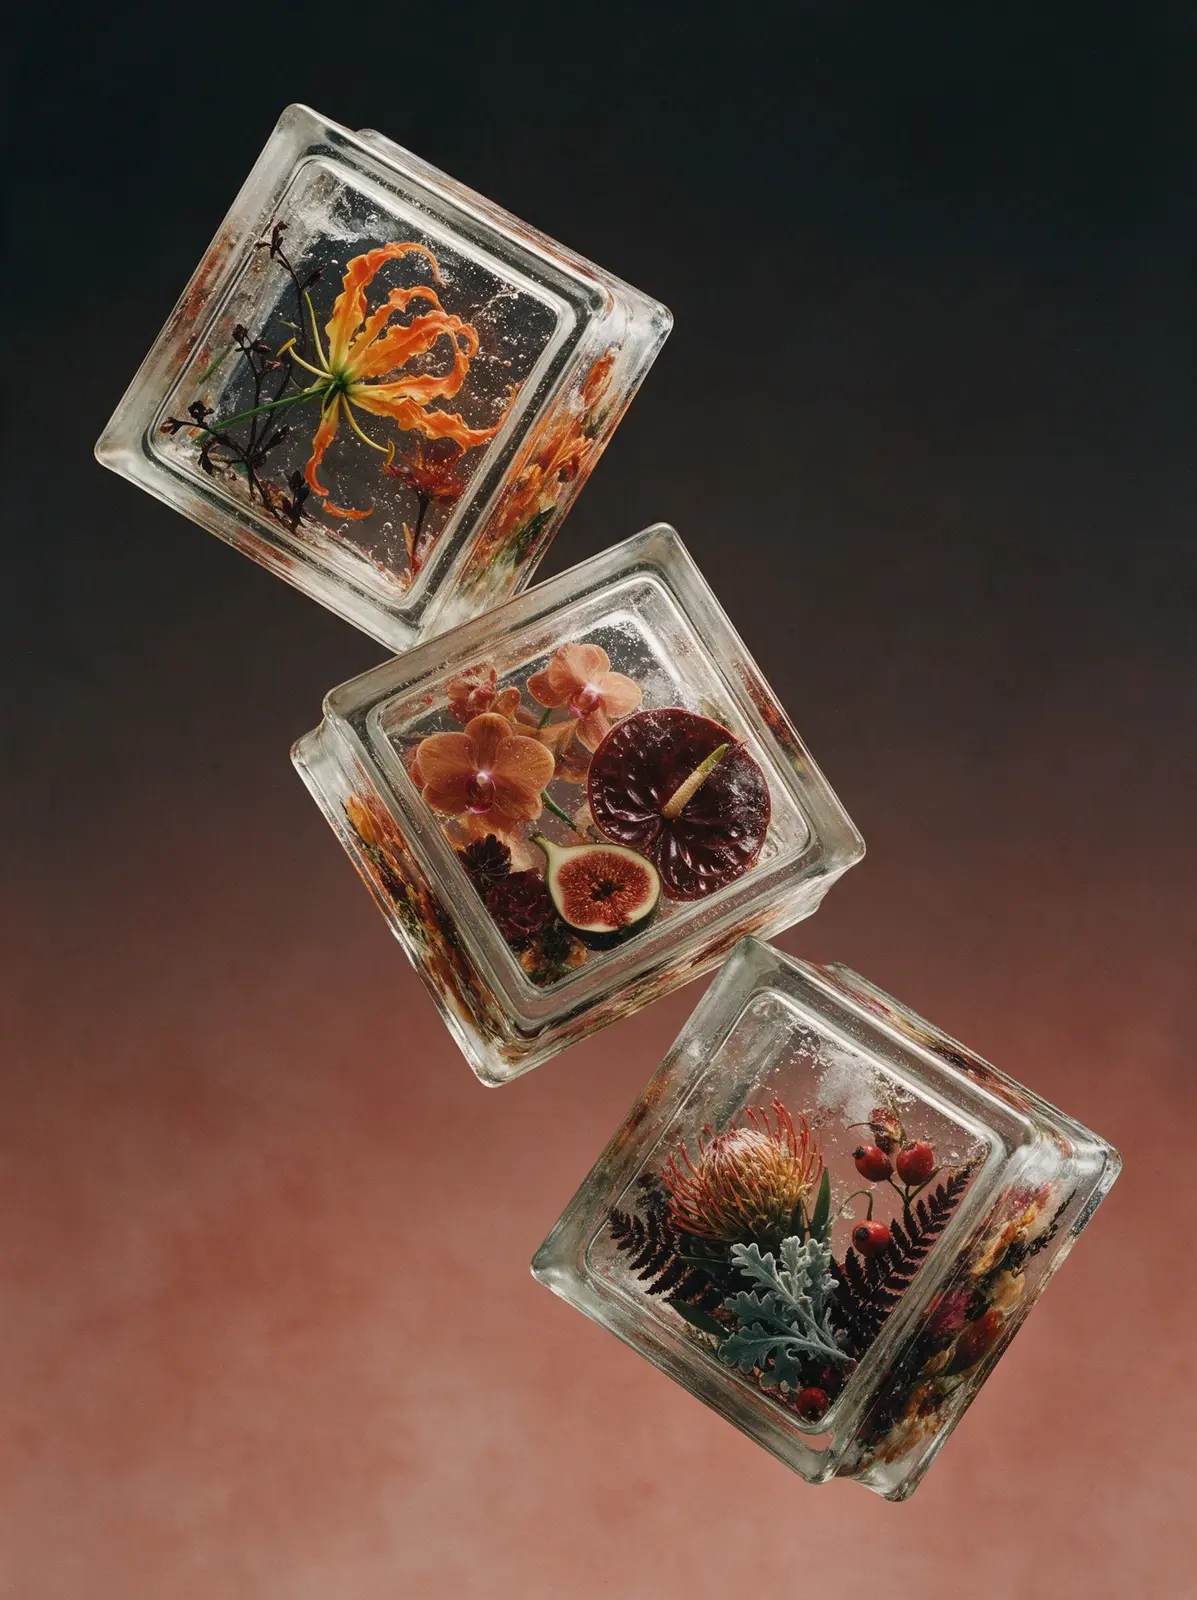
Seedream 5.0 Pro
Copy
Real studio photograph, shot on medium format film. Three Soviet glass bricks hang weightless in empty space in a more dynamic diagonal composition, one higher, one central and one lower, with each block dramatically tilted on two axes as if gently tossed and frozen mid-air. Their front face remains dominant but a side face and top edge are also visible. No floor, no surface, no shadow. The bricks are classic 1970s square pressed-glass Soviet building blocks, about 19 by 19 by 8 centimeters, with raised flat rims, recessed central fields, softly rounded corners, frosted side seams and thick heavy edges. The glass is fully solid, not hollow, and densely packed with rich botanical inclusions. One block contains an oversized curling orange glory lily and dark wiry stems, one contains peach orchids, glossy burgundy anthurium and cut figs with exposed red interiors, and one contains a spiky protea, red rose hips, dusty miller and dark fern. Each inclusion is dense and layered, with no empty center, reading as a compact wall of flowers and fruit inside the glass. The glass visibly overlays everything with suspended bubbles, milky films, internal streaks, underwater-like waviness and refractive displacement at the step between rim and recessed field. The thick edges mirror the contents in stretched fragments. Background: a smooth seamless gradient from near-black charcoal at the top to dusty terracotta and muted burnt clay at the bottom. Strong backlight and soft side lighting create warm inner glow and rich glass depth. Not CGI.
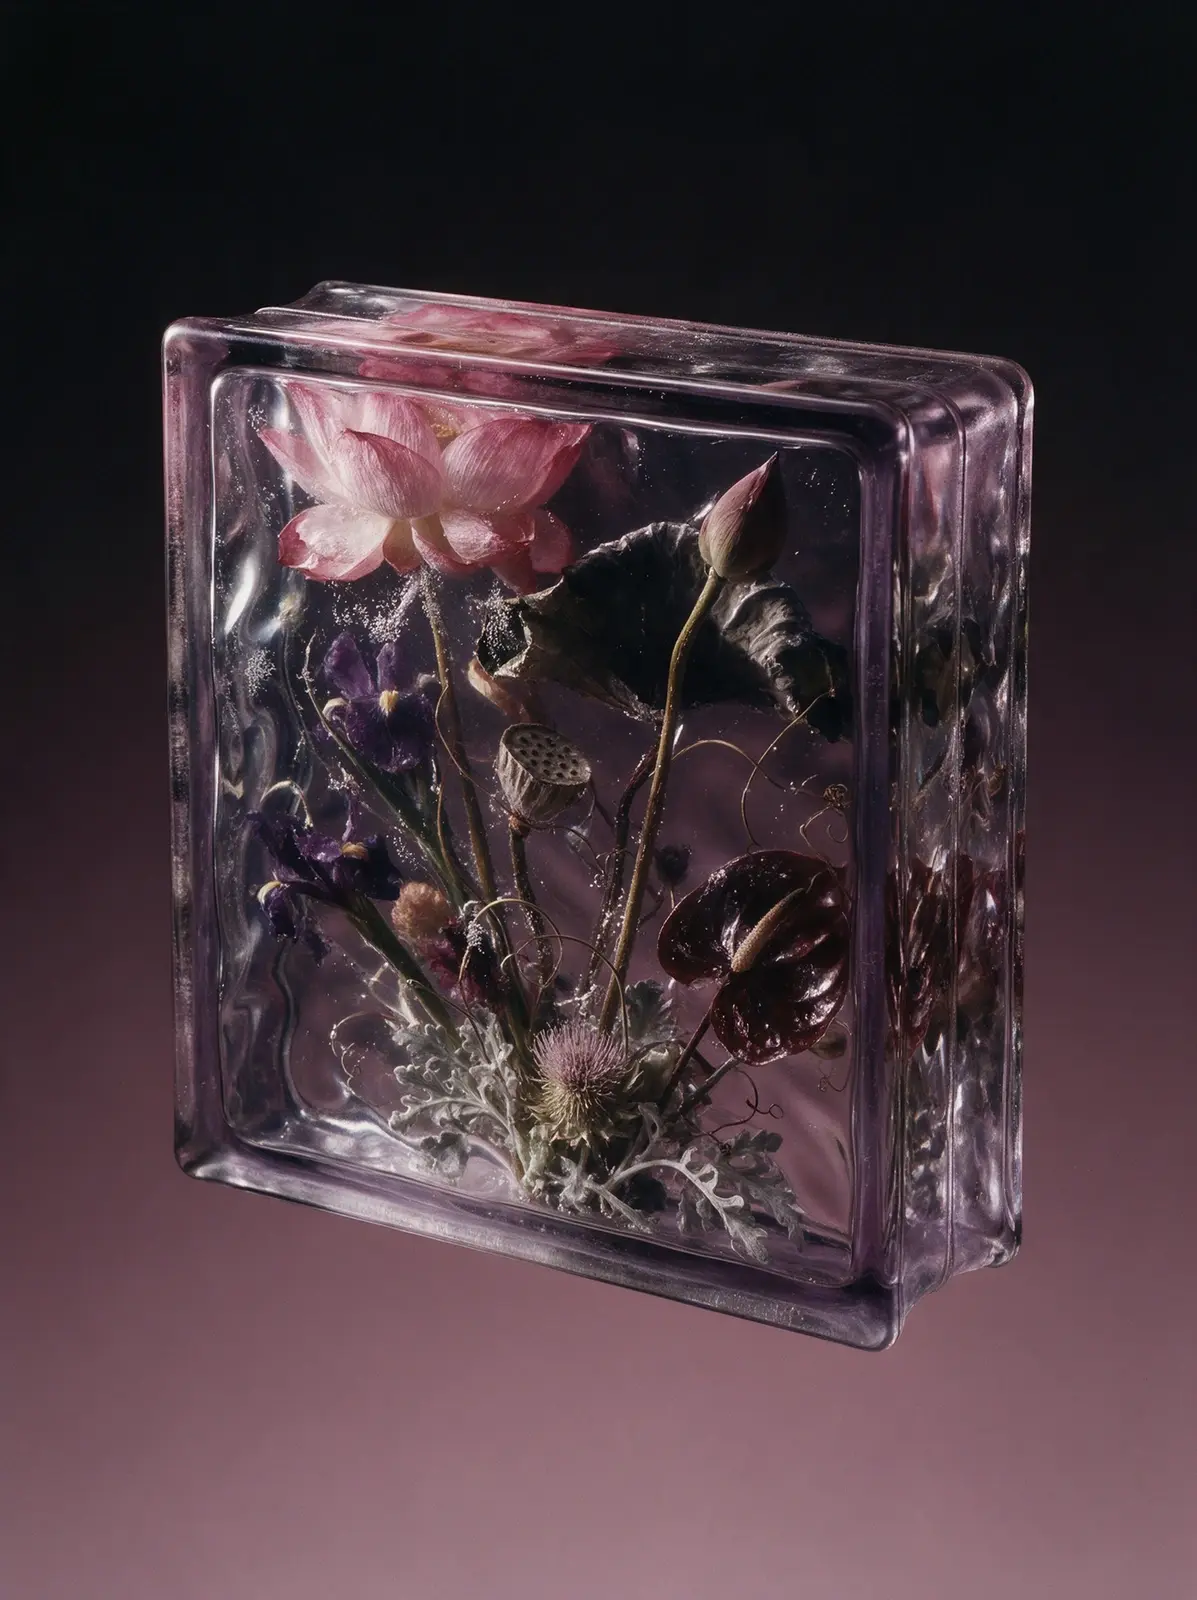
Seedream 5.0 Pro
Copy
Real studio photograph, shot on medium format film. A Soviet glass brick, the classic 1970s square pressed-glass block with a flat raised rim around each face, softly rounded corners and a visible seam around its narrow sides, hangs weightless in empty space at a dramatic three-quarter angle, with one side and a top edge visible. No floor, no ground plane, no surface and no cast shadow. The brick is solid glass all the way through, fully monolithic from the front face to the back, with no inner chamber, no hollow cavity and no separate back panel. The flowers are cast directly into the glass mass, like botanical forms frozen inside a solid block of ice: glass touches every petal, silvery trapped-air films cling to surfaces, and tiny clusters of bubbles gather along stems, leaf edges and petal contours. The front face is wavy and optically active, so everything inside sways as if under water: outlines wobble, petals stretch and compress, stems kink and shift sideways. Nothing inside is perfectly crisp; the deeper flowers sink into soft dark murk within the thickness of the glass. The thick side faces reflect the bouquet in stretched fragmented echoes. The glass has a faint lavender tint that deepens toward violet in the edges. Inside, the composition is dense, asymmetrical and layered from front to back: one huge open pink lotus presses against the front face and is cropped by the rim, a dried lotus seed pod turns sideways in the middle depth, a dark lotus leaf curls around the back like a shadowy wave, a single tall lotus bud on a long bending stem cuts diagonally across the composition, while a deep violet iris and a glossy burgundy anthurium sink into the darker depth. At the base, a pale thistle and silvery dusty miller create a lighter structural cluster, with fine curling tendrils threading through the remaining gaps. The arrangement is packed edge to edge and reads as one continuous sculptural organism rather than separate flowers. Background: a smooth seamless gradient from near-black at the top to dusty mauve at the bottom, pure empty color with no floor. Dramatic backlight and soft side light pass through the glass so the flowers glow softly from within. Photographic, tactile, dense, not CGI.
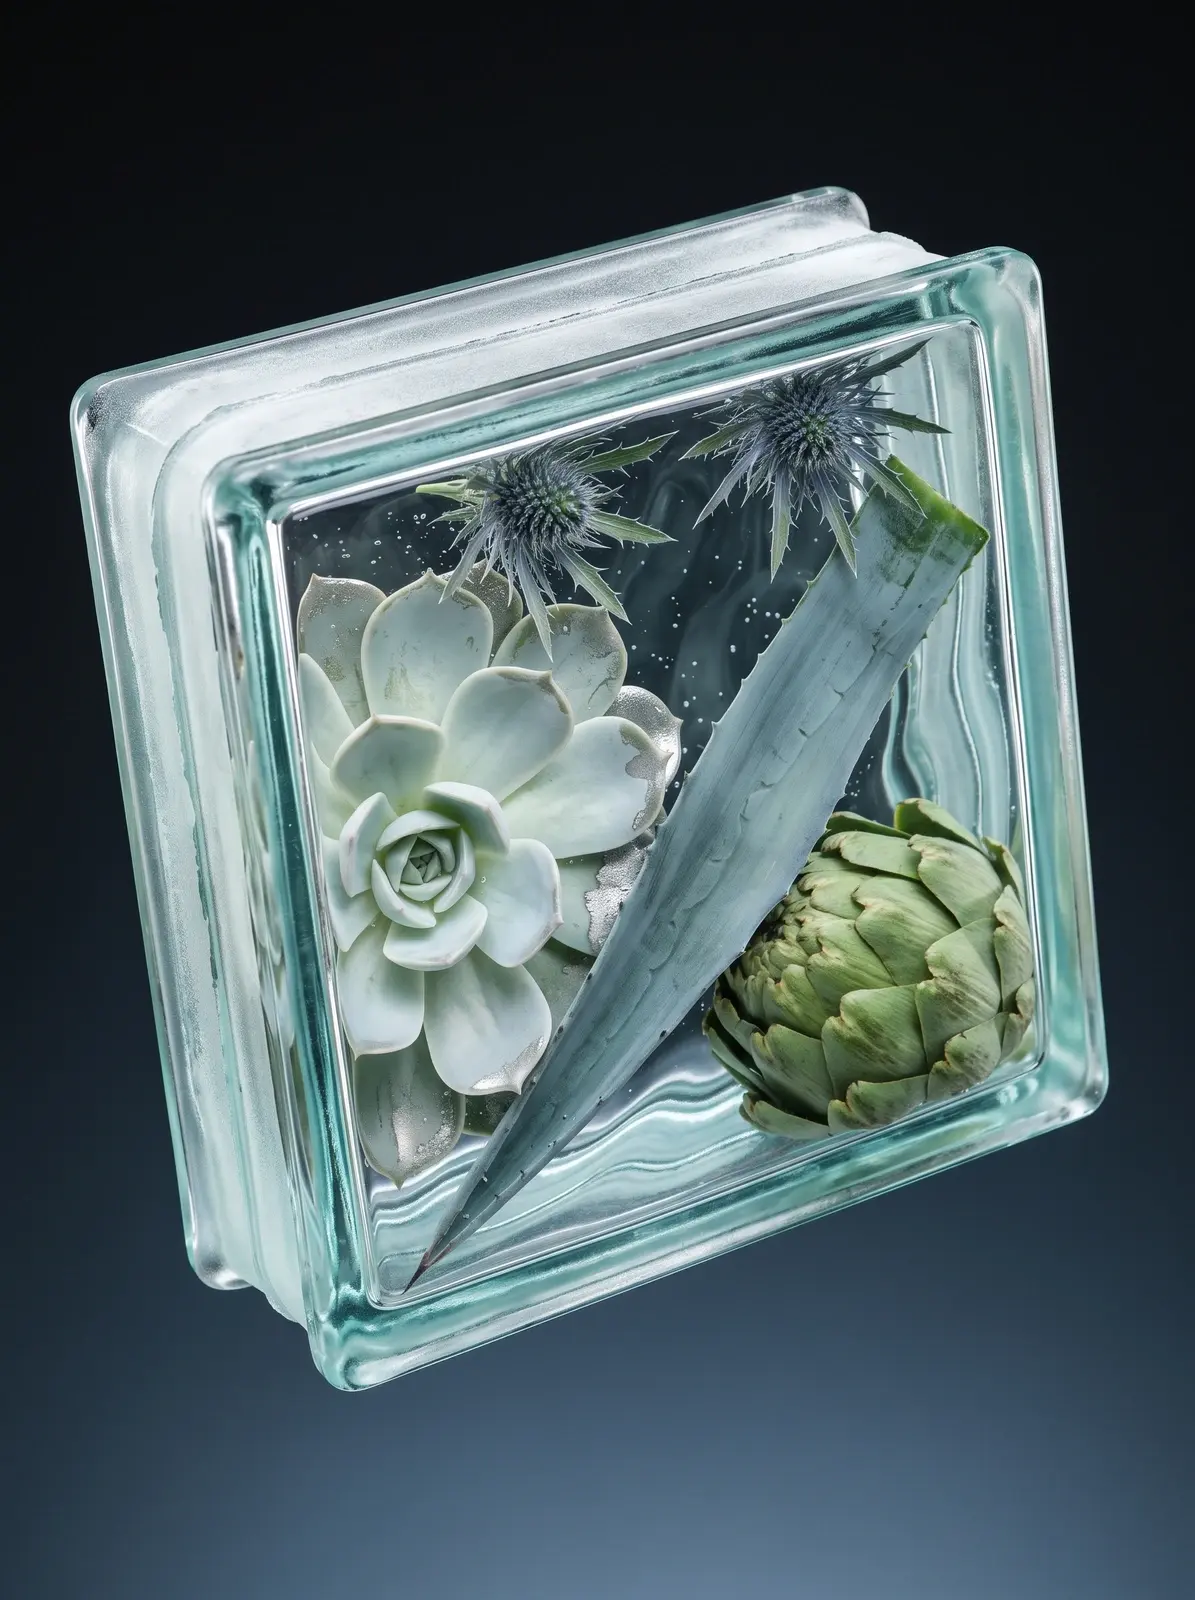
Nano Banana 2.1
Copy
Real studio photograph, shot on medium format film. A classic Soviet glass building block hangs weightless in empty space, seen from above as it tumbles forward: its top narrow side with the frosted mortar channel is visible and the front face tips toward the camera at a sharp angle. No floor, no surface, no shadow. Exact shape: a square brick about 19 by 19 by 8 centimeters, each square face with a narrow flat raised frame and a small step down into a slightly recessed wavy central field; the narrow sides each with a shallow channel holding a rough frosted matte band and a fine fusion seam; softly rounded corners; solid glass all the way through. The plants are life-size, much bigger than the small brick, so only a close-up fragment of the arrangement fits inside, cut off on every side by the frame: one enormous pale silvery-mint echeveria rosette fills half of the face, its fleshy leaves pressed flat against the inside of the glass, a long curved blue-grey agave leaf sweeping across the whole block and out of the frame, spiky steel-blue sea holly heads cut off at the top edge, and a green artichoke pushing in from one corner. The plants are fused with the glass: where leaves touch the inner surface they flatten and turn silvery, tiny bubbles sit right on the leaves, the wavy field bends their outlines, and at the step of the frame everything behind is sharply shifted and broken. The thick edges glow mint and steel blue with the colors trapped inside, showing stretched reflections of the rosette. Faint icy aqua glass. Background: smooth seamless gradient from near-black at the top to deep steel blue at the bottom. Strong backlight through the glass, soft side light. Not a 3D render, not CGI.
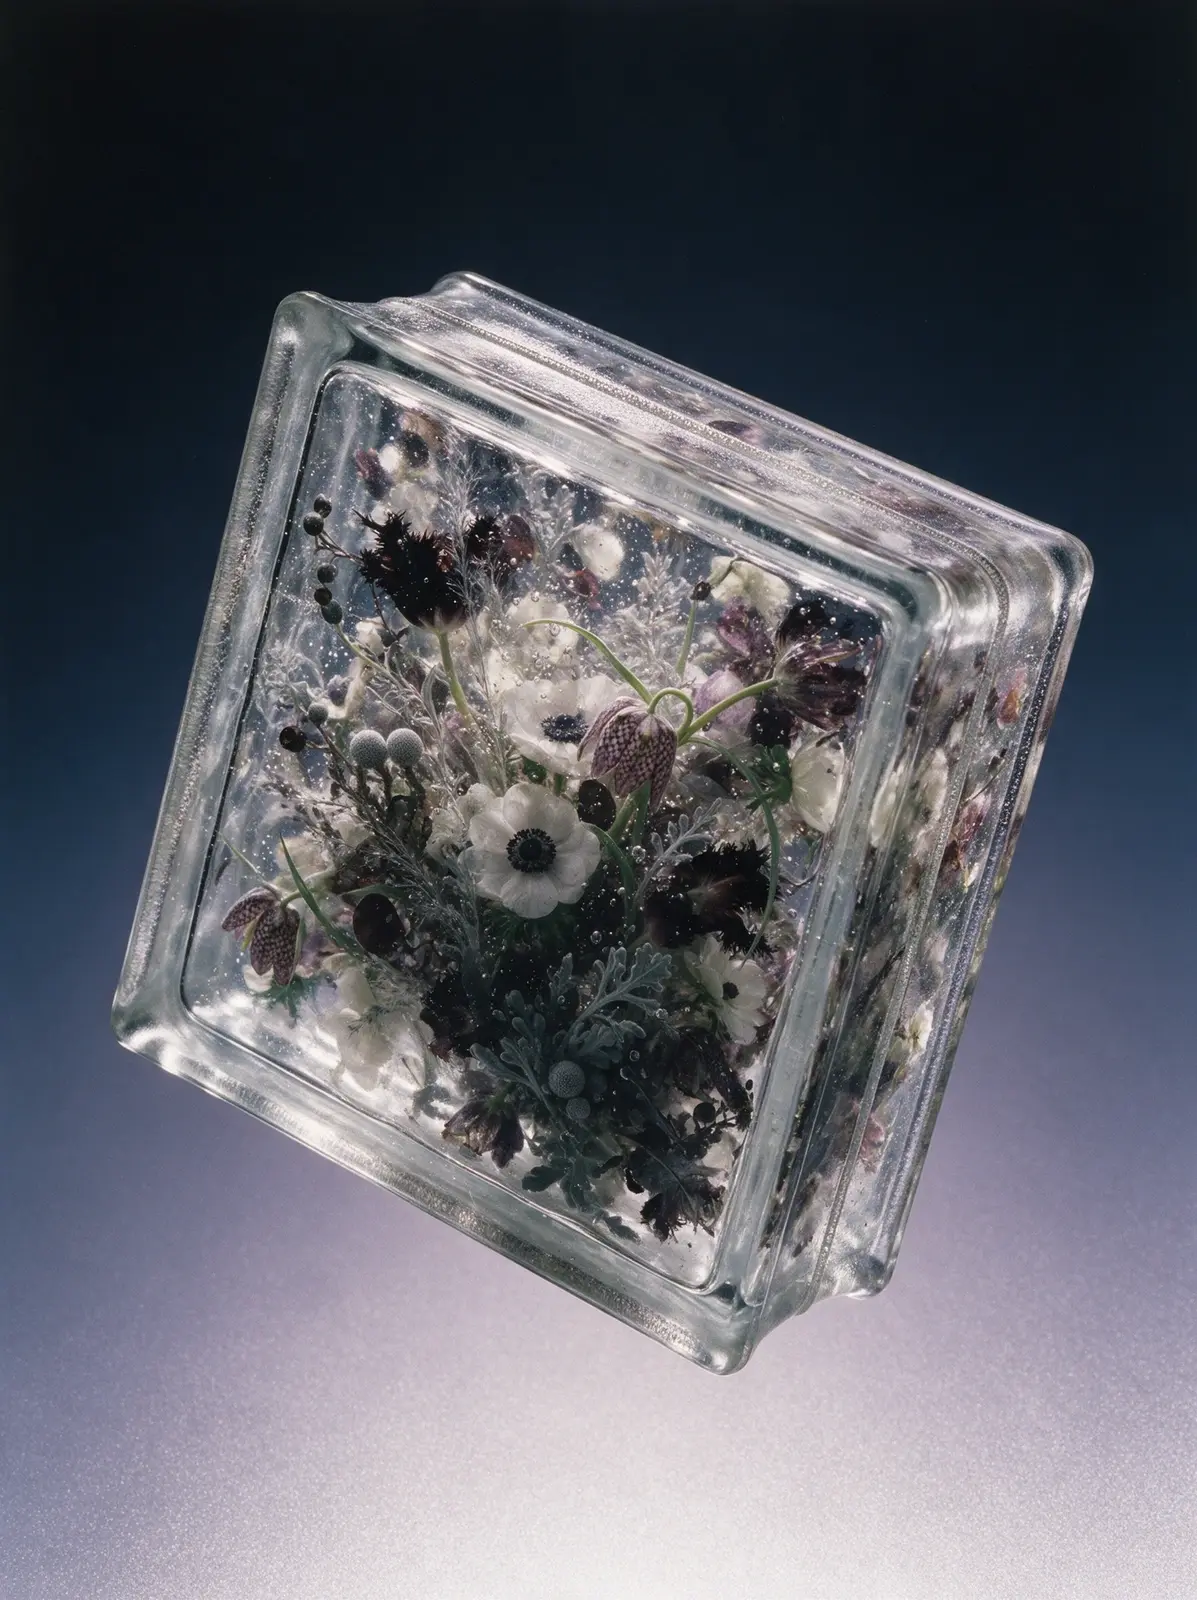
Seedream 5.0 Pro
Copy
Real studio photograph, shot on medium format film. A classic Soviet glass building block from the 1970s hangs weightless in empty space, tilted steeply onto one corner with its front face and one narrow side visible. No floor, no surface, no shadow anywhere. Exact recognizable shape: a square brick about twice as wide as it is thick, like 19 by 19 by 8 centimeters. Each square face has a narrow flat raised frame along its edges, then a small step down into a slightly recessed central field. The four narrow sides each have a shallow channel along their middle with a rough frosted matte band and a fine fusion seam inside it. Softly rounded corners, thick heavy edges, mass-produced pressed glass. The block is solid glass all the way through, no hollow inside. It is packed completely with flowers cast into the glass, so densely that no background shows through the front face at all — a solid wall of blooms, leaves and stems from frame to frame and from the front face deep to the back, cropped on every side: white anemones with black centers, checkered purple fritillaria bells, feathery near-black parrot tulips, silver brunia balls, dark eucalyptus seeds, dusty miller and fine silvery grasses, overlapping and tangled. The glass is clearly in front of the flowers: it is not perfectly clear but has faint milky veils, swirling cords and streaks from the casting, and thousands of tiny bubbles suspended throughout, hanging in front of the petals at every depth. The wavy front field makes everything sway and wobble as if under water. At the step between the frame and the recessed field, the flowers behind are sharply displaced, broken and compressed in a band running all around the face. The flowers look softened and slightly faded, seen through several centimeters of glass, with the deepest layers dissolving into dark murk. The thick edges mirror the flowers in stretched fragments. The glass is clear with a cold silvery tint in the edges. Background: smooth seamless gradient from near-black midnight blue at the top to frosty silvery lilac at the bottom, pure empty color. Dramatic backlight and side light passing through the glass. Not a 3D render, not CGI.
Seedream 5.0 Pro
Copy
Real studio photograph, shot on medium format film. Three thick Soviet glass blocks — the classic 1970s square pressed-glass bricks with a flat rim around each face, softly rounded corners and a seam around their sides — float in mid-air at different heights and depths with generous space between them, each tilted at a different angle so their side, top or bottom faces are visible. The farthest one is slightly soft from depth of field. The glass itself is almost invisible: it shows only through thin bright highlights on the edges and rims, through a delicate pale lavender tint that deepens to soft violet in the thick edges and corners, and through the way it bends everything behind it. The front faces are uneven, so the flowers inside look as if seen through moving water: their outlines wobble and smear, petals are stretched and squeezed in waves, stems kink and jump sideways. Nothing inside is perfectly sharp. The flowers closest to the front are only slightly warped, while the ones further back are softer, darker and murkier. The thick side faces act like mirrors, showing stretched, fragmented reflections of the flowers. Each block is filled from wall to wall with a dense wild arrangement, large blooms pressed against the inner faces and cropped by the edges: the first with a large pink lotus, lotus buds and a lotus seed pod; the second with a deep violet iris, burgundy anthurium and dark fern; the third with pale pink peonies, a thistle, silvery dusty miller and curling tendrils. The flowers are lit only by light passing through the glass, so they glow softly from within. Background: a plain studio paper sweep in a smooth gradient from near-black at the top to dusty mauve at the bottom. Dramatic backlight and side light. No glow, no halo, no shadows beneath. Not a 3D render, not CGI.
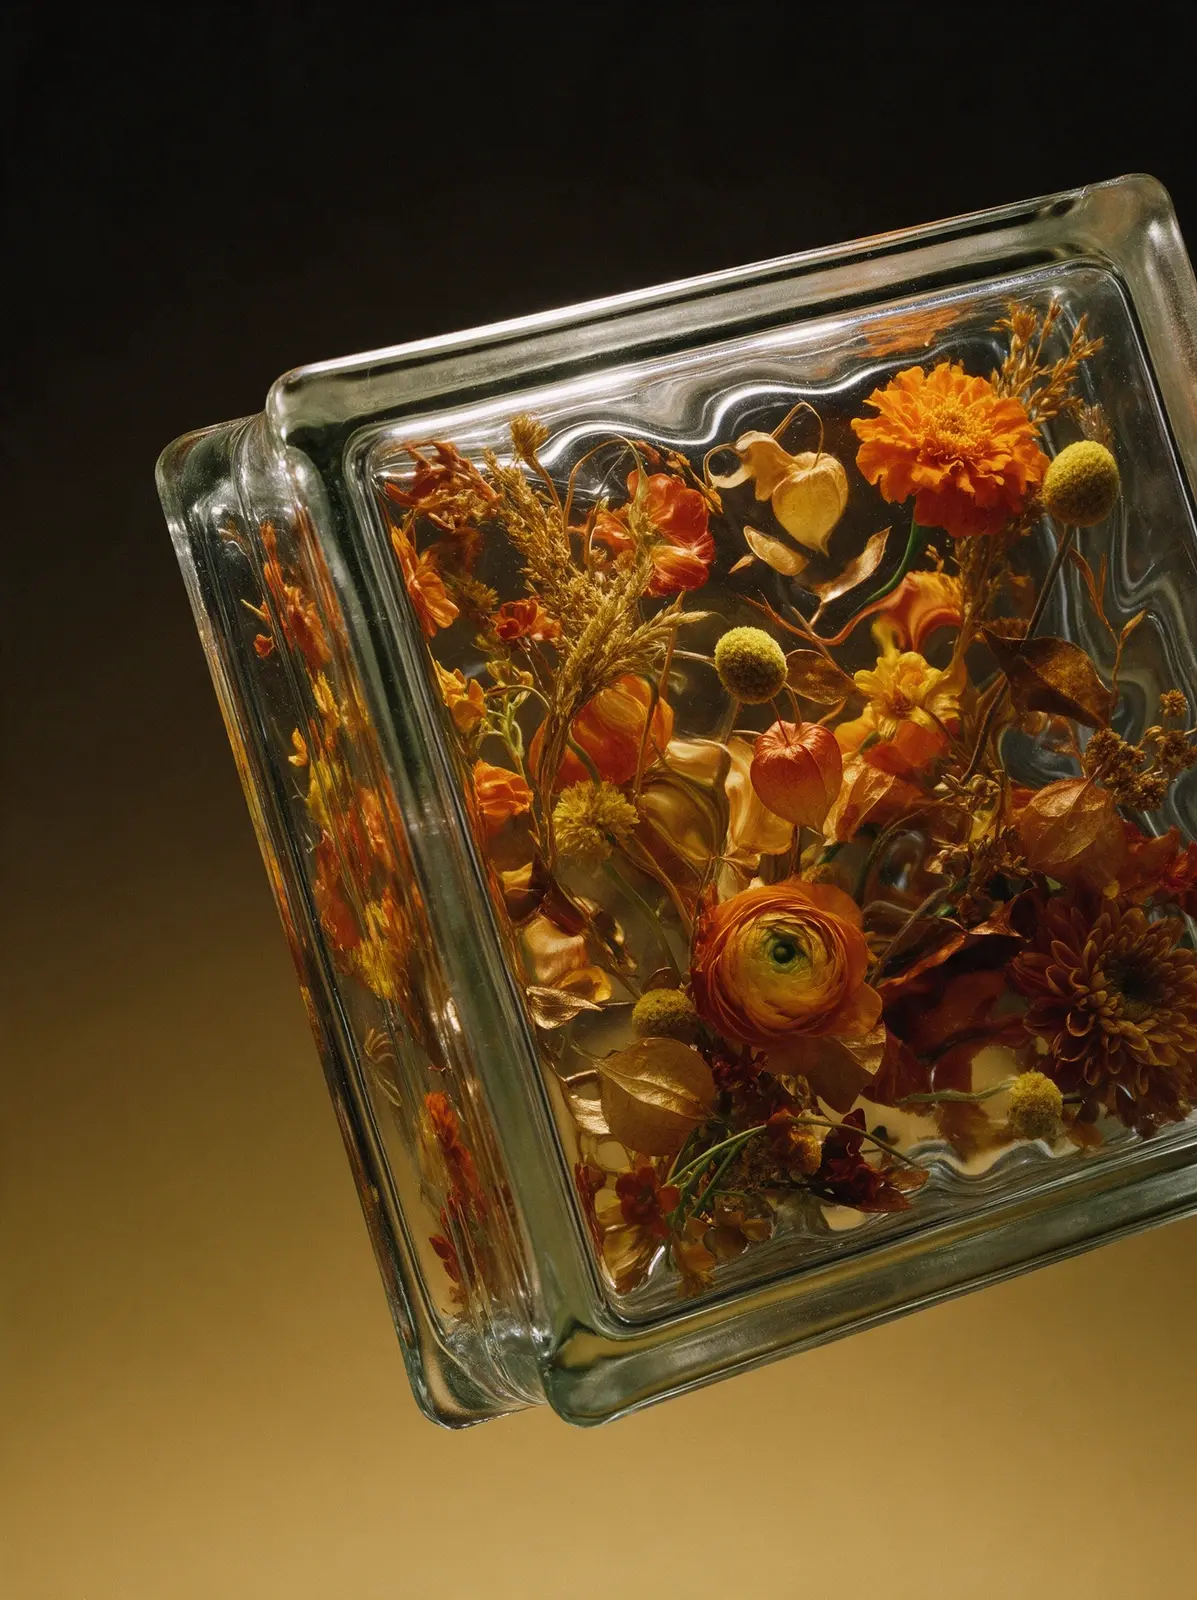
Seedream 5.0 Pro
Copy
SUBJECT: A single heavy, solid clear glass block: a classic architectural glass brick, square, with thick rounded rims and a slightly recessed panel on each face. Its front and back faces have a wavy, rippled, hand-poured glass texture with gentle irregular undulations. The block is completely full: a dense arrangement of orange marigolds, amber ranunculus, yellow billy buttons, dried golden grasses, physalis lanterns, rusty chrysanthemums and bronze leaves is cast inside it, suspended as if frozen in crystal-clear solid glass. There is no air pocket, no empty space and no gap at the top: petals, leaves and stems press against the inner glass on every side and reach into all four corners and the full depth of the block. It is a solid object, not a hollow box, not a container, not a vase, not an aquarium, with no lid, no opening and no water line. Seen through the glass, the flowers are distorted by the ripples: wavy refraction, slight stretching, doubled edges and soft shimmering caustics. The side faces show refracted, compressed mirror copies of the flowers. The thick glass edges read as bright clear bands with crisp specular highlights, faint reflections and a subtle green-gray tint in the thickest parts. Fine detail is crisp everywhere: petal veins, pollen, fuzzy stems, velvety and glossy petals, tiny air bubbles in the glass, faint tool marks on the rims. COMPOSITION: An intimate close-up: the block is tilted 12 degrees and turned slightly to show its left side, so close that it fills about 90% of the frame and its top-right corner and right edge are cropped by the frame; the rippled glass, rims and flowers are huge and detailed. LIGHTING: one soft-edged key light from the upper left, slightly in front, like a classic medium-format still-life photograph. The flowers inside glow with rich, true, saturated color; light travels through the glass, so the rims and ripples catch long bright specular streaks along the top and left edges and small glints on every wave. The lower right part of the block falls into soft shadow where the flowers stay readable in deeper color, never black. The light shows only on the block: no visible beam, no haze, no light pool on the background. SPACE: the block levitates in empty space with nothing under or around it: no floor, no tabletop, no surface, no cast shadow, no contact shadow, no reflection below it, no horizon line. It simply hangs in the air in front of a seamless studio gradient. BACKGROUND: seamless vertical studio gradient, warm black at the top fading smoothly into deep ochre and soft honey-mustard at the bottom; stops #0D0B07 at 0%, #2E2410 at 40%, #8A6B2A at 75%, #C9A961 at 100%. Perfectly smooth and even, no spots, no vignette, no glow, no floor and no horizon. STYLE: analog film still-life
photograph, medium format, Kodak Portra look, fine natural grain, soft rich contrast, razor-sharp focus on the glass and flowers, museum-quality art photography. FINAL CHECK: solid glass block completely filled with flowers, no empty air inside; rippled glass distorting the flowers; crisp petal and glass texture; floating in empty space with no floor and no shadow below; clean even gradient.
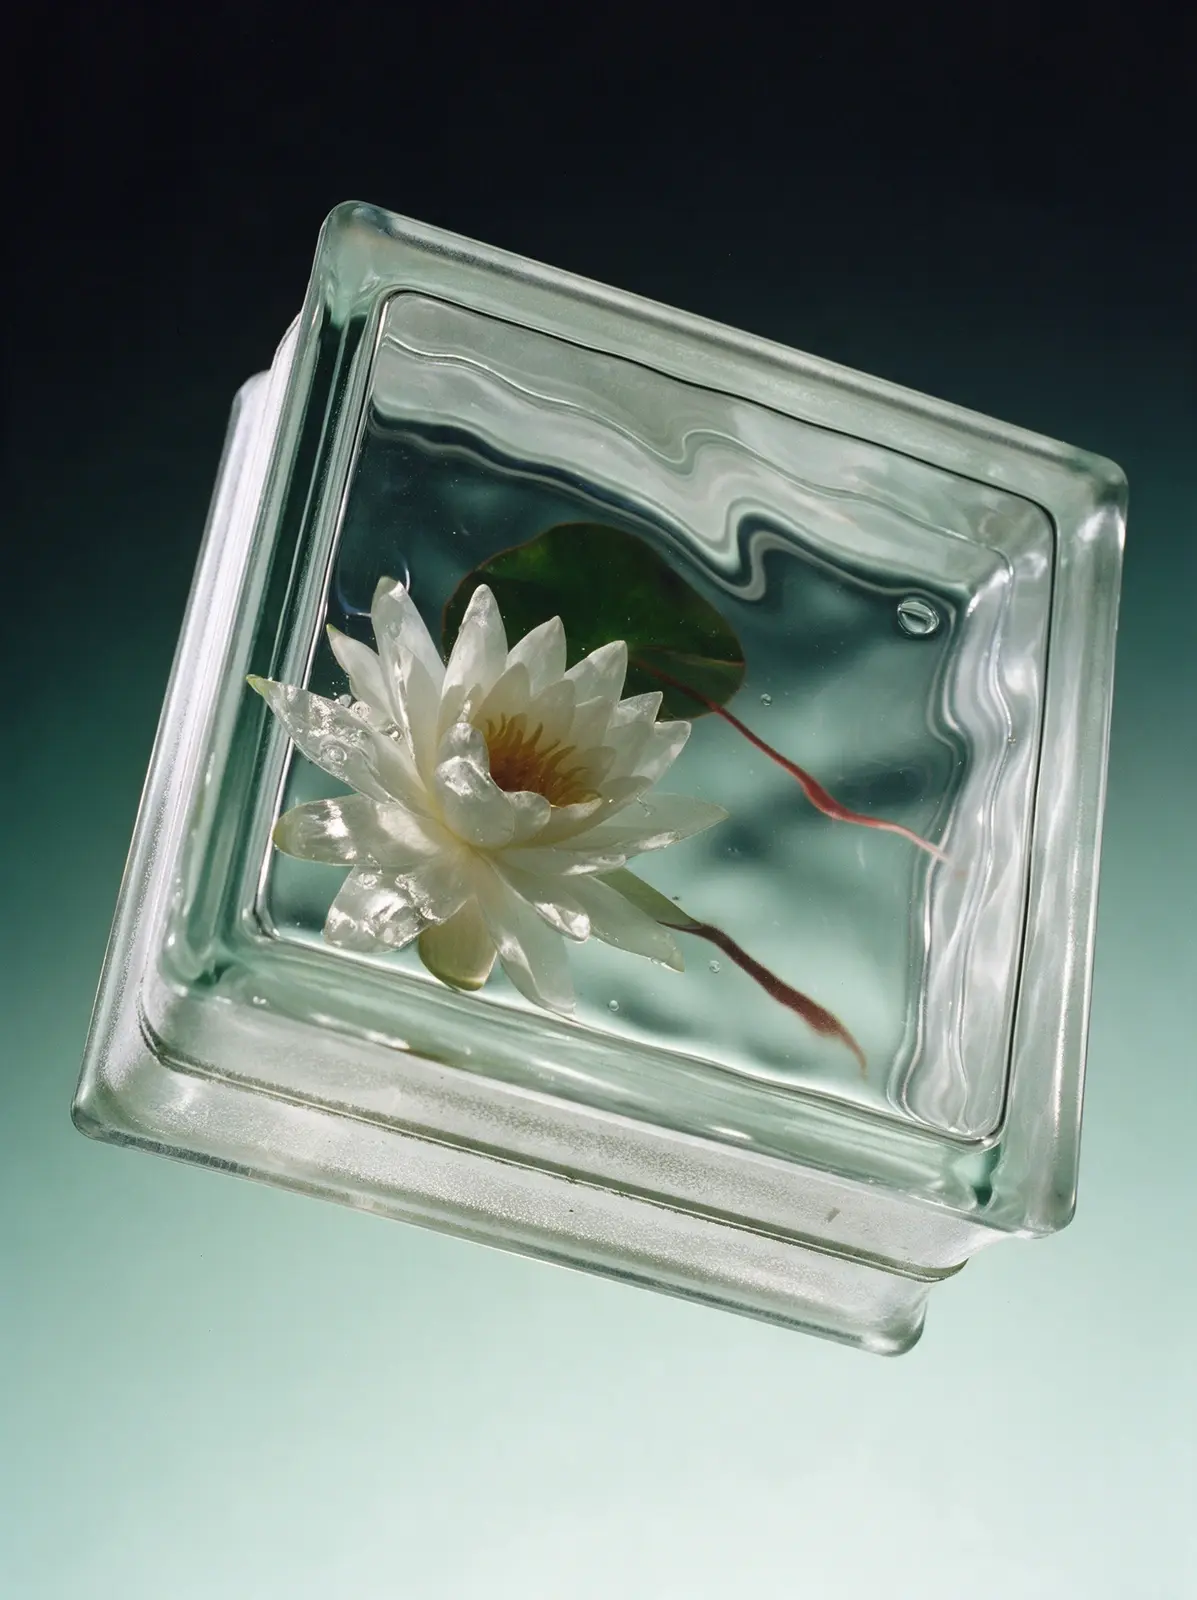
Seedream 5.0 Pro
Copy
Real studio photograph, shot on medium format film. A classic Soviet glass building block hangs weightless in empty space, seen steeply from below: tilted far back so its bottom narrow side with the frosted mortar channel faces the camera and the front face looms overhead in perspective. No floor, no surface, no shadow. Exact shape: a square brick about 19 by 19 by 8 centimeters, each square face with a narrow flat raised frame and a small step down into a slightly recessed wavy central field; the narrow sides each with a shallow channel holding a rough frosted matte band and a fine fusion seam; softly rounded corners. Solid glass all the way through. Everything is sealed completely inside the glass. The block has a clean glass silhouette with nothing sticking out of it, and the space around it is pure empty background. Inside, a minimal graphic composition of only a few elements: one large white water lily with a golden center placed off-center, so big that its pointed petals press against the inner edge of the frame; one round dark green lily pad tilted deeper in the glass behind it; and a single long trailing reddish water stem drifting across the open glass. The rest of the block is open glass. The water lily's front petals are pressed flat against the inner surface of the glass, spread and slightly squashed, with soft silvery sheen and tiny bubbles where they touch. The wavy front field bends every outline as if under water. In the open glass, the background behind is visibly warped by the waves, and a few round bubbles float. At the step of the frame everything behind is sharply shifted and broken. The deeper parts turn soft and hazy. The thick edges carry stretched white and green reflections of the lily. Faint pale aqua glass. No smoke, no mist. Background: smooth seamless gradient from near-black at the top to icy mint at the bottom. Strong backlight through the glass, soft side light. Not a 3D render, not CGI.
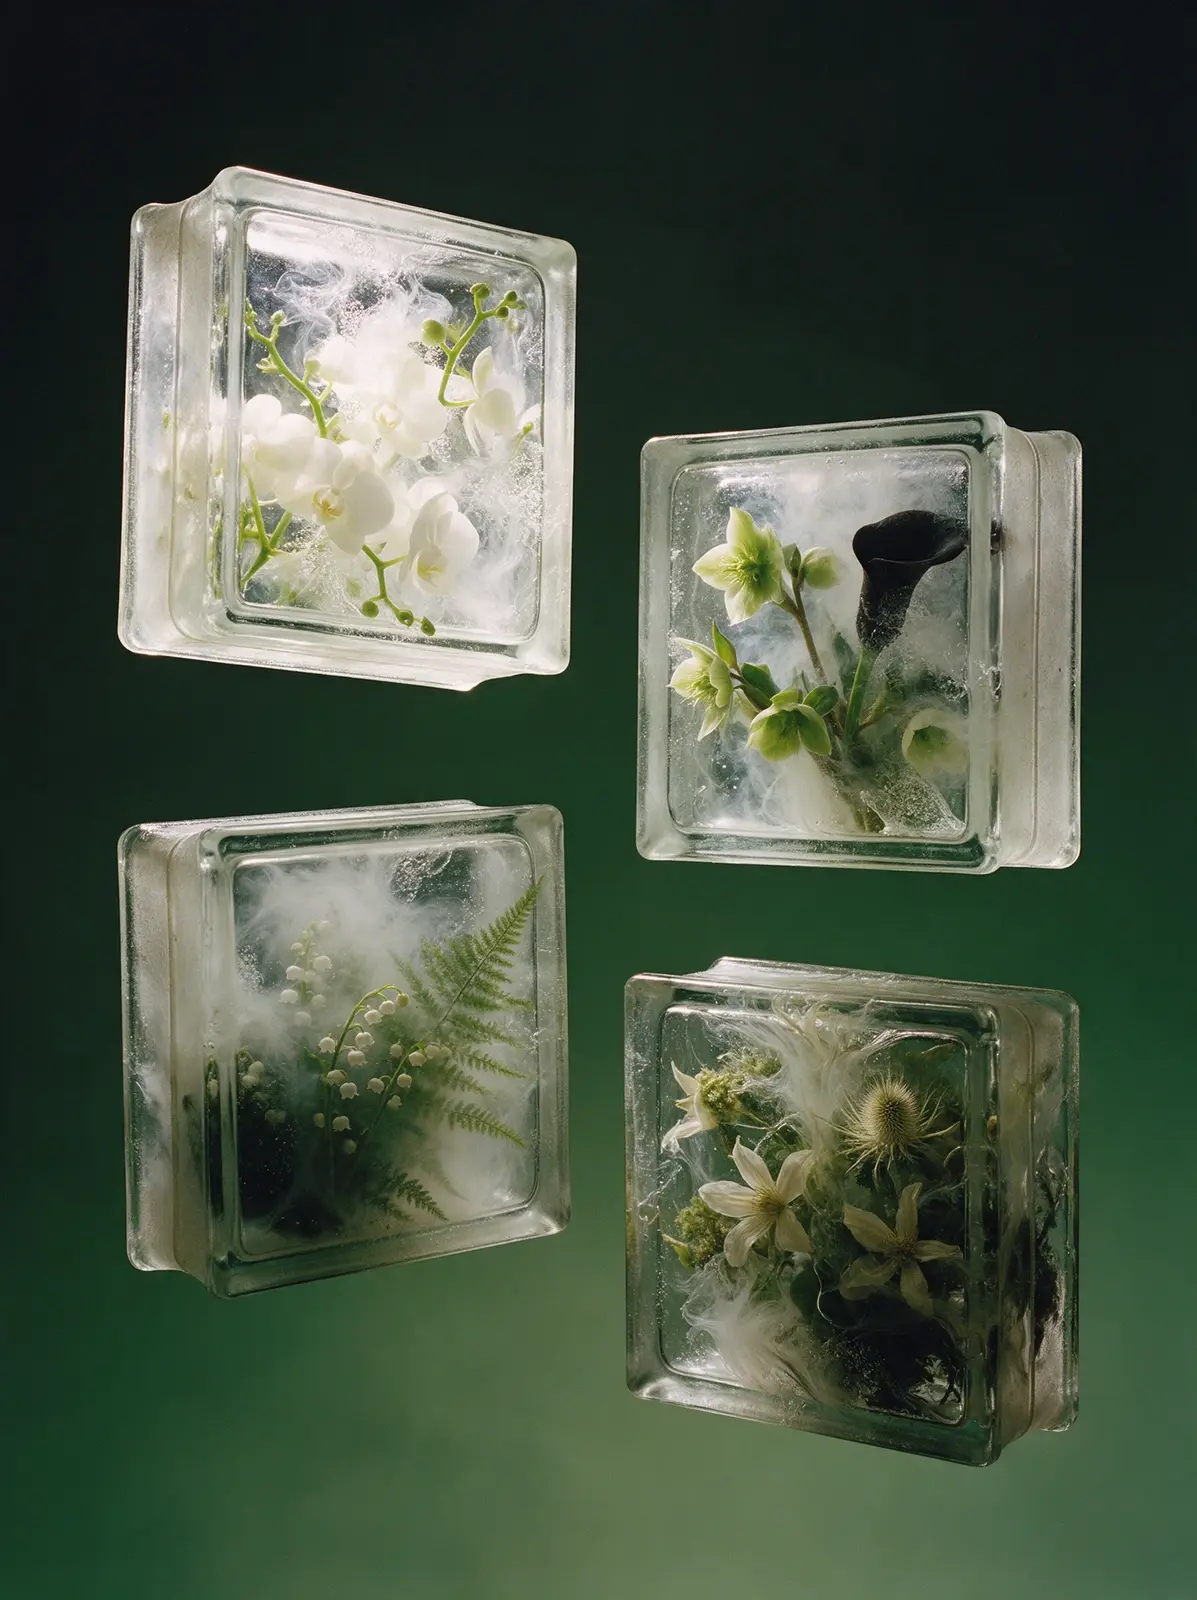
Seedream 5.0 Pro
Copy
Real studio photograph, shot on medium format film. Four vintage Soviet architectural glass blocks float in a carefully spaced sculptural arrangement in mid-air, staggered at different heights and depths with elegant negative space between them, each one turned at a graceful oblique angle rather than flat frontal. No floor, no ground, no visible support, no cast shadow. The blocks are authentic square Soviet pressed-glass bricks with thick heavy proportions, rounded corners, a flat raised perimeter around each face, a recessed central field, matte frosted seams along the narrow sides and slightly irregular pressed-glass surfaces. They are monolithic solid glass all the way through, with no inner chamber. Inside the four blocks are four related floral compositions: one with luminous white moth orchids, one with pale green hellebores and dark calla lily, one with delicate lily-of-the-valley and fern, and one with ivory clematis, pale thistle and mossy foliage. Each arrangement is dense, front-to-back and organically composed, with stems, petals and foliage embedded at multiple depths. The glass flows between every botanical form and is clearly visible in front of the flowers through milky veils, bubble clusters, casting cords, watery distortions and thick edge reflections. Deeper elements fade into soft dark murk within the glass. Background: seamless rich gradient from near-black pine green at the top to forest green and muted mossy green lower down. Crisp backlight shines through the blocks, making the pale flowers luminous against the dark green atmosphere. Not CGI.
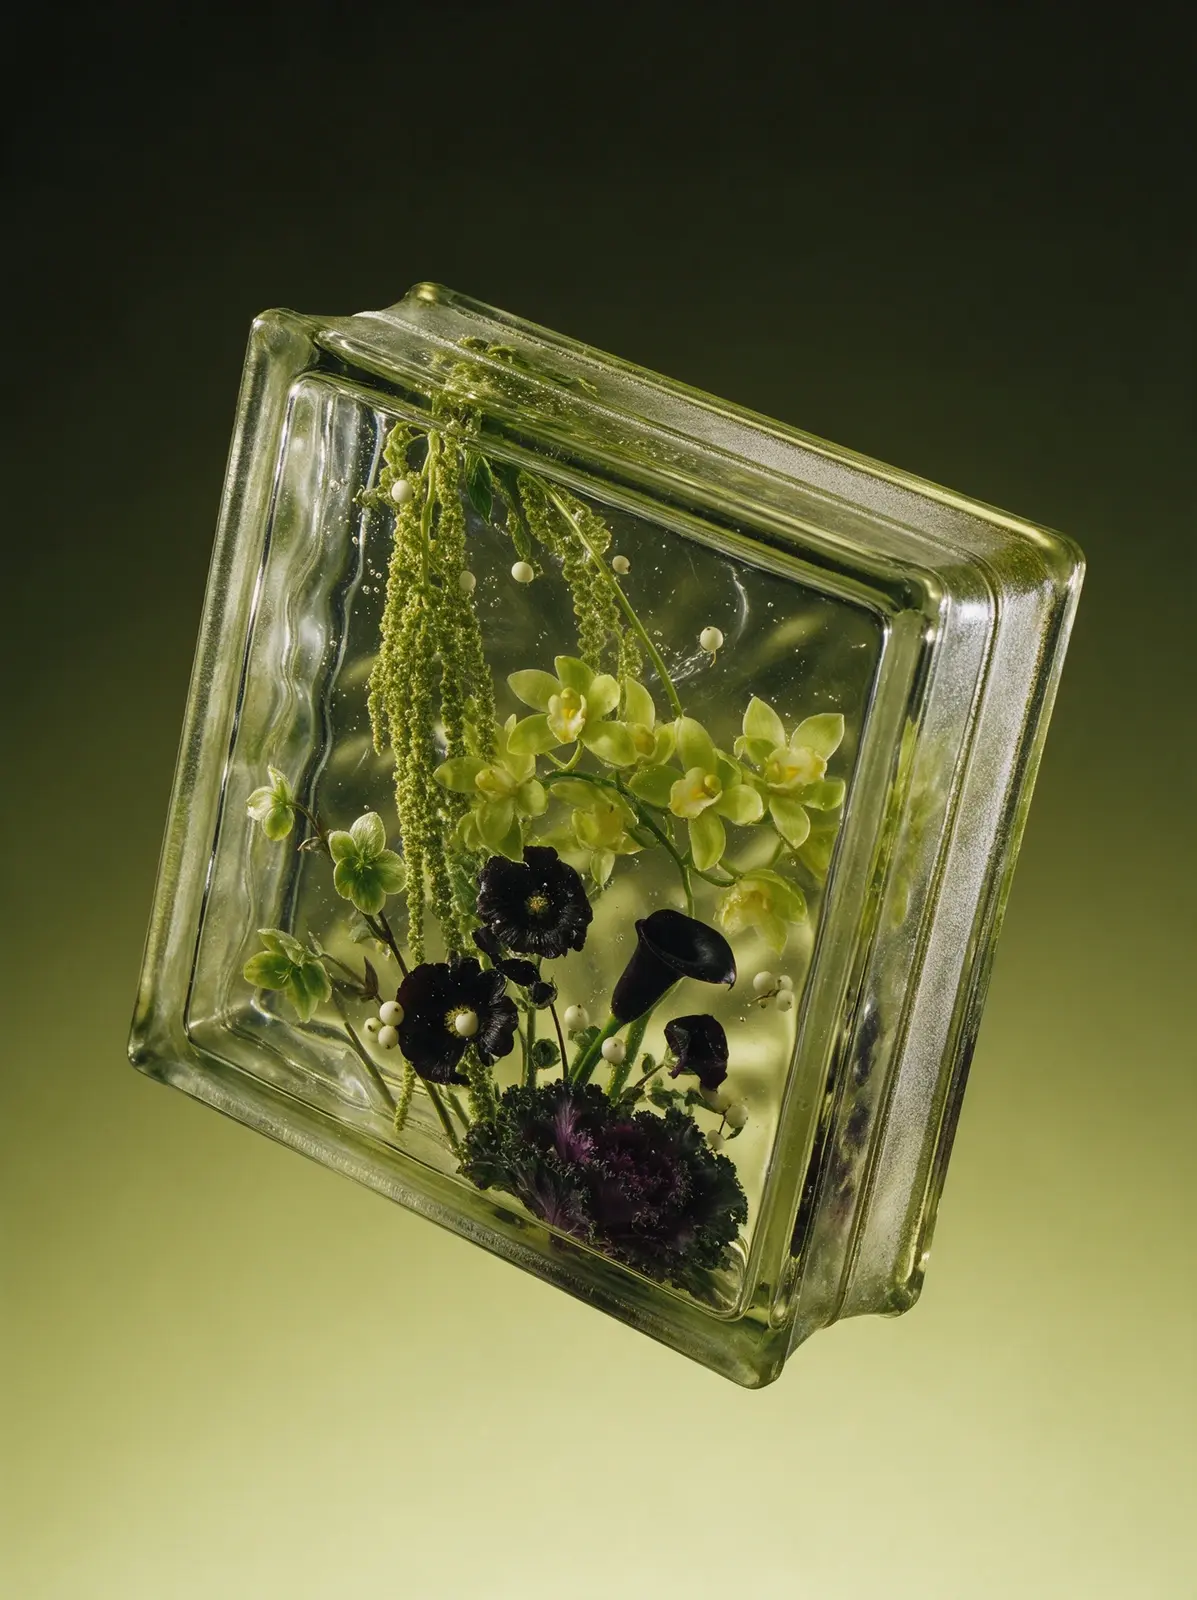
Seedream 5.0 Pro
Copy
Real studio photograph, shot on medium format film. A classic Soviet glass building block from the 1970s hangs weightless in empty space, tilted backward at a three-quarter angle with its front face and one narrow side visible. There is no floor, no ground, no surface anywhere and no shadow anywhere. Its exact recognizable shape: a square brick about twice as wide as it is thick, like 19 by 19 by 8 centimeters. Each square face has a narrow flat raised frame along its edges, then a small step down into a slightly recessed central field. The four narrow sides each have a shallow channel running along their middle with a rough frosted matte band and a fine fusion seam inside it, like the groove that holds the mortar. Softly rounded corners, thick heavy edges, typical mass-produced pressed glass. The block is SOLID glass all the way through, with no hollow, no inner chamber, no inner walls and no back panel. The flowers are cast directly into the glass mass, the way flowers are frozen inside a solid block of ice: glass touches every petal, thin silvery films of trapped air coat the petal surfaces, and clusters of tiny bubbles cling to stems and petal edges. The recessed front field is wavy, so everything inside sways as if seen under water: outlines wobble, petals stretch and squeeze, stems kink and jump sideways. Nothing inside is perfectly sharp; the deeper flowers turn soft, dark and murky in the thickness of the glass. The thick edges mirror the arrangement in stretched, broken reflections. The glass has a faint pale golden-green tint that deepens to olive in the edges. Composition inside: a cascading arrangement: long ropes of hanging green amaranthus pouring down from the top corner through the whole height of the block, a lime-green cymbidium orchid spray arching across the middle and pressed against the front face, rising from the bottom toward them a near-black hollyhock and black calla lilies sinking into the murky depth, a pale green hellebore, white snowberries scattered like pearls, and a ruffled dark purple ornamental kale at the base, cropped by the frame. Background: smooth seamless gradient from near-black olive at the top to pale soft chartreuse at the bottom, pure empty color with no floor. Dramatic backlight and side light passing through the glass, the flowers glowing softly from within. Not a 3D render, not CGI.
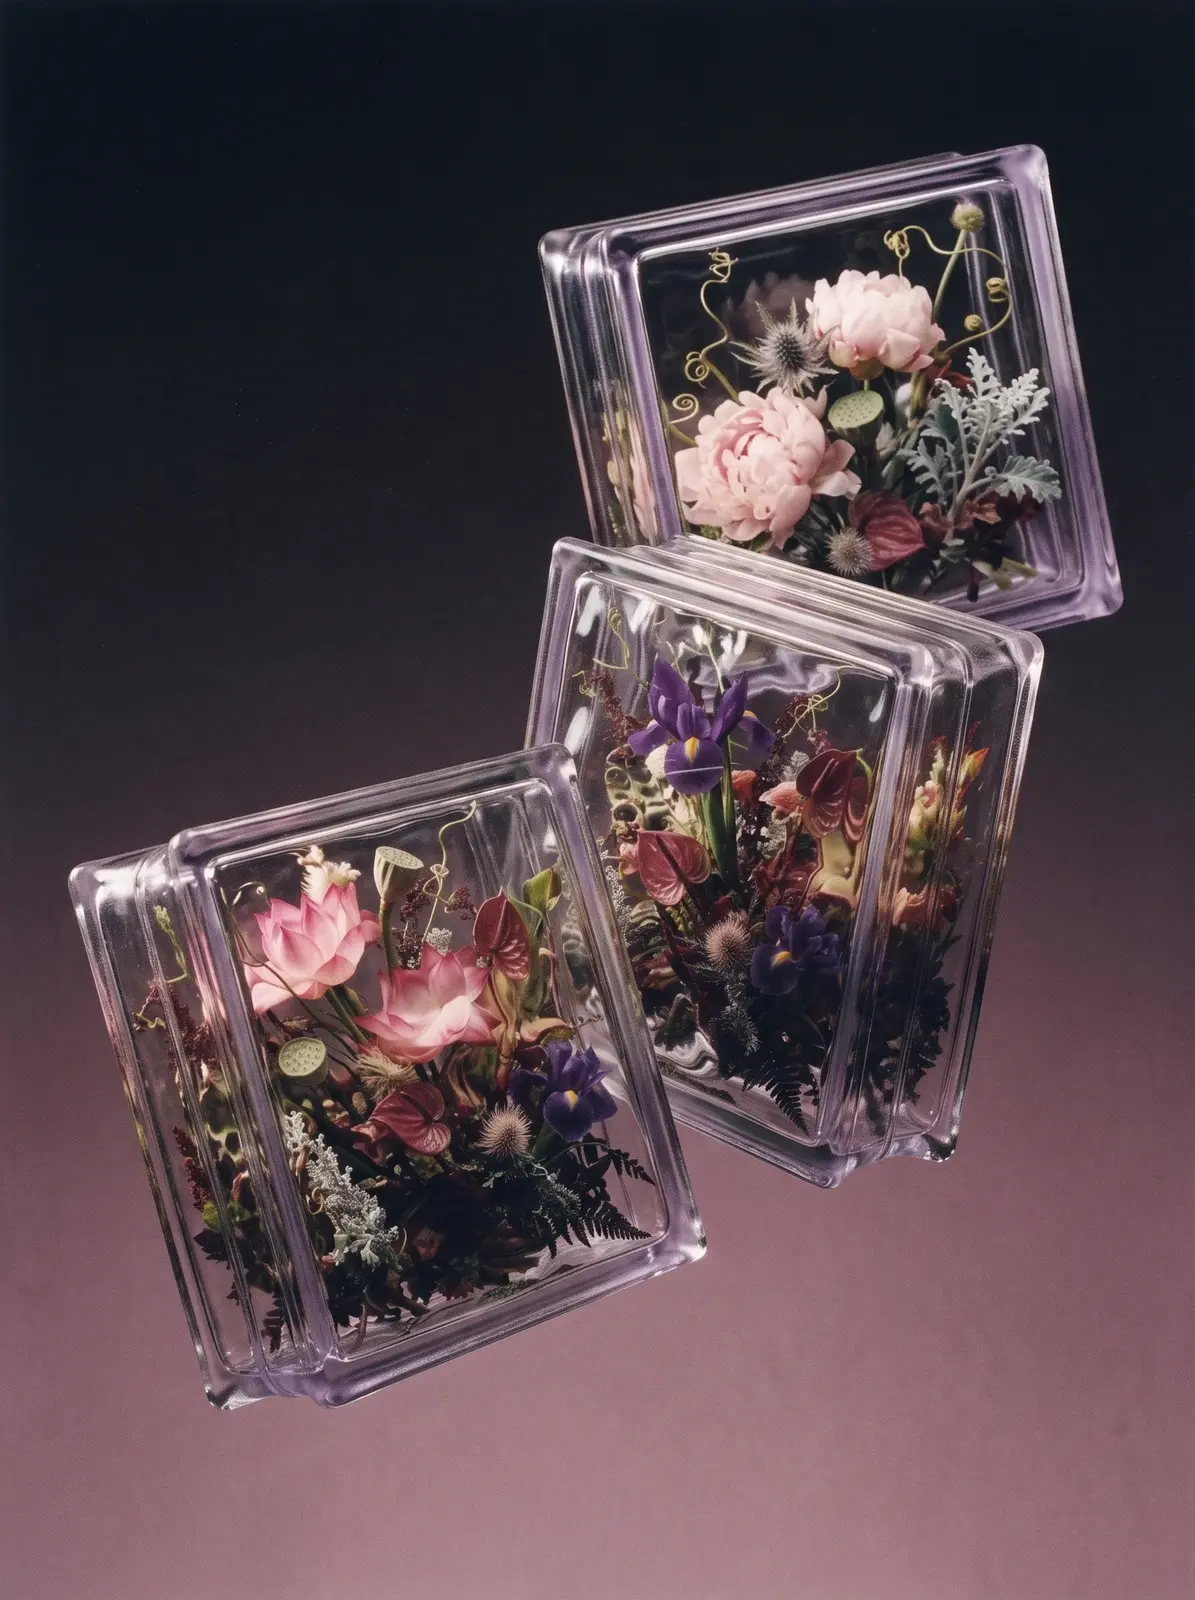
Nano Banana 2.1
Copy
Real studio photograph, shot on medium format film. Three thick Soviet glass blocks — the classic 1970s square pressed-glass bricks with a flat rim around each face, softly rounded corners and a seam around their sides — float in mid-air at different heights and depths with generous space between them, each tilted at a different angle so their side, top or bottom faces are visible. The farthest one is slightly soft from depth of field. The glass itself is almost invisible: it shows only through thin bright highlights on the edges and rims, through a delicate pale lavender tint that deepens to soft violet in the thick edges and corners, and through the way it bends everything behind it. The front faces are uneven, so the flowers inside look as if seen through moving water: their outlines wobble and smear, petals are stretched and squeezed in waves, stems kink and jump sideways. Nothing inside is perfectly sharp. The flowers closest to the front are only slightly warped, while the ones further back are softer, darker and murkier. The thick side faces act like mirrors, showing stretched, fragmented reflections of the flowers. Each block is filled from wall to wall with a dense wild arrangement, large blooms pressed against the inner faces and cropped by the edges: the first with a large pink lotus, lotus buds and a lotus seed pod; the second with a deep violet iris, burgundy anthurium and dark fern; the third with pale pink peonies, a thistle, silvery dusty miller and curling tendrils. The flowers are lit only by light passing through the glass, so they glow softly from within. Background: a plain studio paper sweep in a smooth gradient from near-black at the top to dusty mauve at the bottom. Dramatic backlight and side light. No glow, no halo, no shadows beneath. Not a 3D render, not CGI.
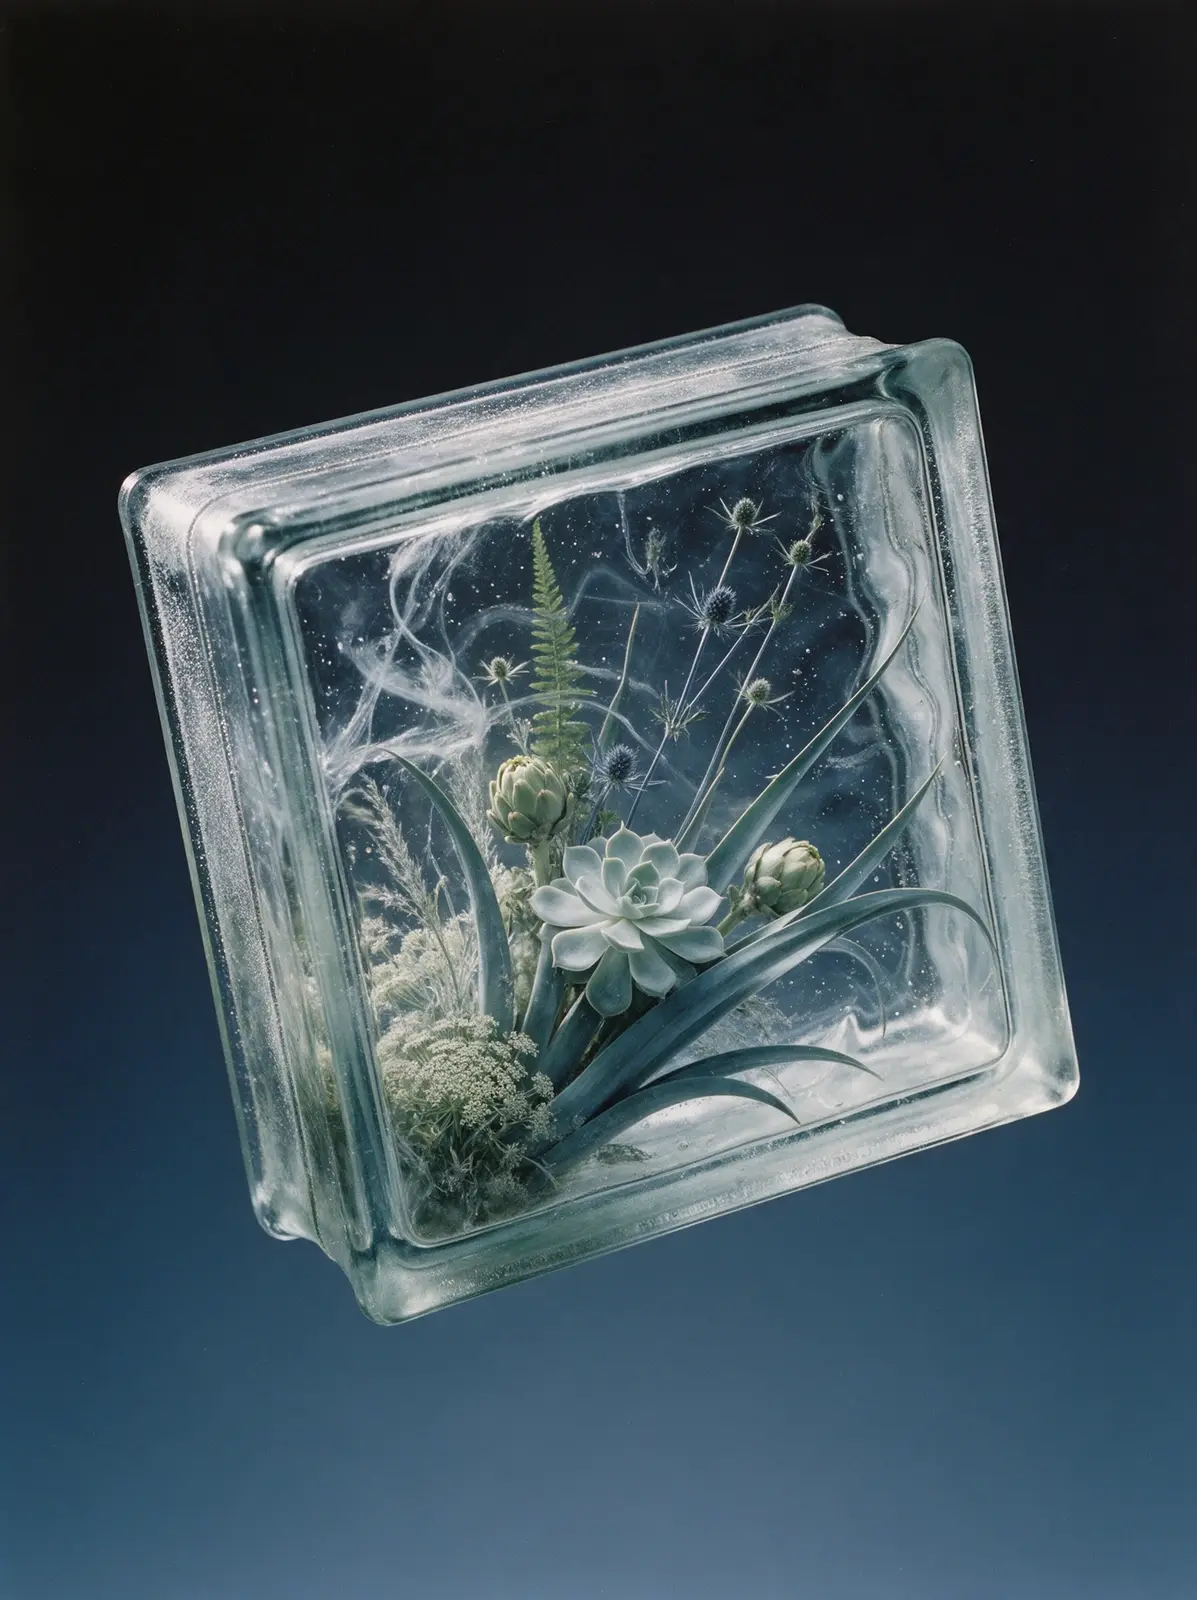
Seedream 5.0 Pro
Copy
Real studio photograph, shot on medium format film. A classic Soviet glass building block from the 1970s hangs weightless in empty space, dramatically tilted on two axes as if tossed and frozen mid-air, its front face and one narrow side visible. No floor, no surface, no shadow anywhere. Exact recognizable shape: a square brick about twice as wide as it is thick, like 19 by 19 by 8 centimeters. Each square face has a narrow flat raised frame along its edges, then a small step down into a slightly recessed central field. The four narrow sides each have a shallow channel along their middle with a rough frosted matte band and a fine fusion seam inside it. Softly rounded corners, thick heavy edges, mass-produced pressed glass. Solid glass all the way through, no hollow inside. Cast inside the glass is a fragment of a sculptural ikebana arrangement with a clear hierarchy, as if the block cut a window out of a larger composition. The gesture: long curved blue-grey agave leaves sweep in a fan from the lower corner and arc out past the frame. The hero is one large pale silvery-mint echeveria rosette pressed against the front face, crisp geometric petals, cropped by the frame. Secondary accents: two pale green artichokes at different depths. A dense base of lacy white Queen Anne's lace and silvery grasses in the lower corner. The upper part stays open, crossed only by a few tall thin steel-blue sea holly stems with spiky heads and one upright green fern spear. The glass is clearly in front of everything: swirling cords and streaks from the casting, thousands of tiny bubbles at every depth, faint milky veils. The wavy front field makes the plants sway and wobble as if under water. At the step between the frame and the recessed field, everything behind is sharply displaced and broken in a band around the face. Deeper elements dissolve into soft murk. The open areas of glass are never empty: refracted streaks of the background color, cords and bubbles drift through them. The glass has a faint icy aqua tint deepening to steel blue in the edges. Background: smooth seamless gradient from near-black at the top to deep steel blue at the bottom, pure empty color. Strong backlight through the glass so the plants glow from within, soft side light along the edges. Not a 3D render, not CGI.
Стеклоблоки со светом
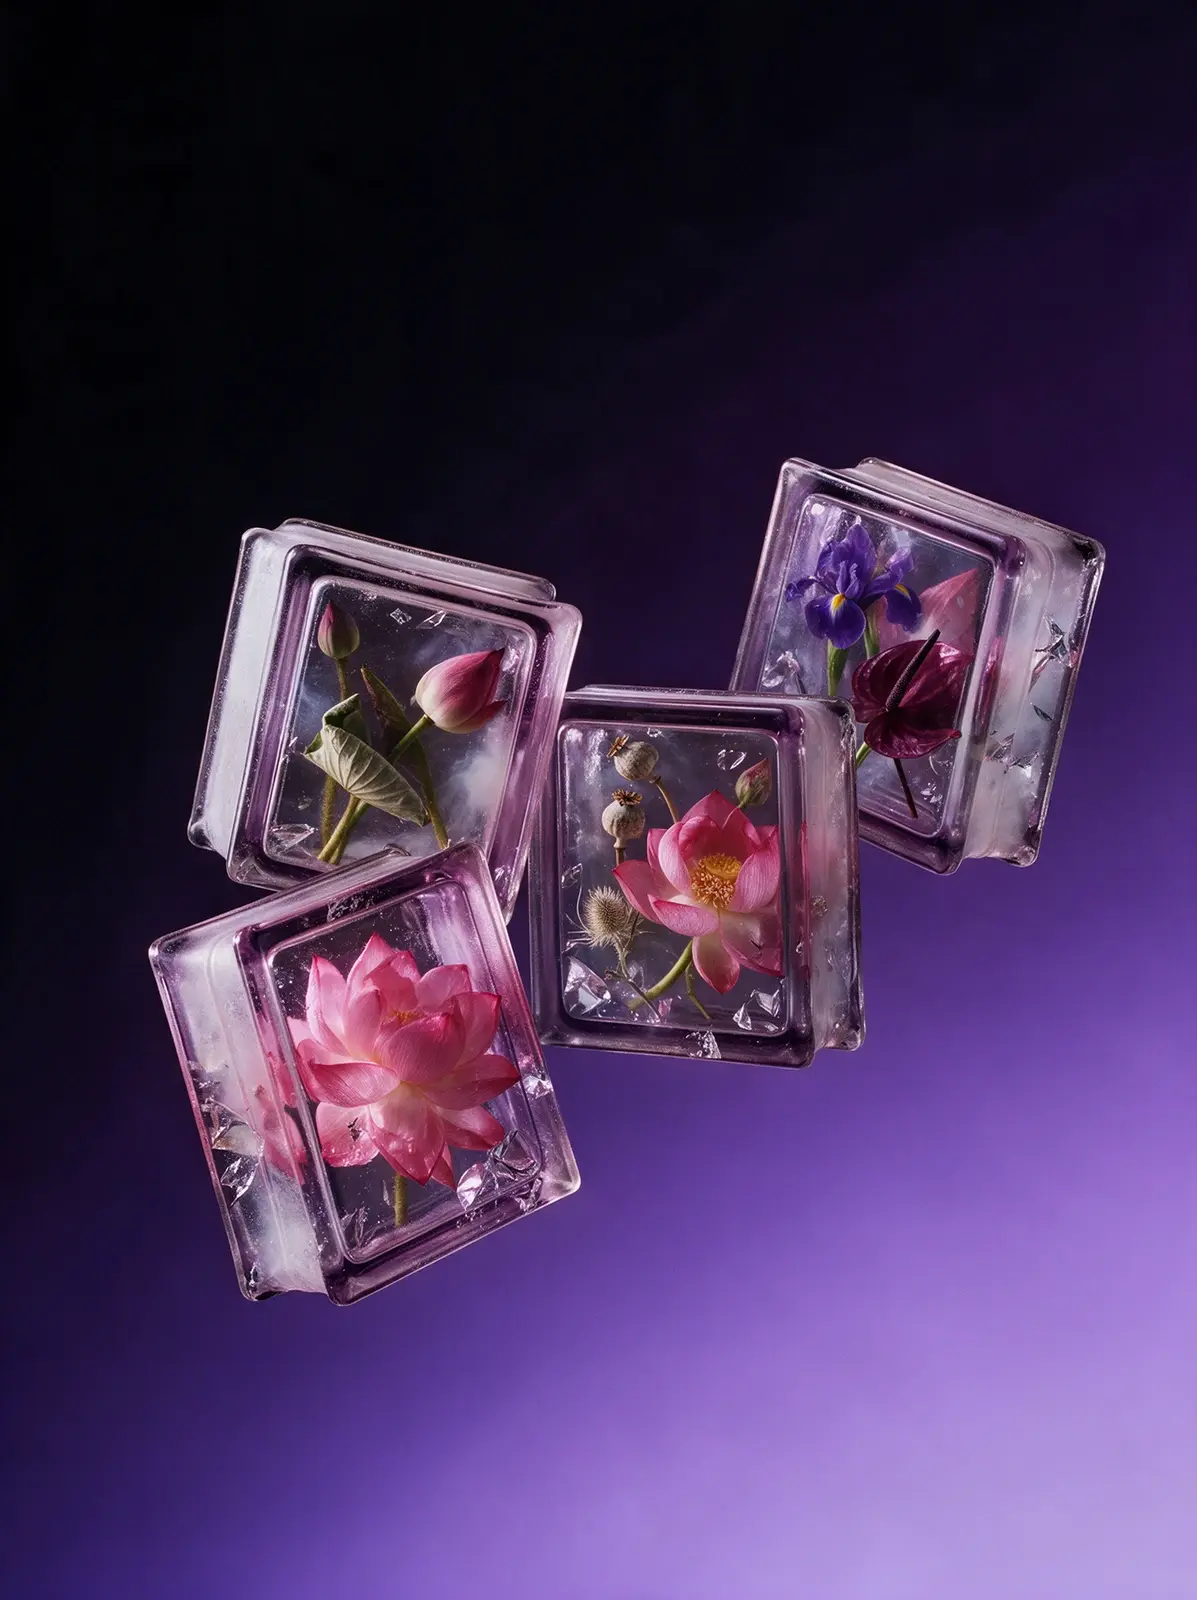
Seedream 5.0 Pro
Copy
{ "priority": "Lighting first; the object must stay exactly as in the reference.", "lighting": "beautiful dramatic directional light on the object, the same in every image. The light comes from outside the frame on the left, at about the height of the object and slightly toward the camera, so it reaches only the object, with strong, smooth falloff across its form: the upper-left part is bright and luminous, the light gradually fades across the middle, and the lower-right part sinks into deep shadow, about 60% lit and 40% in shadow. Every curve, fold, seam, bevel and bulge is sculpted by its own highlight and its own small shadow, so the whole surface becomes a rich, lively pattern of light and shadow, and the texture shows crisp micro-shadows and tiny glints. Glass and glossy parts show long crisp specular highlights along their upper-left edges. The shadow side receives only soft colored reflected light from the lower part of the background, so shadows are deep and saturated, a richer version of the object's own colors mixed with the background hue, with texture and details clearly readable; nothing is solid black, nothing is flat or gray. Fine-art still-life contrast. Completely relight the object; do not keep the lighting of the reference photo. The background is lit separately and evenly, and its brightness comes only from the gradient: the top edge and the top-left corner are the darkest, deepest part of the whole image, uniformly dark, and the background only gets lighter toward the bottom.", "subject": "The exact object from the attached reference image, recreated as a photorealistic hero shot and fully relit. Preserve its identity precisely: the same design, shape, proportions, construction, colors, prints and patterns, logos and lettering, materials and surface finish, and the same number of items (a pair stays a pair, a set stays a set). Do not redesign, simplify, restyle or add anything. Every material keeps its real character and its texture is crisp and readable: knit stays knit, suede stays suede, leather stays leather, mesh stays mesh, metal stays metal. If the object is transparent or translucent (glass, crystal, acrylic, resin, ice), it stays solid and keeps exactly what is inside it in the reference: never make it hollow, empty or box-like, never add air gaps or water lines. Show its real thickness, refraction, ripples, bevels and edge highlights, and keep anything inside it sharp, colorful and readable through the glass. Render only the object: no person, hand, body, mannequin, hanger, stand, string or support.", "composition": "tilted 15 degrees counterclockwise and turned so its front and left side are both visible, three-quarter view, camera slightly above, looking down a little; centered, filling about 65% of the frame.",
"clothing_and_pairs": "If the object is clothing, it is never worn and never on an invisible body: it tumbles through the air bunched, twisted and folded over itself into a sculptural form, with rounded rolls, deep folds and crevices for the light to model; sleeves twist and fold, the hem rolls up, the collar tips sideways; it stays clearly recognizable and moves by its real weight. If the object is a pair, the two items float at different depths with complementary angles; laces, straps and cords drift in soft curves.", "space": "the object levitates in empty space with nothing under or around it: no floor, no tabletop, no surface, no cast shadow, no contact shadow, no reflection below it, no horizon line. It hangs in the air in front of the seamless gradient, clearly floating, with clean space on all sides.", "background": { "description": "deep black-violet at the top fading smoothly into rich royal violet and soft lavender-violet at the bottom", "stops": [ { "position": 0, "color": "#0A0712" }, { "position": 40, "color": "#22133F" }, { "position": 75, "color": "#5A3BA3" }, { "position": 100, "color": "#A68DE3" } ], "rules": "flat, perfectly smooth and evenly toned, like matte paper far behind the object; no blotches, streaks, diagonal light shapes, vignette, glow, halo, floor or horizon" }, "style": "high-end fine-art still-life photography, medium format, subtle analog film character with fine natural grain, rich true colors, razor-sharp focus on the object, museum-quality detail.", "final_check": "the exact object from the reference, unchanged; light from the left, outside the frame, falling off across the object; a rich light-and-shadow pattern on every form; deep colored shadows with readable texture, nothing black; transparent objects stay solid and keep their contents; floating in empty space, no floor, no shadow below, no horizon; clean, flat, even gradient whose top edge and top-left corner are the darkest part of the image." }
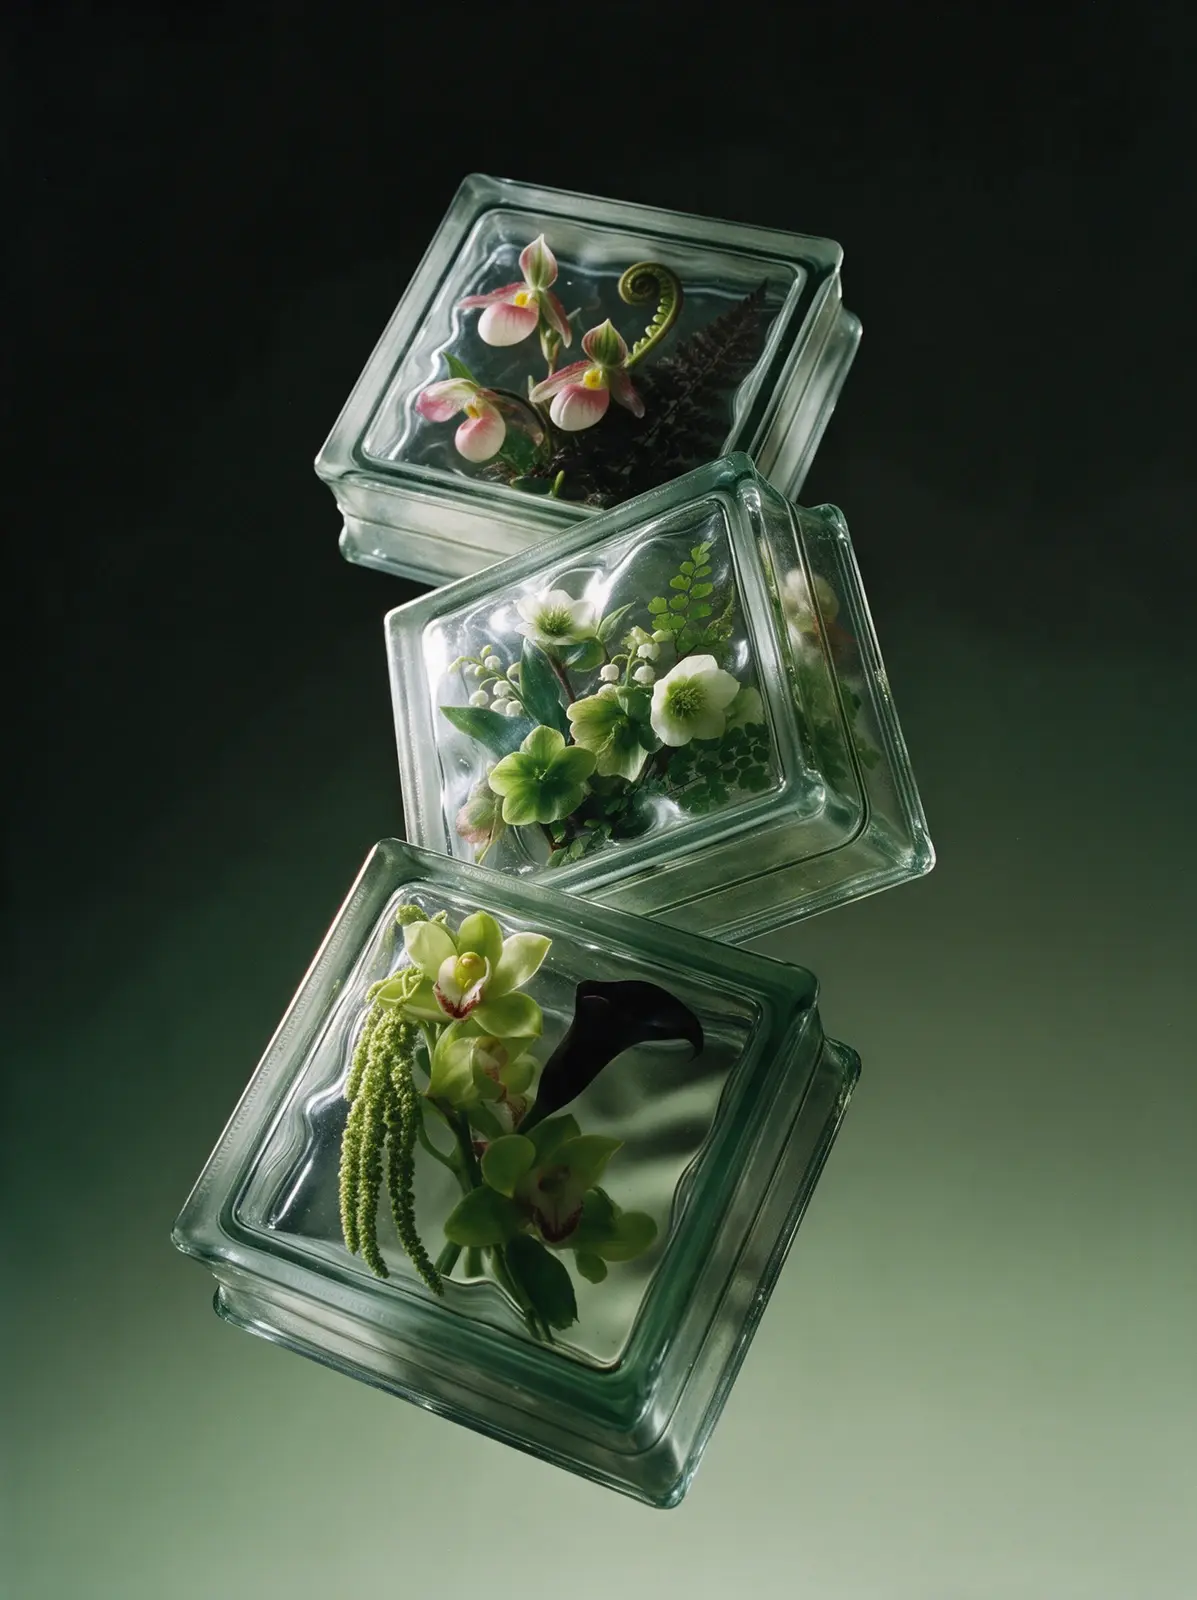
Seedream 5.0 Pro
Copy
{ "priority": "Lighting first; the object must stay exactly as in the reference.", "lighting": "beautiful dramatic directional light on the object, the same in every image. The light comes from outside the frame on the left, at about the height of the object and slightly toward the camera, so it reaches only the object, with strong, smooth falloff across its form: the upper-left part is bright and luminous, the light gradually fades across the middle, and the lower-right part sinks into deep shadow, about 60% lit and 40% in shadow. Every curve, fold, seam, bevel and bulge is sculpted by its own highlight and its own small shadow, so the whole surface becomes a rich, lively pattern of light and shadow, and the texture shows crisp micro-shadows and tiny glints. Glass and glossy parts show long crisp specular highlights along their upper-left edges. The shadow side receives only soft colored reflected light from the lower part of the background, so shadows are deep and saturated, a richer version of the object's own colors mixed with the background hue, with texture and details clearly readable; nothing is solid black, nothing is flat or gray. Fine-art still-life contrast. Completely relight the object; do not keep the lighting of the reference photo. The background is lit separately and evenly, and its brightness comes only from the gradient: the top edge and the top-left corner are the darkest, deepest part of the whole image, uniformly dark, and the background only gets lighter toward the bottom.", "subject": "The exact object from the attached reference image, recreated as a photorealistic hero shot and fully relit. Preserve its identity precisely: the same design, shape, proportions, construction, colors, prints and patterns, logos and lettering, materials and surface finish, and the same number of items (a pair stays a pair, a set stays a set). Do not redesign, simplify, restyle or add anything. Every material keeps its real character and its texture is crisp and readable: knit stays knit, suede stays suede, leather stays leather, mesh stays mesh, metal stays metal. If the object is transparent or translucent (glass, crystal, acrylic, resin, ice), it stays solid and keeps exactly what is inside it in the reference: never make it hollow, empty or box-like, never add air gaps or water lines. Show its real thickness, refraction, ripples, bevels and edge highlights, and keep anything inside it sharp, colorful and readable through the glass. Render only the object: no person, hand, body, mannequin, hanger, stand, string or support.", "composition": "tilted 22 degrees counterclockwise and turned to show its right side; dramatic low camera angle from below, looking up at its underside and front, so it feels monumental; centered, filling about 65% of the
frame.", "clothing_and_pairs": "If the object is clothing, it is never worn and never on an invisible body: it tumbles through the air bunched, twisted and folded over itself into a sculptural form, with rounded rolls, deep folds and crevices for the light to model; sleeves twist and fold, the hem rolls up, the collar tips sideways; it stays clearly recognizable and moves by its real weight. If the object is a pair, the two items float at different depths with complementary angles; laces, straps and cords drift in soft curves.", "space": "the object levitates in empty space with nothing under or around it: no floor, no tabletop, no surface, no cast shadow, no contact shadow, no reflection below it, no horizon line. It hangs in the air in front of the seamless gradient, clearly floating, with clean space on all sides.", "background": { "description": "deep green-black at the top fading smoothly into muted sage and pale grey-green at the bottom", "stops": [ { "position": 0, "color": "#0A100D" }, { "position": 40, "color": "#1C2B23" }, { "position": 75, "color": "#4F6E58" }, { "position": 100, "color": "#8FAA8C" } ], "rules": "flat, perfectly smooth and evenly toned, like matte paper far behind the object; no blotches, streaks, diagonal light shapes, vignette, glow, halo, floor or horizon" }, "style": "high-end fine-art still-life photography, medium format, subtle analog film character with fine natural grain, rich true colors, razor-sharp focus on the object, museum-quality detail.", "final_check": "the exact object from the reference, unchanged; light from the left, outside the frame, falling off across the object; a rich light-and-shadow pattern on every form; deep colored shadows with readable texture, nothing black; transparent objects stay solid and keep their contents; floating in empty space, no floor, no shadow below, no horizon; clean, flat, even gradient whose top edge and top-left corner are the darkest part of the image." }
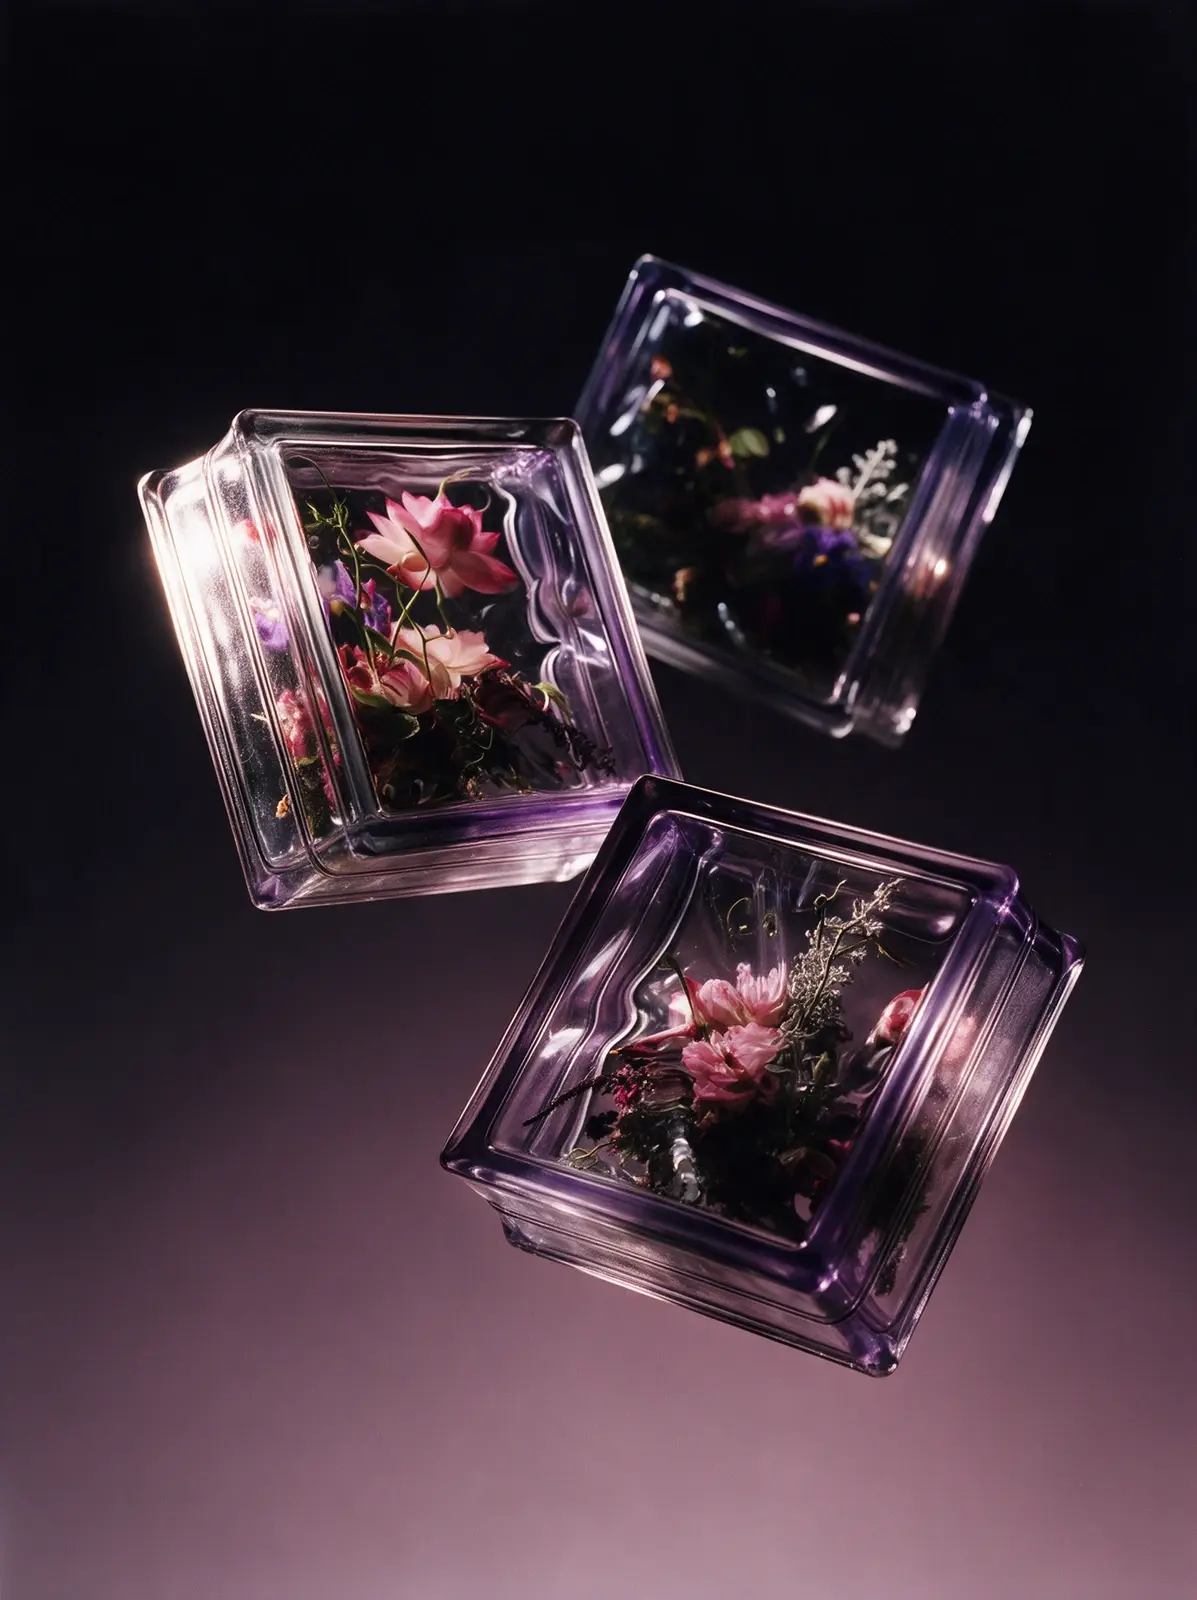
Seedream 5.0 Pro
Copy
{ "priority": "Lighting first; the object must stay exactly as in the reference.", "lighting": "beautiful dramatic directional light on the object, the same in every image. The light comes from outside the frame on the left, at about the height of the object and slightly toward the camera, so it reaches only the object, with strong, smooth falloff across its form: the upper-left part is bright and luminous, the light gradually fades across the middle, and the lower-right part sinks into deep shadow, about 60% lit and 40% in shadow. Every curve, fold, seam, bevel and bulge is sculpted by its own highlight and its own small shadow, so the whole surface becomes a rich, lively pattern of light and shadow, and the texture shows crisp micro-shadows and tiny glints. Glass and glossy parts show long crisp specular highlights along their upper-left edges. The shadow side receives only soft colored reflected light from the lower part of the background, so shadows are deep and saturated, a richer version of the object's own colors mixed with the background hue, with texture and details clearly readable; nothing is solid black, nothing is flat or gray. Fine-art still-life contrast. Completely relight the object; do not keep the lighting of the reference photo. The background is lit separately and evenly, and its brightness comes only from the gradient: the top edge and the top-left corner are the darkest, deepest part of the whole image, uniformly dark, and the background only gets lighter toward the bottom.", "subject": "The exact object from the attached reference image, recreated as a photorealistic hero shot and fully relit. Preserve its identity precisely: the same design, shape, proportions, construction, colors, prints and patterns, logos and lettering, materials and surface finish, and the same number of items (a pair stays a pair, a set stays a set). Do not redesign, simplify, restyle or add anything. Every material keeps its real character and its texture is crisp and readable: knit stays knit, suede stays suede, leather stays leather, mesh stays mesh, metal stays metal. If the object is transparent or translucent (glass, crystal, acrylic, resin, ice), it stays solid and keeps exactly what is inside it in the reference: never make it hollow, empty or box-like, never add air gaps or water lines. Show its real thickness, refraction, ripples, bevels and edge highlights, and keep anything inside it sharp, colorful and readable through the glass. Render only the object: no person, hand, body, mannequin, hanger, stand, string or support.", "composition": "tilted 18 degrees clockwise and turned so its front and right side are both visible, three-quarter view; camera slightly below center looking up a little; centered, filling about 65% of the frame.",
"clothing_and_pairs": "If the object is clothing, it is never worn and never on an invisible body: it tumbles through the air bunched, twisted and folded over itself into a sculptural form, with rounded rolls, deep folds and crevices for the light to model; sleeves twist and fold, the hem rolls up, the collar tips sideways; it stays clearly recognizable and moves by its real weight. If the object is a pair, the two items float at different depths with complementary angles; laces, straps and cords drift in soft curves.", "space": "the object levitates in empty space with nothing under or around it: no floor, no tabletop, no surface, no cast shadow, no contact shadow, no reflection below it, no horizon line. It hangs in the air in front of the seamless gradient, clearly floating, with clean space on all sides.", "background": { "description": "near-black plum at the top fading smoothly into dusty mauve-rose at the bottom", "stops": [ { "position": 0, "color": "#0D0A10" }, { "position": 40, "color": "#2A1C26" }, { "position": 75, "color": "#6E4F5E" }, { "position": 100, "color": "#A3818F" } ], "rules": "flat, perfectly smooth and evenly toned, like matte paper far behind the object; no blotches, streaks, diagonal light shapes, vignette, glow, halo, floor or horizon" }, "style": "high-end fine-art still-life photography, medium format, subtle analog film character with fine natural grain, rich true colors, razor-sharp focus on the object, museum-quality detail.", "final_check": "the exact object from the reference, unchanged; light from the left, outside the frame, falling off across the object; a rich light-and-shadow pattern on every form; deep colored shadows with readable texture, nothing black; transparent objects stay solid and keep their contents; floating in empty space, no floor, no shadow below, no horizon; clean, flat, even gradient whose top edge and top-left corner are the darkest part of the image." }
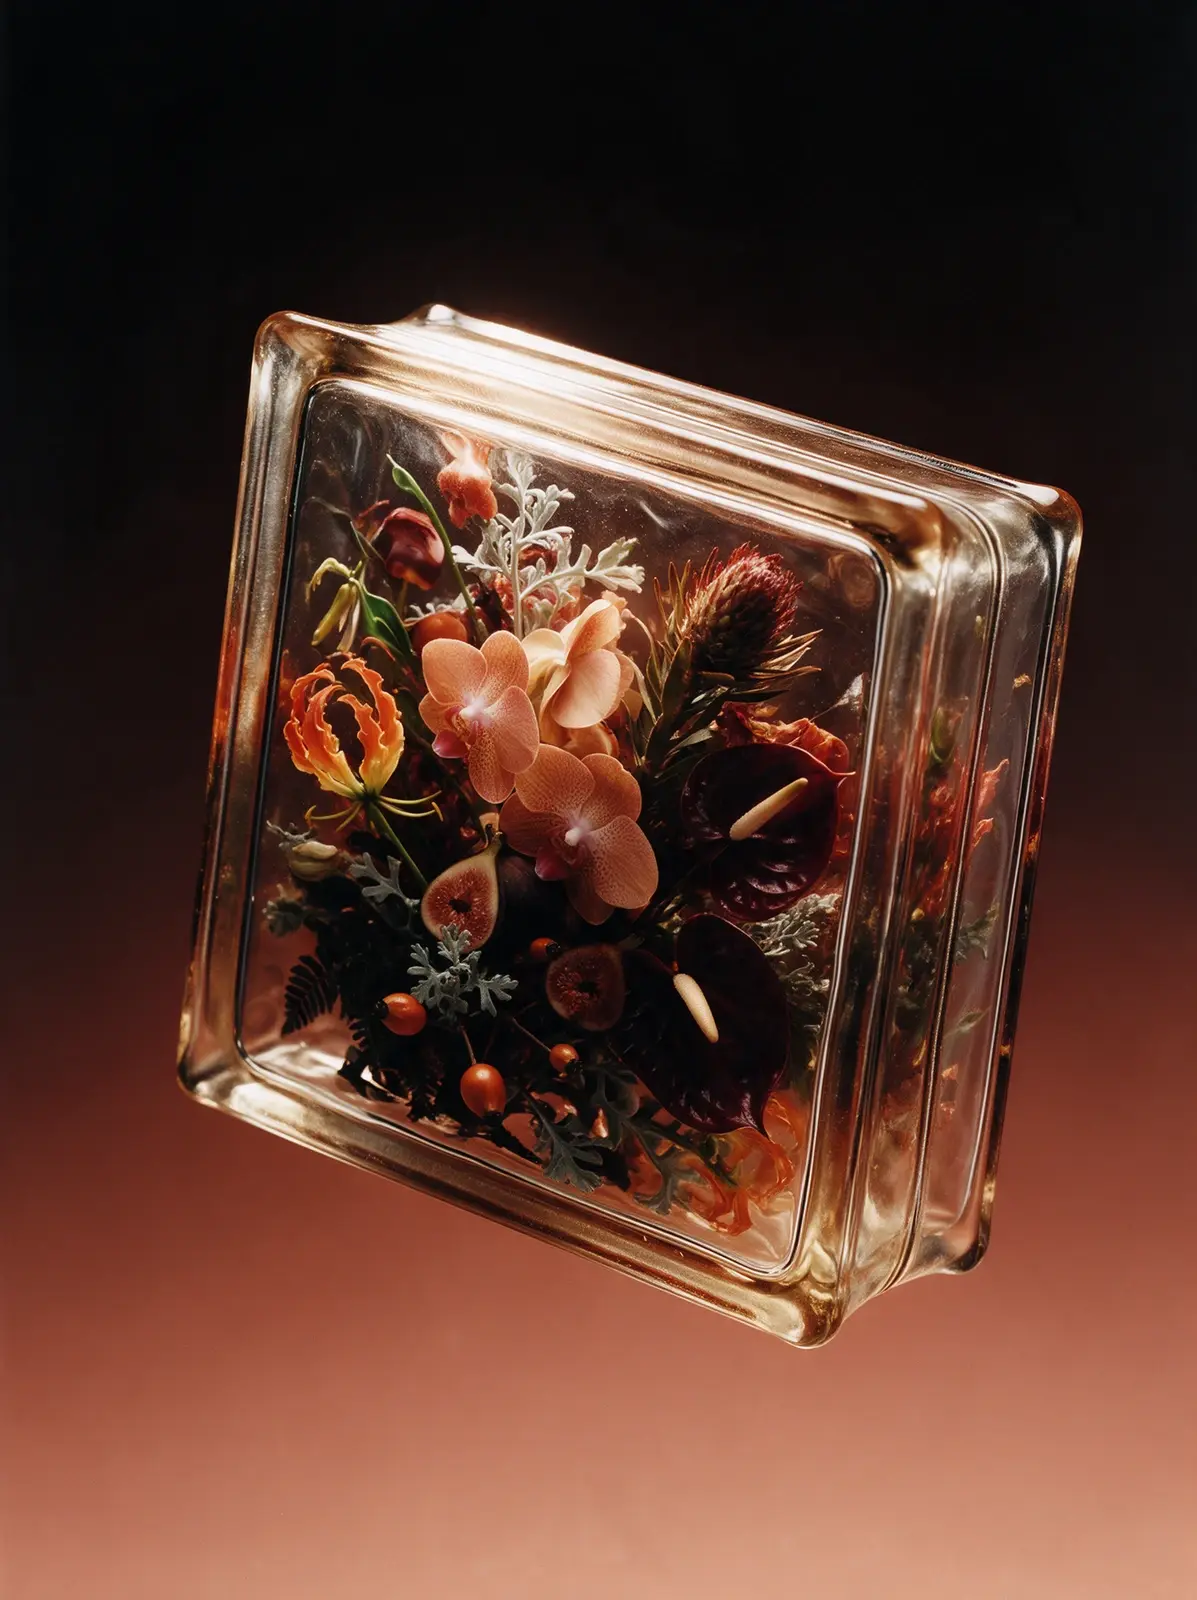
Seedream 5.0 Pro
Copy
{ "priority": "Lighting first; the object must stay exactly as in the reference.", "lighting": "beautiful dramatic directional light on the object, the same in every image. The object is lit from the upper left and slightly in front, with strong, smooth falloff across its form: the upper-left part is bright and luminous, the light gradually fades across the middle, and the lower-right part sinks into deep shadow, about 60% lit and 40% in shadow. Every curve, fold, seam, bevel and bulge is sculpted by its own highlight and its own small shadow, so the whole surface becomes a rich, lively pattern of light and shadow, and the texture shows crisp micro-shadows and tiny glints. Glass and glossy parts show long crisp specular highlights along their upper-left edges. The shadow side receives only soft colored reflected light from the lower part of the background, so shadows are deep and saturated, a richer version of the object's own colors mixed with the background hue, with texture and details clearly readable; nothing is solid black, nothing is flat or gray. Fine-art still-life contrast. Completely relight the object; do not keep the lighting of the reference photo. All the light falls on the object only: the background behind it stays a perfectly even, untouched gradient with no light shapes, no bright streaks and no lighter areas on it.", "subject": "The exact object from the attached reference image, recreated as a photorealistic hero shot and fully relit. Preserve its identity precisely: the same design, shape, proportions, construction, colors, prints and patterns, logos and lettering, materials and surface finish, and the same number of items (a pair stays a pair, a set stays a set). Do not redesign, simplify, restyle or add anything. Every material keeps its real character and its texture is crisp and readable: knit stays knit, suede stays suede, leather stays leather, mesh stays mesh, metal stays metal. If the object is transparent or translucent (glass, crystal, acrylic, resin, ice), it stays solid and keeps exactly what is inside it in the reference: never make it hollow, empty or box-like, never add air gaps or water lines. Show its real thickness, refraction, ripples, bevels and edge highlights, and keep anything inside it sharp, colorful and readable through the glass. Render only the object: no person, hand, body, mannequin, hanger, stand, string or support.", "composition": "turned 25 degrees to show its left side, with a slight 6 degree counterclockwise roll; camera at eye level; placed a little left of center, filling about 70% of the frame, with calm empty space on the right.", "clothing_and_pairs": "If the object is clothing, it is never worn and never on an invisible body: it tumbles through the air bunched, twisted and folded over
itself into a sculptural form, with rounded rolls, deep folds and crevices for the light to model; sleeves twist and fold, the hem rolls up, the collar tips sideways; it stays clearly recognizable and moves by its real weight. If the object is a pair, the two items float at different depths with complementary angles; laces, straps and cords drift in soft curves.", "space": "the object levitates in empty space with nothing under or around it: no floor, no tabletop, no surface, no cast shadow, no contact shadow, no reflection below it, no horizon line. It hangs in the air in front of the seamless gradient, clearly floating, with clean space on all sides.", "background": { "description": "deep warm black at the top fading smoothly into burnt terracotta and soft peach-clay at the bottom", "stops": [ { "position": 0, "color": "#0C0909" }, { "position": 38, "color": "#2B1611" }, { "position": 72, "color": "#8A4836" }, { "position": 100, "color": "#D49478" } ], "rules": "flat, perfectly smooth and evenly toned, like matte paper far behind the object; no blotches, streaks, diagonal light shapes, vignette, glow, halo, floor or horizon" }, "style": "high-end fine-art still-life photography, medium format, subtle analog film character with fine natural grain, rich true colors, razor-sharp focus on the object, museum-quality detail.", "final_check": "the exact object from the reference, unchanged; directional light from the upper left falling off across the object; a rich light-and-shadow pattern on every form; deep colored shadows with readable texture, nothing black; transparent objects stay solid and keep their contents; floating in empty space, no floor, no shadow below, no horizon; clean, flat, even gradient with no light shapes on it." }
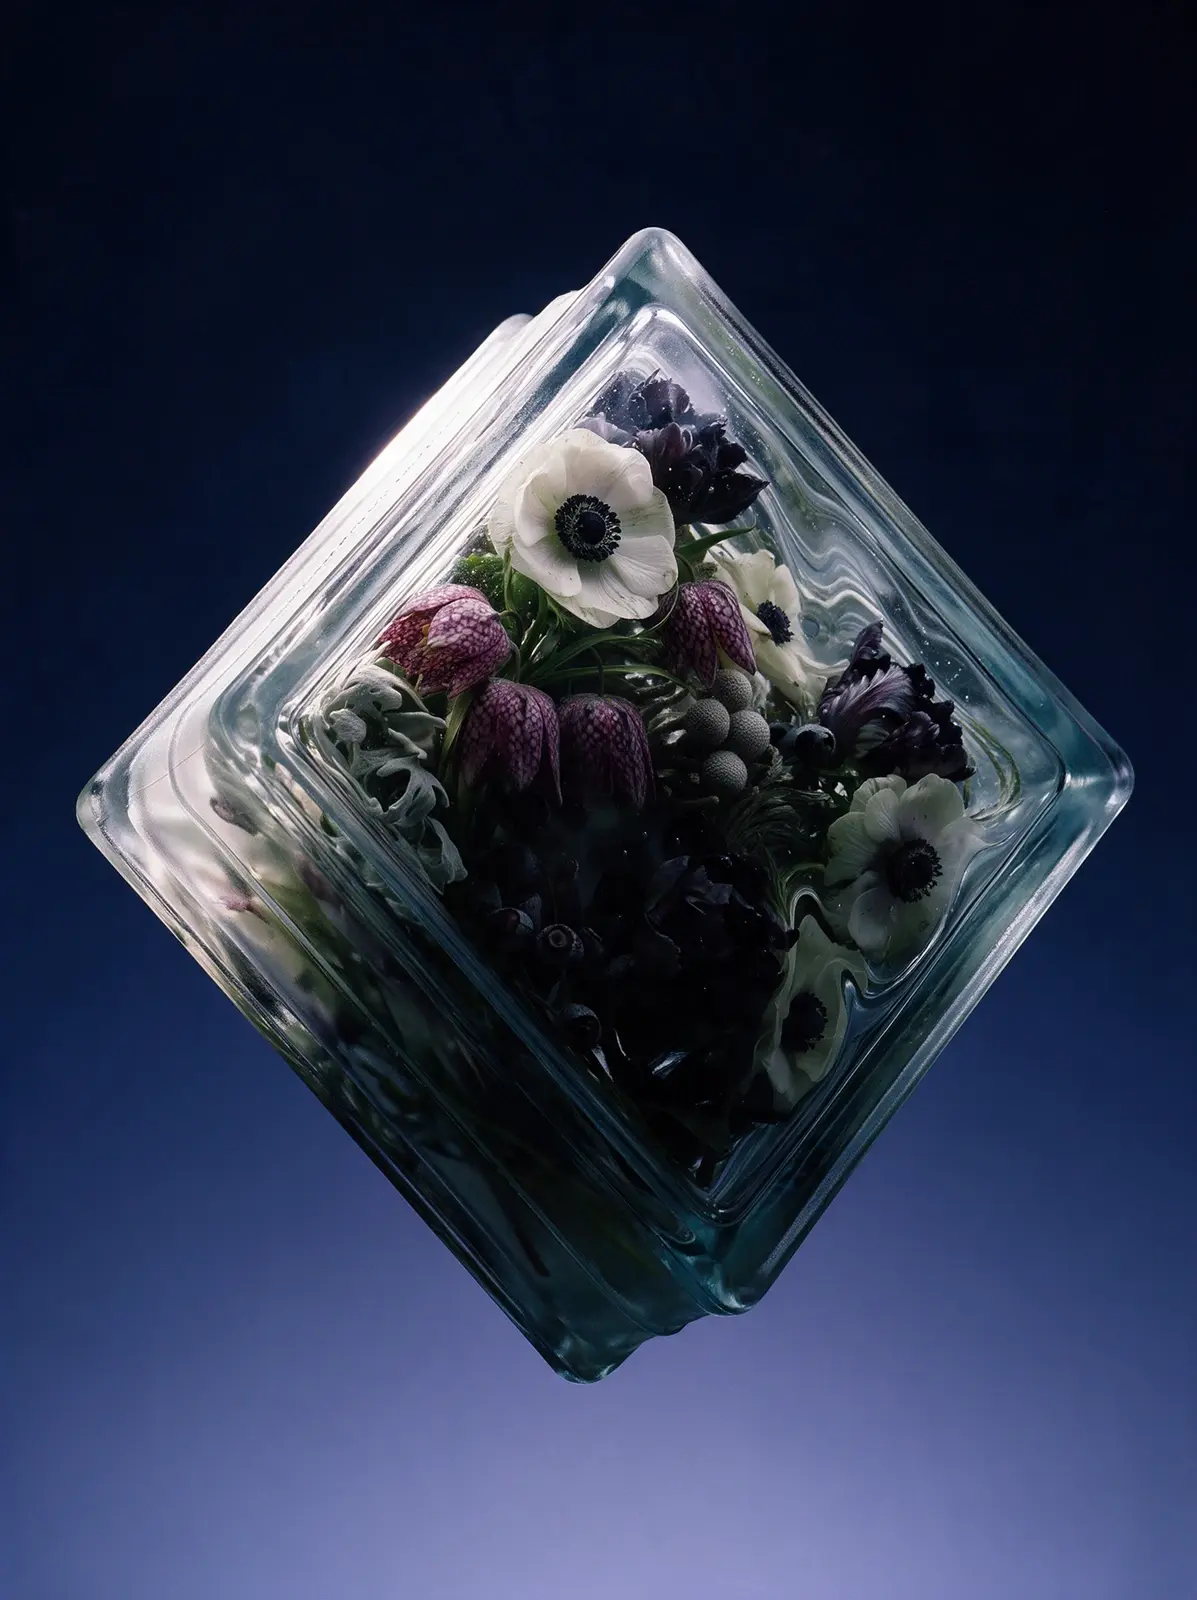
Seedream 5.0 Pro
Copy
{ "priority": "Lighting first; the object must stay exactly as in the reference.", "lighting": "beautiful dramatic directional light on the object, the same in every image. The object is lit from the upper left and slightly in front, with strong, smooth falloff across its form: the upper-left part is bright and luminous, the light gradually fades across the middle, and the lower-right part sinks into deep shadow, about 60% lit and 40% in shadow. Every curve, fold, seam, bevel and bulge is sculpted by its own highlight and its own small shadow, so the whole surface becomes a rich, lively pattern of light and shadow, and the texture shows crisp micro-shadows and tiny glints. Glass and glossy parts show long crisp specular highlights along their upper-left edges. The shadow side receives only soft colored reflected light from the lower part of the background, so shadows are deep and saturated, a richer version of the object's own colors mixed with the background hue, with texture and details clearly readable; nothing is solid black, nothing is flat or gray. Fine-art still-life contrast. Completely relight the object; do not keep the lighting of the reference photo. All the light falls on the object only: the background behind it stays a perfectly even, untouched gradient with no light shapes, no bright streaks and no lighter areas on it.", "subject": "The exact object from the attached reference image, recreated as a photorealistic hero shot and fully relit. Preserve its identity precisely: the same design, shape, proportions, construction, colors, prints and patterns, logos and lettering, materials and surface finish, and the same number of items (a pair stays a pair, a set stays a set). Do not redesign, simplify, restyle or add anything. Every material keeps its real character and its texture is crisp and readable: knit stays knit, suede stays suede, leather stays leather, mesh stays mesh, metal stays metal. If the object is transparent or translucent (glass, crystal, acrylic, resin, ice), it stays solid and keeps exactly what is inside it in the reference: never make it hollow, empty or box-like, never add air gaps or water lines. Show its real thickness, refraction, ripples, bevels and edge highlights, and keep anything inside it sharp, colorful and readable through the glass. Render only the object: no person, hand, body, mannequin, hanger, stand, string or support.", "composition": "tipped steeply by 40 degrees so it runs along a strong diagonal of the frame, as if balancing on one corner or tip, front toward the camera with a slight downward view of its top; centered, filling about 70% of the frame.", "clothing_and_pairs": "If the object is clothing, it is never worn and never on an invisible body: it tumbles through the air bunched, twisted and
folded over itself into a sculptural form, with rounded rolls, deep folds and crevices for the light to model; sleeves twist and fold, the hem rolls up, the collar tips sideways; it stays clearly recognizable and moves by its real weight. If the object is a pair, the two items float at different depths with complementary angles; laces, straps and cords drift in soft curves.", "space": "the object levitates in empty space with nothing under or around it: no floor, no tabletop, no surface, no cast shadow, no contact shadow, no reflection below it, no horizon line. It hangs in the air in front of the seamless gradient, clearly floating, with clean space on all sides.", "background": { "description": "deep ink-navy at the top fading smoothly into periwinkle blue and soft lilac-blue at the bottom", "stops": [ { "position": 0, "color": "#080B18" }, { "position": 40, "color": "#1A2350" }, { "position": 75, "color": "#4E5FA8" }, { "position": 100, "color": "#A3ADE3" } ], "rules": "flat, perfectly smooth and evenly toned, like matte paper far behind the object; no blotches, streaks, diagonal light shapes, vignette, glow, halo, floor or horizon" }, "style": "high-end fine-art still-life photography, medium format, subtle analog film character with fine natural grain, rich true colors, razor-sharp focus on the object, museum-quality detail.", "final_check": "the exact object from the reference, unchanged; directional light from the upper left falling off across the object; a rich light-and-shadow pattern on every form; deep colored shadows with readable texture, nothing black; transparent objects stay solid and keep their contents; floating in empty space, no floor, no shadow below, no horizon; clean, flat, even gradient with no light shapes on it." }
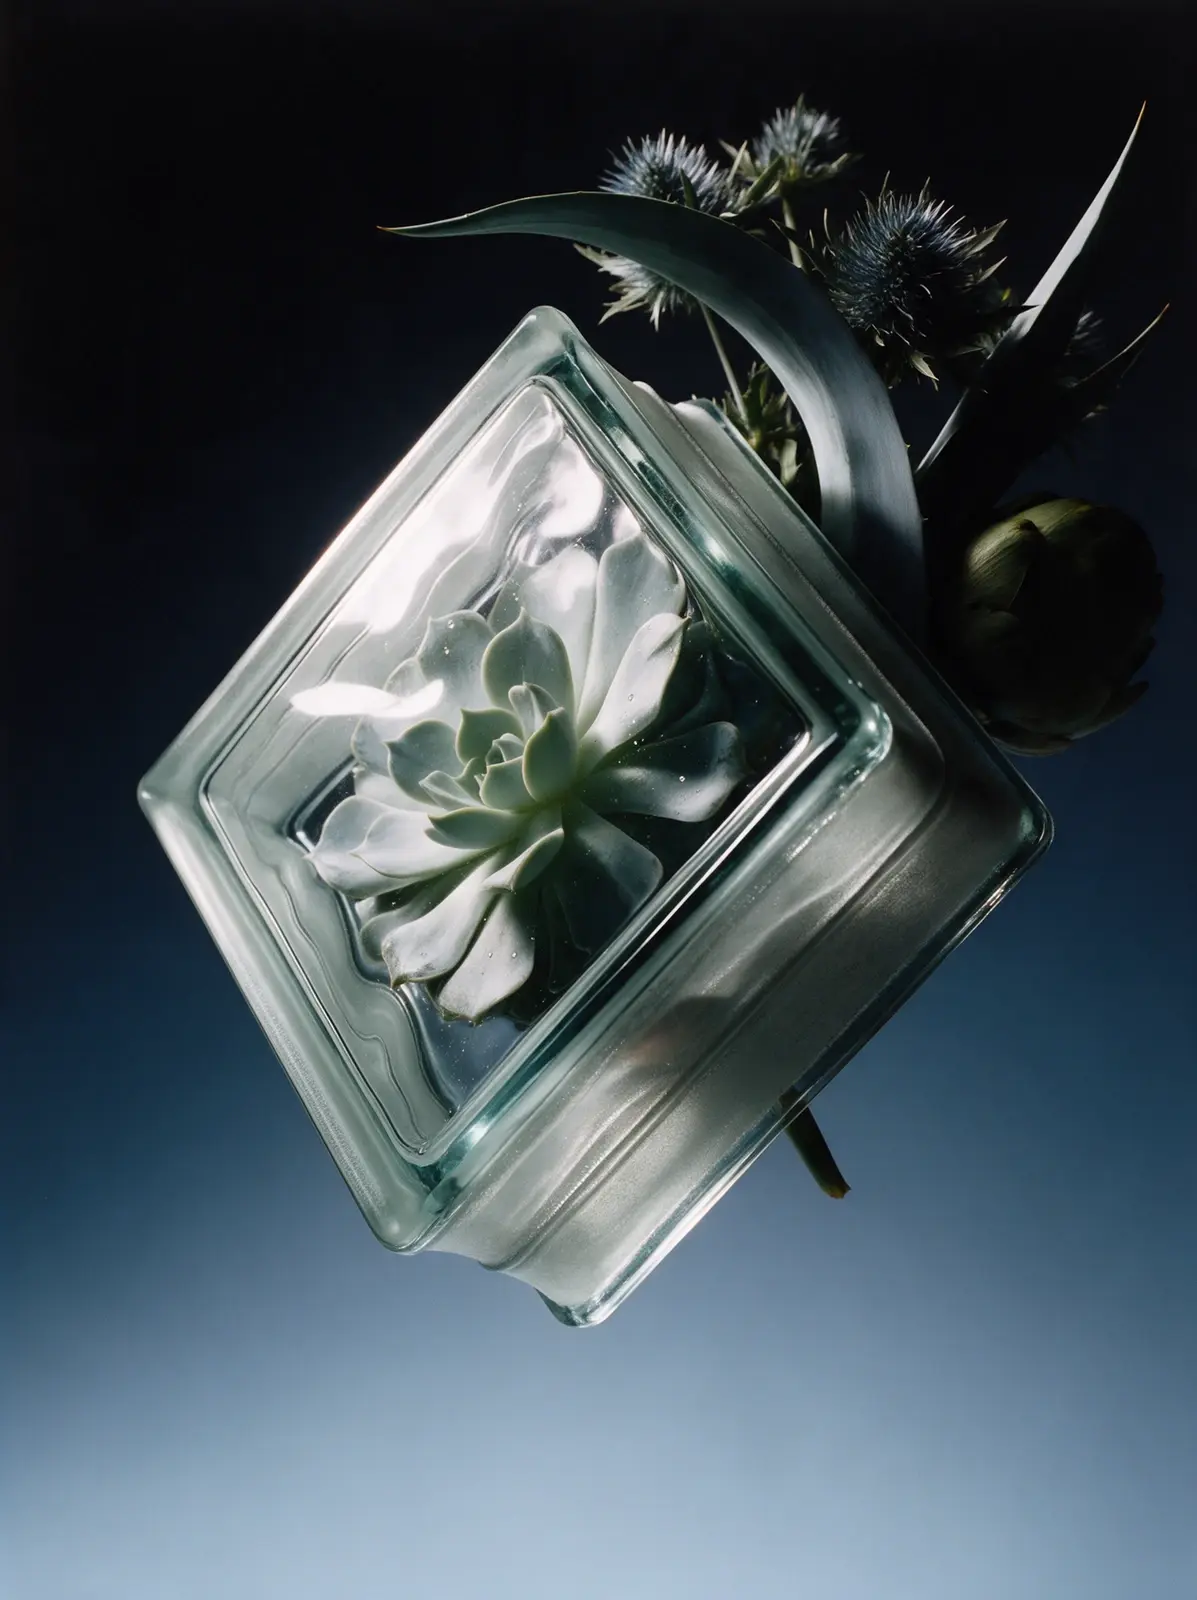
Seedream 5.0 Pro
Copy
LIGHTING (most important): beautiful dramatic directional light on the object, the same in every image. The object is lit from the upper left and slightly in front, with strong, smooth falloff across its form: the upper-left part is bright and luminous, the light gradually fades across the middle, and the lower-right part sinks into deep shadow, about 60% lit and 40% in shadow. Every curve, fold, seam, bevel and bulge is sculpted by its own highlight and its own small shadow, so the whole surface becomes a rich, lively pattern of light and shadow, and the texture shows crisp micro-shadows and tiny glints. Glass and glossy parts show long crisp specular highlights along their upper-left edges. The shadow side receives only soft colored reflected light from the lower part of the background, so shadows are deep and saturated, a richer version of the object's own colors mixed with the background hue, with texture and details clearly readable; nothing is solid black, nothing is flat or gray. Fine-art still-life contrast. Completely relight the object; do not keep the lighting of the reference photo. All the light falls on the object only: the background behind it stays a perfectly even, untouched gradient with no light shapes, no bright streaks and no lighter areas on it. SUBJECT: The exact object from the attached reference image, recreated as a photorealistic hero shot and fully relit. Preserve its identity precisely: the same design, shape, proportions, construction, colors, prints and patterns, logos and lettering, materials and surface finish, and the same number of items (a pair stays a pair, a set stays a set). Do not redesign, simplify, restyle or add anything. Every material keeps its real character and its texture is crisp and readable: knit stays knit, suede stays suede, leather stays leather, mesh stays mesh, metal stays metal. If the object is transparent or translucent (glass, crystal, acrylic, resin, ice), it stays solid and keeps exactly what is inside it in the reference: never make it hollow, empty or box-like, never add air gaps or water lines. Show its real thickness, refraction, ripples, bevels and edge highlights, and keep anything inside it sharp, colorful and readable through the glass. Render only the object: no person, hand, body, mannequin, hanger, stand, string or support. COMPOSITION: The object is turned about 60 degrees so its side dominates and the front recedes in strong perspective, tilted 10 degrees; 50mm lens close to the object for a bold perspective; centered, filling about 65% of the frame. If the object is clothing, it is never worn and never on an invisible body: it tumbles through the air bunched, twisted and folded over itself into a sculptural form, with rounded rolls, deep folds and crevices for the light to
model; sleeves twist and fold, the hem rolls up, the collar tips sideways; it stays clearly recognizable and moves by its real weight. If the object is a pair, the two items float at different depths with complementary angles; laces, straps and cords drift in soft curves. SPACE: the object levitates in empty space with nothing under or around it: no floor, no tabletop, no surface, no cast shadow, no contact shadow, no reflection below it, no horizon line. It hangs in the air in front of the seamless gradient, clearly floating, with clean space on all sides. BACKGROUND: seamless vertical studio gradient, deep graphite-black at the top fading smoothly into cool steel-blue and pale icy blue at the bottom; stops #0A0C0F at 0%, #1C2530 at 40%, #5A7287 at 75%, #A9C0D2 at 100%. Flat, perfectly smooth and evenly toned from top to bottom, like seamless matte paper far behind the object; no blotches, no streaks, no diagonal light shapes, no vignette, no glow, no halo, no floor, no horizon. STYLE: high-end fine-art still-life photography, medium format, subtle analog film character with fine natural grain, rich true colors, razor-sharp focus on the object, museum-quality detail. FINAL CHECK: the exact object from the reference, unchanged; directional light from the upper left falling off across the object; a rich light-and-shadow pattern on every form; deep colored shadows with readable texture, nothing black; transparent objects stay solid and keep their contents; floating in empty space, no floor, no shadow below, no horizon; clean, flat, even gradient with no light shapes on it.
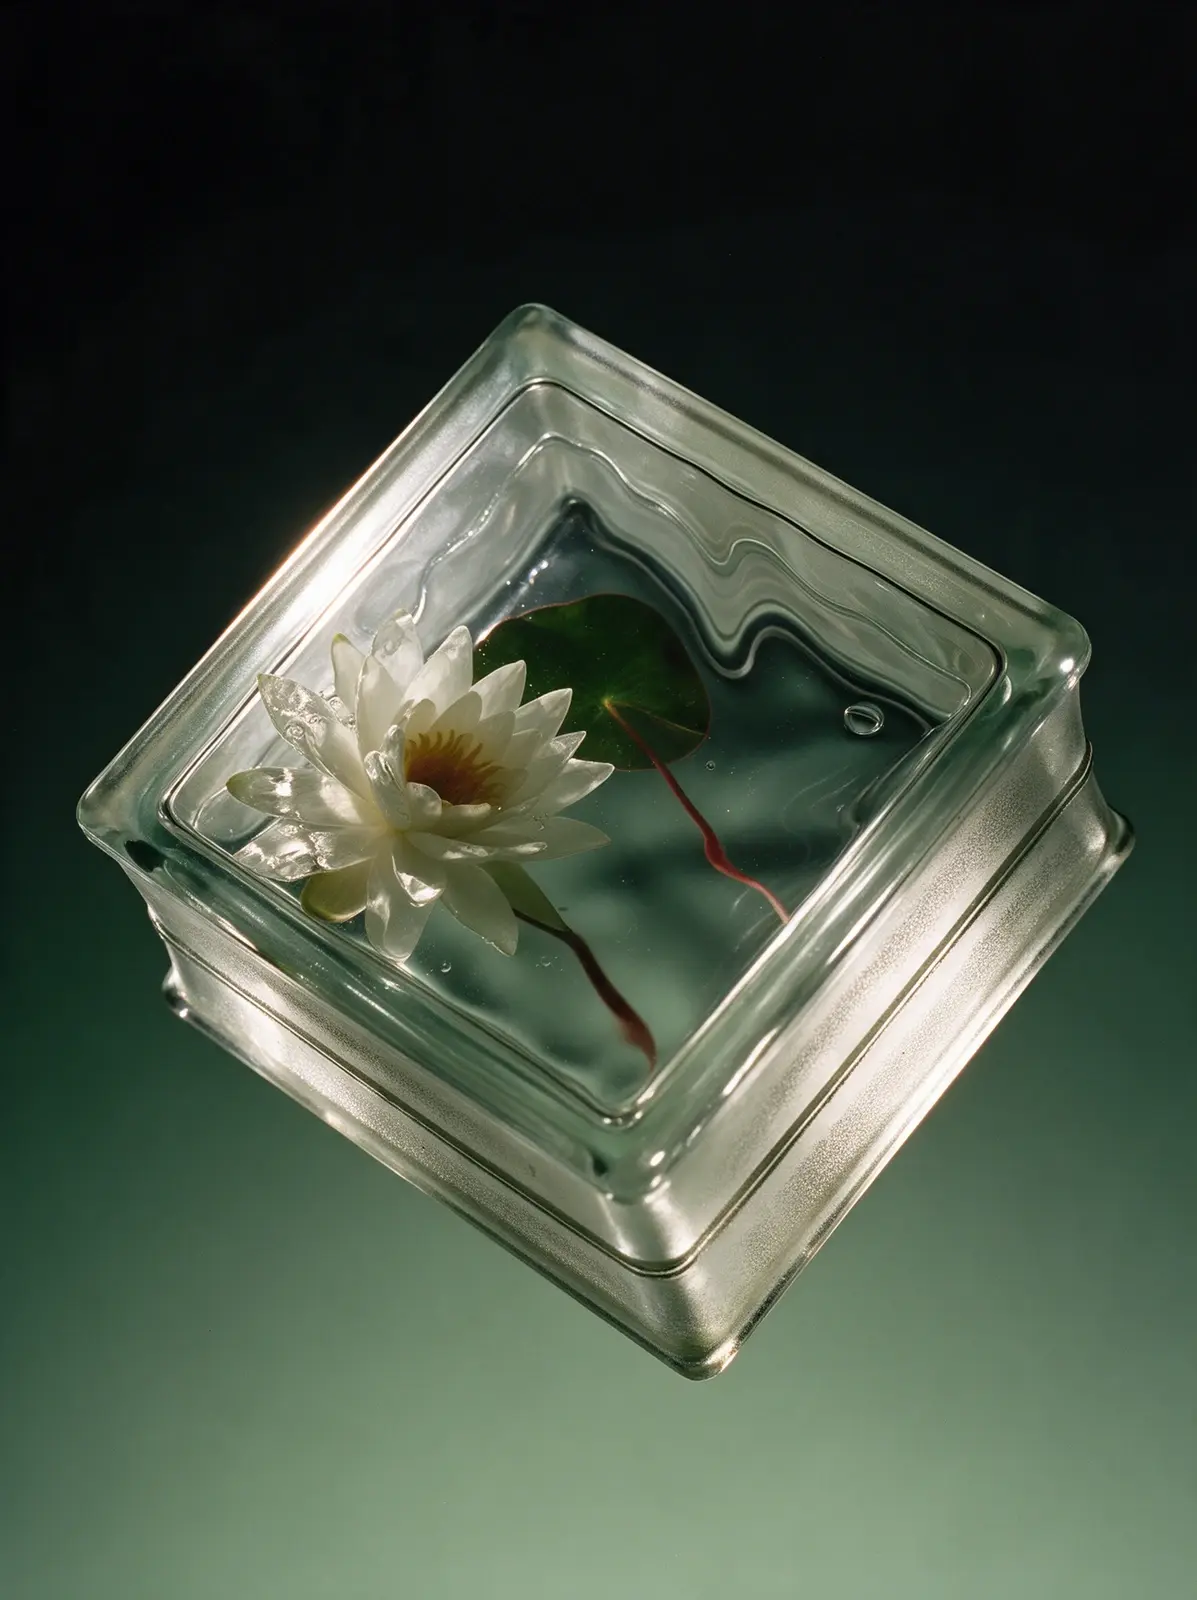
Seedream 5.0 Pro
Copy
{ "priority": "Lighting first; the object must stay exactly as in the reference.", "lighting": "beautiful dramatic directional light on the object, the same in every image. The object is lit from the upper left and slightly in front, with strong, smooth falloff across its form: the upper-left part is bright and luminous, the light gradually fades across the middle, and the lower-right part sinks into deep shadow, about 60% lit and 40% in shadow. Every curve, fold, seam, bevel and bulge is sculpted by its own highlight and its own small shadow, so the whole surface becomes a rich, lively pattern of light and shadow, and the texture shows crisp micro-shadows and tiny glints. Glass and glossy parts show long crisp specular highlights along their upper-left edges. The shadow side receives only soft colored reflected light from the lower part of the background, so shadows are deep and saturated, a richer version of the object's own colors mixed with the background hue, with texture and details clearly readable; nothing is solid black, nothing is flat or gray. Fine-art still-life contrast. Completely relight the object; do not keep the lighting of the reference photo. All the light falls on the object only: the background behind it stays a perfectly even, untouched gradient with no light shapes, no bright streaks and no lighter areas on it.", "subject": "The exact object from the attached reference image, recreated as a photorealistic hero shot and fully relit. Preserve its identity precisely: the same design, shape, proportions, construction, colors, prints and patterns, logos and lettering, materials and surface finish, and the same number of items (a pair stays a pair, a set stays a set). Do not redesign, simplify, restyle or add anything. Every material keeps its real character and its texture is crisp and readable: knit stays knit, suede stays suede, leather stays leather, mesh stays mesh, metal stays metal. If the object is transparent or translucent (glass, crystal, acrylic, resin, ice), it stays solid and keeps exactly what is inside it in the reference: never make it hollow, empty or box-like, never add air gaps or water lines. Show its real thickness, refraction, ripples, bevels and edge highlights, and keep anything inside it sharp, colorful and readable through the glass. Render only the object: no person, hand, body, mannequin, hanger, stand, string or support.", "composition": "tilted 22 degrees counterclockwise and turned to show its right side; dramatic low camera angle from below, looking up at its underside and front, so it feels monumental; centered, filling about 65% of the frame.", "clothing_and_pairs": "If the object is clothing, it is never worn and never on an invisible body: it tumbles through the air bunched, twisted and folded
over itself into a sculptural form, with rounded rolls, deep folds and crevices for the light to model; sleeves twist and fold, the hem rolls up, the collar tips sideways; it stays clearly recognizable and moves by its real weight. If the object is a pair, the two items float at different depths with complementary angles; laces, straps and cords drift in soft curves.", "space": "the object levitates in empty space with nothing under or around it: no floor, no tabletop, no surface, no cast shadow, no contact shadow, no reflection below it, no horizon line. It hangs in the air in front of the seamless gradient, clearly floating, with clean space on all sides.", "background": { "description": "deep green-black at the top fading smoothly into muted sage and pale grey-green at the bottom", "stops": [ { "position": 0, "color": "#0A100D" }, { "position": 40, "color": "#1C2B23" }, { "position": 75, "color": "#4F6E58" }, { "position": 100, "color": "#8FAA8C" } ], "rules": "flat, perfectly smooth and evenly toned, like matte paper far behind the object; no blotches, streaks, diagonal light shapes, vignette, glow, halo, floor or horizon" }, "style": "high-end fine-art still-life photography, medium format, subtle analog film character with fine natural grain, rich true colors, razor-sharp focus on the object, museum-quality detail.", "final_check": "the exact object from the reference, unchanged; directional light from the upper left falling off across the object; a rich light-and-shadow pattern on every form; deep colored shadows with readable texture, nothing black; transparent objects stay solid and keep their contents; floating in empty space, no floor, no shadow below, no horizon; clean, flat, even gradient with no light shapes on it." }
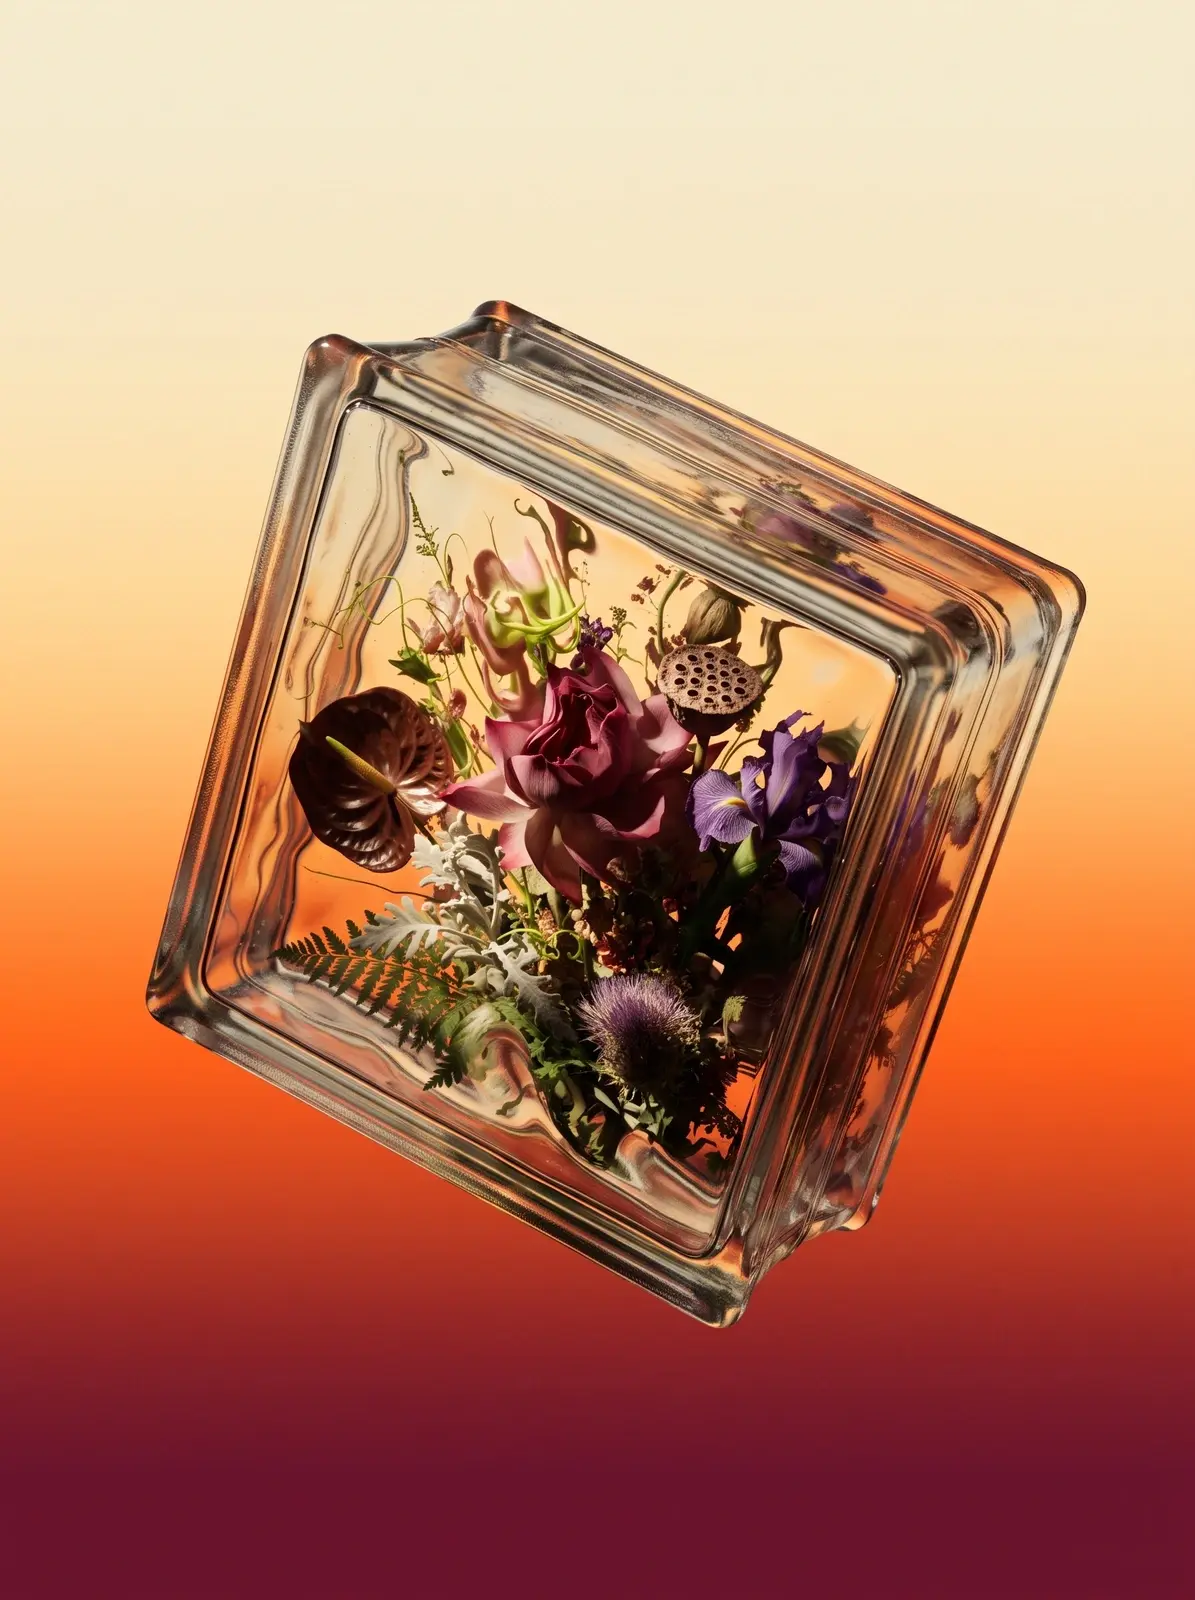
Nano Banana 2.1
Copy
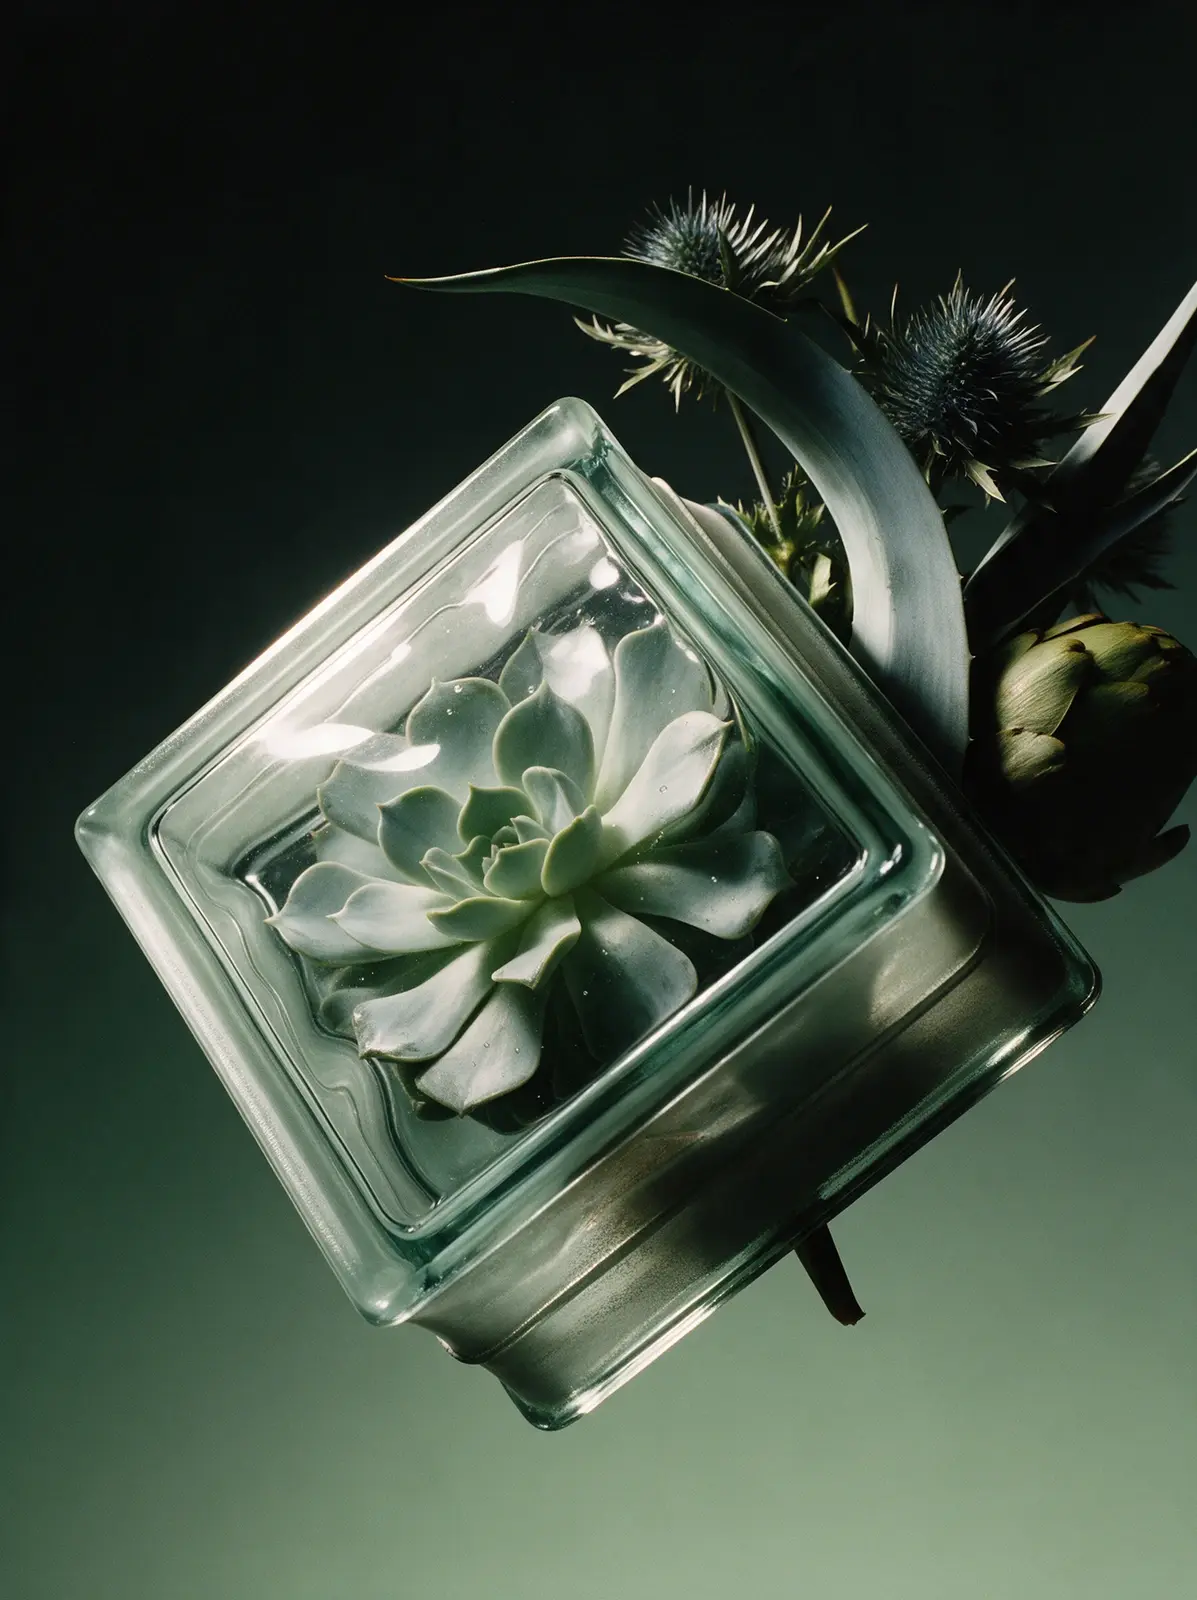
Seedream 5.0 Pro
Copy
{ "priority": "Lighting first; the object must stay exactly as in the reference.", "lighting": "beautiful dramatic directional light on the object, the same in every image. The object is lit from the upper left and slightly in front, with strong, smooth falloff across its form: the upper-left part is bright and luminous, the light gradually fades across the middle, and the lower-right part sinks into deep shadow, about 60% lit and 40% in shadow. Every curve, fold, seam, bevel and bulge is sculpted by its own highlight and its own small shadow, so the whole surface becomes a rich, lively pattern of light and shadow, and the texture shows crisp micro-shadows and tiny glints. Glass and glossy parts show long crisp specular highlights along their upper-left edges. The shadow side receives only soft colored reflected light from the lower part of the background, so shadows are deep and saturated, a richer version of the object's own colors mixed with the background hue, with texture and details clearly readable; nothing is solid black, nothing is flat or gray. Fine-art still-life contrast. Completely relight the object; do not keep the lighting of the reference photo. All the light falls on the object only: the background behind it stays a perfectly even, untouched gradient with no light shapes, no bright streaks and no lighter areas on it.", "subject": "The exact object from the attached reference image, recreated as a photorealistic hero shot and fully relit. Preserve its identity precisely: the same design, shape, proportions, construction, colors, prints and patterns, logos and lettering, materials and surface finish, and the same number of items (a pair stays a pair, a set stays a set). Do not redesign, simplify, restyle or add anything. Every material keeps its real character and its texture is crisp and readable: knit stays knit, suede stays suede, leather stays leather, mesh stays mesh, metal stays metal. If the object is transparent or translucent (glass, crystal, acrylic, resin, ice), it stays solid and keeps exactly what is inside it in the reference: never make it hollow, empty or box-like, never add air gaps or water lines. Show its real thickness, refraction, ripples, bevels and edge highlights, and keep anything inside it sharp, colorful and readable through the glass. Render only the object: no person, hand, body, mannequin, hanger, stand, string or support.", "composition": "tilted 22 degrees counterclockwise and turned to show its right side; dramatic low camera angle from below, looking up at its underside and front, so it feels monumental; centered, filling about 65% of the frame.", "clothing_and_pairs": "If the object is clothing, it is never worn and never on an invisible body: it tumbles through the air bunched, twisted and folded
over itself into a sculptural form, with rounded rolls, deep folds and crevices for the light to model; sleeves twist and fold, the hem rolls up, the collar tips sideways; it stays clearly recognizable and moves by its real weight. If the object is a pair, the two items float at different depths with complementary angles; laces, straps and cords drift in soft curves.", "space": "the object levitates in empty space with nothing under or around it: no floor, no tabletop, no surface, no cast shadow, no contact shadow, no reflection below it, no horizon line. It hangs in the air in front of the seamless gradient, clearly floating, with clean space on all sides.", "background": { "description": "deep green-black at the top fading smoothly into muted sage and pale grey-green at the bottom", "stops": [ { "position": 0, "color": "#0A100D" }, { "position": 40, "color": "#1C2B23" }, { "position": 75, "color": "#4F6E58" }, { "position": 100, "color": "#8FAA8C" } ], "rules": "flat, perfectly smooth and evenly toned, like matte paper far behind the object; no blotches, streaks, diagonal light shapes, vignette, glow, halo, floor or horizon" }, "style": "high-end fine-art still-life photography, medium format, subtle analog film character with fine natural grain, rich true colors, razor-sharp focus on the object, museum-quality detail.", "final_check": "the exact object from the reference, unchanged; directional light from the upper left falling off across the object; a rich light-and-shadow pattern on every form; deep colored shadows with readable texture, nothing black; transparent objects stay solid and keep their contents; floating in empty space, no floor, no shadow below, no horizon; clean, flat, even gradient with no light shapes on it." }
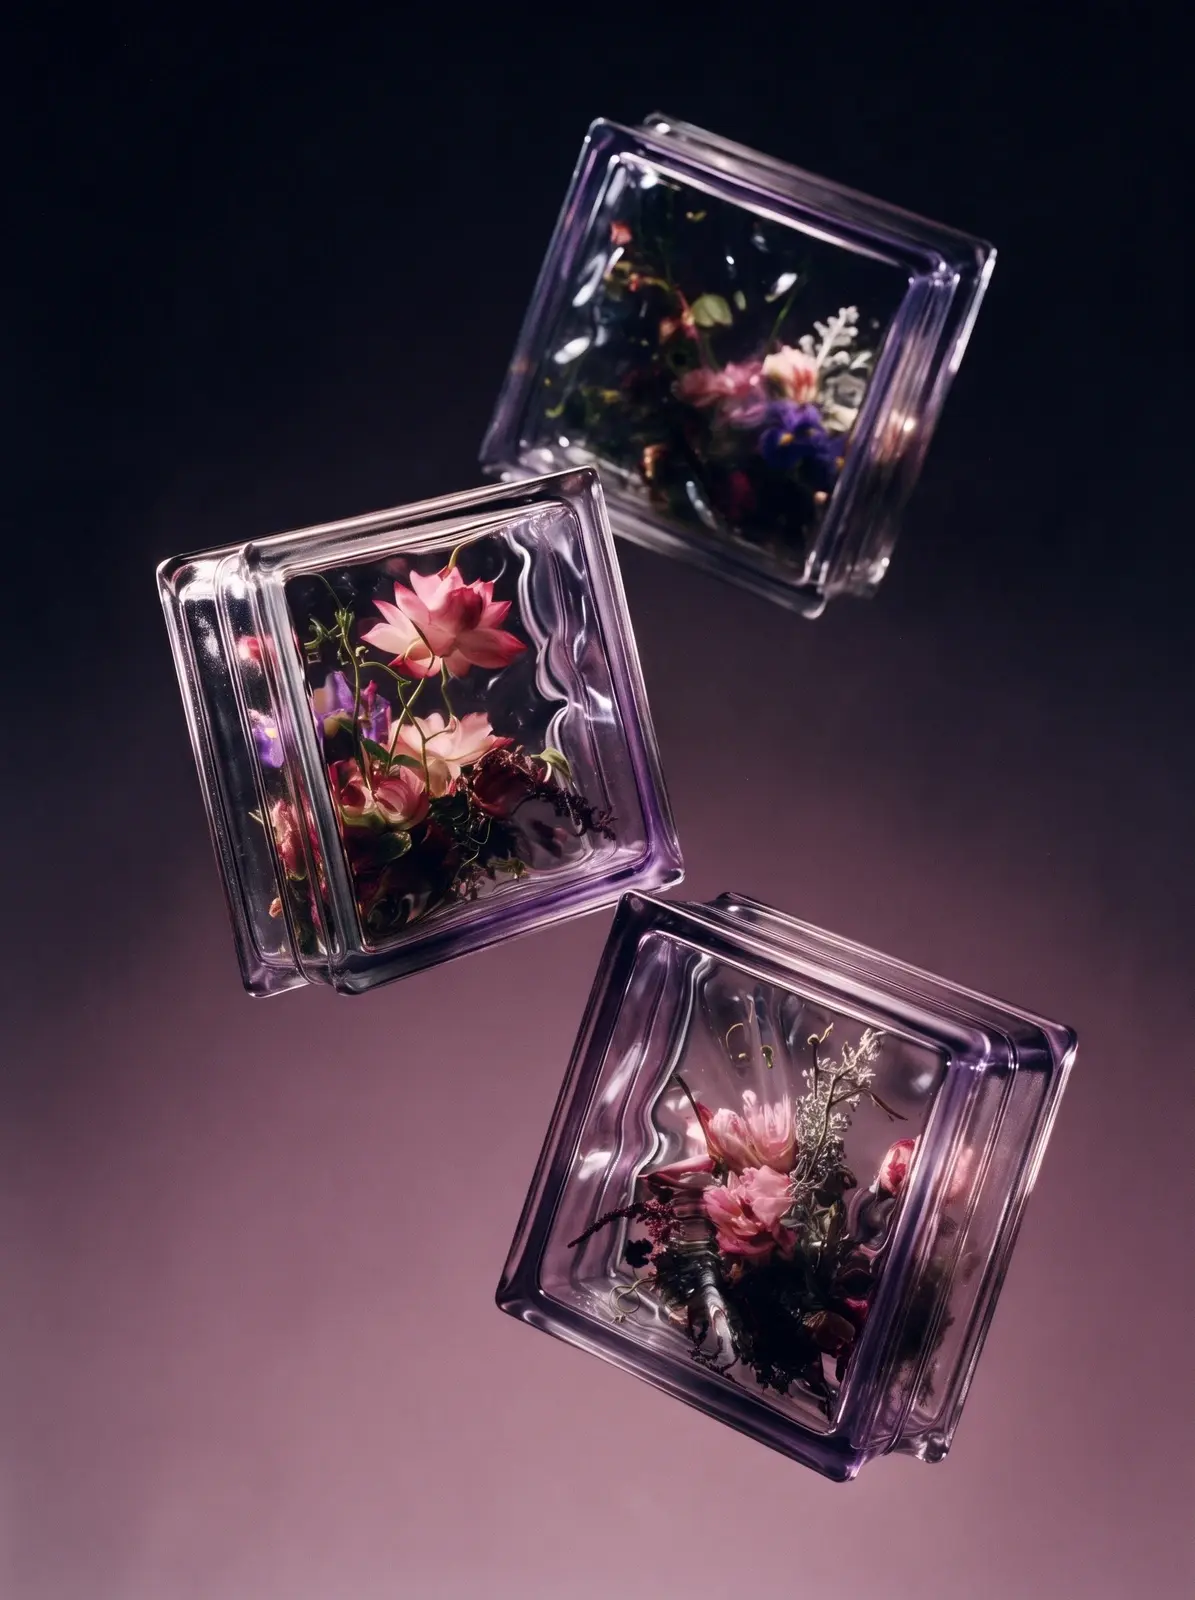
Nano Banana 2.1
Copy
{ "priority": "Lighting first; the object must stay exactly as in the reference.", "lighting": "beautiful dramatic directional light on the object, the same in every image. The light comes from outside the frame on the left, at about the height of the object and slightly toward the camera, so it reaches only the object, with strong, smooth falloff across its form: the upper-left part is bright and luminous, the light gradually fades across the middle, and the lower-right part sinks into deep shadow, about 60% lit and 40% in shadow. Every curve, fold, seam, bevel and bulge is sculpted by its own highlight and its own small shadow, so the whole surface becomes a rich, lively pattern of light and shadow, and the texture shows crisp micro-shadows and tiny glints. Glass and glossy parts show long crisp specular highlights along their upper-left edges. The shadow side receives only soft colored reflected light from the lower part of the background, so shadows are deep and saturated, a richer version of the object's own colors mixed with the background hue, with texture and details clearly readable; nothing is solid black, nothing is flat or gray. Fine-art still-life contrast. Completely relight the object; do not keep the lighting of the reference photo. The background is lit separately and evenly, and its brightness comes only from the gradient: the top edge and the top-left corner are the darkest, deepest part of the whole image, uniformly dark, and the background only gets lighter toward the bottom.", "subject": "The exact object from the attached reference image, recreated as a photorealistic hero shot and fully relit. Preserve its identity precisely: the same design, shape, proportions, construction, colors, prints and patterns, logos and lettering, materials and surface finish, and the same number of items (a pair stays a pair, a set stays a set). Do not redesign, simplify, restyle or add anything. Every material keeps its real character and its texture is crisp and readable: knit stays knit, suede stays suede, leather stays leather, mesh stays mesh, metal stays metal. If the object is transparent or translucent (glass, crystal, acrylic, resin, ice), it stays solid and keeps exactly what is inside it in the reference: never make it hollow, empty or box-like, never add air gaps or water lines. Show its real thickness, refraction, ripples, bevels and edge highlights, and keep anything inside it sharp, colorful and readable through the glass. Render only the object: no person, hand, body, mannequin, hanger, stand, string or support.", "composition": "tilted 18 degrees clockwise and turned so its front and right side are both visible, three-quarter view; camera slightly below center looking up a little; centered, filling about 65% of the frame.",
"clothing_and_pairs": "If the object is clothing, it is never worn and never on an invisible body: it tumbles through the air bunched, twisted and folded over itself into a sculptural form, with rounded rolls, deep folds and crevices for the light to model; sleeves twist and fold, the hem rolls up, the collar tips sideways; it stays clearly recognizable and moves by its real weight. If the object is a pair, the two items float at different depths with complementary angles; laces, straps and cords drift in soft curves.", "space": "the object levitates in empty space with nothing under or around it: no floor, no tabletop, no surface, no cast shadow, no contact shadow, no reflection below it, no horizon line. It hangs in the air in front of the seamless gradient, clearly floating, with clean space on all sides.", "background": { "description": "near-black plum at the top fading smoothly into dusty mauve-rose at the bottom", "stops": [ { "position": 0, "color": "#0D0A10" }, { "position": 40, "color": "#2A1C26" }, { "position": 75, "color": "#6E4F5E" }, { "position": 100, "color": "#A3818F" } ], "rules": "flat, perfectly smooth and evenly toned, like matte paper far behind the object; no blotches, streaks, diagonal light shapes, vignette, glow, halo, floor or horizon" }, "style": "high-end fine-art still-life photography, medium format, subtle analog film character with fine natural grain, rich true colors, razor-sharp focus on the object, museum-quality detail.", "final_check": "the exact object from the reference, unchanged; light from the left, outside the frame, falling off across the object; a rich light-and-shadow pattern on every form; deep colored shadows with readable texture, nothing black; transparent objects stay solid and keep their contents; floating in empty space, no floor, no shadow below, no horizon; clean, flat, even gradient whose top edge and top-left corner are the darkest part of the image." }
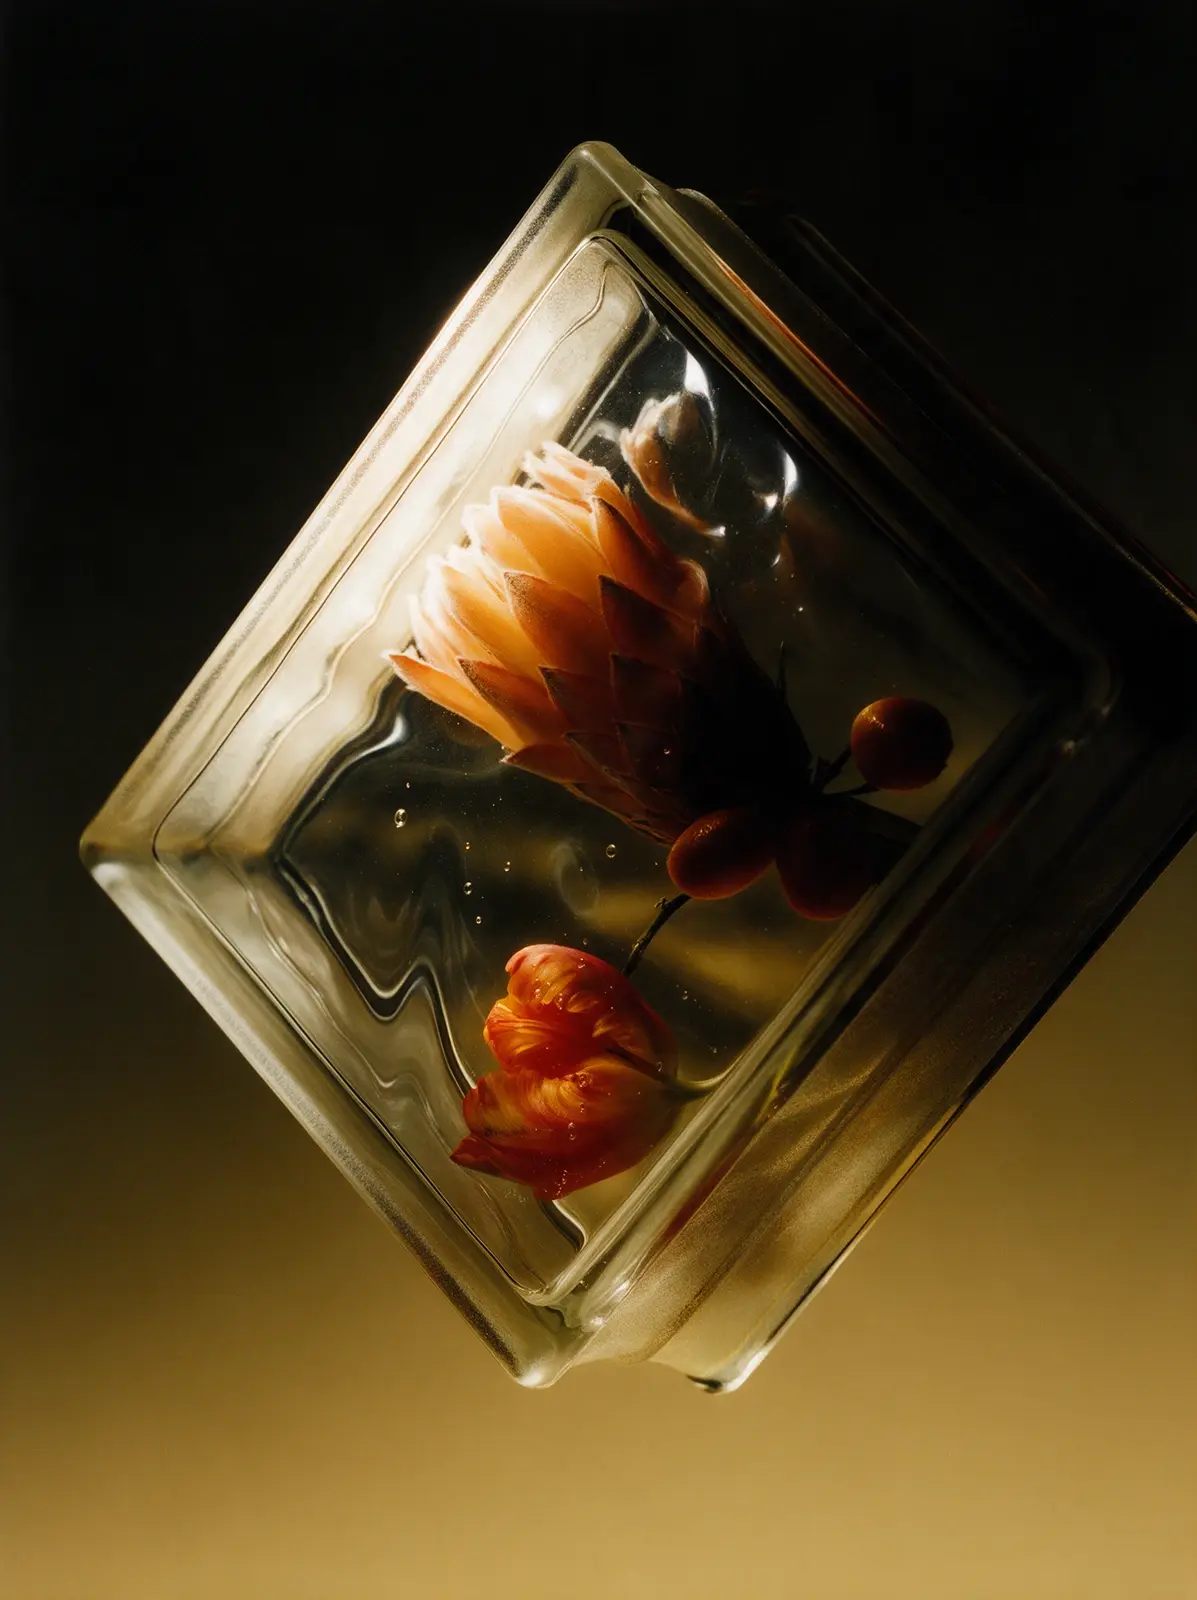
Seedream 5.0 Pro
Copy
{ "priority": "Lighting first; the object must stay exactly as in the reference.", "lighting": "beautiful dramatic directional light on the object, the same in every image. The object is lit from the upper left and slightly in front, with strong, smooth falloff across its form: the upper-left part is bright and luminous, the light gradually fades across the middle, and the lower-right part sinks into deep shadow, about 60% lit and 40% in shadow. Every curve, fold, seam, bevel and bulge is sculpted by its own highlight and its own small shadow, so the whole surface becomes a rich, lively pattern of light and shadow, and the texture shows crisp micro-shadows and tiny glints. Glass and glossy parts show long crisp specular highlights along their upper-left edges. The shadow side receives only soft colored reflected light from the lower part of the background, so shadows are deep and saturated, a richer version of the object's own colors mixed with the background hue, with texture and details clearly readable; nothing is solid black, nothing is flat or gray. Fine-art still-life contrast. Completely relight the object; do not keep the lighting of the reference photo. All the light falls on the object only: the background behind it stays a perfectly even, untouched gradient with no light shapes, no bright streaks and no lighter areas on it.", "subject": "The exact object from the attached reference image, recreated as a photorealistic hero shot and fully relit. Preserve its identity precisely: the same design, shape, proportions, construction, colors, prints and patterns, logos and lettering, materials and surface finish, and the same number of items (a pair stays a pair, a set stays a set). Do not redesign, simplify, restyle or add anything. Every material keeps its real character and its texture is crisp and readable: knit stays knit, suede stays suede, leather stays leather, mesh stays mesh, metal stays metal. If the object is transparent or translucent (glass, crystal, acrylic, resin, ice), it stays solid and keeps exactly what is inside it in the reference: never make it hollow, empty or box-like, never add air gaps or water lines. Show its real thickness, refraction, ripples, bevels and edge highlights, and keep anything inside it sharp, colorful and readable through the glass. Render only the object: no person, hand, body, mannequin, hanger, stand, string or support.", "composition": "an intimate close-up: tilted 12 degrees and turned slightly to show its left side, so close that it fills about 90% of the frame and its top-right part is cropped by the frame edge; textures and details are huge and crisp.", "clothing_and_pairs": "If the object is clothing, it is never worn and never on an invisible body: it tumbles through the air bunched, twisted and
folded over itself into a sculptural form, with rounded rolls, deep folds and crevices for the light to model; sleeves twist and fold, the hem rolls up, the collar tips sideways; it stays clearly recognizable and moves by its real weight. If the object is a pair, the two items float at different depths with complementary angles; laces, straps and cords drift in soft curves.", "space": "the object levitates in empty space with nothing under or around it: no floor, no tabletop, no surface, no cast shadow, no contact shadow, no reflection below it, no horizon line. It hangs in the air in front of the seamless gradient, clearly floating, with clean space on all sides.", "background": { "description": "warm black at the top fading smoothly into deep ochre and soft honey-mustard at the bottom", "stops": [ { "position": 0, "color": "#0D0B07" }, { "position": 40, "color": "#2E2410" }, { "position": 75, "color": "#8A6B2A" }, { "position": 100, "color": "#C9A961" } ], "rules": "flat, perfectly smooth and evenly toned, like matte paper far behind the object; no blotches, streaks, diagonal light shapes, vignette, glow, halo, floor or horizon" }, "style": "high-end fine-art still-life photography, medium format, subtle analog film character with fine natural grain, rich true colors, razor-sharp focus on the object, museum-quality detail.", "final_check": "the exact object from the reference, unchanged; directional light from the upper left falling off across the object; a rich light-and-shadow pattern on every form; deep colored shadows with readable texture, nothing black; transparent objects stay solid and keep their contents; floating in empty space, no floor, no shadow below, no horizon; clean, flat, even gradient with no light shapes on it." }
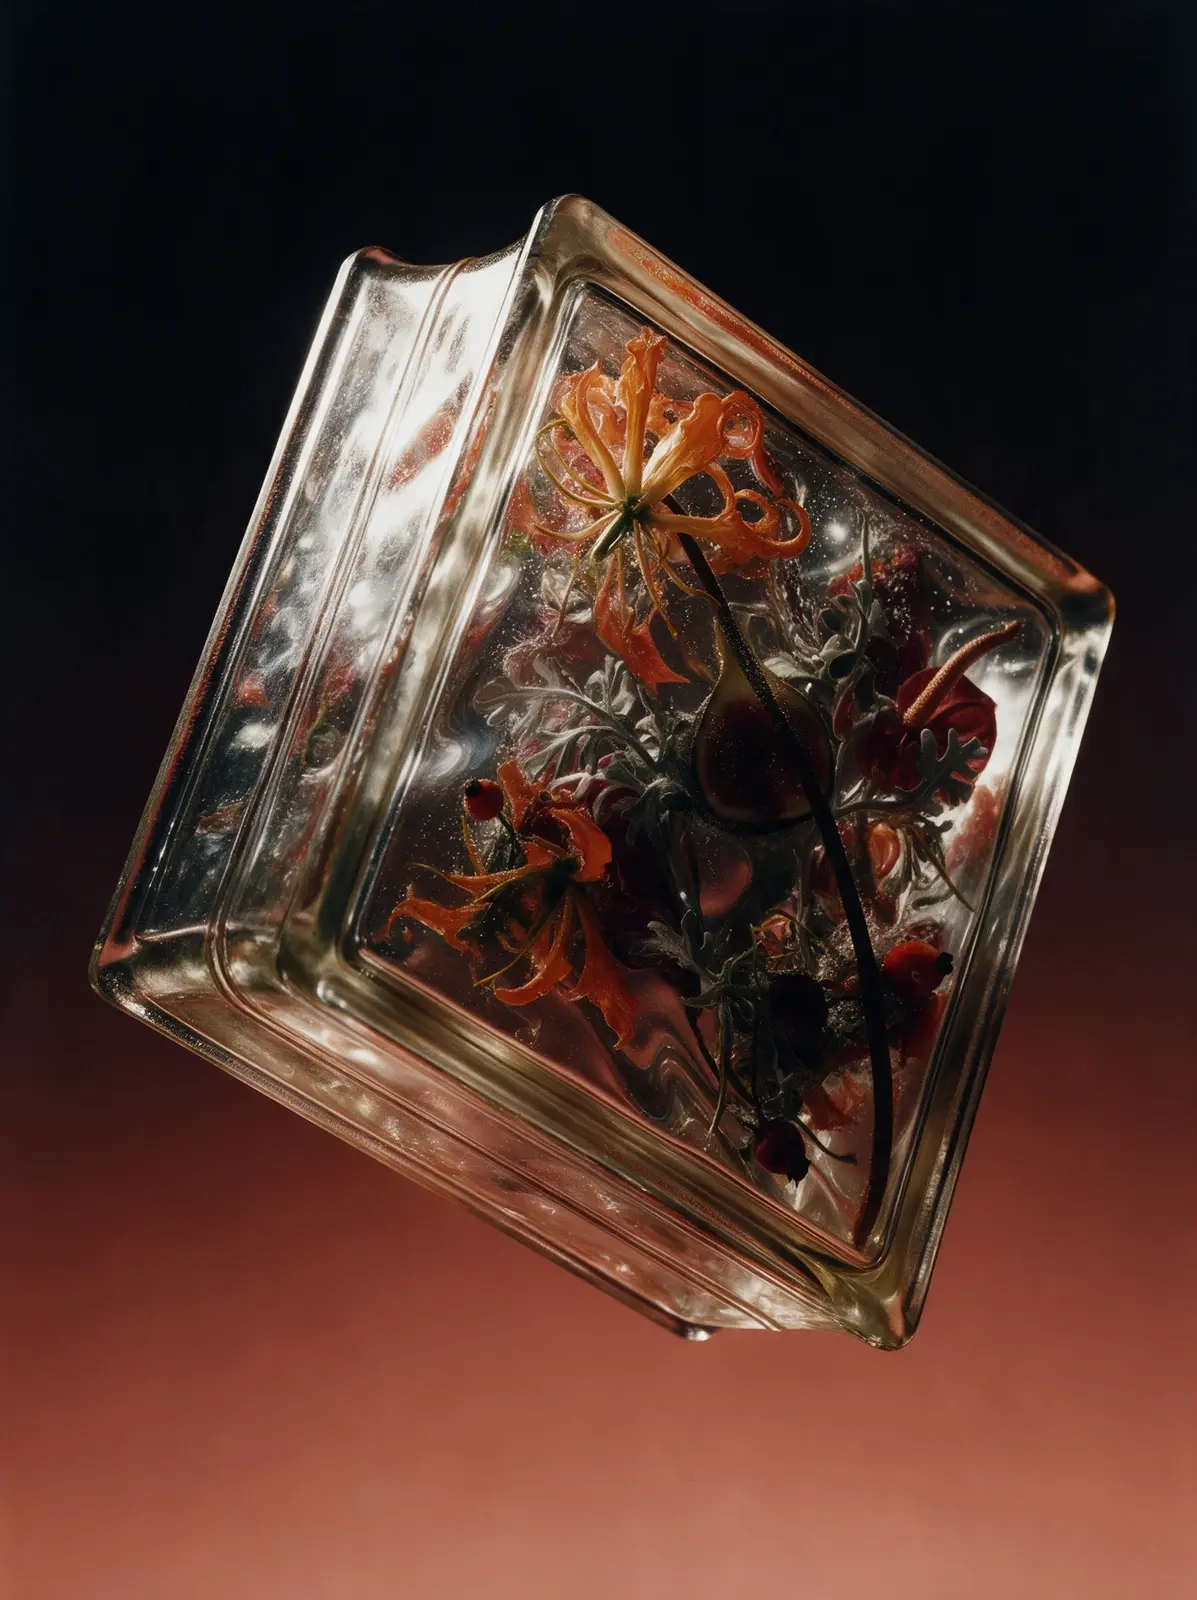
Seedream 5.0 Pro
Copy
{ "priority": "Lighting first; the object must stay exactly as in the reference.", "lighting": "beautiful dramatic directional light on the object, the same in every image. The object is lit from the upper left and slightly in front, with strong, smooth falloff across its form: the upper-left part is bright and luminous, the light gradually fades across the middle, and the lower-right part sinks into deep shadow, about 60% lit and 40% in shadow. Every curve, fold, seam, bevel and bulge is sculpted by its own highlight and its own small shadow, so the whole surface becomes a rich, lively pattern of light and shadow, and the texture shows crisp micro-shadows and tiny glints. Glass and glossy parts show long crisp specular highlights along their upper-left edges. The shadow side receives only soft colored reflected light from the lower part of the background, so shadows are deep and saturated, a richer version of the object's own colors mixed with the background hue, with texture and details clearly readable; nothing is solid black, nothing is flat or gray. Fine-art still-life contrast. Completely relight the object; do not keep the lighting of the reference photo. All the light falls on the object only: the background behind it stays a perfectly even, untouched gradient with no light shapes, no bright streaks and no lighter areas on it.", "subject": "The exact object from the attached reference image, recreated as a photorealistic hero shot and fully relit. Preserve its identity precisely: the same design, shape, proportions, construction, colors, prints and patterns, logos and lettering, materials and surface finish, and the same number of items (a pair stays a pair, a set stays a set). Do not redesign, simplify, restyle or add anything. Every material keeps its real character and its texture is crisp and readable: knit stays knit, suede stays suede, leather stays leather, mesh stays mesh, metal stays metal. If the object is transparent or translucent (glass, crystal, acrylic, resin, ice), it stays solid and keeps exactly what is inside it in the reference: never make it hollow, empty or box-like, never add air gaps or water lines. Show its real thickness, refraction, ripples, bevels and edge highlights, and keep anything inside it sharp, colorful and readable through the glass. Render only the object: no person, hand, body, mannequin, hanger, stand, string or support.", "composition": "turned 25 degrees to show its left side, with a slight 6 degree counterclockwise roll; camera at eye level; placed a little left of center, filling about 70% of the frame, with calm empty space on the right.", "clothing_and_pairs": "If the object is clothing, it is never worn and never on an invisible body: it tumbles through the air bunched, twisted and folded over
itself into a sculptural form, with rounded rolls, deep folds and crevices for the light to model; sleeves twist and fold, the hem rolls up, the collar tips sideways; it stays clearly recognizable and moves by its real weight. If the object is a pair, the two items float at different depths with complementary angles; laces, straps and cords drift in soft curves.", "space": "the object levitates in empty space with nothing under or around it: no floor, no tabletop, no surface, no cast shadow, no contact shadow, no reflection below it, no horizon line. It hangs in the air in front of the seamless gradient, clearly floating, with clean space on all sides.", "background": { "description": "deep warm black at the top fading smoothly into burnt terracotta and soft peach-clay at the bottom", "stops": [ { "position": 0, "color": "#0C0909" }, { "position": 38, "color": "#2B1611" }, { "position": 72, "color": "#8A4836" }, { "position": 100, "color": "#D49478" } ], "rules": "flat, perfectly smooth and evenly toned, like matte paper far behind the object; no blotches, streaks, diagonal light shapes, vignette, glow, halo, floor or horizon" }, "style": "high-end fine-art still-life photography, medium format, subtle analog film character with fine natural grain, rich true colors, razor-sharp focus on the object, museum-quality detail.", "final_check": "the exact object from the reference, unchanged; directional light from the upper left falling off across the object; a rich light-and-shadow pattern on every form; deep colored shadows with readable texture, nothing black; transparent objects stay solid and keep their contents; floating in empty space, no floor, no shadow below, no horizon; clean, flat, even gradient with no light shapes on it." }
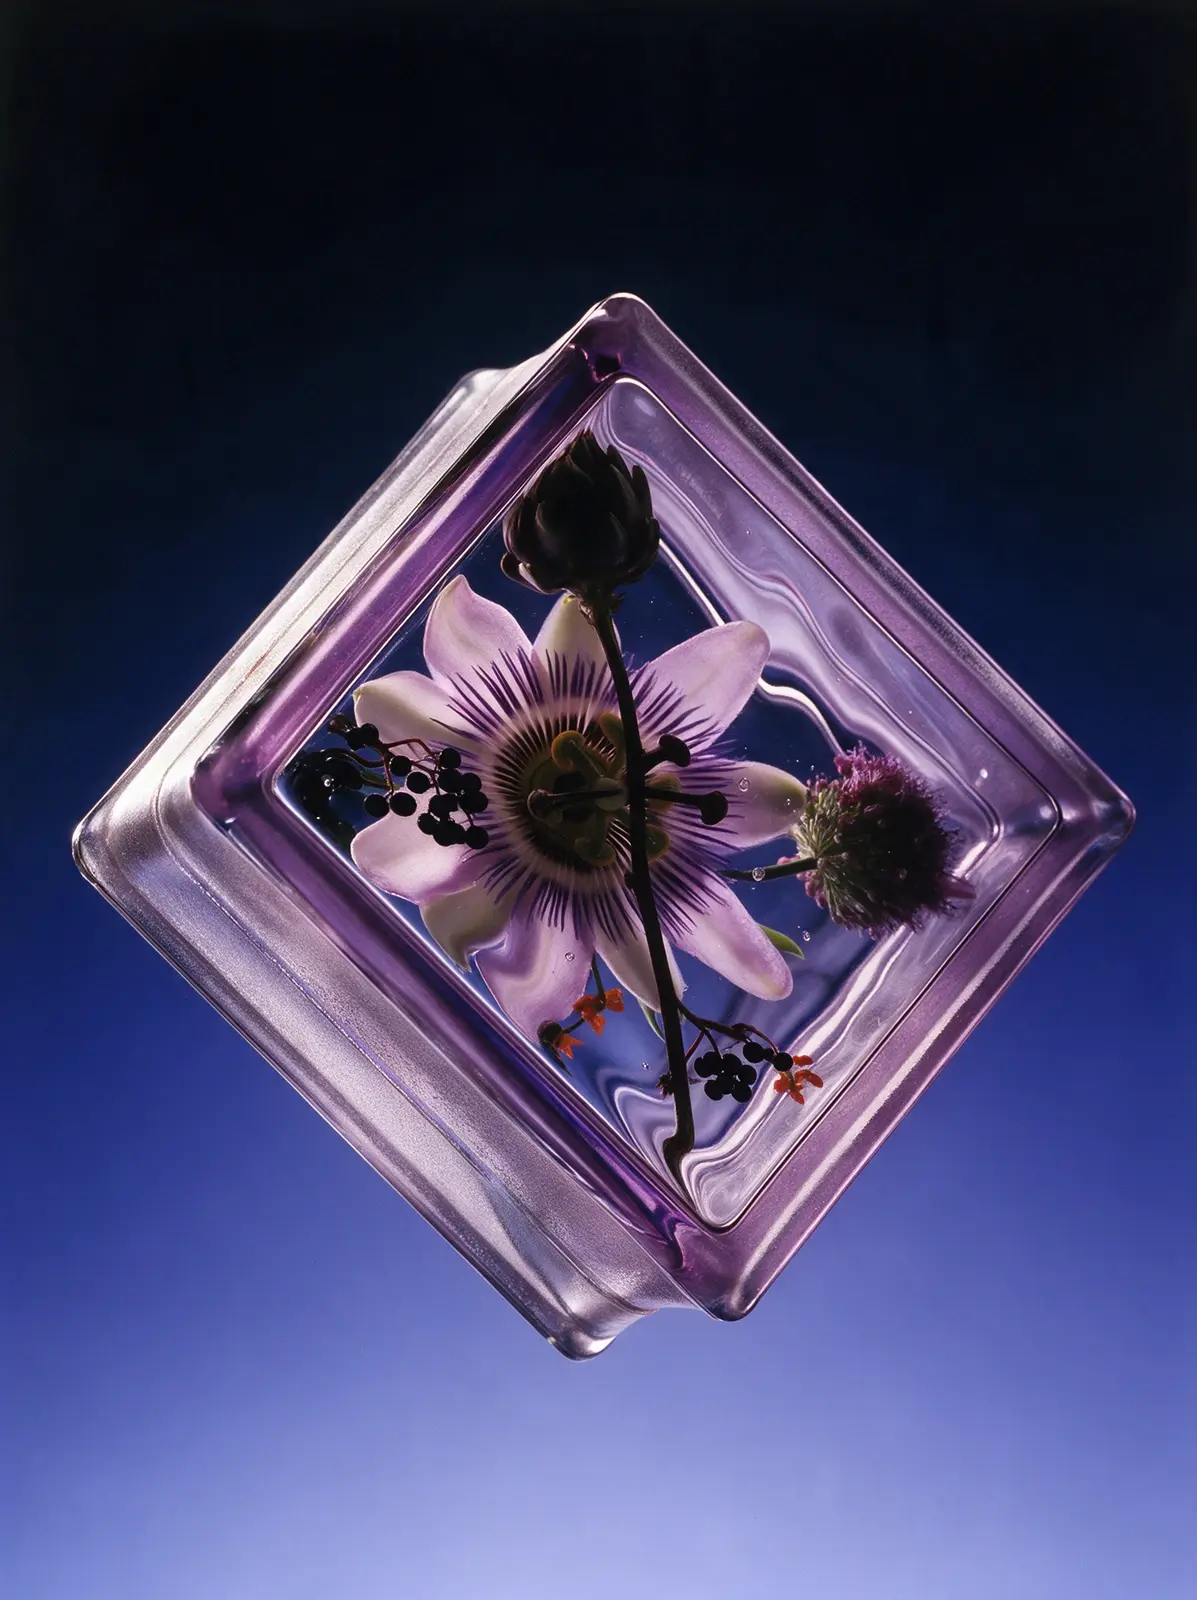
Seedream 5.0 Pro
Copy
LIGHTING (most important): beautiful dramatic directional light on the object, the same in every image. The object is lit from the upper left and slightly in front, with strong, smooth falloff across its form: the upper-left part is bright and luminous, the light gradually fades across the middle, and the lower-right part sinks into deep shadow, about 60% lit and 40% in shadow. Every curve, fold, seam, bevel and bulge is sculpted by its own highlight and its own small shadow, so the whole surface becomes a rich, lively pattern of light and shadow, and the texture shows crisp micro-shadows and tiny glints. Glass and glossy parts show long crisp specular highlights along their upper-left edges. The shadow side receives only soft colored reflected light from the lower part of the background, so shadows are deep and saturated, a richer version of the object's own colors mixed with the background hue, with texture and details clearly readable; nothing is solid black, nothing is flat or gray. Fine-art still-life contrast. Completely relight the object; do not keep the lighting of the reference photo. All the light falls on the object only: the background behind it stays a perfectly even, untouched gradient with no light shapes, no bright streaks and no lighter areas on it. SUBJECT: The exact object from the attached reference image, recreated as a photorealistic hero shot and fully relit. Preserve its identity precisely: the same design, shape, proportions, construction, colors, prints and patterns, logos and lettering, materials and surface finish, and the same number of items (a pair stays a pair, a set stays a set). Do not redesign, simplify, restyle or add anything. Every material keeps its real character and its texture is crisp and readable: knit stays knit, suede stays suede, leather stays leather, mesh stays mesh, metal stays metal. If the object is transparent or translucent (glass, crystal, acrylic, resin, ice), it stays solid and keeps exactly what is inside it in the reference: never make it hollow, empty or box-like, never add air gaps or water lines. Show its real thickness, refraction, ripples, bevels and edge highlights, and keep anything inside it sharp, colorful and readable through the glass. Render only the object: no person, hand, body, mannequin, hanger, stand, string or support. COMPOSITION: The object is tipped steeply by 40 degrees so it runs along a strong diagonal of the frame, as if balancing on one corner or tip, front toward the camera with a slight downward view of its top; centered, filling about 70% of the frame. If the object is clothing, it is never worn and never on an invisible body: it tumbles through the air bunched, twisted and folded over itself into a sculptural form, with rounded rolls, deep folds and crevices for
the light to model; sleeves twist and fold, the hem rolls up, the collar tips sideways; it stays clearly recognizable and moves by its real weight. If the object is a pair, the two items float at different depths with complementary angles; laces, straps and cords drift in soft curves. SPACE: the object levitates in empty space with nothing under or around it: no floor, no tabletop, no surface, no cast shadow, no contact shadow, no reflection below it, no horizon line. It hangs in the air in front of the seamless gradient, clearly floating, with clean space on all sides. BACKGROUND: seamless vertical studio gradient, deep ink-navy at the top fading smoothly into periwinkle blue and soft lilac-blue at the bottom; stops #080B18 at 0%, #1A2350 at 40%, #4E5FA8 at 75%, #A3ADE3 at 100%. Flat, perfectly smooth and evenly toned from top to bottom, like seamless matte paper far behind the object; no blotches, no streaks, no diagonal light shapes, no vignette, no glow, no halo, no floor, no horizon. STYLE: high-end fine-art still-life photography, medium format, subtle analog film character with fine natural grain, rich true colors, razor-sharp focus on the object, museum-quality detail. FINAL CHECK: the exact object from the reference, unchanged; directional light from the upper left falling off across the object; a rich light-and-shadow pattern on every form; deep colored shadows with readable texture, nothing black; transparent objects stay solid and keep their contents; floating in empty space, no floor, no shadow below, no horizon; clean, flat, even gradient with no light shapes on it.
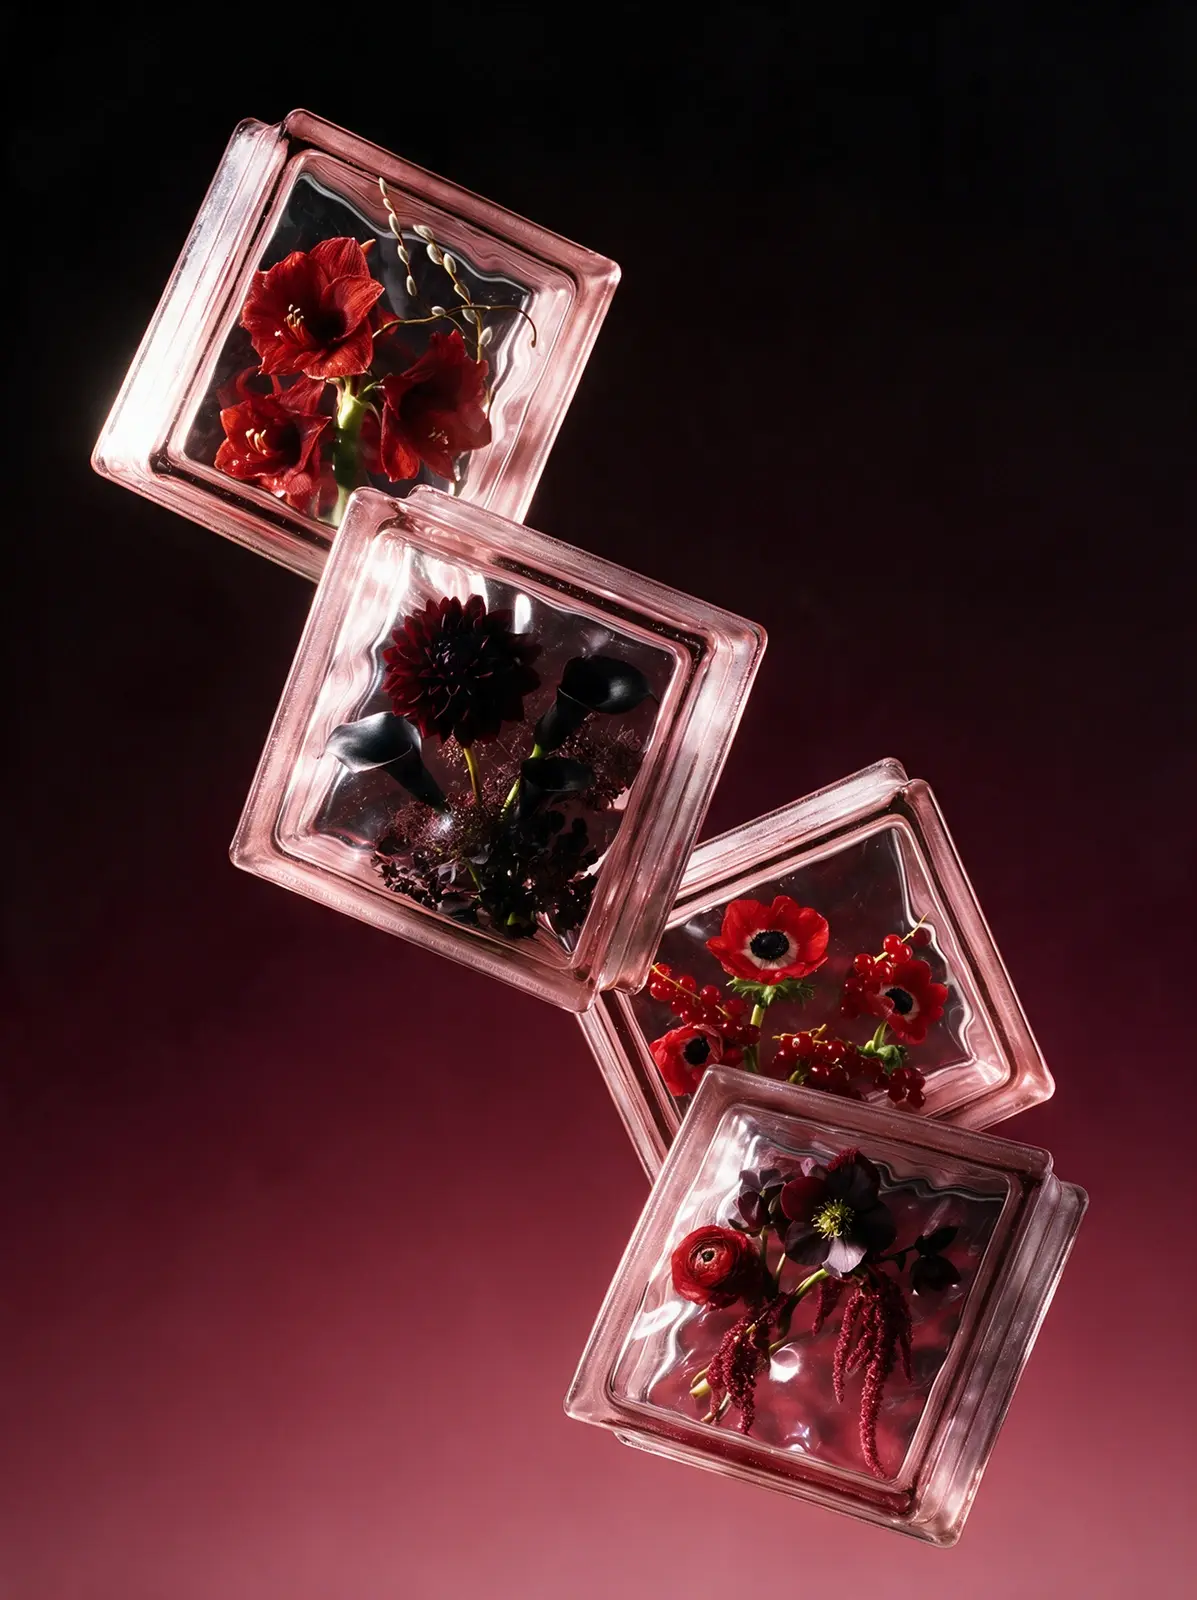
Seedream 5.0 Pro
Copy
{ "priority": "Lighting first; the object must stay exactly as in the reference.", "lighting": "beautiful dramatic directional light on the object, the same in every image. The light comes from outside the frame on the left, at about the height of the object and slightly toward the camera, so it reaches only the object, with strong, smooth falloff across its form: the upper-left part is bright and luminous, the light gradually fades across the middle, and the lower-right part sinks into deep shadow, about 60% lit and 40% in shadow. Every curve, fold, seam, bevel and bulge is sculpted by its own highlight and its own small shadow, so the whole surface becomes a rich, lively pattern of light and shadow, and the texture shows crisp micro-shadows and tiny glints. Glass and glossy parts show long crisp specular highlights along their upper-left edges. The shadow side receives only soft colored reflected light from the lower part of the background, so shadows are deep and saturated, a richer version of the object's own colors mixed with the background hue, with texture and details clearly readable; nothing is solid black, nothing is flat or gray. Fine-art still-life contrast. Completely relight the object; do not keep the lighting of the reference photo. The background is lit separately and evenly, and its brightness comes only from the gradient: the top edge and the top-left corner are the darkest, deepest part of the whole image, uniformly dark, and the background only gets lighter toward the bottom.", "subject": "The exact object from the attached reference image, recreated as a photorealistic hero shot and fully relit. Preserve its identity precisely: the same design, shape, proportions, construction, colors, prints and patterns, logos and lettering, materials and surface finish, and the same number of items (a pair stays a pair, a set stays a set). Do not redesign, simplify, restyle or add anything. Every material keeps its real character and its texture is crisp and readable: knit stays knit, suede stays suede, leather stays leather, mesh stays mesh, metal stays metal. If the object is transparent or translucent (glass, crystal, acrylic, resin, ice), it stays solid and keeps exactly what is inside it in the reference: never make it hollow, empty or box-like, never add air gaps or water lines. Show its real thickness, refraction, ripples, bevels and edge highlights, and keep anything inside it sharp, colorful and readable through the glass. Render only the object: no person, hand, body, mannequin, hanger, stand, string or support.", "composition": "caught mid-tumble, rotated 30 degrees and seen from slightly above in three-quarter view, so its top and one side are visible; centered, filling about 60% of the frame.", "clothing_and_pairs": "If the
object is clothing, it is never worn and never on an invisible body: it tumbles through the air bunched, twisted and folded over itself into a sculptural form, with rounded rolls, deep folds and crevices for the light to model; sleeves twist and fold, the hem rolls up, the collar tips sideways; it stays clearly recognizable and moves by its real weight. If the object is a pair, the two items float at different depths with complementary angles; laces, straps and cords drift in soft curves.", "space": "the object levitates in empty space with nothing under or around it: no floor, no tabletop, no surface, no cast shadow, no contact shadow, no reflection below it, no horizon line. It hangs in the air in front of the seamless gradient, clearly floating, with clean space on all sides.", "background": { "description": "deep black at the top fading smoothly into rich wine-burgundy and dusty rose-red at the bottom", "stops": [ { "position": 0, "color": "#0B0809" }, { "position": 40, "color": "#2A0F16" }, { "position": 75, "color": "#6E2433" }, { "position": 100, "color": "#B0626E" } ], "rules": "flat, perfectly smooth and evenly toned, like matte paper far behind the object; no blotches, streaks, diagonal light shapes, vignette, glow, halo, floor or horizon" }, "style": "high-end fine-art still-life photography, medium format, subtle analog film character with fine natural grain, rich true colors, razor-sharp focus on the object, museum-quality detail.", "final_check": "the exact object from the reference, unchanged; light from the left, outside the frame, falling off across the object; a rich light-and-shadow pattern on every form; deep colored shadows with readable texture, nothing black; transparent objects stay solid and keep their contents; floating in empty space, no floor, no shadow below, no horizon; clean, flat, even gradient whose top edge and top-left corner are the darkest part of the image." }
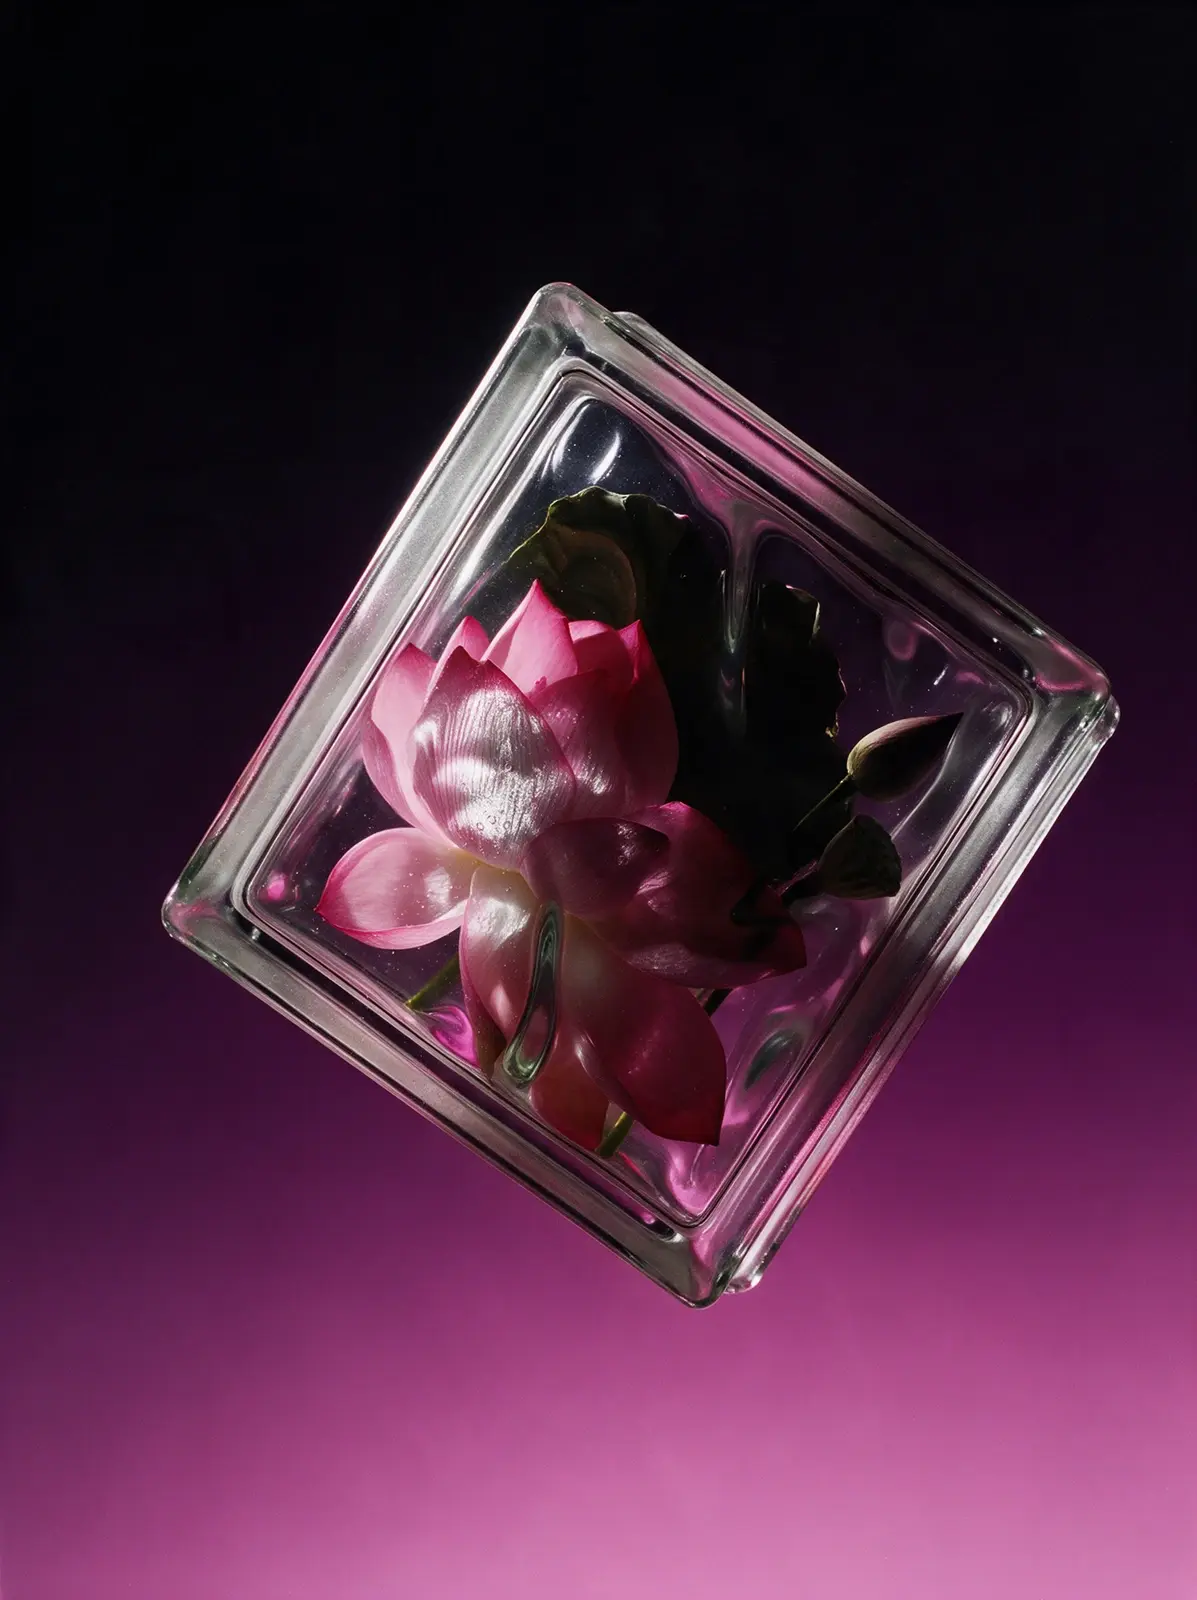
Seedream 5.0 Pro
Copy
{ "priority": "Lighting first; the object must stay exactly as in the reference.", "lighting": "beautiful dramatic directional light on the object, the same in every image. The object is lit from the upper left and slightly in front, with strong, smooth falloff across its form: the upper-left part is bright and luminous, the light gradually fades across the middle, and the lower-right part sinks into deep shadow, about 60% lit and 40% in shadow. Every curve, fold, seam, bevel and bulge is sculpted by its own highlight and its own small shadow, so the whole surface becomes a rich, lively pattern of light and shadow, and the texture shows crisp micro-shadows and tiny glints. Glass and glossy parts show long crisp specular highlights along their upper-left edges. The shadow side receives only soft colored reflected light from the lower part of the background, so shadows are deep and saturated, a richer version of the object's own colors mixed with the background hue, with texture and details clearly readable; nothing is solid black, nothing is flat or gray. Fine-art still-life contrast. Completely relight the object; do not keep the lighting of the reference photo. All the light falls on the object only: the background behind it stays a perfectly even, untouched gradient with no light shapes, no bright streaks and no lighter areas on it.", "subject": "The exact object from the attached reference image, recreated as a photorealistic hero shot and fully relit. Preserve its identity precisely: the same design, shape, proportions, construction, colors, prints and patterns, logos and lettering, materials and surface finish, and the same number of items (a pair stays a pair, a set stays a set). Do not redesign, simplify, restyle or add anything. Every material keeps its real character and its texture is crisp and readable: knit stays knit, suede stays suede, leather stays leather, mesh stays mesh, metal stays metal. If the object is transparent or translucent (glass, crystal, acrylic, resin, ice), it stays solid and keeps exactly what is inside it in the reference: never make it hollow, empty or box-like, never add air gaps or water lines. Show its real thickness, refraction, ripples, bevels and edge highlights, and keep anything inside it sharp, colorful and readable through the glass. Render only the object: no person, hand, body, mannequin, hanger, stand, string or support.", "composition": "tilted 25 degrees counterclockwise in three-quarter view, placed in the upper right part of the frame, filling about 55% of it, with generous empty space below and to the left, as if it is rising.", "clothing_and_pairs": "If the object is clothing, it is never worn and never on an invisible body: it tumbles through the air bunched, twisted and folded over itself into a
sculptural form, with rounded rolls, deep folds and crevices for the light to model; sleeves twist and fold, the hem rolls up, the collar tips sideways; it stays clearly recognizable and moves by its real weight. If the object is a pair, the two items float at different depths with complementary angles; laces, straps and cords drift in soft curves.", "space": "the object levitates in empty space with nothing under or around it: no floor, no tabletop, no surface, no cast shadow, no contact shadow, no reflection below it, no horizon line. It hangs in the air in front of the seamless gradient, clearly floating, with clean space on all sides.", "background": { "description": "deep black-violet at the top fading smoothly into vivid fuchsia and soft pink at the bottom", "stops": [ { "position": 0, "color": "#0C080D" }, { "position": 40, "color": "#2C0F2A" }, { "position": 75, "color": "#8C2C78" }, { "position": 100, "color": "#D97FBE" } ], "rules": "flat, perfectly smooth and evenly toned, like matte paper far behind the object; no blotches, streaks, diagonal light shapes, vignette, glow, halo, floor or horizon" }, "style": "high-end fine-art still-life photography, medium format, subtle analog film character with fine natural grain, rich true colors, razor-sharp focus on the object, museum-quality detail.", "final_check": "the exact object from the reference, unchanged; directional light from the upper left falling off across the object; a rich light-and-shadow pattern on every form; deep colored shadows with readable texture, nothing black; transparent objects stay solid and keep their contents; floating in empty space, no floor, no shadow below, no horizon; clean, flat, even gradient with no light shapes on it." }
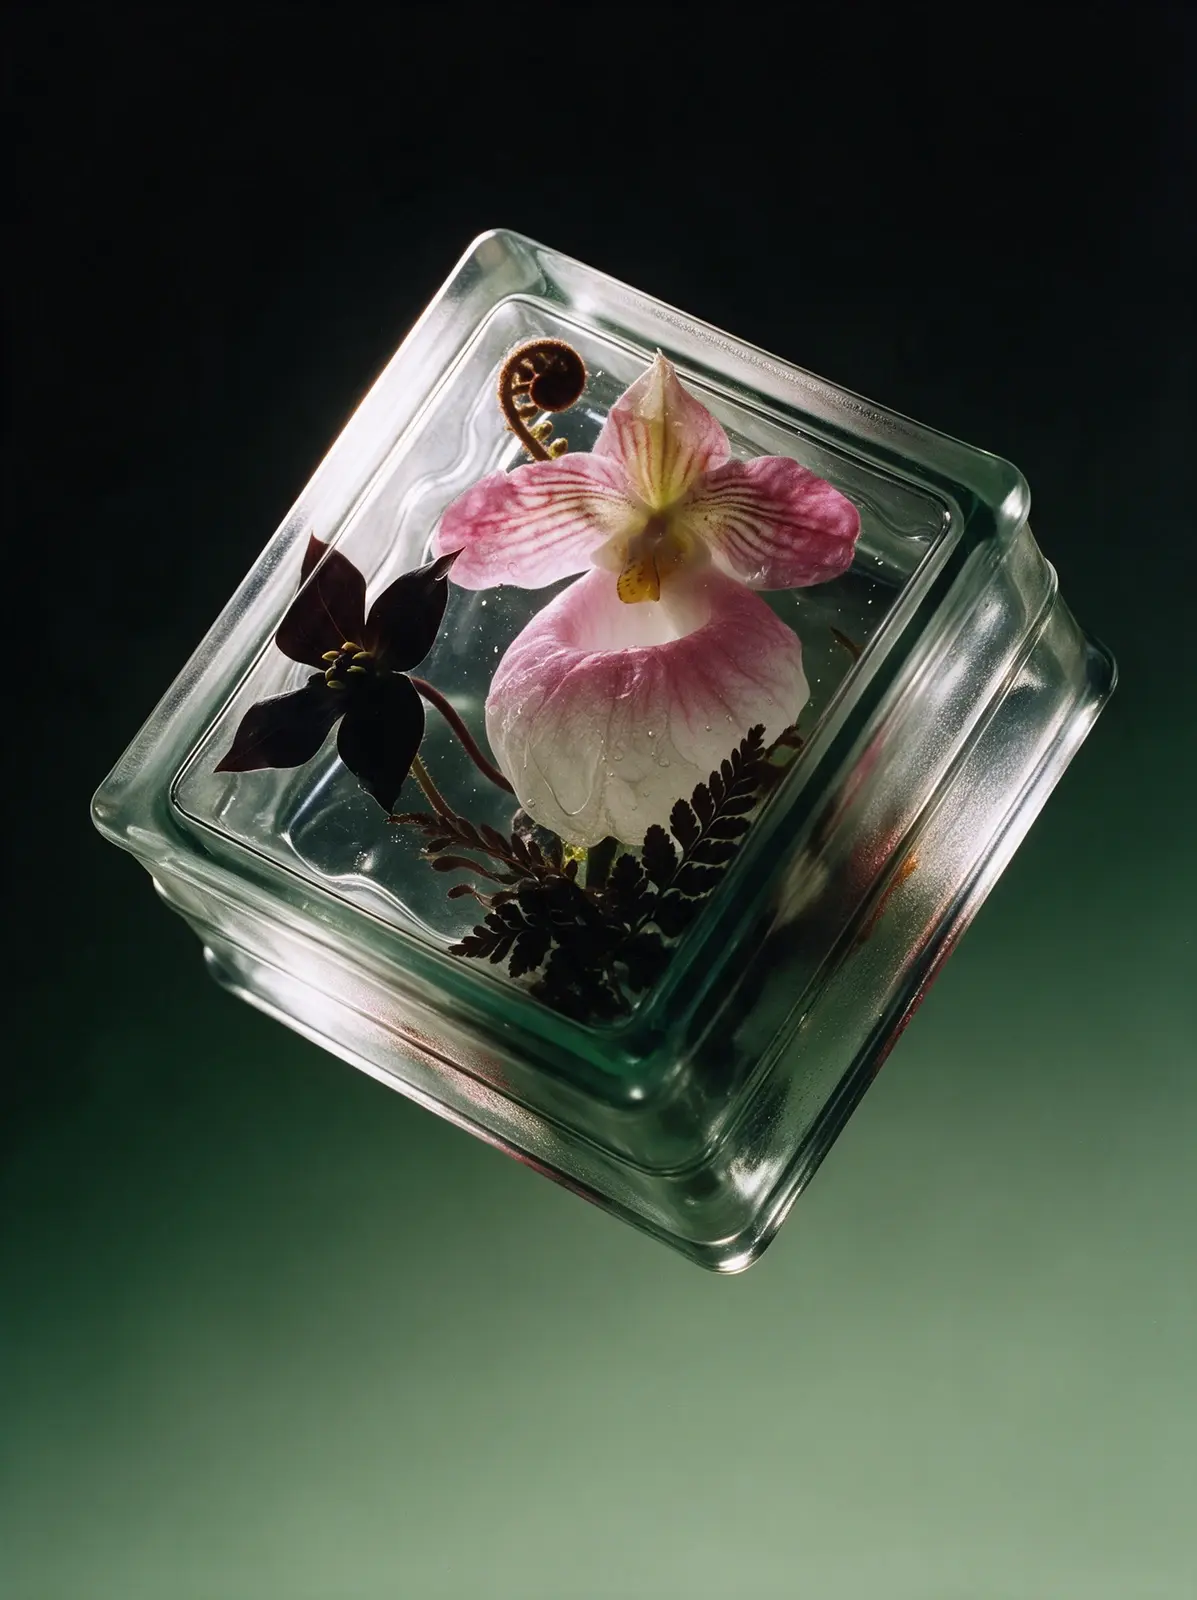
Seedream 5.0 Pro
Copy
{ "priority": "Lighting first; the object must stay exactly as in the reference.", "lighting": "beautiful dramatic directional light on the object, the same in every image. The object is lit from the upper left and slightly in front, with strong, smooth falloff across its form: the upper-left part is bright and luminous, the light gradually fades across the middle, and the lower-right part sinks into deep shadow, about 60% lit and 40% in shadow. Every curve, fold, seam, bevel and bulge is sculpted by its own highlight and its own small shadow, so the whole surface becomes a rich, lively pattern of light and shadow, and the texture shows crisp micro-shadows and tiny glints. Glass and glossy parts show long crisp specular highlights along their upper-left edges. The shadow side receives only soft colored reflected light from the lower part of the background, so shadows are deep and saturated, a richer version of the object's own colors mixed with the background hue, with texture and details clearly readable; nothing is solid black, nothing is flat or gray. Fine-art still-life contrast. Completely relight the object; do not keep the lighting of the reference photo. All the light falls on the object only: the background behind it stays a perfectly even, untouched gradient with no light shapes, no bright streaks and no lighter areas on it.", "subject": "The exact object from the attached reference image, recreated as a photorealistic hero shot and fully relit. Preserve its identity precisely: the same design, shape, proportions, construction, colors, prints and patterns, logos and lettering, materials and surface finish, and the same number of items (a pair stays a pair, a set stays a set). Do not redesign, simplify, restyle or add anything. Every material keeps its real character and its texture is crisp and readable: knit stays knit, suede stays suede, leather stays leather, mesh stays mesh, metal stays metal. If the object is transparent or translucent (glass, crystal, acrylic, resin, ice), it stays solid and keeps exactly what is inside it in the reference: never make it hollow, empty or box-like, never add air gaps or water lines. Show its real thickness, refraction, ripples, bevels and edge highlights, and keep anything inside it sharp, colorful and readable through the glass. Render only the object: no person, hand, body, mannequin, hanger, stand, string or support.", "composition": "tilted 22 degrees counterclockwise and turned to show its right side; dramatic low camera angle from below, looking up at its underside and front, so it feels monumental; centered, filling about 65% of the frame.", "clothing_and_pairs": "If the object is clothing, it is never worn and never on an invisible body: it tumbles through the air bunched, twisted and folded
over itself into a sculptural form, with rounded rolls, deep folds and crevices for the light to model; sleeves twist and fold, the hem rolls up, the collar tips sideways; it stays clearly recognizable and moves by its real weight. If the object is a pair, the two items float at different depths with complementary angles; laces, straps and cords drift in soft curves.", "space": "the object levitates in empty space with nothing under or around it: no floor, no tabletop, no surface, no cast shadow, no contact shadow, no reflection below it, no horizon line. It hangs in the air in front of the seamless gradient, clearly floating, with clean space on all sides.", "background": { "description": "deep green-black at the top fading smoothly into muted sage and pale grey-green at the bottom", "stops": [ { "position": 0, "color": "#0A100D" }, { "position": 40, "color": "#1C2B23" }, { "position": 75, "color": "#4F6E58" }, { "position": 100, "color": "#8FAA8C" } ], "rules": "flat, perfectly smooth and evenly toned, like matte paper far behind the object; no blotches, streaks, diagonal light shapes, vignette, glow, halo, floor or horizon" }, "style": "high-end fine-art still-life photography, medium format, subtle analog film character with fine natural grain, rich true colors, razor-sharp focus on the object, museum-quality detail.", "final_check": "the exact object from the reference, unchanged; directional light from the upper left falling off across the object; a rich light-and-shadow pattern on every form; deep colored shadows with readable texture, nothing black; transparent objects stay solid and keep their contents; floating in empty space, no floor, no shadow below, no horizon; clean, flat, even gradient with no light shapes on it." }
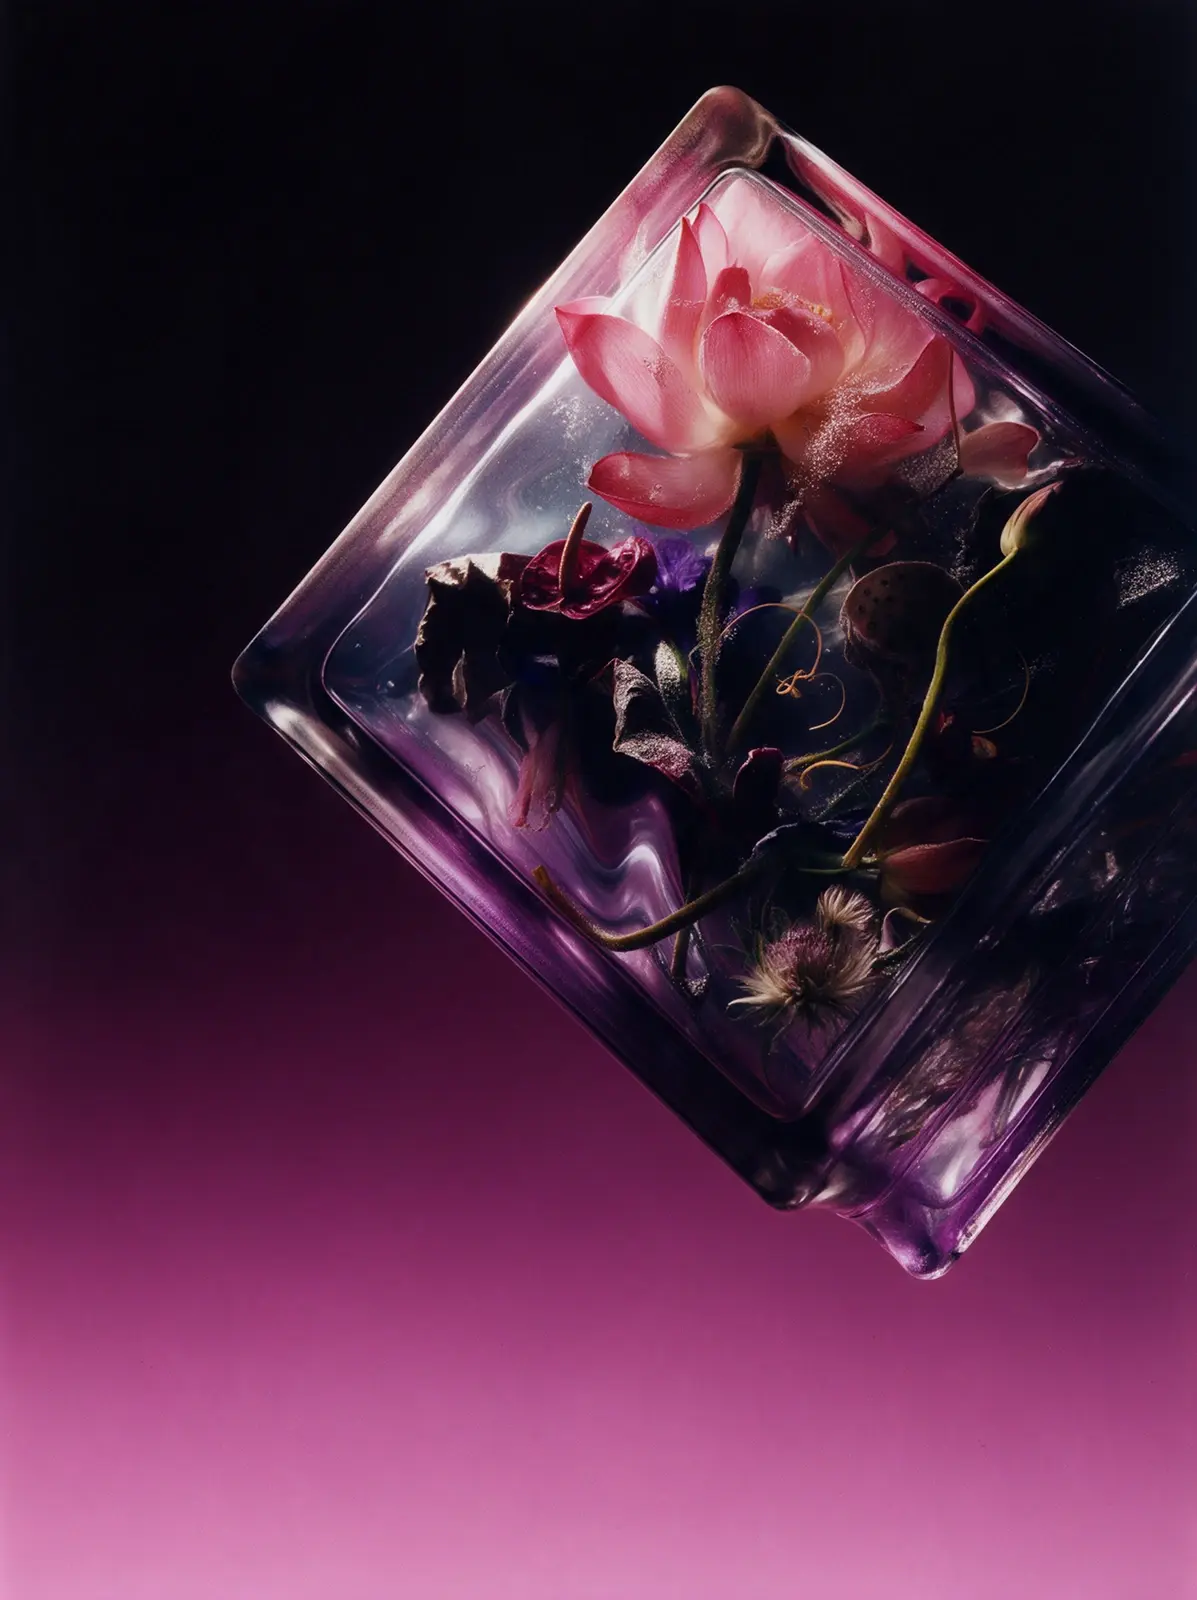
Seedream 5.0 Pro
Copy
{ "priority": "Lighting first; the object must stay exactly as in the reference.", "lighting": "beautiful dramatic directional light on the object, the same in every image. The object is lit from the upper left and slightly in front, with strong, smooth falloff across its form: the upper-left part is bright and luminous, the light gradually fades across the middle, and the lower-right part sinks into deep shadow, about 60% lit and 40% in shadow. Every curve, fold, seam, bevel and bulge is sculpted by its own highlight and its own small shadow, so the whole surface becomes a rich, lively pattern of light and shadow, and the texture shows crisp micro-shadows and tiny glints. Glass and glossy parts show long crisp specular highlights along their upper-left edges. The shadow side receives only soft colored reflected light from the lower part of the background, so shadows are deep and saturated, a richer version of the object's own colors mixed with the background hue, with texture and details clearly readable; nothing is solid black, nothing is flat or gray. Fine-art still-life contrast. Completely relight the object; do not keep the lighting of the reference photo. All the light falls on the object only: the background behind it stays a perfectly even, untouched gradient with no light shapes, no bright streaks and no lighter areas on it.", "subject": "The exact object from the attached reference image, recreated as a photorealistic hero shot and fully relit. Preserve its identity precisely: the same design, shape, proportions, construction, colors, prints and patterns, logos and lettering, materials and surface finish, and the same number of items (a pair stays a pair, a set stays a set). Do not redesign, simplify, restyle or add anything. Every material keeps its real character and its texture is crisp and readable: knit stays knit, suede stays suede, leather stays leather, mesh stays mesh, metal stays metal. If the object is transparent or translucent (glass, crystal, acrylic, resin, ice), it stays solid and keeps exactly what is inside it in the reference: never make it hollow, empty or box-like, never add air gaps or water lines. Show its real thickness, refraction, ripples, bevels and edge highlights, and keep anything inside it sharp, colorful and readable through the glass. Render only the object: no person, hand, body, mannequin, hanger, stand, string or support.", "composition": "tilted 25 degrees counterclockwise in three-quarter view, placed in the upper right part of the frame, filling about 55% of it, with generous empty space below and to the left, as if it is rising.", "clothing_and_pairs": "If the object is clothing, it is never worn and never on an invisible body: it tumbles through the air bunched, twisted and folded over itself into a
sculptural form, with rounded rolls, deep folds and crevices for the light to model; sleeves twist and fold, the hem rolls up, the collar tips sideways; it stays clearly recognizable and moves by its real weight. If the object is a pair, the two items float at different depths with complementary angles; laces, straps and cords drift in soft curves.", "space": "the object levitates in empty space with nothing under or around it: no floor, no tabletop, no surface, no cast shadow, no contact shadow, no reflection below it, no horizon line. It hangs in the air in front of the seamless gradient, clearly floating, with clean space on all sides.", "background": { "description": "deep black-violet at the top fading smoothly into vivid fuchsia and soft pink at the bottom", "stops": [ { "position": 0, "color": "#0C080D" }, { "position": 40, "color": "#2C0F2A" }, { "position": 75, "color": "#8C2C78" }, { "position": 100, "color": "#D97FBE" } ], "rules": "flat, perfectly smooth and evenly toned, like matte paper far behind the object; no blotches, streaks, diagonal light shapes, vignette, glow, halo, floor or horizon" }, "style": "high-end fine-art still-life photography, medium format, subtle analog film character with fine natural grain, rich true colors, razor-sharp focus on the object, museum-quality detail.", "final_check": "the exact object from the reference, unchanged; directional light from the upper left falling off across the object; a rich light-and-shadow pattern on every form; deep colored shadows with readable texture, nothing black; transparent objects stay solid and keep their contents; floating in empty space, no floor, no shadow below, no horizon; clean, flat, even gradient with no light shapes on it." }
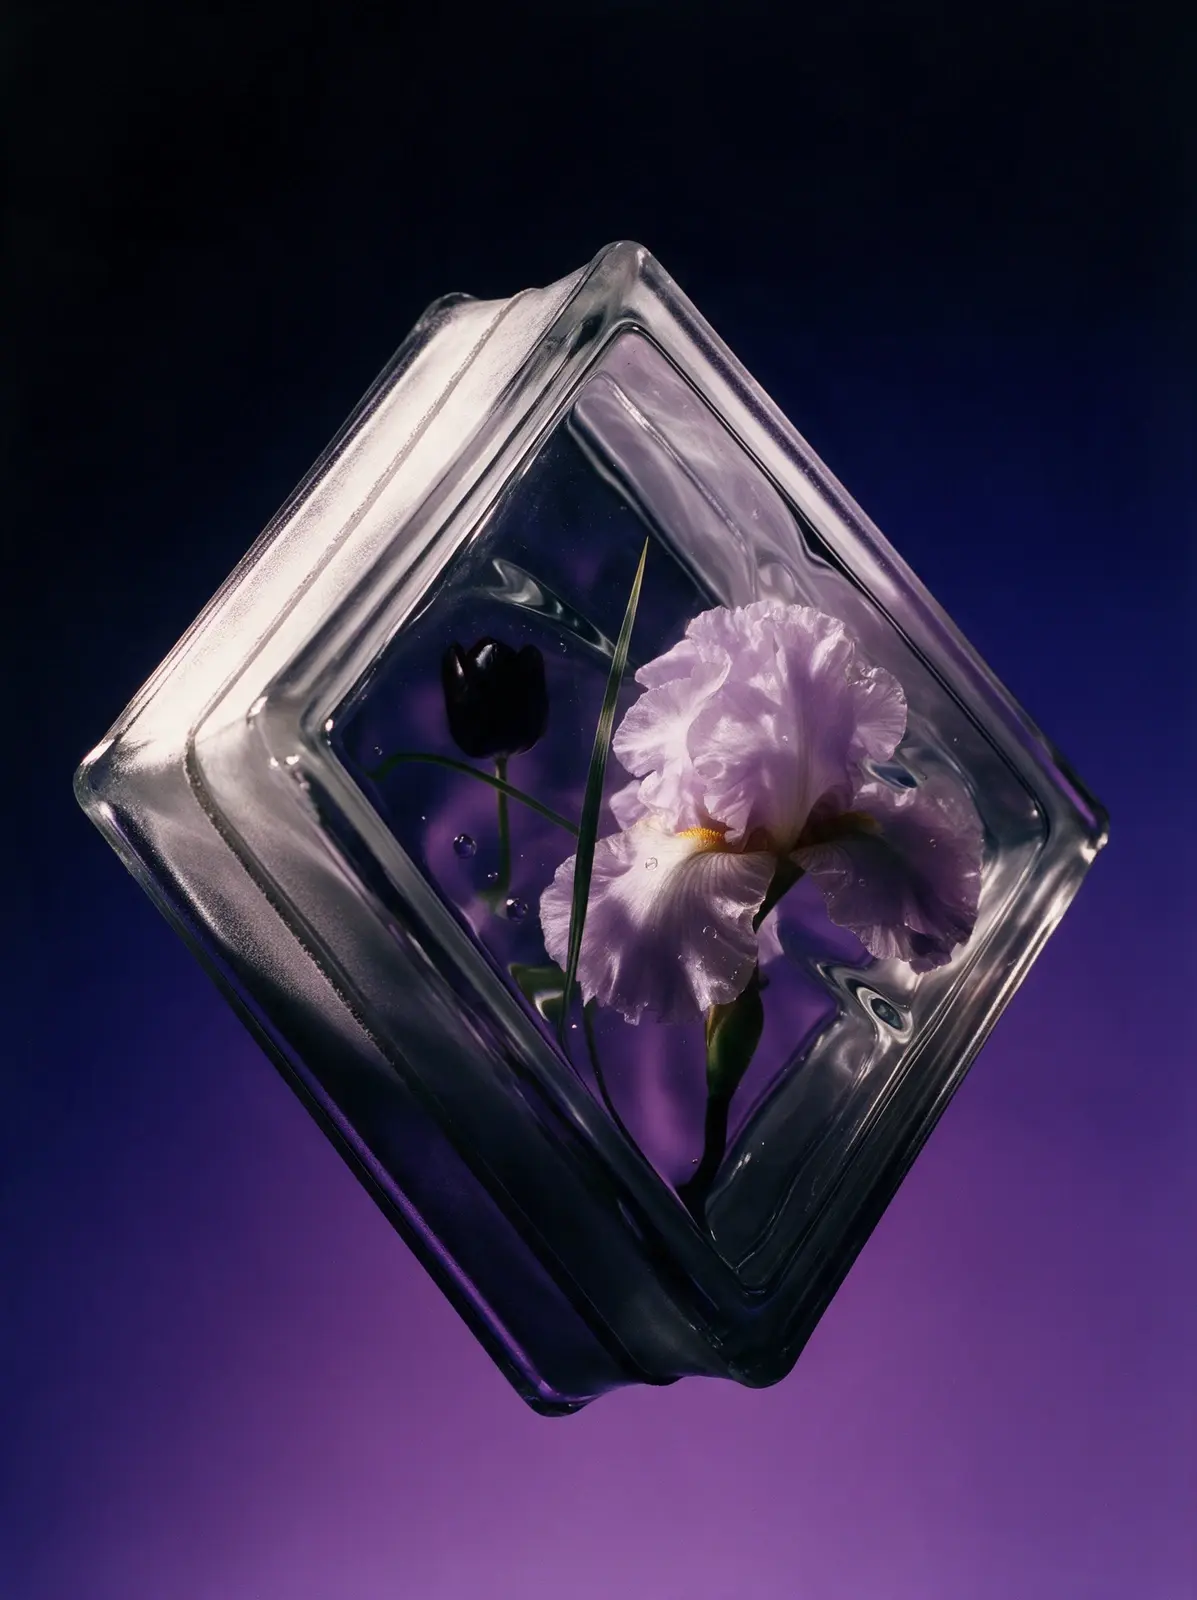
Seedream 5.0 Pro
Copy
{ "priority": "Lighting first; the object must stay exactly as in the reference.", "lighting": "beautiful dramatic directional light on the object, the same in every image. The light comes from outside the frame on the left, at about the height of the object and slightly toward the camera, so it reaches only the object, with strong, smooth falloff across its form: the upper-left part is bright and luminous, the light gradually fades across the middle, and the lower-right part sinks into deep shadow, about 60% lit and 40% in shadow. Every curve, fold, seam, bevel and bulge is sculpted by its own highlight and its own small shadow, so the whole surface becomes a rich, lively pattern of light and shadow, and the texture shows crisp micro-shadows and tiny glints. Glass and glossy parts show long crisp specular highlights along their upper-left edges. The shadow side receives only soft colored reflected light from the lower part of the background, so shadows are deep and saturated, a richer version of the object's own colors mixed with the background hue, with texture and details clearly readable; nothing is solid black, nothing is flat or gray. Fine-art still-life contrast. Completely relight the object; do not keep the lighting of the reference photo. The background is lit separately and evenly, and its brightness comes only from the gradient: the top edge and the top-left corner are the darkest, deepest part of the whole image, uniformly dark, and the background only gets lighter toward the bottom.", "subject": "The exact object from the attached reference image, recreated as a photorealistic hero shot and fully relit. Preserve its identity precisely: the same design, shape, proportions, construction, colors, prints and patterns, logos and lettering, materials and surface finish, and the same number of items (a pair stays a pair, a set stays a set). Do not redesign, simplify, restyle or add anything. Every material keeps its real character and its texture is crisp and readable: knit stays knit, suede stays suede, leather stays leather, mesh stays mesh, metal stays metal. If the object is transparent or translucent (glass, crystal, acrylic, resin, ice), it stays solid and keeps exactly what is inside it in the reference: never make it hollow, empty or box-like, never add air gaps or water lines. Show its real thickness, refraction, ripples, bevels and edge highlights, and keep anything inside it sharp, colorful and readable through the glass. Render only the object: no person, hand, body, mannequin, hanger, stand, string or support.", "composition": "tilted 15 degrees counterclockwise and turned so its front and left side are both visible, three-quarter view, camera slightly above, looking down a little; centered, filling about 65% of the frame.",
"clothing_and_pairs": "If the object is clothing, it is never worn and never on an invisible body: it tumbles through the air bunched, twisted and folded over itself into a sculptural form, with rounded rolls, deep folds and crevices for the light to model; sleeves twist and fold, the hem rolls up, the collar tips sideways; it stays clearly recognizable and moves by its real weight. If the object is a pair, the two items float at different depths with complementary angles; laces, straps and cords drift in soft curves.", "space": "the object levitates in empty space with nothing under or around it: no floor, no tabletop, no surface, no cast shadow, no contact shadow, no reflection below it, no horizon line. It hangs in the air in front of the seamless gradient, clearly floating, with clean space on all sides.", "background": { "description": "deep black-violet at the top fading smoothly into rich royal violet and soft lavender-violet at the bottom", "stops": [ { "position": 0, "color": "#0A0712" }, { "position": 40, "color": "#22133F" }, { "position": 75, "color": "#5A3BA3" }, { "position": 100, "color": "#A68DE3" } ], "rules": "flat, perfectly smooth and evenly toned, like matte paper far behind the object; no blotches, streaks, diagonal light shapes, vignette, glow, halo, floor or horizon" }, "style": "high-end fine-art still-life photography, medium format, subtle analog film character with fine natural grain, rich true colors, razor-sharp focus on the object, museum-quality detail.", "final_check": "the exact object from the reference, unchanged; light from the left, outside the frame, falling off across the object; a rich light-and-shadow pattern on every form; deep colored shadows with readable texture, nothing black; transparent objects stay solid and keep their contents; floating in empty space, no floor, no shadow below, no horizon; clean, flat, even gradient whose top edge and top-left corner are the darkest part of the image." }
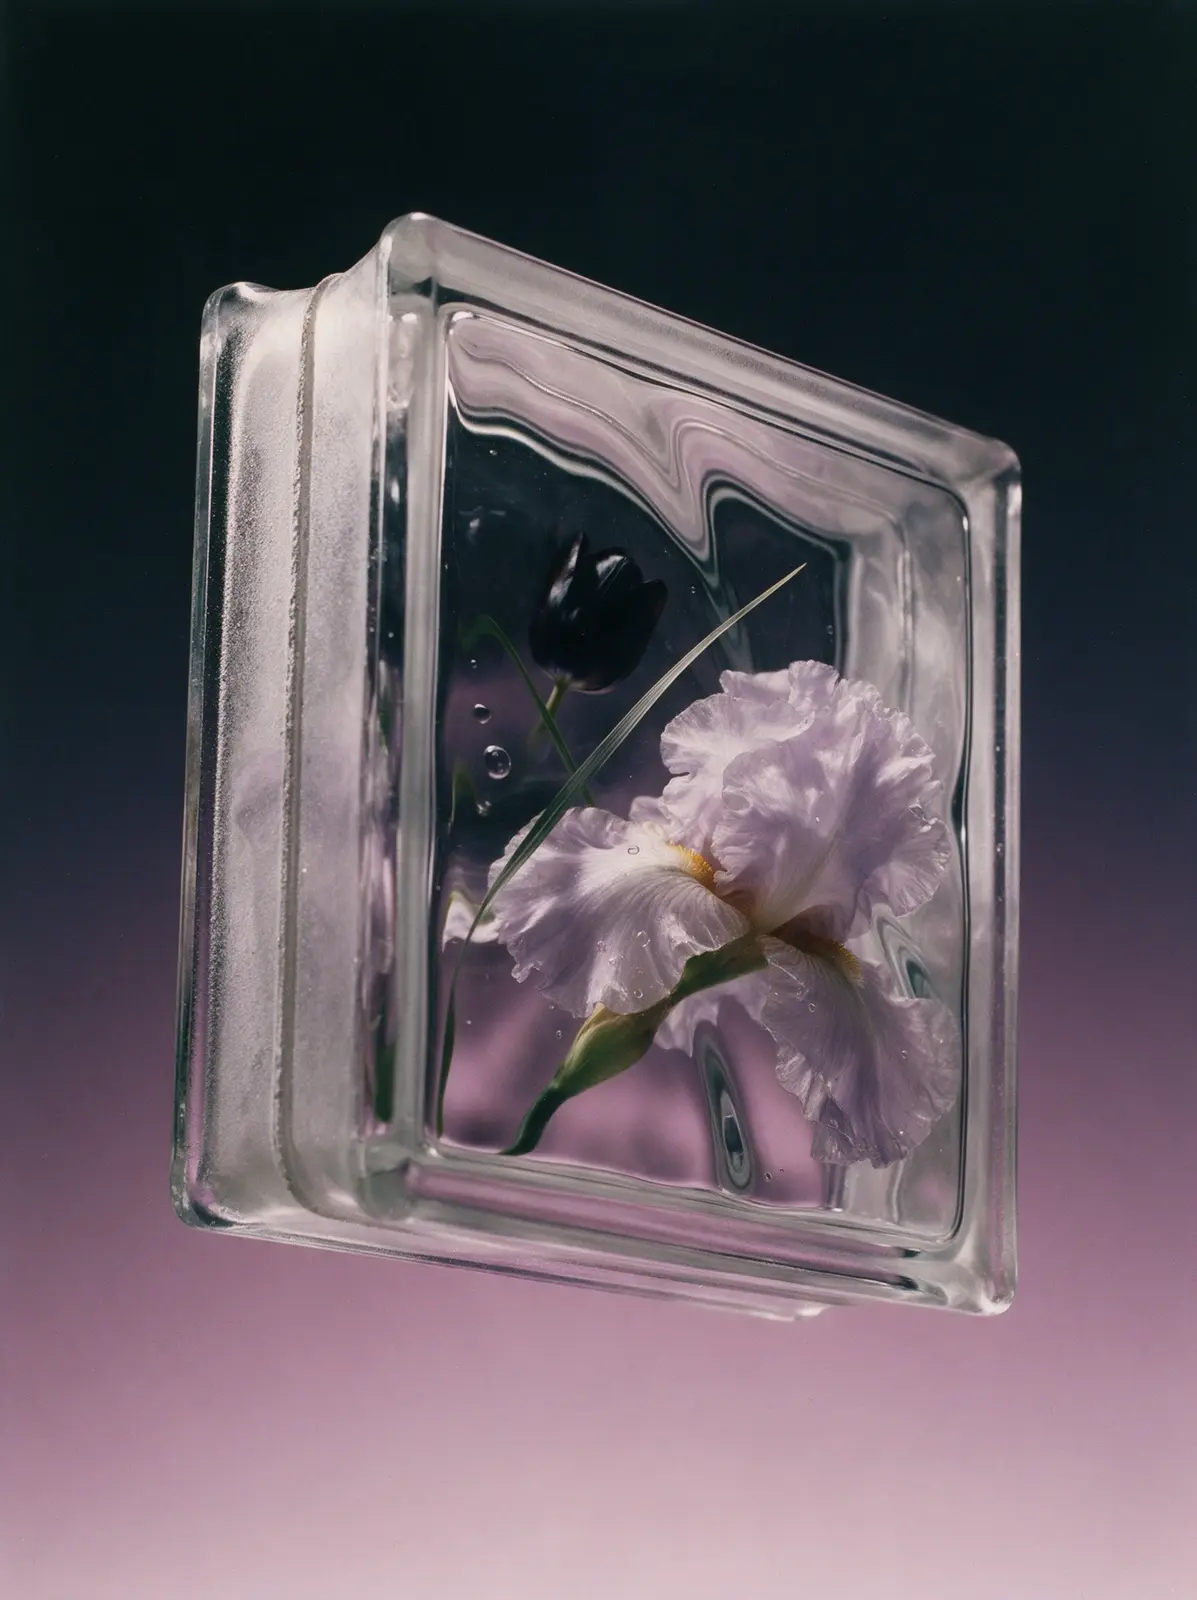
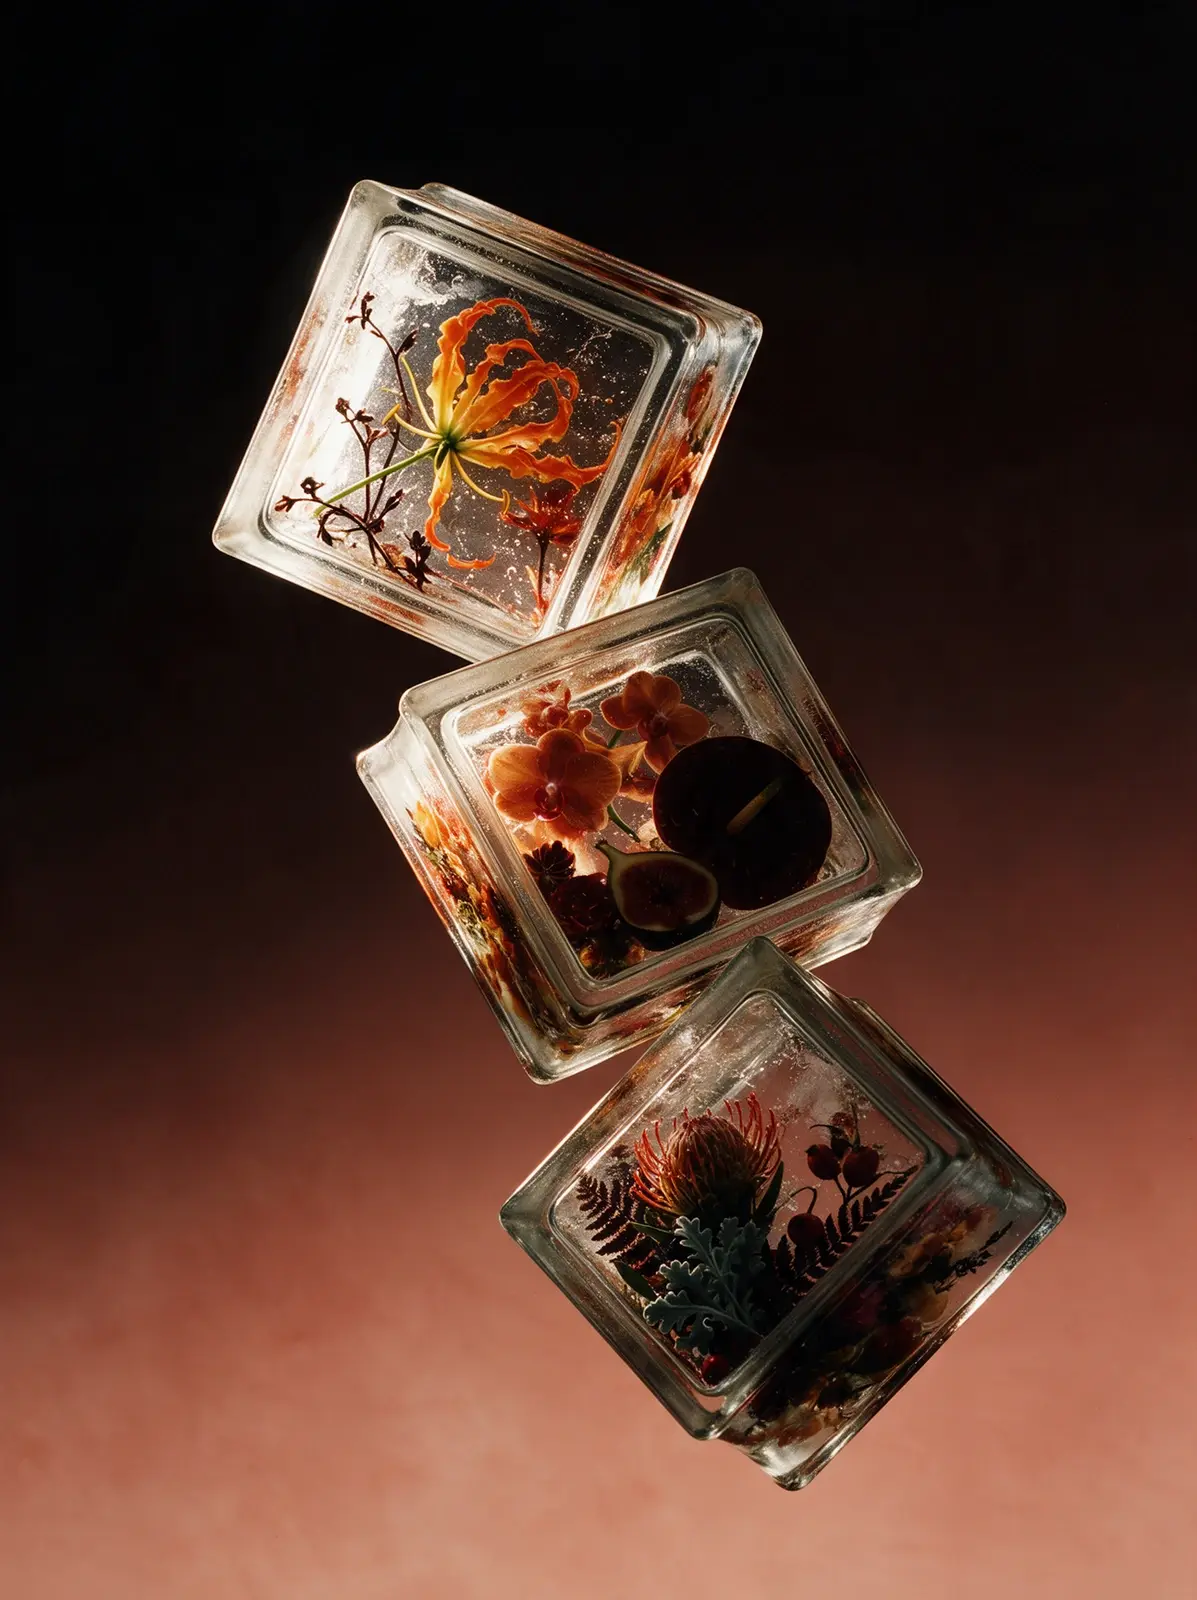
Seedream 5.0 Pro
Copy
{ "priority": "Lighting first; the object must stay exactly as in the reference.", "lighting": "beautiful dramatic directional light on the object, the same in every image. The light comes from outside the frame on the left, at about the height of the object and slightly toward the camera, so it reaches only the object, with strong, smooth falloff across its form: the upper-left part is bright and luminous, the light gradually fades across the middle, and the lower-right part sinks into deep shadow, about 60% lit and 40% in shadow. Every curve, fold, seam, bevel and bulge is sculpted by its own highlight and its own small shadow, so the whole surface becomes a rich, lively pattern of light and shadow, and the texture shows crisp micro-shadows and tiny glints. Glass and glossy parts show long crisp specular highlights along their upper-left edges. The shadow side receives only soft colored reflected light from the lower part of the background, so shadows are deep and saturated, a richer version of the object's own colors mixed with the background hue, with texture and details clearly readable; nothing is solid black, nothing is flat or gray. Fine-art still-life contrast. Completely relight the object; do not keep the lighting of the reference photo. The background is lit separately and evenly, and its brightness comes only from the gradient: the top edge and the top-left corner are the darkest, deepest part of the whole image, uniformly dark, and the background only gets lighter toward the bottom.", "subject": "The exact object from the attached reference image, recreated as a photorealistic hero shot and fully relit. Preserve its identity precisely: the same design, shape, proportions, construction, colors, prints and patterns, logos and lettering, materials and surface finish, and the same number of items (a pair stays a pair, a set stays a set). Do not redesign, simplify, restyle or add anything. Every material keeps its real character and its texture is crisp and readable: knit stays knit, suede stays suede, leather stays leather, mesh stays mesh, metal stays metal. If the object is transparent or translucent (glass, crystal, acrylic, resin, ice), it stays solid and keeps exactly what is inside it in the reference: never make it hollow, empty or box-like, never add air gaps or water lines. Show its real thickness, refraction, ripples, bevels and edge highlights, and keep anything inside it sharp, colorful and readable through the glass. Render only the object: no person, hand, body, mannequin, hanger, stand, string or support.", "composition": "turned 25 degrees to show its left side, with a slight 6 degree counterclockwise roll; camera at eye level; placed a little left of center, filling about 70% of the frame, with calm empty space on the
right.", "clothing_and_pairs": "If the object is clothing, it is never worn and never on an invisible body: it tumbles through the air bunched, twisted and folded over itself into a sculptural form, with rounded rolls, deep folds and crevices for the light to model; sleeves twist and fold, the hem rolls up, the collar tips sideways; it stays clearly recognizable and moves by its real weight. If the object is a pair, the two items float at different depths with complementary angles; laces, straps and cords drift in soft curves.", "space": "the object levitates in empty space with nothing under or around it: no floor, no tabletop, no surface, no cast shadow, no contact shadow, no reflection below it, no horizon line. It hangs in the air in front of the seamless gradient, clearly floating, with clean space on all sides.", "background": { "description": "deep warm black at the top fading smoothly into burnt terracotta and soft peach-clay at the bottom", "stops": [ { "position": 0, "color": "#0C0909" }, { "position": 38, "color": "#2B1611" }, { "position": 72, "color": "#8A4836" }, { "position": 100, "color": "#D49478" } ], "rules": "flat, perfectly smooth and evenly toned, like matte paper far behind the object; no blotches, streaks, diagonal light shapes, vignette, glow, halo, floor or horizon" }, "style": "high-end fine-art still-life photography, medium format, subtle analog film character with fine natural grain, rich true colors, razor-sharp focus on the object, museum-quality detail.", "final_check": "the exact object from the reference, unchanged; light from the left, outside the frame, falling off across the object; a rich light-and-shadow pattern on every form; deep colored shadows with readable texture, nothing black; transparent objects stay solid and keep their contents; floating in empty space, no floor, no shadow below, no horizon; clean, flat, even gradient whose top edge and top-left corner are the darkest part of the image." }
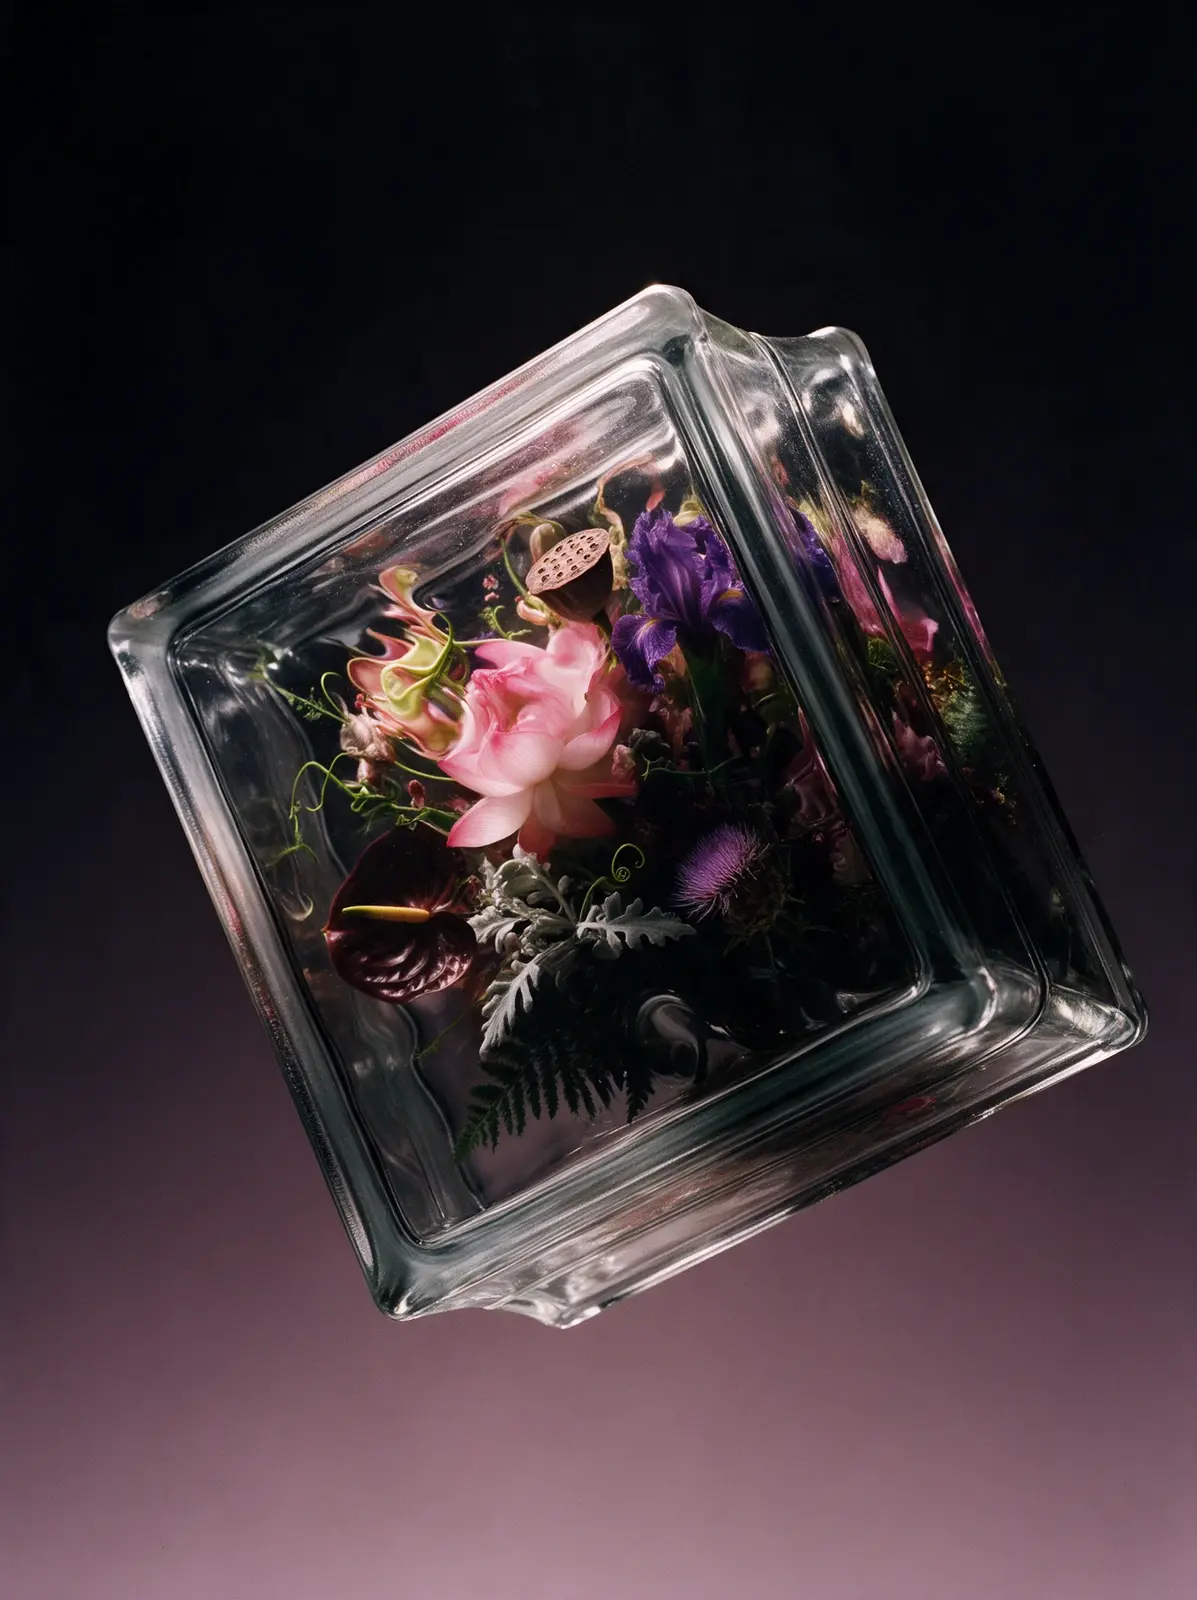
Seedream 5.0 Pro
Copy
{ "priority": "Lighting first; the object must stay exactly as in the reference.", "lighting": "beautiful dramatic directional light on the object, the same in every image. The object is lit from the upper left and slightly in front, with strong, smooth falloff across its form: the upper-left part is bright and luminous, the light gradually fades across the middle, and the lower-right part sinks into deep shadow, about 60% lit and 40% in shadow. Every curve, fold, seam, bevel and bulge is sculpted by its own highlight and its own small shadow, so the whole surface becomes a rich, lively pattern of light and shadow, and the texture shows crisp micro-shadows and tiny glints. Glass and glossy parts show long crisp specular highlights along their upper-left edges. The shadow side receives only soft colored reflected light from the lower part of the background, so shadows are deep and saturated, a richer version of the object's own colors mixed with the background hue, with texture and details clearly readable; nothing is solid black, nothing is flat or gray. Fine-art still-life contrast. Completely relight the object; do not keep the lighting of the reference photo. All the light falls on the object only: the background behind it stays a perfectly even, untouched gradient with no light shapes, no bright streaks and no lighter areas on it.", "subject": "The exact object from the attached reference image, recreated as a photorealistic hero shot and fully relit. Preserve its identity precisely: the same design, shape, proportions, construction, colors, prints and patterns, logos and lettering, materials and surface finish, and the same number of items (a pair stays a pair, a set stays a set). Do not redesign, simplify, restyle or add anything. Every material keeps its real character and its texture is crisp and readable: knit stays knit, suede stays suede, leather stays leather, mesh stays mesh, metal stays metal. If the object is transparent or translucent (glass, crystal, acrylic, resin, ice), it stays solid and keeps exactly what is inside it in the reference: never make it hollow, empty or box-like, never add air gaps or water lines. Show its real thickness, refraction, ripples, bevels and edge highlights, and keep anything inside it sharp, colorful and readable through the glass. Render only the object: no person, hand, body, mannequin, hanger, stand, string or support.", "composition": "tilted 18 degrees clockwise and turned so its front and right side are both visible, three-quarter view; camera slightly below center looking up a little; centered, filling about 65% of the frame.", "clothing_and_pairs": "If the object is clothing, it is never worn and never on an invisible body: it tumbles through the air bunched, twisted and folded over itself into a
sculptural form, with rounded rolls, deep folds and crevices for the light to model; sleeves twist and fold, the hem rolls up, the collar tips sideways; it stays clearly recognizable and moves by its real weight. If the object is a pair, the two items float at different depths with complementary angles; laces, straps and cords drift in soft curves.", "space": "the object levitates in empty space with nothing under or around it: no floor, no tabletop, no surface, no cast shadow, no contact shadow, no reflection below it, no horizon line. It hangs in the air in front of the seamless gradient, clearly floating, with clean space on all sides.", "background": { "description": "near-black plum at the top fading smoothly into dusty mauve-rose at the bottom", "stops": [ { "position": 0, "color": "#0D0A10" }, { "position": 40, "color": "#2A1C26" }, { "position": 75, "color": "#6E4F5E" }, { "position": 100, "color": "#A3818F" } ], "rules": "flat, perfectly smooth and evenly toned, like matte paper far behind the object; no blotches, streaks, diagonal light shapes, vignette, glow, halo, floor or horizon" }, "style": "high-end fine-art still-life photography, medium format, subtle analog film character with fine natural grain, rich true colors, razor-sharp focus on the object, museum-quality detail.", "final_check": "the exact object from the reference, unchanged; directional light from the upper left falling off across the object; a rich light-and-shadow pattern on every form; deep colored shadows with readable texture, nothing black; transparent objects stay solid and keep their contents; floating in empty space, no floor, no shadow below, no horizon; clean, flat, even gradient with no light shapes on it." }
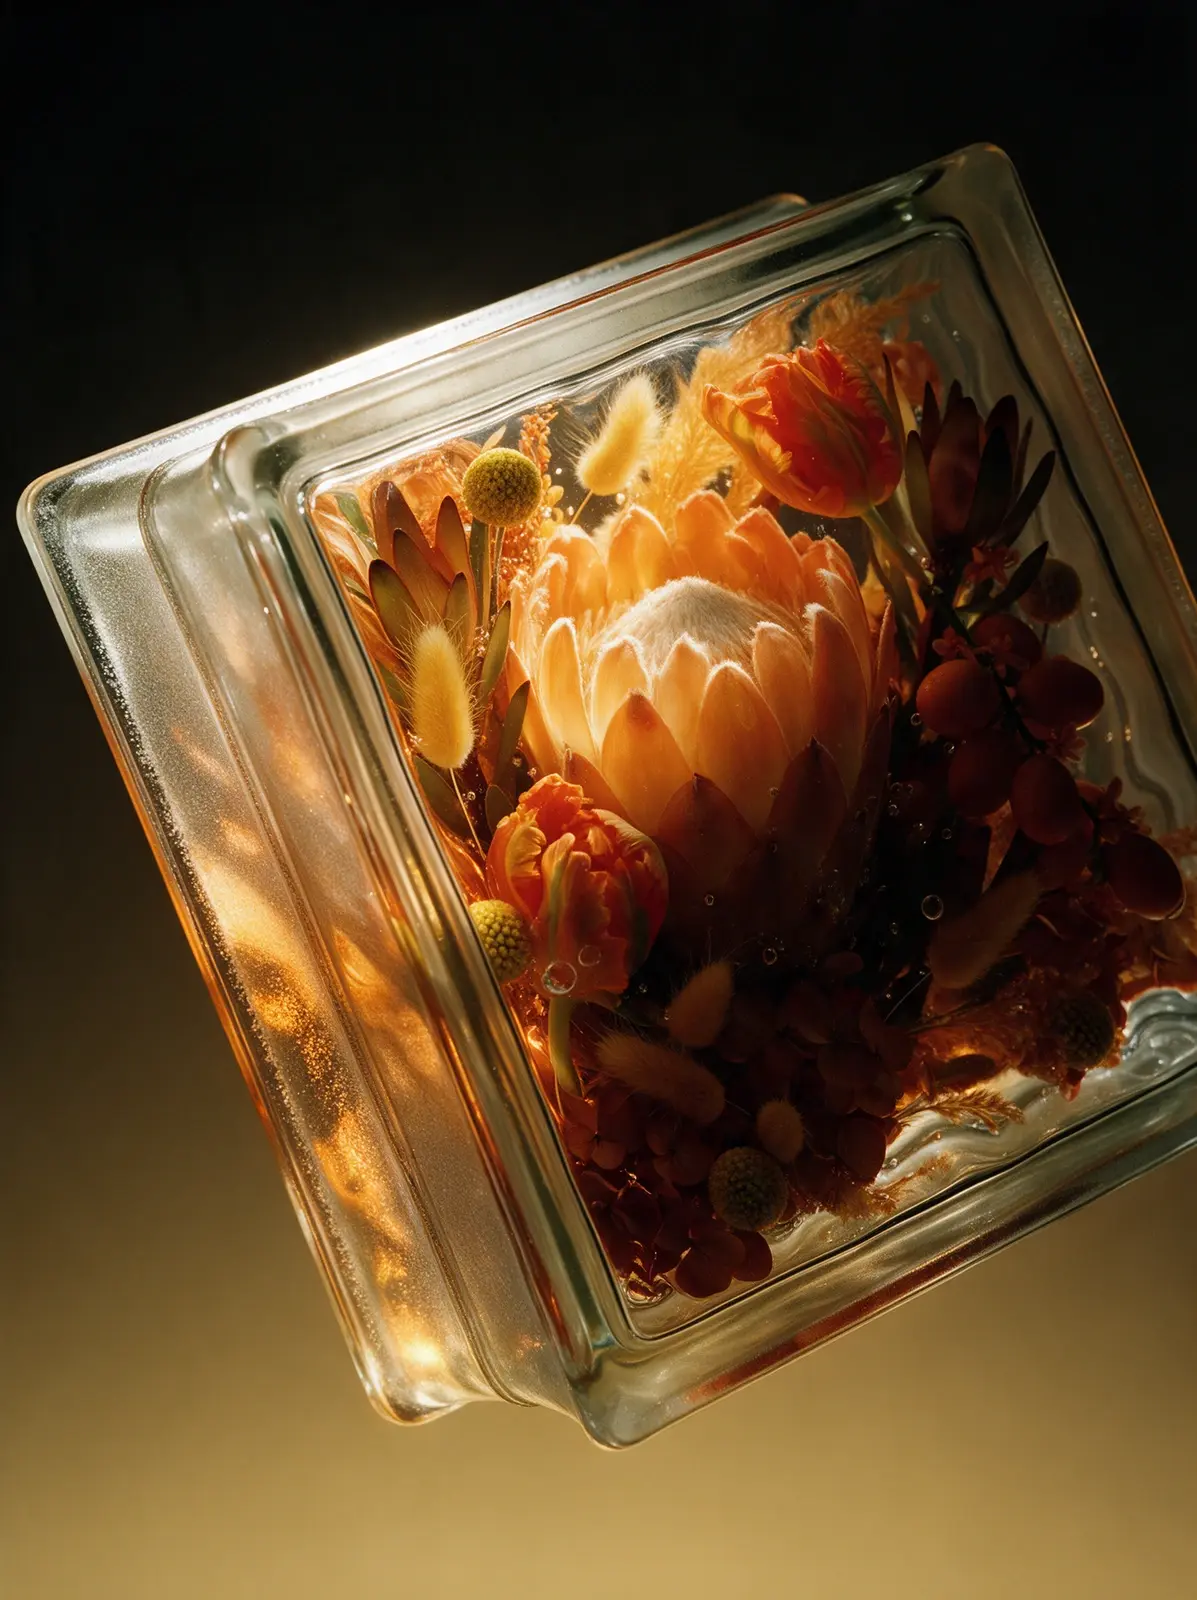
Seedream 5.0 Pro
Copy
{ "priority": "Lighting first; the object must stay exactly as in the reference.", "lighting": "beautiful dramatic directional light on the object, the same in every image. The object is lit from the upper left and slightly in front, with strong, smooth falloff across its form: the upper-left part is bright and luminous, the light gradually fades across the middle, and the lower-right part sinks into deep shadow, about 60% lit and 40% in shadow. Every curve, fold, seam, bevel and bulge is sculpted by its own highlight and its own small shadow, so the whole surface becomes a rich, lively pattern of light and shadow, and the texture shows crisp micro-shadows and tiny glints. Glass and glossy parts show long crisp specular highlights along their upper-left edges. The shadow side receives only soft colored reflected light from the lower part of the background, so shadows are deep and saturated, a richer version of the object's own colors mixed with the background hue, with texture and details clearly readable; nothing is solid black, nothing is flat or gray. Fine-art still-life contrast. Completely relight the object; do not keep the lighting of the reference photo. All the light falls on the object only: the background behind it stays a perfectly even, untouched gradient with no light shapes, no bright streaks and no lighter areas on it.", "subject": "The exact object from the attached reference image, recreated as a photorealistic hero shot and fully relit. Preserve its identity precisely: the same design, shape, proportions, construction, colors, prints and patterns, logos and lettering, materials and surface finish, and the same number of items (a pair stays a pair, a set stays a set). Do not redesign, simplify, restyle or add anything. Every material keeps its real character and its texture is crisp and readable: knit stays knit, suede stays suede, leather stays leather, mesh stays mesh, metal stays metal. If the object is transparent or translucent (glass, crystal, acrylic, resin, ice), it stays solid and keeps exactly what is inside it in the reference: never make it hollow, empty or box-like, never add air gaps or water lines. Show its real thickness, refraction, ripples, bevels and edge highlights, and keep anything inside it sharp, colorful and readable through the glass. Render only the object: no person, hand, body, mannequin, hanger, stand, string or support.", "composition": "an intimate close-up: tilted 12 degrees and turned slightly to show its left side, so close that it fills about 90% of the frame and its top-right part is cropped by the frame edge; textures and details are huge and crisp.", "clothing_and_pairs": "If the object is clothing, it is never worn and never on an invisible body: it tumbles through the air bunched, twisted and
folded over itself into a sculptural form, with rounded rolls, deep folds and crevices for the light to model; sleeves twist and fold, the hem rolls up, the collar tips sideways; it stays clearly recognizable and moves by its real weight. If the object is a pair, the two items float at different depths with complementary angles; laces, straps and cords drift in soft curves.", "space": "the object levitates in empty space with nothing under or around it: no floor, no tabletop, no surface, no cast shadow, no contact shadow, no reflection below it, no horizon line. It hangs in the air in front of the seamless gradient, clearly floating, with clean space on all sides.", "background": { "description": "warm black at the top fading smoothly into deep ochre and soft honey-mustard at the bottom", "stops": [ { "position": 0, "color": "#0D0B07" }, { "position": 40, "color": "#2E2410" }, { "position": 75, "color": "#8A6B2A" }, { "position": 100, "color": "#C9A961" } ], "rules": "flat, perfectly smooth and evenly toned, like matte paper far behind the object; no blotches, streaks, diagonal light shapes, vignette, glow, halo, floor or horizon" }, "style": "high-end fine-art still-life photography, medium format, subtle analog film character with fine natural grain, rich true colors, razor-sharp focus on the object, museum-quality detail.", "final_check": "the exact object from the reference, unchanged; directional light from the upper left falling off across the object; a rich light-and-shadow pattern on every form; deep colored shadows with readable texture, nothing black; transparent objects stay solid and keep their contents; floating in empty space, no floor, no shadow below, no horizon; clean, flat, even gradient with no light shapes on it." }
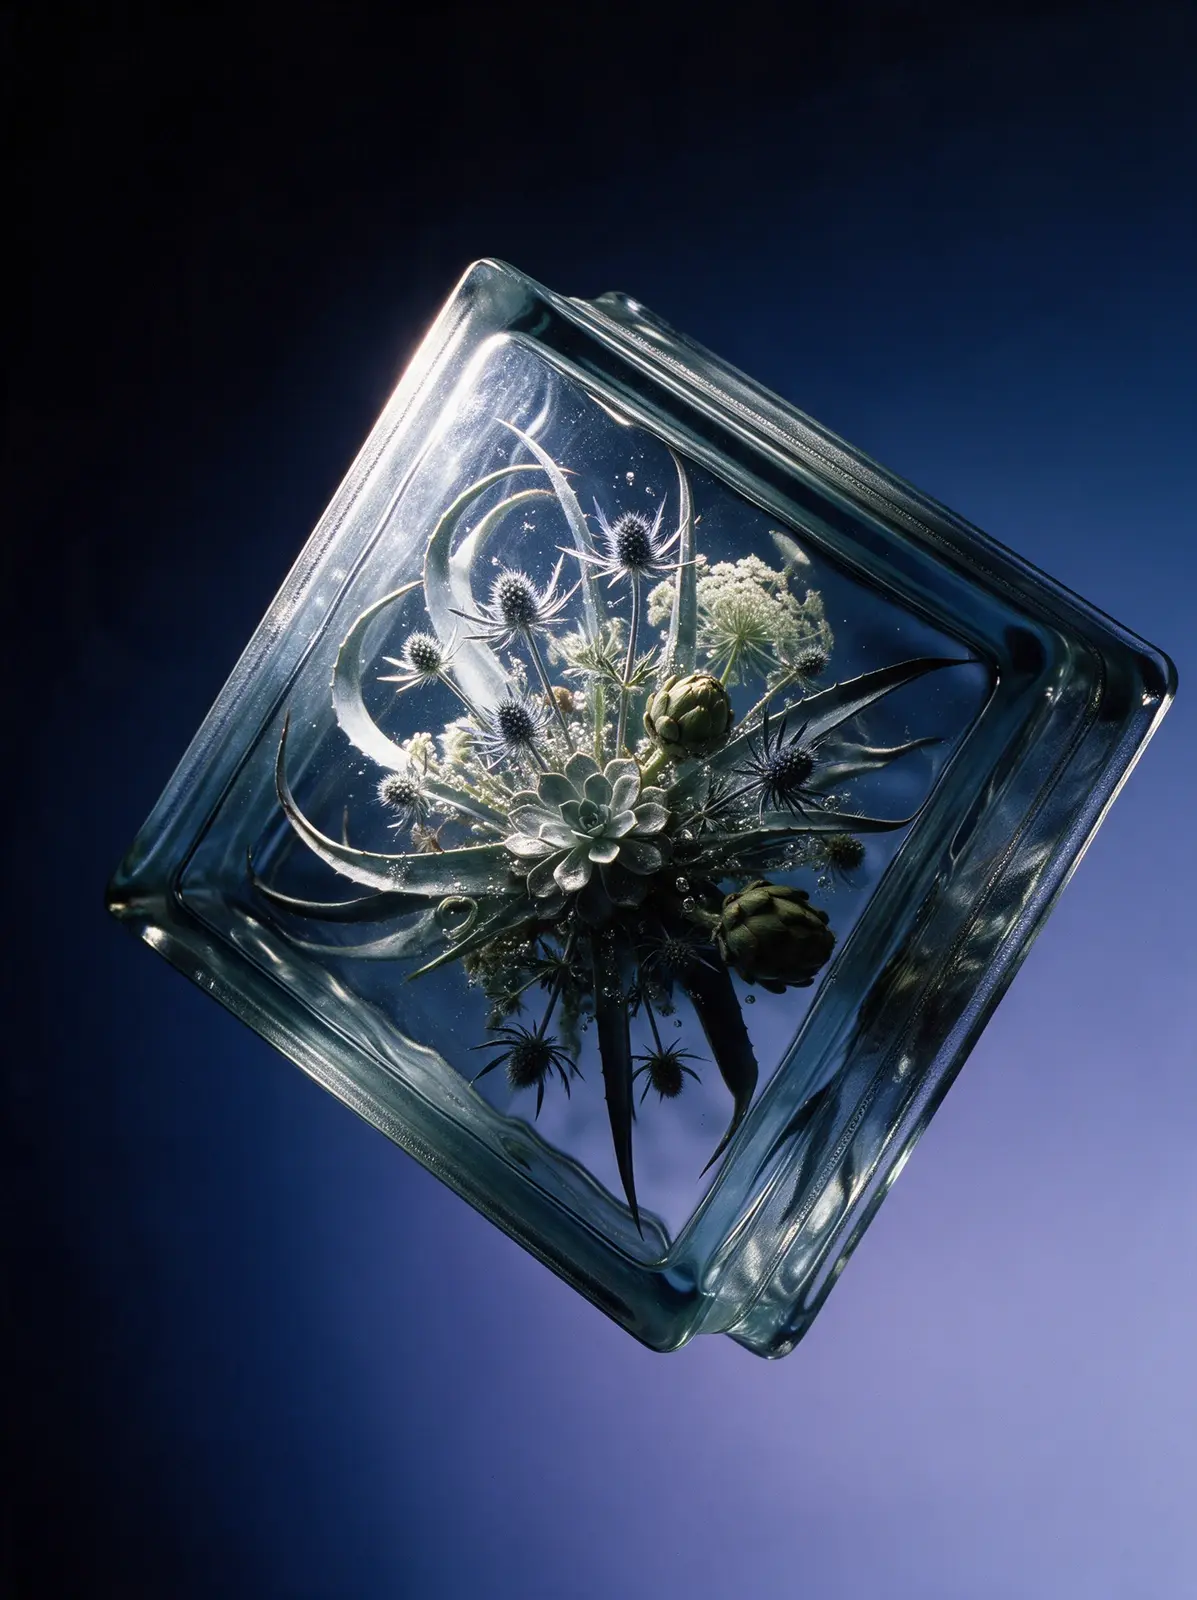
Seedream 5.0 Pro
Copy
{ "priority": "Lighting first; the object must stay exactly as in the reference.", "lighting": "beautiful dramatic directional light on the object, the same in every image. The light comes from outside the frame on the left, at about the height of the object and slightly toward the camera, so it reaches only the object, with strong, smooth falloff across its form: the upper-left part is bright and luminous, the light gradually fades across the middle, and the lower-right part sinks into deep shadow, about 60% lit and 40% in shadow. Every curve, fold, seam, bevel and bulge is sculpted by its own highlight and its own small shadow, so the whole surface becomes a rich, lively pattern of light and shadow, and the texture shows crisp micro-shadows and tiny glints. Glass and glossy parts show long crisp specular highlights along their upper-left edges. The shadow side receives only soft colored reflected light from the lower part of the background, so shadows are deep and saturated, a richer version of the object's own colors mixed with the background hue, with texture and details clearly readable; nothing is solid black, nothing is flat or gray. Fine-art still-life contrast. Completely relight the object; do not keep the lighting of the reference photo. The background is lit separately and evenly, and its brightness comes only from the gradient: the top edge and the top-left corner are the darkest, deepest part of the whole image, uniformly dark, and the background only gets lighter toward the bottom.", "subject": "The exact object from the attached reference image, recreated as a photorealistic hero shot and fully relit. Preserve its identity precisely: the same design, shape, proportions, construction, colors, prints and patterns, logos and lettering, materials and surface finish, and the same number of items (a pair stays a pair, a set stays a set). Do not redesign, simplify, restyle or add anything. Every material keeps its real character and its texture is crisp and readable: knit stays knit, suede stays suede, leather stays leather, mesh stays mesh, metal stays metal. If the object is transparent or translucent (glass, crystal, acrylic, resin, ice), it stays solid and keeps exactly what is inside it in the reference: never make it hollow, empty or box-like, never add air gaps or water lines. Show its real thickness, refraction, ripples, bevels and edge highlights, and keep anything inside it sharp, colorful and readable through the glass. Render only the object: no person, hand, body, mannequin, hanger, stand, string or support.", "composition": "tipped steeply by 40 degrees so it runs along a strong diagonal of the frame, as if balancing on one corner or tip, front toward the camera with a slight downward view of its top; centered, filling about
70% of the frame.", "clothing_and_pairs": "If the object is clothing, it is never worn and never on an invisible body: it tumbles through the air bunched, twisted and folded over itself into a sculptural form, with rounded rolls, deep folds and crevices for the light to model; sleeves twist and fold, the hem rolls up, the collar tips sideways; it stays clearly recognizable and moves by its real weight. If the object is a pair, the two items float at different depths with complementary angles; laces, straps and cords drift in soft curves.", "space": "the object levitates in empty space with nothing under or around it: no floor, no tabletop, no surface, no cast shadow, no contact shadow, no reflection below it, no horizon line. It hangs in the air in front of the seamless gradient, clearly floating, with clean space on all sides.", "background": { "description": "deep ink-navy at the top fading smoothly into periwinkle blue and soft lilac-blue at the bottom", "stops": [ { "position": 0, "color": "#080B18" }, { "position": 40, "color": "#1A2350" }, { "position": 75, "color": "#4E5FA8" }, { "position": 100, "color": "#A3ADE3" } ], "rules": "flat, perfectly smooth and evenly toned, like matte paper far behind the object; no blotches, streaks, diagonal light shapes, vignette, glow, halo, floor or horizon" }, "style": "high-end fine-art still-life photography, medium format, subtle analog film character with fine natural grain, rich true colors, razor-sharp focus on the object, museum-quality detail.", "final_check": "the exact object from the reference, unchanged; light from the left, outside the frame, falling off across the object; a rich light-and-shadow pattern on every form; deep colored shadows with readable texture, nothing black; transparent objects stay solid and keep their contents; floating in empty space, no floor, no shadow below, no horizon; clean, flat, even gradient whose top edge and top-left corner are the darkest part of the image." }
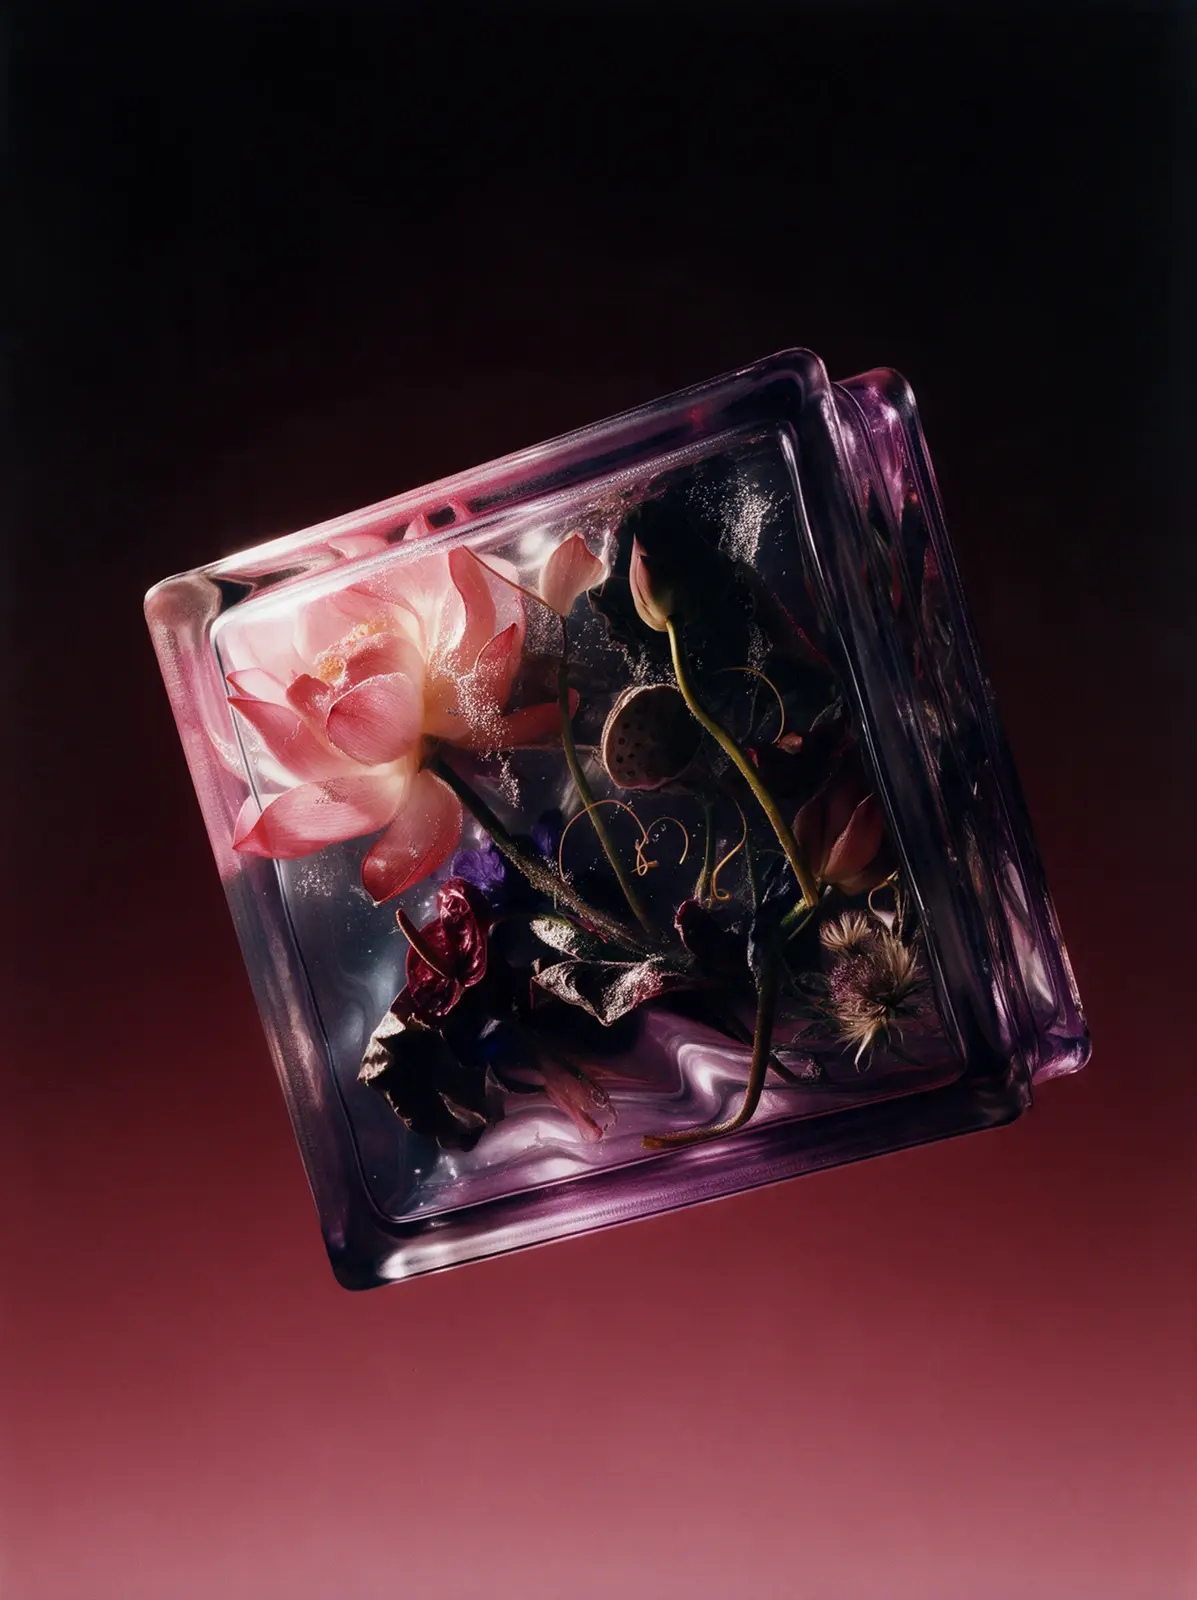
Seedream 5.0 Pro
Copy
LIGHTING (most important): beautiful dramatic directional light on the object, the same in every image. The object is lit from the upper left and slightly in front, with strong, smooth falloff across its form: the upper-left part is bright and luminous, the light gradually fades across the middle, and the lower-right part sinks into deep shadow, about 60% lit and 40% in shadow. Every curve, fold, seam, bevel and bulge is sculpted by its own highlight and its own small shadow, so the whole surface becomes a rich, lively pattern of light and shadow, and the texture shows crisp micro-shadows and tiny glints. Glass and glossy parts show long crisp specular highlights along their upper-left edges. The shadow side receives only soft colored reflected light from the lower part of the background, so shadows are deep and saturated, a richer version of the object's own colors mixed with the background hue, with texture and details clearly readable; nothing is solid black, nothing is flat or gray. Fine-art still-life contrast. Completely relight the object; do not keep the lighting of the reference photo. All the light falls on the object only: the background behind it stays a perfectly even, untouched gradient with no light shapes, no bright streaks and no lighter areas on it. SUBJECT: The exact object from the attached reference image, recreated as a photorealistic hero shot and fully relit. Preserve its identity precisely: the same design, shape, proportions, construction, colors, prints and patterns, logos and lettering, materials and surface finish, and the same number of items (a pair stays a pair, a set stays a set). Do not redesign, simplify, restyle or add anything. Every material keeps its real character and its texture is crisp and readable: knit stays knit, suede stays suede, leather stays leather, mesh stays mesh, metal stays metal. If the object is transparent or translucent (glass, crystal, acrylic, resin, ice), it stays solid and keeps exactly what is inside it in the reference: never make it hollow, empty or box-like, never add air gaps or water lines. Show its real thickness, refraction, ripples, bevels and edge highlights, and keep anything inside it sharp, colorful and readable through the glass. Render only the object: no person, hand, body, mannequin, hanger, stand, string or support. COMPOSITION: Caught mid-tumble, rotated 30 degrees and seen from slightly above in three-quarter view, so its top and one side are visible; centered, filling about 60% of the frame. If the object is clothing, it is never worn and never on an invisible body: it tumbles through the air bunched, twisted and folded over itself into a sculptural form, with rounded rolls, deep folds and crevices for the light to model; sleeves twist and fold, the hem rolls up, the
collar tips sideways; it stays clearly recognizable and moves by its real weight. If the object is a pair, the two items float at different depths with complementary angles; laces, straps and cords drift in soft curves. SPACE: the object levitates in empty space with nothing under or around it: no floor, no tabletop, no surface, no cast shadow, no contact shadow, no reflection below it, no horizon line. It hangs in the air in front of the seamless gradient, clearly floating, with clean space on all sides. BACKGROUND: seamless vertical studio gradient, deep black at the top fading smoothly into rich wine-burgundy and dusty rose-red at the bottom; stops #0B0809 at 0%, #2A0F16 at 40%, #6E2433 at 75%, #B0626E at 100%. Flat, perfectly smooth and evenly toned from top to bottom, like seamless matte paper far behind the object; no blotches, no streaks, no diagonal light shapes, no vignette, no glow, no halo, no floor, no horizon. STYLE: high-end fine-art still-life photography, medium format, subtle analog film character with fine natural grain, rich true colors, razor-sharp focus on the object, museum-quality detail. FINAL CHECK: the exact object from the reference, unchanged; directional light from the upper left falling off across the object; a rich light-and-shadow pattern on every form; deep colored shadows with readable texture, nothing black; transparent objects stay solid and keep their contents; floating in empty space, no floor, no shadow below, no horizon; clean, flat, even gradient with no light shapes on it.
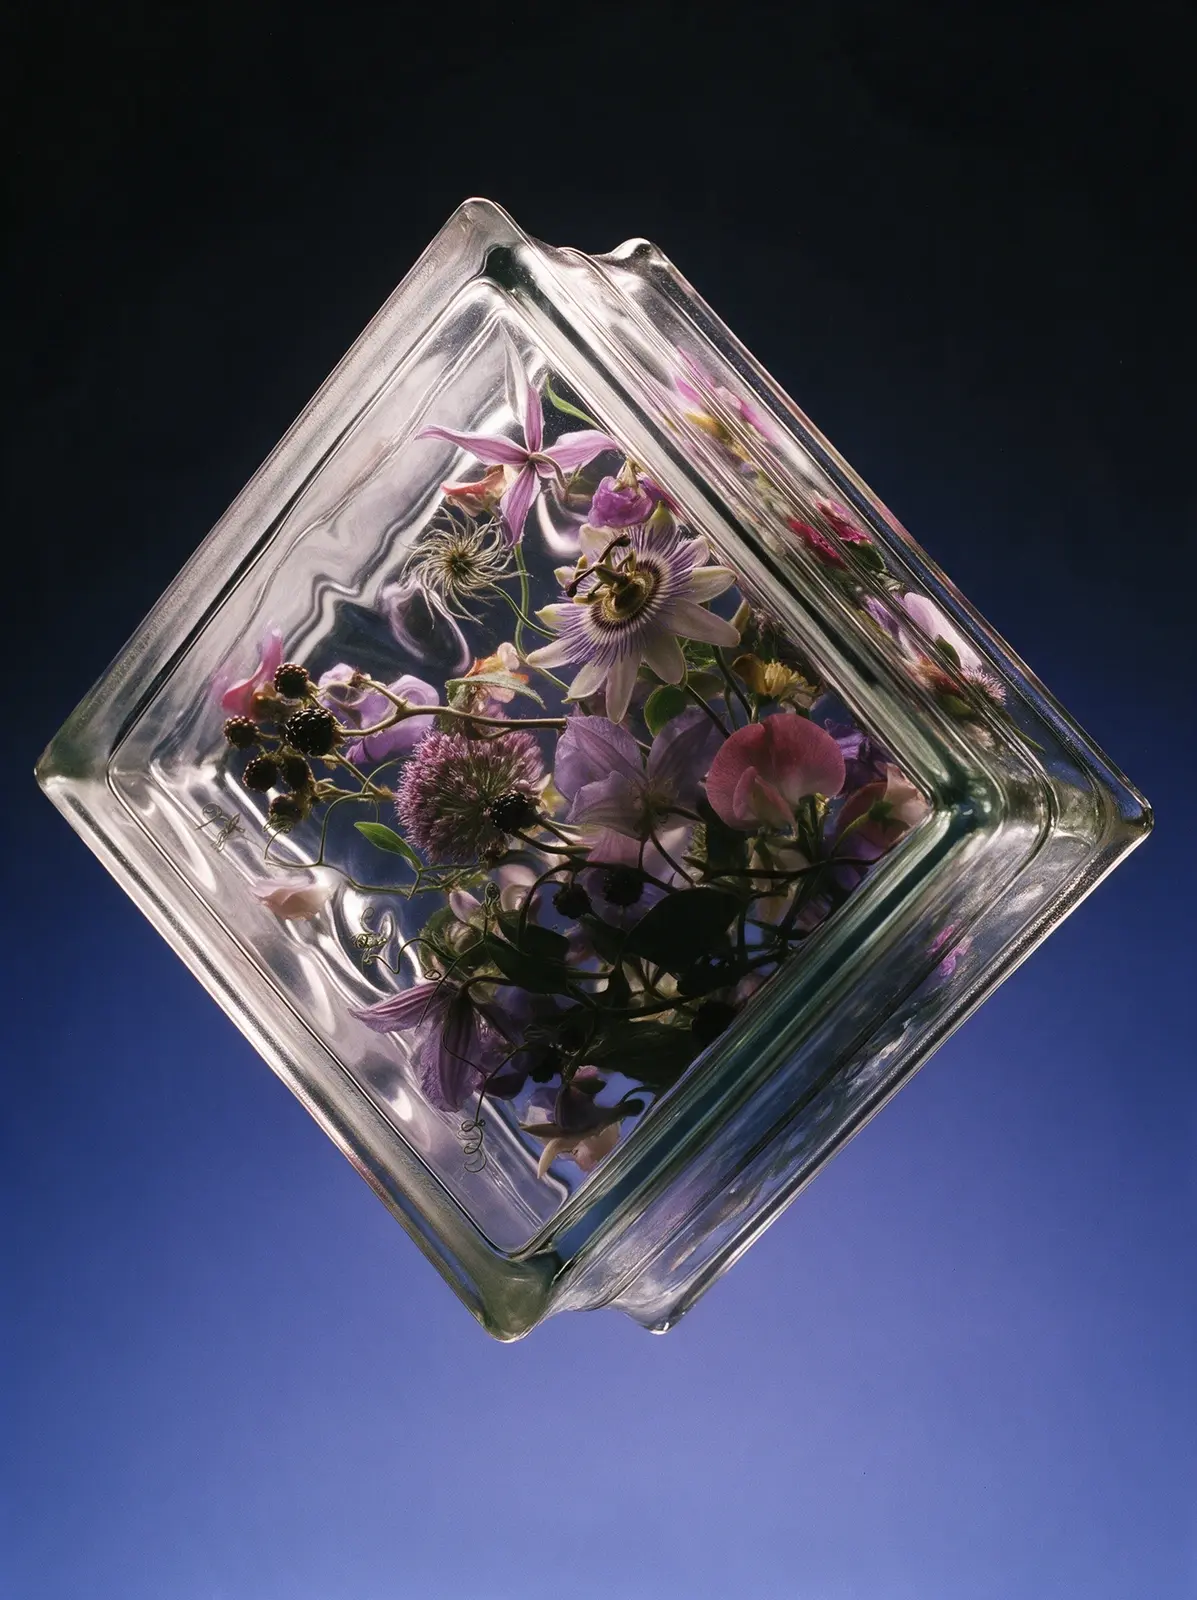
Seedream 5.0 Pro
Copy
{ "subject": "A single heavy, solid clear glass block: a classic architectural glass brick, square, with thick rounded rims and a slightly recessed panel on each face. Its front and back faces have a wavy, rippled, hand-poured glass texture with gentle irregular undulations. The block is completely full: a dense arrangement of lavender passionflowers, purple clematis, allium globes, pink sweet peas, ripe blackberries, fluffy clematis seed heads and dark green leaves is cast inside it, suspended as if frozen in crystal-clear solid glass. There is no air pocket, no empty space and no gap at the top: petals, leaves and stems press against the inner glass on every side and reach into all four corners and the full depth of the block. It is a solid object, not a hollow box, not a container, not a vase, not an aquarium, with no lid, no opening and no water line. Seen through the glass, the flowers are distorted by the ripples: wavy refraction, slight stretching, doubled edges and soft shimmering caustics. The side faces show refracted, compressed mirror copies of the flowers. The thick glass edges read as bright clear bands with crisp specular highlights, faint reflections and a subtle green-gray tint in the thickest parts. Fine detail is crisp everywhere: petal veins, pollen, fuzzy stems, velvety and glossy petals, tiny air bubbles in the glass, faint tool marks on the rims.", "composition": "rotated 45 degrees so it balances on one corner like a diamond, front face toward the camera with a slight downward tilt that shows the top rims; centered, filling about 70% of the frame.", "lighting": "one soft-edged key light from the upper left, slightly in front, like a classic medium-format still-life photograph. The flowers inside glow with rich, true, saturated color; light travels through the glass, so the rims and ripples catch long bright specular streaks along the top and left edges and small glints on every wave. The lower right part of the block falls into soft shadow where the flowers stay readable in deeper color, never black. The light shows only on the block: no visible beam, no haze, no light pool on the background.", "space": "the block levitates in empty space with nothing under or around it: no floor, no tabletop, no surface, no cast shadow, no contact shadow, no reflection below it, no horizon line. It simply hangs in the air in front of a seamless studio gradient.", "background": { "description": "deep ink-navy at the top fading smoothly into periwinkle blue and soft lilac-blue at the bottom", "stops": [ { "position": 0, "color": "#080B18" }, { "position": 40, "color": "#1A2350" }, { "position": 75, "color": "#4E5FA8" }, { "position": 100, "color": "#A3ADE3" } ], "rules": "perfectly smooth and even, no spots, no vignette, no glow, no floor, no
horizon" }, "style": "analog film still-life photograph, medium format, Kodak Portra look, fine natural grain, soft rich contrast, razor-sharp focus on the glass and flowers, museum-quality art photography.", "final_check": "solid block fully filled with flowers, no empty air inside; rippled glass distortion; crisp textures; floating, no floor, no shadow below; clean gradient" }
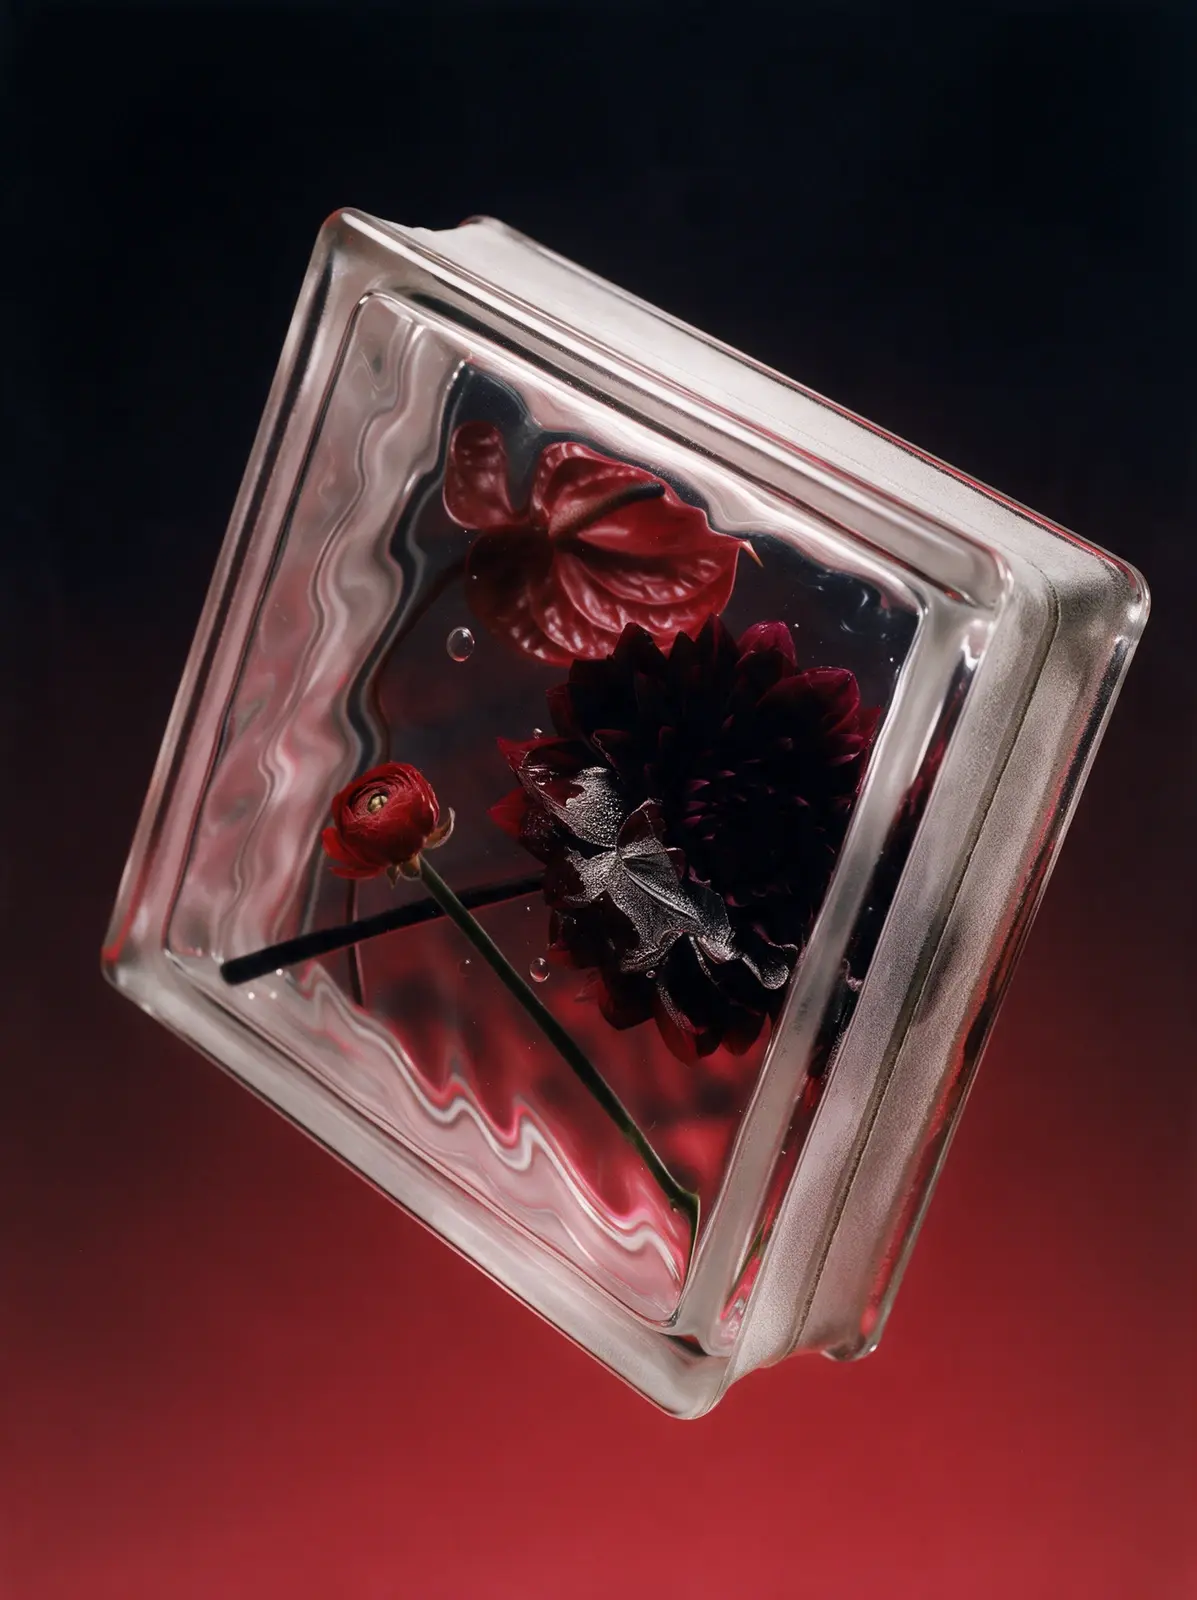
Seedream 5.0 Pro
Copy
LIGHTING (most important): beautiful dramatic directional light on the object, the same in every image. The object is lit from the upper left and slightly in front, with strong, smooth falloff across its form: the upper-left part is bright and luminous, the light gradually fades across the middle, and the lower-right part sinks into deep shadow, about 60% lit and 40% in shadow. Every curve, fold, seam, bevel and bulge is sculpted by its own highlight and its own small shadow, so the whole surface becomes a rich, lively pattern of light and shadow, and the texture shows crisp micro-shadows and tiny glints. Glass and glossy parts show long crisp specular highlights along their upper-left edges. The shadow side receives only soft colored reflected light from the lower part of the background, so shadows are deep and saturated, a richer version of the object's own colors mixed with the background hue, with texture and details clearly readable; nothing is solid black, nothing is flat or gray. Fine-art still-life contrast. Completely relight the object; do not keep the lighting of the reference photo. All the light falls on the object only: the background behind it stays a perfectly even, untouched gradient with no light shapes, no bright streaks and no lighter areas on it. SUBJECT: The exact object from the attached reference image, recreated as a photorealistic hero shot and fully relit. Preserve its identity precisely: the same design, shape, proportions, construction, colors, prints and patterns, logos and lettering, materials and surface finish, and the same number of items (a pair stays a pair, a set stays a set). Do not redesign, simplify, restyle or add anything. Every material keeps its real character and its texture is crisp and readable: knit stays knit, suede stays suede, leather stays leather, mesh stays mesh, metal stays metal. If the object is transparent or translucent (glass, crystal, acrylic, resin, ice), it stays solid and keeps exactly what is inside it in the reference: never make it hollow, empty or box-like, never add air gaps or water lines. Show its real thickness, refraction, ripples, bevels and edge highlights, and keep anything inside it sharp, colorful and readable through the glass. Render only the object: no person, hand, body, mannequin, hanger, stand, string or support. COMPOSITION: Caught mid-tumble, rotated 30 degrees and seen from slightly above in three-quarter view, so its top and one side are visible; centered, filling about 60% of the frame. If the object is clothing, it is never worn and never on an invisible body: it tumbles through the air bunched, twisted and folded over itself into a sculptural form, with rounded rolls, deep folds and crevices for the light to model; sleeves twist and fold, the hem rolls up, the
collar tips sideways; it stays clearly recognizable and moves by its real weight. If the object is a pair, the two items float at different depths with complementary angles; laces, straps and cords drift in soft curves. SPACE: the object levitates in empty space with nothing under or around it: no floor, no tabletop, no surface, no cast shadow, no contact shadow, no reflection below it, no horizon line. It hangs in the air in front of the seamless gradient, clearly floating, with clean space on all sides. BACKGROUND: seamless vertical studio gradient, deep black at the top fading smoothly into rich wine-burgundy and dusty rose-red at the bottom; stops #0B0809 at 0%, #2A0F16 at 40%, #6E2433 at 75%, #B0626E at 100%. Flat, perfectly smooth and evenly toned from top to bottom, like seamless matte paper far behind the object; no blotches, no streaks, no diagonal light shapes, no vignette, no glow, no halo, no floor, no horizon. STYLE: high-end fine-art still-life photography, medium format, subtle analog film character with fine natural grain, rich true colors, razor-sharp focus on the object, museum-quality detail. FINAL CHECK: the exact object from the reference, unchanged; directional light from the upper left falling off across the object; a rich light-and-shadow pattern on every form; deep colored shadows with readable texture, nothing black; transparent objects stay solid and keep their contents; floating in empty space, no floor, no shadow below, no horizon; clean, flat, even gradient with no light shapes on it.
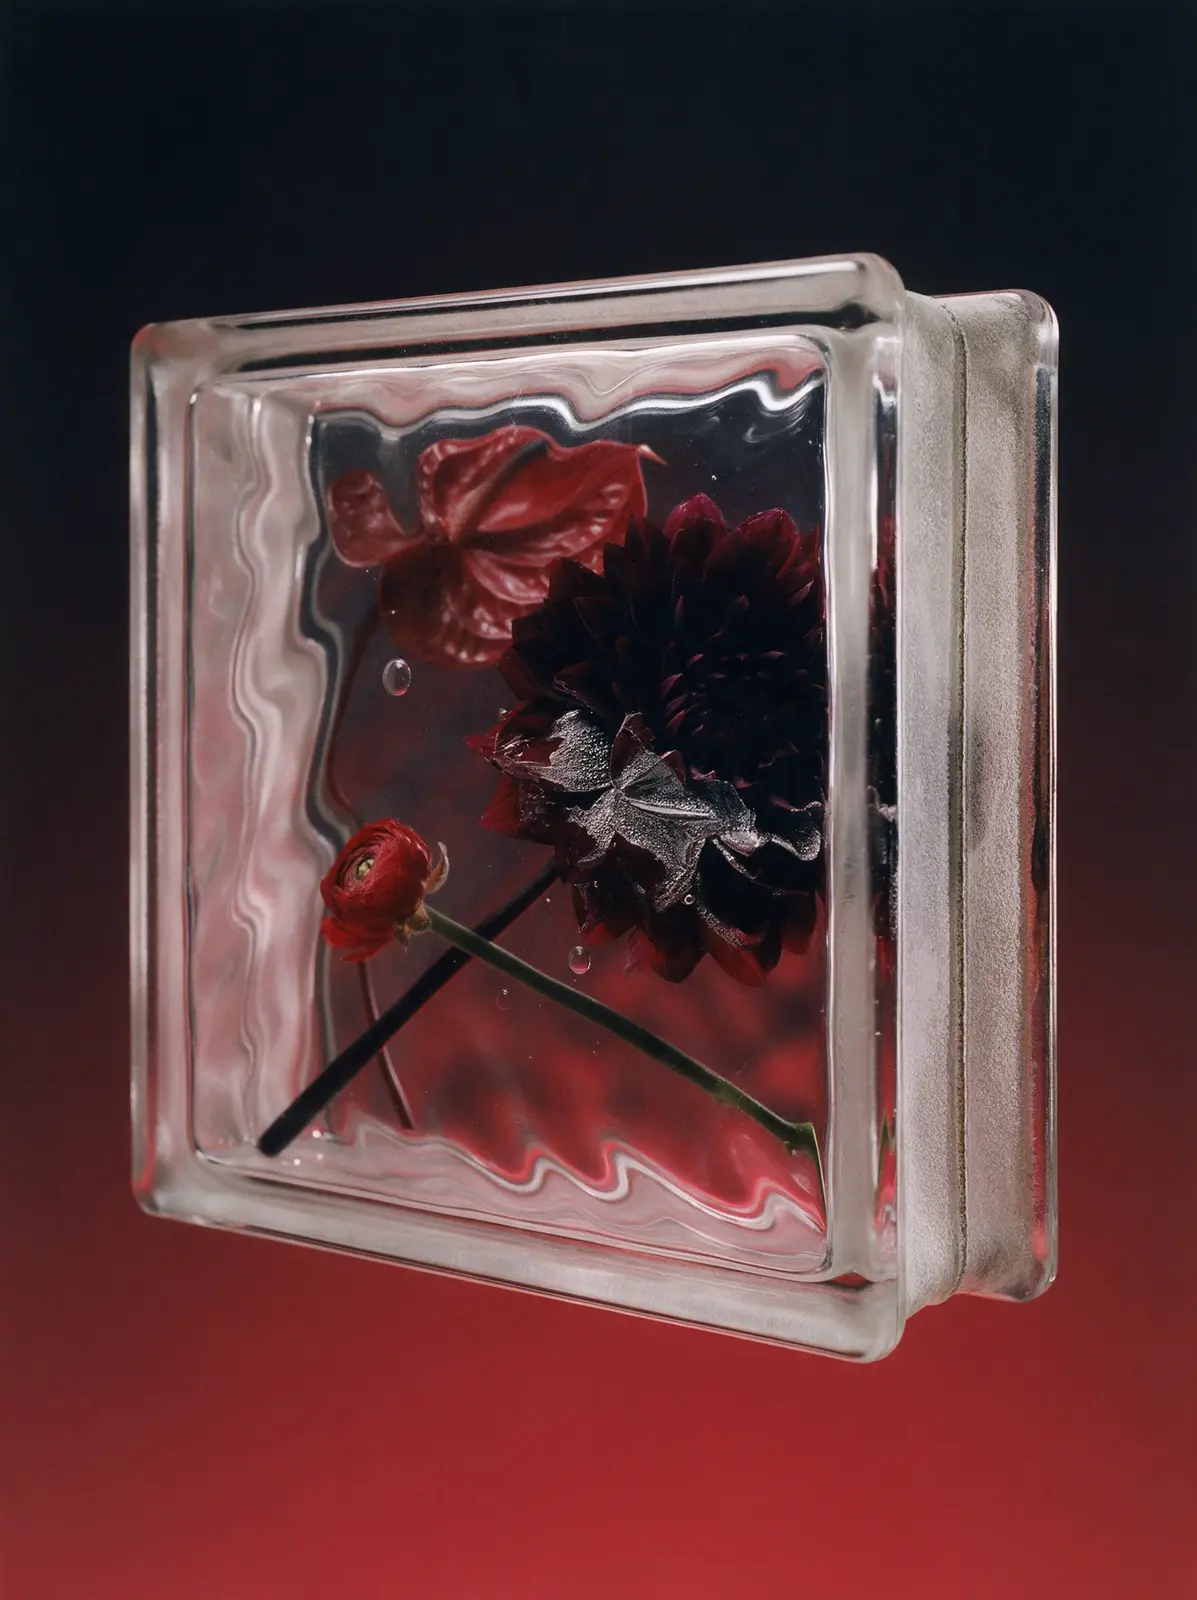
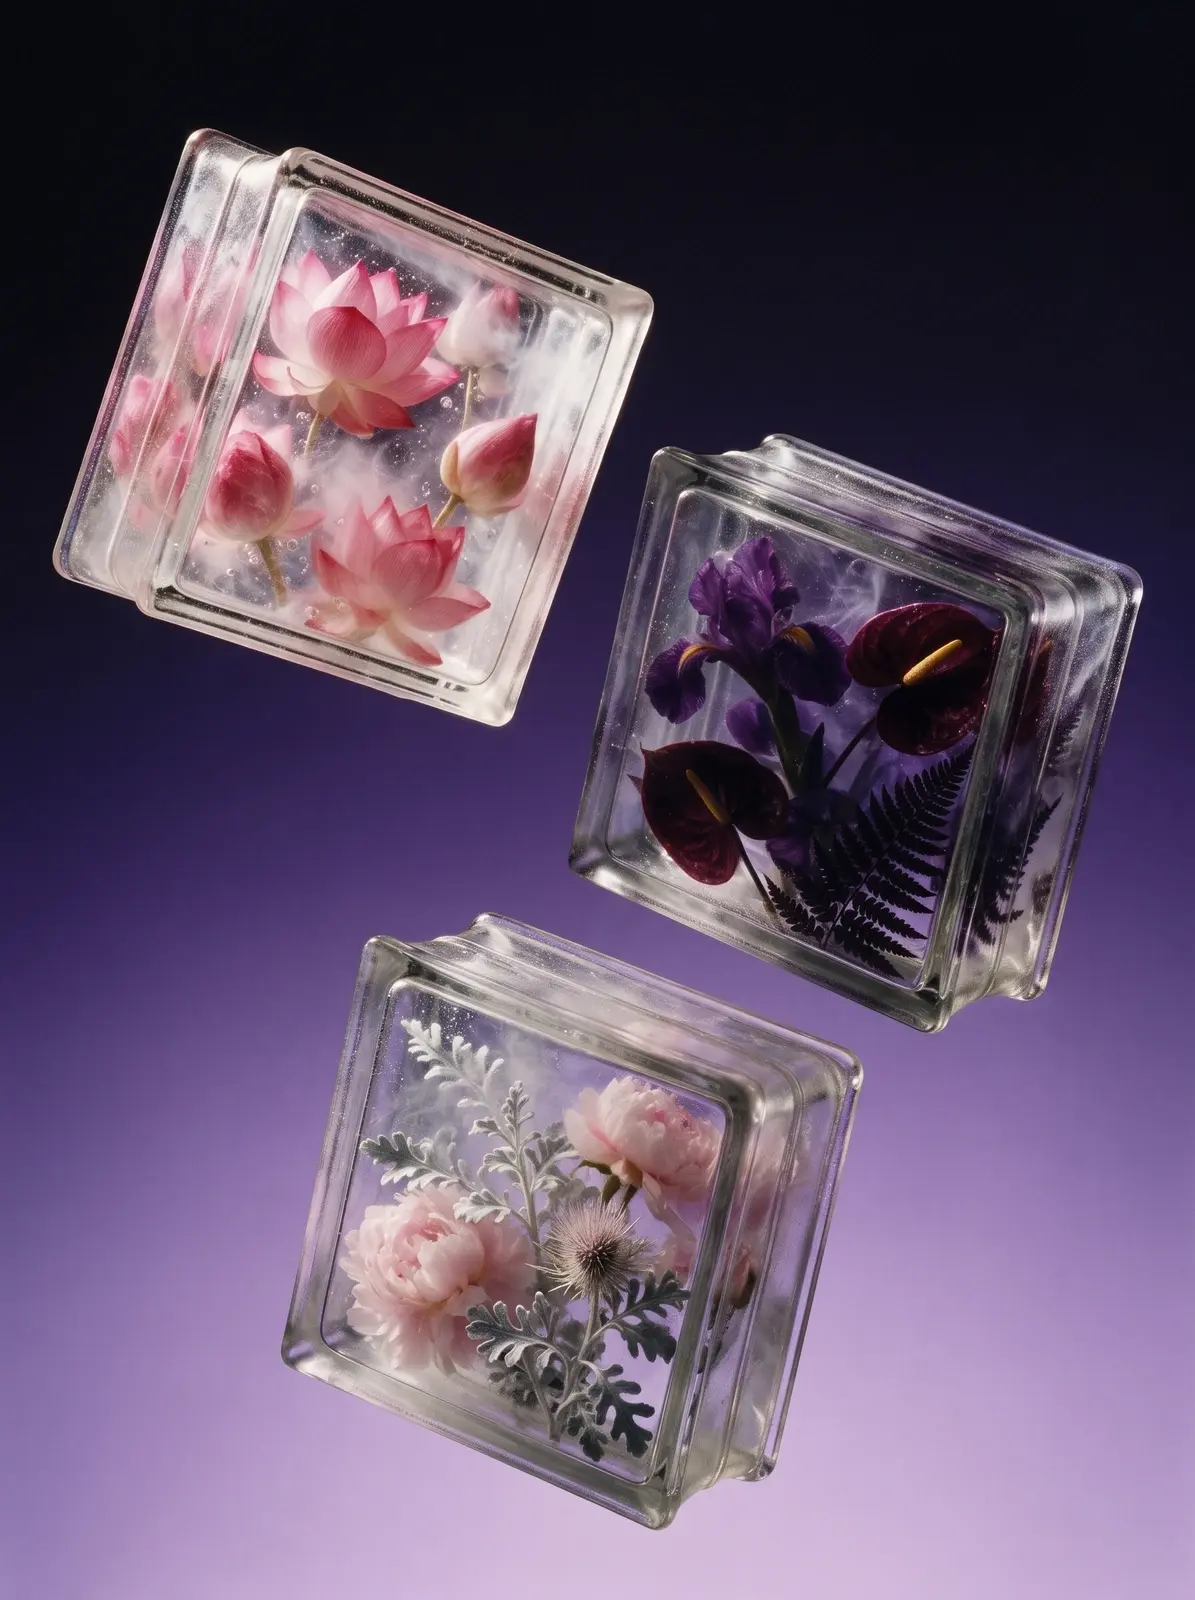
Nano Banana 2.1
Copy
{ "priority": "Lighting first; the object must stay exactly as in the reference.", "lighting": "beautiful dramatic directional light on the object, the same in every image. The light comes from outside the frame on the left, at about the height of the object and slightly toward the camera, so it reaches only the object, with strong, smooth falloff across its form: the upper-left part is bright and luminous, the light gradually fades across the middle, and the lower-right part sinks into deep shadow, about 60% lit and 40% in shadow. Every curve, fold, seam, bevel and bulge is sculpted by its own highlight and its own small shadow, so the whole surface becomes a rich, lively pattern of light and shadow, and the texture shows crisp micro-shadows and tiny glints. Glass and glossy parts show long crisp specular highlights along their upper-left edges. The shadow side receives only soft colored reflected light from the lower part of the background, so shadows are deep and saturated, a richer version of the object's own colors mixed with the background hue, with texture and details clearly readable; nothing is solid black, nothing is flat or gray. Fine-art still-life contrast. Completely relight the object; do not keep the lighting of the reference photo. The background is lit separately and evenly, and its brightness comes only from the gradient: the top edge and the top-left corner are the darkest, deepest part of the whole image, uniformly dark, and the background only gets lighter toward the bottom.", "subject": "The exact object from the attached reference image, recreated as a photorealistic hero shot and fully relit. Preserve its identity precisely: the same design, shape, proportions, construction, colors, prints and patterns, logos and lettering, materials and surface finish, and the same number of items (a pair stays a pair, a set stays a set). Do not redesign, simplify, restyle or add anything. Every material keeps its real character and its texture is crisp and readable: knit stays knit, suede stays suede, leather stays leather, mesh stays mesh, metal stays metal. If the object is transparent or translucent (glass, crystal, acrylic, resin, ice), it stays solid and keeps exactly what is inside it in the reference: never make it hollow, empty or box-like, never add air gaps or water lines. Show its real thickness, refraction, ripples, bevels and edge highlights, and keep anything inside it sharp, colorful and readable through the glass. Render only the object: no person, hand, body, mannequin, hanger, stand, string or support.", "composition": "tilted 15 degrees counterclockwise and turned so its front and left side are both visible, three-quarter view, camera slightly above, looking down a little; centered, filling about 65% of the frame.",
"clothing_and_pairs": "If the object is clothing, it is never worn and never on an invisible body: it tumbles through the air bunched, twisted and folded over itself into a sculptural form, with rounded rolls, deep folds and crevices for the light to model; sleeves twist and fold, the hem rolls up, the collar tips sideways; it stays clearly recognizable and moves by its real weight. If the object is a pair, the two items float at different depths with complementary angles; laces, straps and cords drift in soft curves.", "space": "the object levitates in empty space with nothing under or around it: no floor, no tabletop, no surface, no cast shadow, no contact shadow, no reflection below it, no horizon line. It hangs in the air in front of the seamless gradient, clearly floating, with clean space on all sides.", "background": { "description": "deep black-violet at the top fading smoothly into rich royal violet and soft lavender-violet at the bottom", "stops": [ { "position": 0, "color": "#0A0712" }, { "position": 40, "color": "#22133F" }, { "position": 75, "color": "#5A3BA3" }, { "position": 100, "color": "#A68DE3" } ], "rules": "flat, perfectly smooth and evenly toned, like matte paper far behind the object; no blotches, streaks, diagonal light shapes, vignette, glow, halo, floor or horizon" }, "style": "high-end fine-art still-life photography, medium format, subtle analog film character with fine natural grain, rich true colors, razor-sharp focus on the object, museum-quality detail.", "final_check": "the exact object from the reference, unchanged; light from the left, outside the frame, falling off across the object; a rich light-and-shadow pattern on every form; deep colored shadows with readable texture, nothing black; transparent objects stay solid and keep their contents; floating in empty space, no floor, no shadow below, no horizon; clean, flat, even gradient whose top edge and top-left corner are the darkest part of the image." }
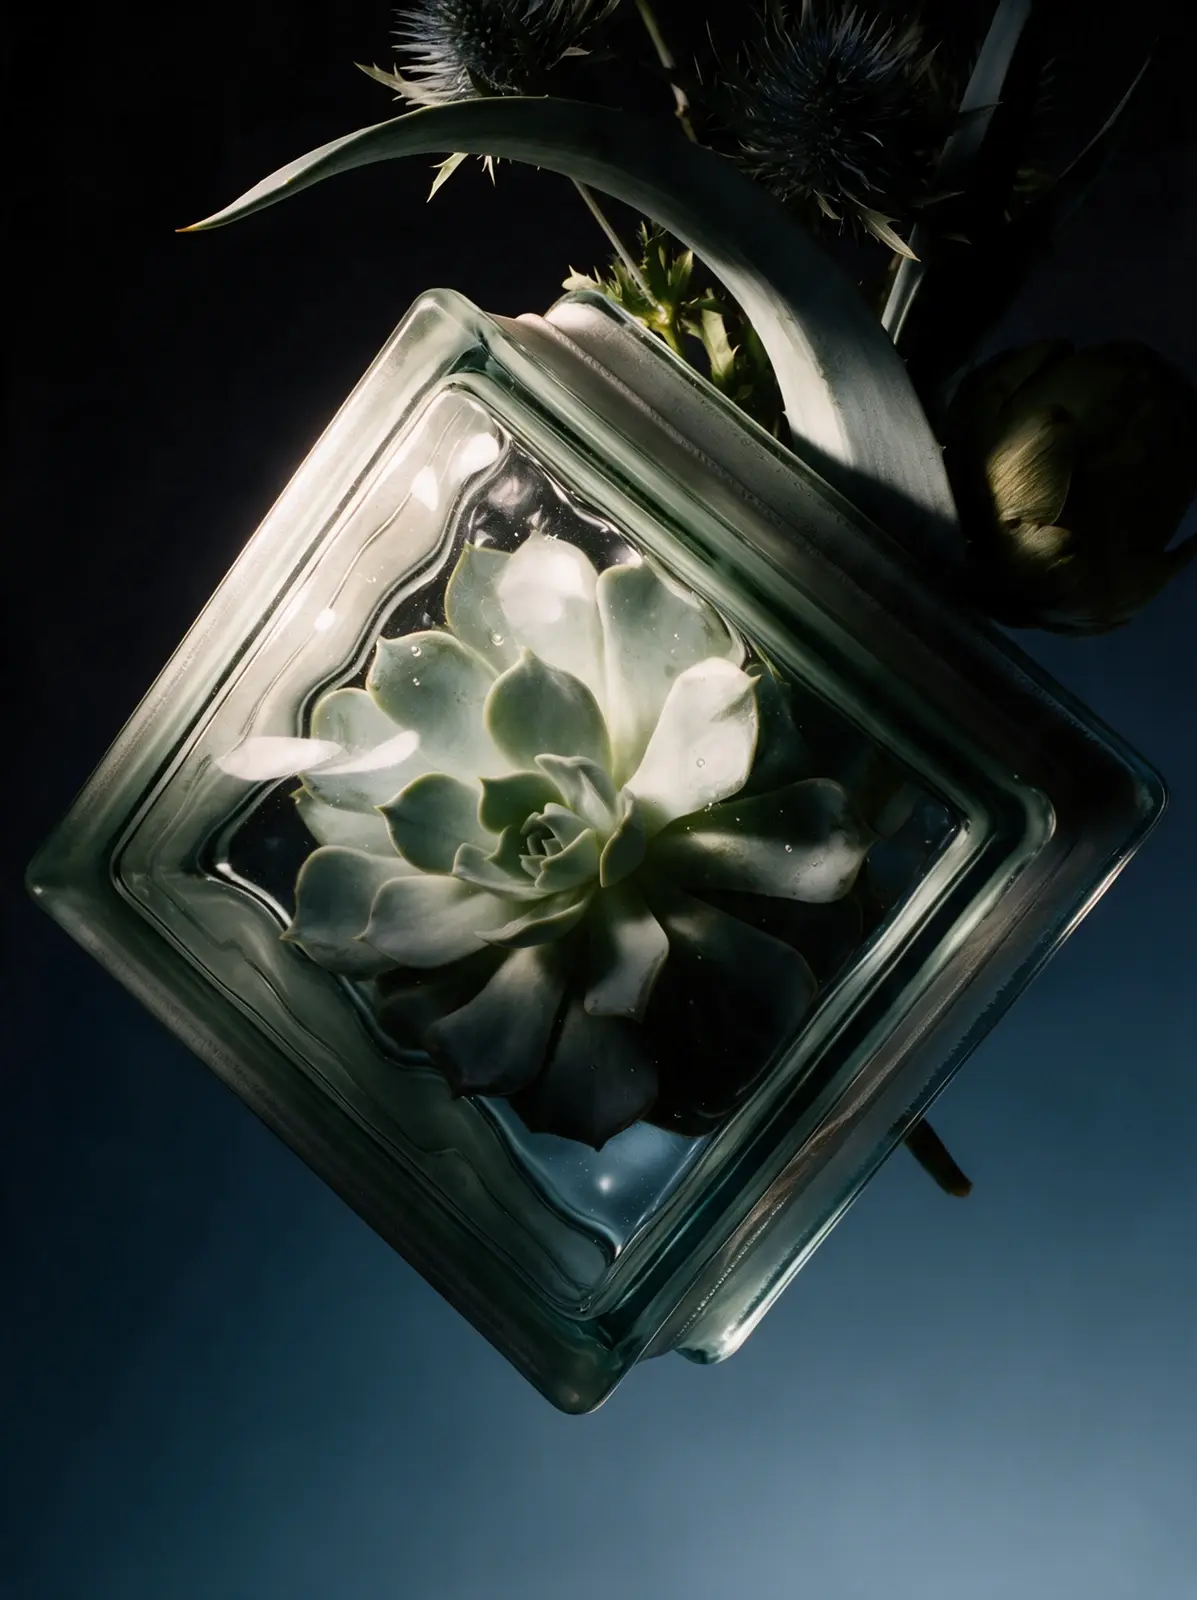
Seedream 5.0 Pro
Copy
{ "priority": "Lighting first; the object must stay exactly as in the reference.", "lighting": "beautiful dramatic directional light on the object, the same in every image. The object is lit from the upper left and slightly in front, with strong, smooth falloff across its form: the upper-left part is bright and luminous, the light gradually fades across the middle, and the lower-right part sinks into deep shadow, about 60% lit and 40% in shadow. Every curve, fold, seam, bevel and bulge is sculpted by its own highlight and its own small shadow, so the whole surface becomes a rich, lively pattern of light and shadow, and the texture shows crisp micro-shadows and tiny glints. Glass and glossy parts show long crisp specular highlights along their upper-left edges. The shadow side receives only soft colored reflected light from the lower part of the background, so shadows are deep and saturated, a richer version of the object's own colors mixed with the background hue, with texture and details clearly readable; nothing is solid black, nothing is flat or gray. Fine-art still-life contrast. Completely relight the object; do not keep the lighting of the reference photo. All the light falls on the object only: the background behind it stays a perfectly even, untouched gradient with no light shapes, no bright streaks and no lighter areas on it.", "subject": "The exact object from the attached reference image, recreated as a photorealistic hero shot and fully relit. Preserve its identity precisely: the same design, shape, proportions, construction, colors, prints and patterns, logos and lettering, materials and surface finish, and the same number of items (a pair stays a pair, a set stays a set). Do not redesign, simplify, restyle or add anything. Every material keeps its real character and its texture is crisp and readable: knit stays knit, suede stays suede, leather stays leather, mesh stays mesh, metal stays metal. If the object is transparent or translucent (glass, crystal, acrylic, resin, ice), it stays solid and keeps exactly what is inside it in the reference: never make it hollow, empty or box-like, never add air gaps or water lines. Show its real thickness, refraction, ripples, bevels and edge highlights, and keep anything inside it sharp, colorful and readable through the glass. Render only the object: no person, hand, body, mannequin, hanger, stand, string or support.", "composition": "turned about 60 degrees so its side dominates and the front recedes in strong perspective, tilted 10 degrees; 50mm lens close to the object for a bold perspective; centered, filling about 65% of the frame.", "clothing_and_pairs": "If the object is clothing, it is never worn and never on an invisible body: it tumbles through the air bunched, twisted and folded over
itself into a sculptural form, with rounded rolls, deep folds and crevices for the light to model; sleeves twist and fold, the hem rolls up, the collar tips sideways; it stays clearly recognizable and moves by its real weight. If the object is a pair, the two items float at different depths with complementary angles; laces, straps and cords drift in soft curves.", "space": "the object levitates in empty space with nothing under or around it: no floor, no tabletop, no surface, no cast shadow, no contact shadow, no reflection below it, no horizon line. It hangs in the air in front of the seamless gradient, clearly floating, with clean space on all sides.", "background": { "description": "deep graphite-black at the top fading smoothly into cool steel-blue and pale icy blue at the bottom", "stops": [ { "position": 0, "color": "#0A0C0F" }, { "position": 40, "color": "#1C2530" }, { "position": 75, "color": "#5A7287" }, { "position": 100, "color": "#A9C0D2" } ], "rules": "flat, perfectly smooth and evenly toned, like matte paper far behind the object; no blotches, streaks, diagonal light shapes, vignette, glow, halo, floor or horizon" }, "style": "high-end fine-art still-life photography, medium format, subtle analog film character with fine natural grain, rich true colors, razor-sharp focus on the object, museum-quality detail.", "final_check": "the exact object from the reference, unchanged; directional light from the upper left falling off across the object; a rich light-and-shadow pattern on every form; deep colored shadows with readable texture, nothing black; transparent objects stay solid and keep their contents; floating in empty space, no floor, no shadow below, no horizon; clean, flat, even gradient with no light shapes on it." }
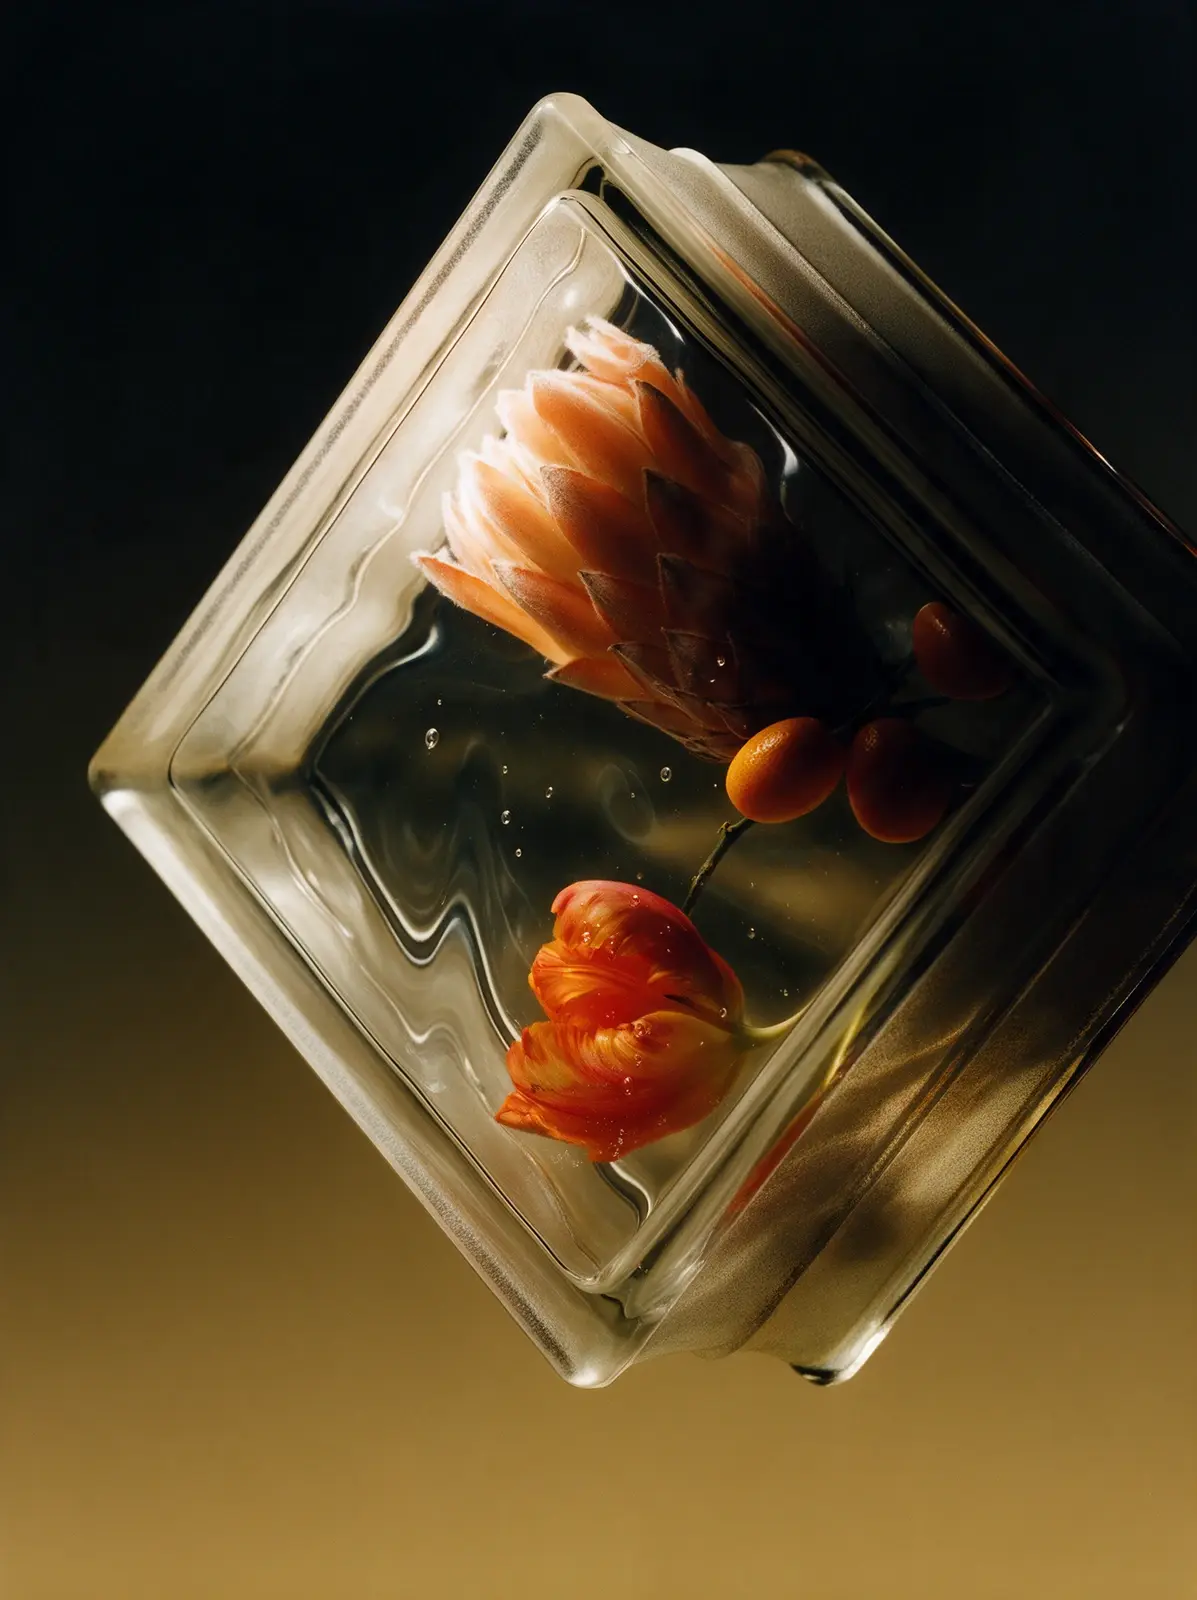
Seedream 5.0 Pro
Copy
LIGHTING (most important): beautiful dramatic directional light on the object, the same in every image. The object is lit from the upper left and slightly in front, with strong, smooth falloff across its form: the upper-left part is bright and luminous, the light gradually fades across the middle, and the lower-right part sinks into deep shadow, about 60% lit and 40% in shadow. Every curve, fold, seam, bevel and bulge is sculpted by its own highlight and its own small shadow, so the whole surface becomes a rich, lively pattern of light and shadow, and the texture shows crisp micro-shadows and tiny glints. Glass and glossy parts show long crisp specular highlights along their upper-left edges. The shadow side receives only soft colored reflected light from the lower part of the background, so shadows are deep and saturated, a richer version of the object's own colors mixed with the background hue, with texture and details clearly readable; nothing is solid black, nothing is flat or gray. Fine-art still-life contrast. Completely relight the object; do not keep the lighting of the reference photo. All the light falls on the object only: the background behind it stays a perfectly even, untouched gradient with no light shapes, no bright streaks and no lighter areas on it. SUBJECT: The exact object from the attached reference image, recreated as a photorealistic hero shot and fully relit. Preserve its identity precisely: the same design, shape, proportions, construction, colors, prints and patterns, logos and lettering, materials and surface finish, and the same number of items (a pair stays a pair, a set stays a set). Do not redesign, simplify, restyle or add anything. Every material keeps its real character and its texture is crisp and readable: knit stays knit, suede stays suede, leather stays leather, mesh stays mesh, metal stays metal. If the object is transparent or translucent (glass, crystal, acrylic, resin, ice), it stays solid and keeps exactly what is inside it in the reference: never make it hollow, empty or box-like, never add air gaps or water lines. Show its real thickness, refraction, ripples, bevels and edge highlights, and keep anything inside it sharp, colorful and readable through the glass. Render only the object: no person, hand, body, mannequin, hanger, stand, string or support. COMPOSITION: An intimate close-up: tilted 12 degrees and turned slightly to show its left side, so close that it fills about 90% of the frame and its top-right part is cropped by the frame edge; textures and details are huge and crisp. If the object is clothing, it is never worn and never on an invisible body: it tumbles through the air bunched, twisted and folded over itself into a sculptural form, with rounded rolls, deep folds and crevices for the light to
model; sleeves twist and fold, the hem rolls up, the collar tips sideways; it stays clearly recognizable and moves by its real weight. If the object is a pair, the two items float at different depths with complementary angles; laces, straps and cords drift in soft curves. SPACE: the object levitates in empty space with nothing under or around it: no floor, no tabletop, no surface, no cast shadow, no contact shadow, no reflection below it, no horizon line. It hangs in the air in front of the seamless gradient, clearly floating, with clean space on all sides. BACKGROUND: seamless vertical studio gradient, warm black at the top fading smoothly into deep ochre and soft honey-mustard at the bottom; stops #0D0B07 at 0%, #2E2410 at 40%, #8A6B2A at 75%, #C9A961 at 100%. Flat, perfectly smooth and evenly toned from top to bottom, like seamless matte paper far behind the object; no blotches, no streaks, no diagonal light shapes, no vignette, no glow, no halo, no floor, no horizon. STYLE: high-end fine-art still-life photography, medium format, subtle analog film character with fine natural grain, rich true colors, razor-sharp focus on the object, museum-quality detail. FINAL CHECK: the exact object from the reference, unchanged; directional light from the upper left falling off across the object; a rich light-and-shadow pattern on every form; deep colored shadows with readable texture, nothing black; transparent objects stay solid and keep their contents; floating in empty space, no floor, no shadow below, no horizon; clean, flat, even gradient with no light shapes on it.
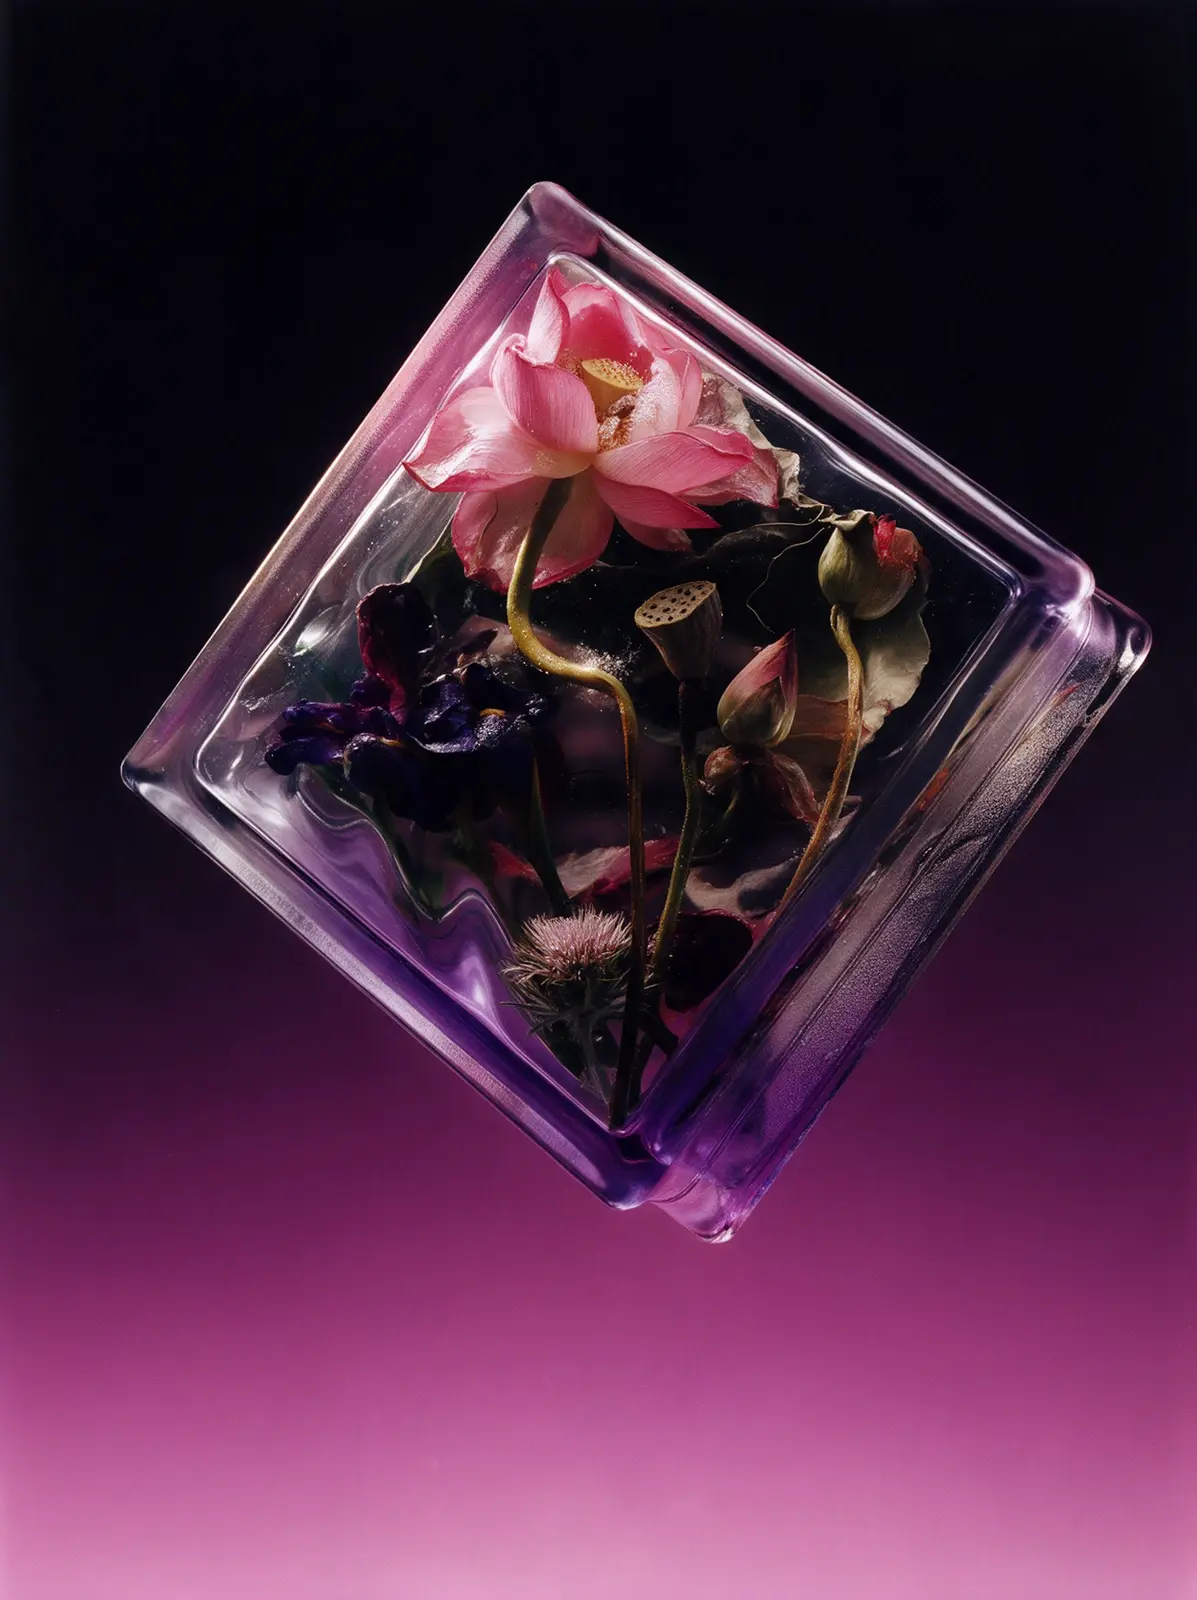
Seedream 5.0 Pro
Copy
LIGHTING (most important): beautiful dramatic directional light on the object, the same in every image. The object is lit from the upper left and slightly in front, with strong, smooth falloff across its form: the upper-left part is bright and luminous, the light gradually fades across the middle, and the lower-right part sinks into deep shadow, about 60% lit and 40% in shadow. Every curve, fold, seam, bevel and bulge is sculpted by its own highlight and its own small shadow, so the whole surface becomes a rich, lively pattern of light and shadow, and the texture shows crisp micro-shadows and tiny glints. Glass and glossy parts show long crisp specular highlights along their upper-left edges. The shadow side receives only soft colored reflected light from the lower part of the background, so shadows are deep and saturated, a richer version of the object's own colors mixed with the background hue, with texture and details clearly readable; nothing is solid black, nothing is flat or gray. Fine-art still-life contrast. Completely relight the object; do not keep the lighting of the reference photo. All the light falls on the object only: the background behind it stays a perfectly even, untouched gradient with no light shapes, no bright streaks and no lighter areas on it. SUBJECT: The exact object from the attached reference image, recreated as a photorealistic hero shot and fully relit. Preserve its identity precisely: the same design, shape, proportions, construction, colors, prints and patterns, logos and lettering, materials and surface finish, and the same number of items (a pair stays a pair, a set stays a set). Do not redesign, simplify, restyle or add anything. Every material keeps its real character and its texture is crisp and readable: knit stays knit, suede stays suede, leather stays leather, mesh stays mesh, metal stays metal. If the object is transparent or translucent (glass, crystal, acrylic, resin, ice), it stays solid and keeps exactly what is inside it in the reference: never make it hollow, empty or box-like, never add air gaps or water lines. Show its real thickness, refraction, ripples, bevels and edge highlights, and keep anything inside it sharp, colorful and readable through the glass. Render only the object: no person, hand, body, mannequin, hanger, stand, string or support. COMPOSITION: The object is tilted 25 degrees counterclockwise in three-quarter view, placed in the upper right part of the frame, filling about 55% of it, with generous empty space below and to the left, as if it is rising. If the object is clothing, it is never worn and never on an invisible body: it tumbles through the air bunched, twisted and folded over itself into a sculptural form, with rounded rolls, deep folds and crevices for the light to model;
sleeves twist and fold, the hem rolls up, the collar tips sideways; it stays clearly recognizable and moves by its real weight. If the object is a pair, the two items float at different depths with complementary angles; laces, straps and cords drift in soft curves. SPACE: the object levitates in empty space with nothing under or around it: no floor, no tabletop, no surface, no cast shadow, no contact shadow, no reflection below it, no horizon line. It hangs in the air in front of the seamless gradient, clearly floating, with clean space on all sides. BACKGROUND: seamless vertical studio gradient, deep black-violet at the top fading smoothly into vivid fuchsia and soft pink at the bottom; stops #0C080D at 0%, #2C0F2A at 40%, #8C2C78 at 75%, #D97FBE at 100%. Flat, perfectly smooth and evenly toned from top to bottom, like seamless matte paper far behind the object; no blotches, no streaks, no diagonal light shapes, no vignette, no glow, no halo, no floor, no horizon. STYLE: high-end fine-art still-life photography, medium format, subtle analog film character with fine natural grain, rich true colors, razor-sharp focus on the object, museum-quality detail. FINAL CHECK: the exact object from the reference, unchanged; directional light from the upper left falling off across the object; a rich light-and-shadow pattern on every form; deep colored shadows with readable texture, nothing black; transparent objects stay solid and keep their contents; floating in empty space, no floor, no shadow below, no horizon; clean, flat, even gradient with no light shapes on it.
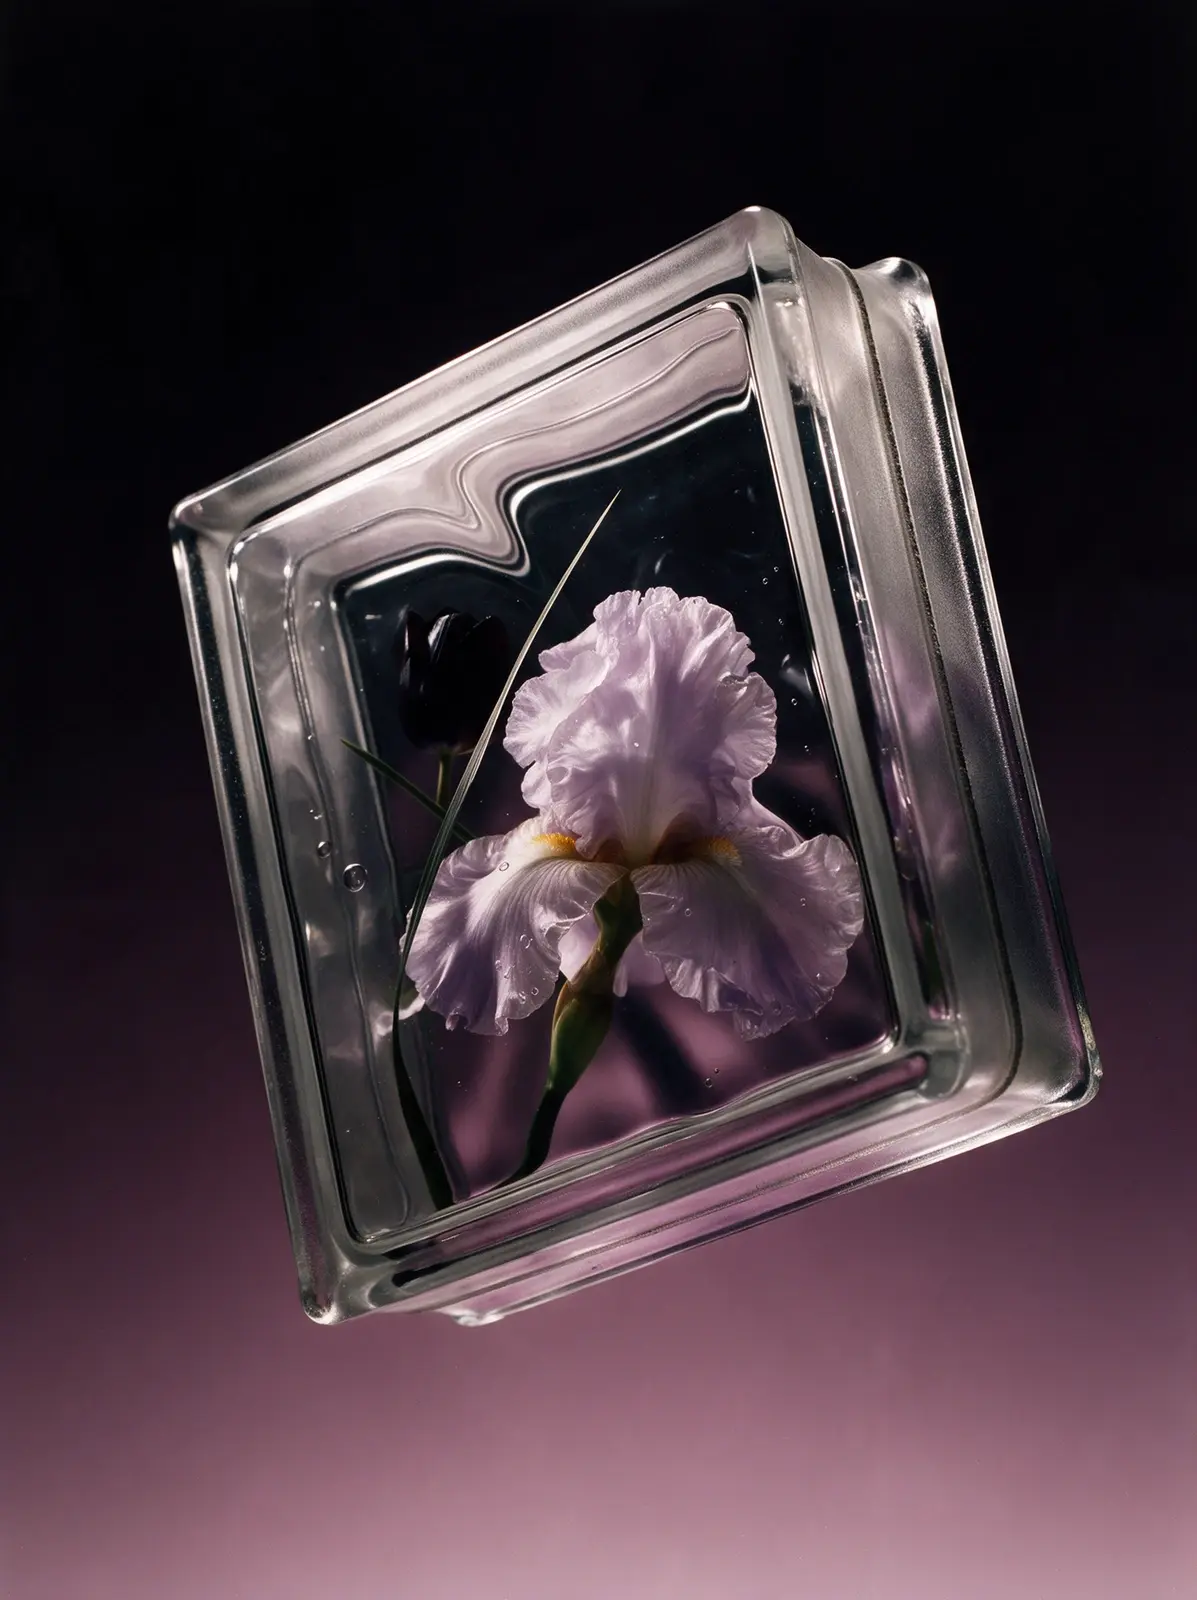
Seedream 5.0 Pro
Copy
{ "priority": "Lighting first; the object must stay exactly as in the reference.", "lighting": "beautiful dramatic directional light on the object, the same in every image. The object is lit from the upper left and slightly in front, with strong, smooth falloff across its form: the upper-left part is bright and luminous, the light gradually fades across the middle, and the lower-right part sinks into deep shadow, about 60% lit and 40% in shadow. Every curve, fold, seam, bevel and bulge is sculpted by its own highlight and its own small shadow, so the whole surface becomes a rich, lively pattern of light and shadow, and the texture shows crisp micro-shadows and tiny glints. Glass and glossy parts show long crisp specular highlights along their upper-left edges. The shadow side receives only soft colored reflected light from the lower part of the background, so shadows are deep and saturated, a richer version of the object's own colors mixed with the background hue, with texture and details clearly readable; nothing is solid black, nothing is flat or gray. Fine-art still-life contrast. Completely relight the object; do not keep the lighting of the reference photo. All the light falls on the object only: the background behind it stays a perfectly even, untouched gradient with no light shapes, no bright streaks and no lighter areas on it.", "subject": "The exact object from the attached reference image, recreated as a photorealistic hero shot and fully relit. Preserve its identity precisely: the same design, shape, proportions, construction, colors, prints and patterns, logos and lettering, materials and surface finish, and the same number of items (a pair stays a pair, a set stays a set). Do not redesign, simplify, restyle or add anything. Every material keeps its real character and its texture is crisp and readable: knit stays knit, suede stays suede, leather stays leather, mesh stays mesh, metal stays metal. If the object is transparent or translucent (glass, crystal, acrylic, resin, ice), it stays solid and keeps exactly what is inside it in the reference: never make it hollow, empty or box-like, never add air gaps or water lines. Show its real thickness, refraction, ripples, bevels and edge highlights, and keep anything inside it sharp, colorful and readable through the glass. Render only the object: no person, hand, body, mannequin, hanger, stand, string or support.", "composition": "tilted 18 degrees clockwise and turned so its front and right side are both visible, three-quarter view; camera slightly below center looking up a little; centered, filling about 65% of the frame.", "clothing_and_pairs": "If the object is clothing, it is never worn and never on an invisible body: it tumbles through the air bunched, twisted and folded over itself into a
sculptural form, with rounded rolls, deep folds and crevices for the light to model; sleeves twist and fold, the hem rolls up, the collar tips sideways; it stays clearly recognizable and moves by its real weight. If the object is a pair, the two items float at different depths with complementary angles; laces, straps and cords drift in soft curves.", "space": "the object levitates in empty space with nothing under or around it: no floor, no tabletop, no surface, no cast shadow, no contact shadow, no reflection below it, no horizon line. It hangs in the air in front of the seamless gradient, clearly floating, with clean space on all sides.", "background": { "description": "near-black plum at the top fading smoothly into dusty mauve-rose at the bottom", "stops": [ { "position": 0, "color": "#0D0A10" }, { "position": 40, "color": "#2A1C26" }, { "position": 75, "color": "#6E4F5E" }, { "position": 100, "color": "#A3818F" } ], "rules": "flat, perfectly smooth and evenly toned, like matte paper far behind the object; no blotches, streaks, diagonal light shapes, vignette, glow, halo, floor or horizon" }, "style": "high-end fine-art still-life photography, medium format, subtle analog film character with fine natural grain, rich true colors, razor-sharp focus on the object, museum-quality detail.", "final_check": "the exact object from the reference, unchanged; directional light from the upper left falling off across the object; a rich light-and-shadow pattern on every form; deep colored shadows with readable texture, nothing black; transparent objects stay solid and keep their contents; floating in empty space, no floor, no shadow below, no horizon; clean, flat, even gradient with no light shapes on it." }
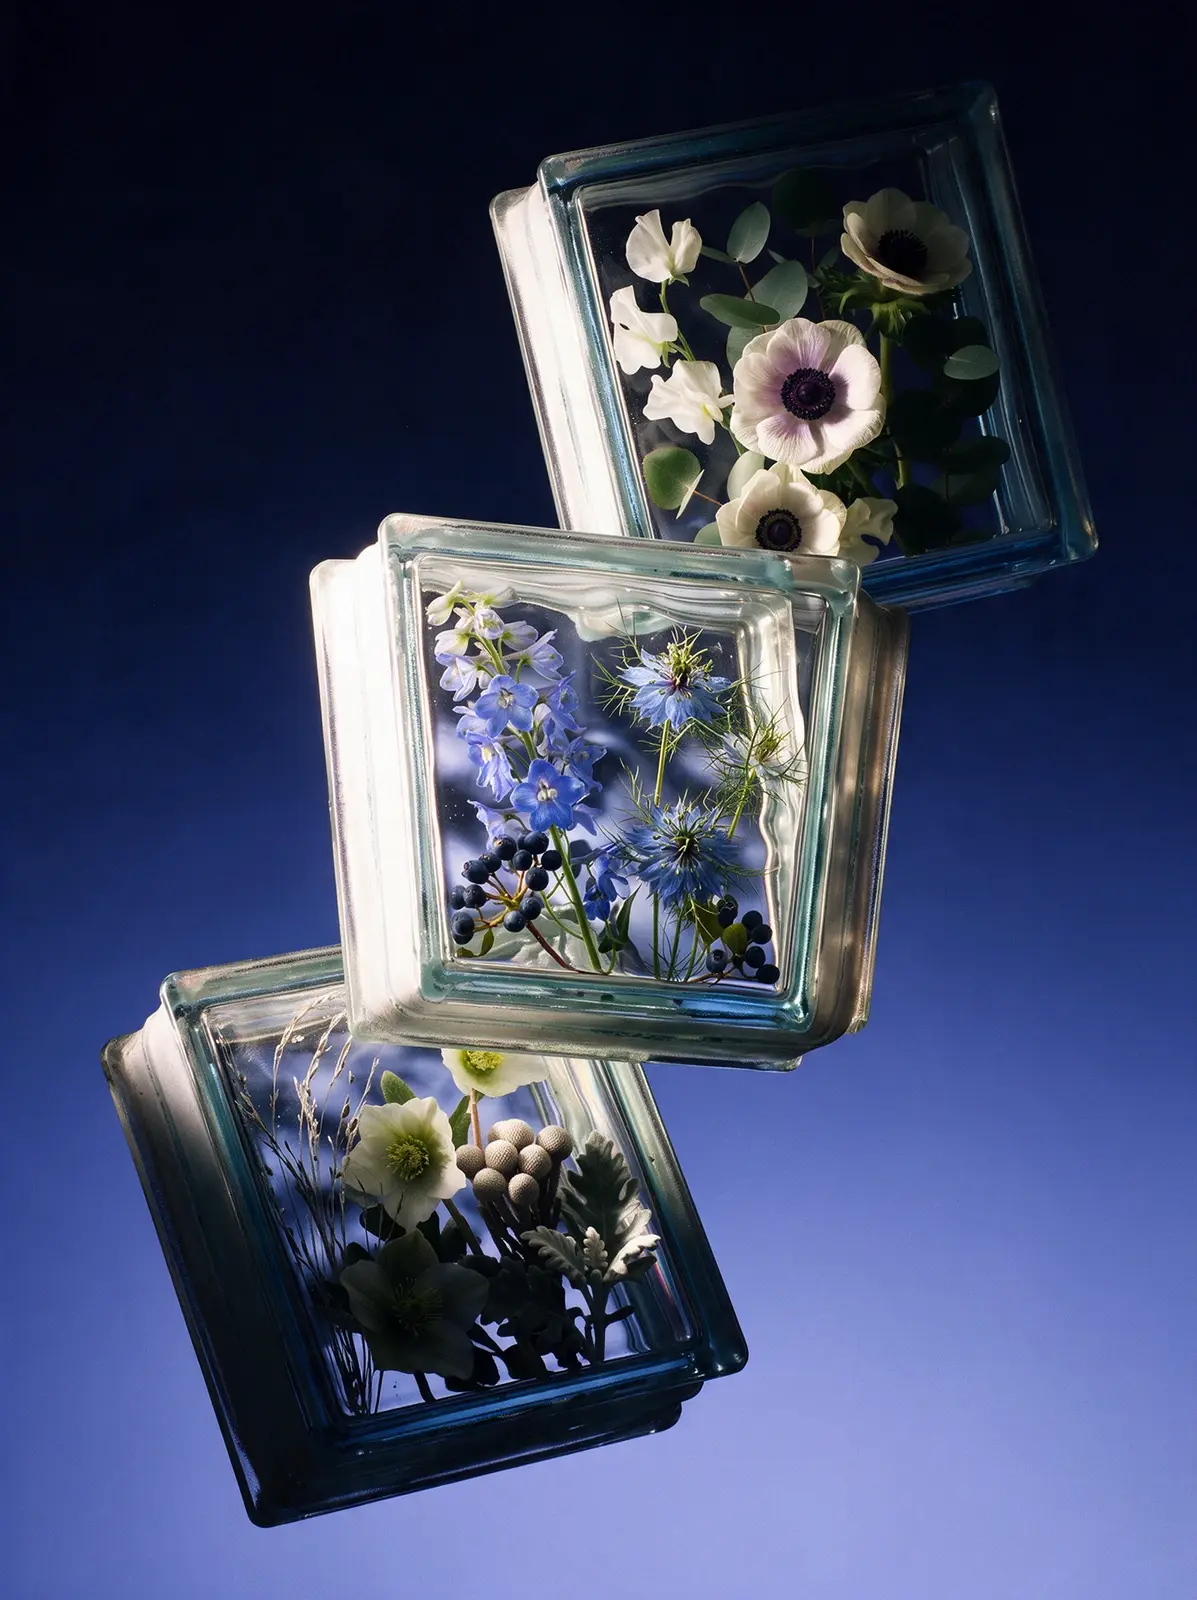
Seedream 5.0 Pro
Copy
{ "priority": "Lighting first; the object must stay exactly as in the reference.", "lighting": "beautiful dramatic directional light on the object, the same in every image. The light comes from outside the frame on the left, at about the height of the object and slightly toward the camera, so it reaches only the object, with strong, smooth falloff across its form: the upper-left part is bright and luminous, the light gradually fades across the middle, and the lower-right part sinks into deep shadow, about 60% lit and 40% in shadow. Every curve, fold, seam, bevel and bulge is sculpted by its own highlight and its own small shadow, so the whole surface becomes a rich, lively pattern of light and shadow, and the texture shows crisp micro-shadows and tiny glints. Glass and glossy parts show long crisp specular highlights along their upper-left edges. The shadow side receives only soft colored reflected light from the lower part of the background, so shadows are deep and saturated, a richer version of the object's own colors mixed with the background hue, with texture and details clearly readable; nothing is solid black, nothing is flat or gray. Fine-art still-life contrast. Completely relight the object; do not keep the lighting of the reference photo. The background is lit separately and evenly, and its brightness comes only from the gradient: the top edge and the top-left corner are the darkest, deepest part of the whole image, uniformly dark, and the background only gets lighter toward the bottom.", "subject": "The exact object from the attached reference image, recreated as a photorealistic hero shot and fully relit. Preserve its identity precisely: the same design, shape, proportions, construction, colors, prints and patterns, logos and lettering, materials and surface finish, and the same number of items (a pair stays a pair, a set stays a set). Do not redesign, simplify, restyle or add anything. Every material keeps its real character and its texture is crisp and readable: knit stays knit, suede stays suede, leather stays leather, mesh stays mesh, metal stays metal. If the object is transparent or translucent (glass, crystal, acrylic, resin, ice), it stays solid and keeps exactly what is inside it in the reference: never make it hollow, empty or box-like, never add air gaps or water lines. Show its real thickness, refraction, ripples, bevels and edge highlights, and keep anything inside it sharp, colorful and readable through the glass. Render only the object: no person, hand, body, mannequin, hanger, stand, string or support.", "composition": "tipped steeply by 40 degrees so it runs along a strong diagonal of the frame, as if balancing on one corner or tip, front toward the camera with a slight downward view of its top; centered, filling about
70% of the frame.", "clothing_and_pairs": "If the object is clothing, it is never worn and never on an invisible body: it tumbles through the air bunched, twisted and folded over itself into a sculptural form, with rounded rolls, deep folds and crevices for the light to model; sleeves twist and fold, the hem rolls up, the collar tips sideways; it stays clearly recognizable and moves by its real weight. If the object is a pair, the two items float at different depths with complementary angles; laces, straps and cords drift in soft curves.", "space": "the object levitates in empty space with nothing under or around it: no floor, no tabletop, no surface, no cast shadow, no contact shadow, no reflection below it, no horizon line. It hangs in the air in front of the seamless gradient, clearly floating, with clean space on all sides.", "background": { "description": "deep ink-navy at the top fading smoothly into periwinkle blue and soft lilac-blue at the bottom", "stops": [ { "position": 0, "color": "#080B18" }, { "position": 40, "color": "#1A2350" }, { "position": 75, "color": "#4E5FA8" }, { "position": 100, "color": "#A3ADE3" } ], "rules": "flat, perfectly smooth and evenly toned, like matte paper far behind the object; no blotches, streaks, diagonal light shapes, vignette, glow, halo, floor or horizon" }, "style": "high-end fine-art still-life photography, medium format, subtle analog film character with fine natural grain, rich true colors, razor-sharp focus on the object, museum-quality detail.", "final_check": "the exact object from the reference, unchanged; light from the left, outside the frame, falling off across the object; a rich light-and-shadow pattern on every form; deep colored shadows with readable texture, nothing black; transparent objects stay solid and keep their contents; floating in empty space, no floor, no shadow below, no horizon; clean, flat, even gradient whose top edge and top-left corner are the darkest part of the image." }
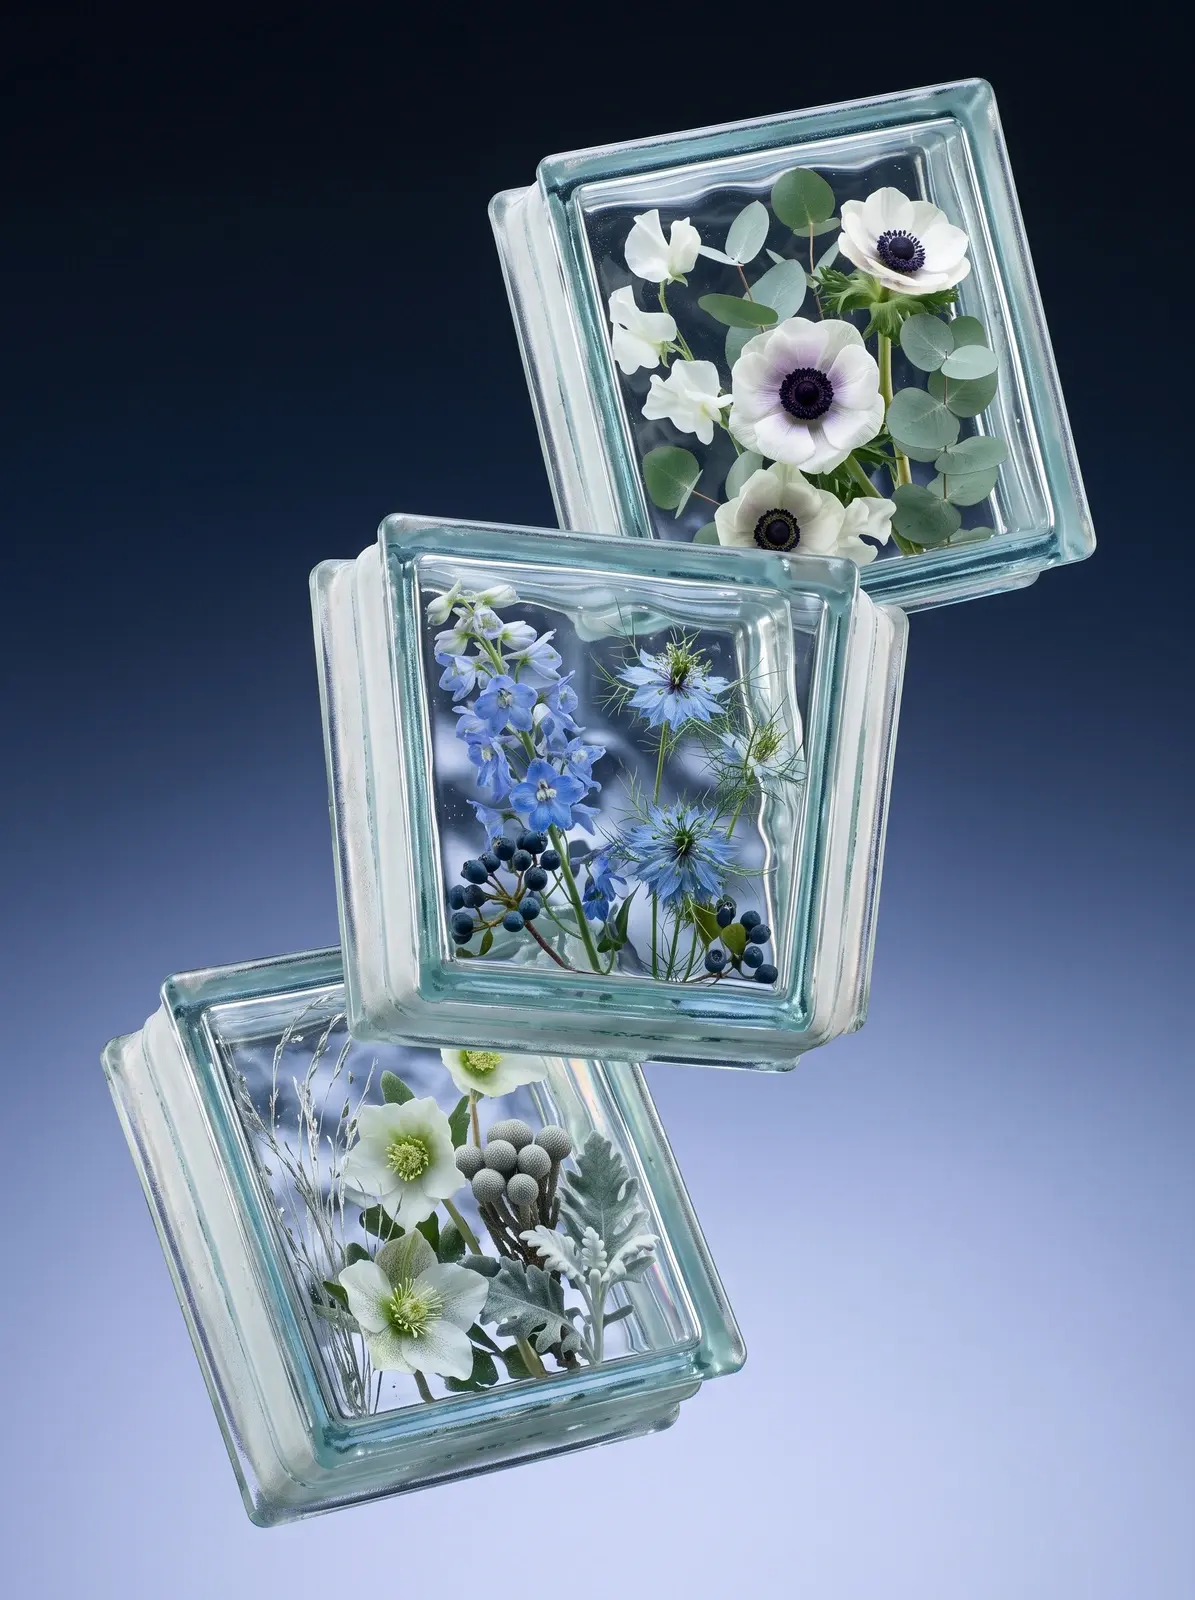
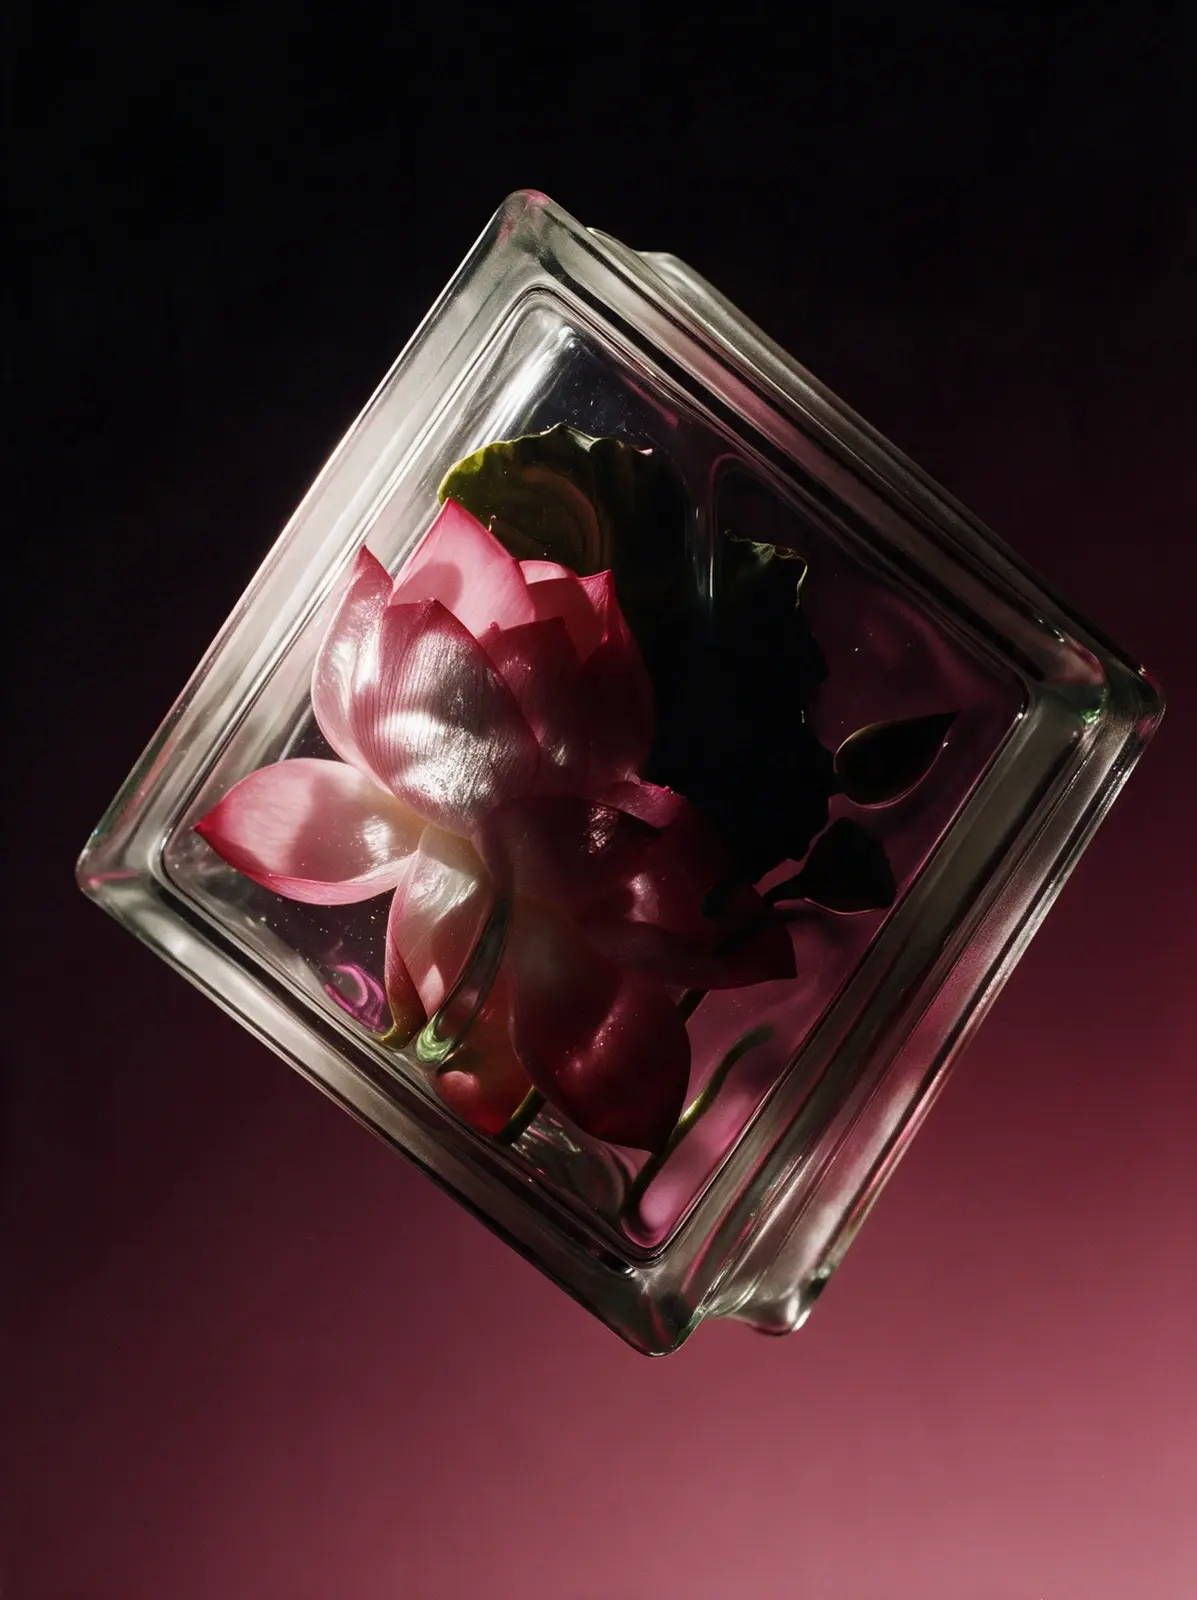
Seedream 5.0 Pro
Copy
LIGHTING (most important): beautiful dramatic directional light on the object, the same in every image. The object is lit from the upper left and slightly in front, with strong, smooth falloff across its form: the upper-left part is bright and luminous, the light gradually fades across the middle, and the lower-right part sinks into deep shadow, about 60% lit and 40% in shadow. Every curve, fold, seam, bevel and bulge is sculpted by its own highlight and its own small shadow, so the whole surface becomes a rich, lively pattern of light and shadow, and the texture shows crisp micro-shadows and tiny glints. Glass and glossy parts show long crisp specular highlights along their upper-left edges. The shadow side receives only soft colored reflected light from the lower part of the background, so shadows are deep and saturated, a richer version of the object's own colors mixed with the background hue, with texture and details clearly readable; nothing is solid black, nothing is flat or gray. Fine-art still-life contrast. Completely relight the object; do not keep the lighting of the reference photo. All the light falls on the object only: the background behind it stays a perfectly even, untouched gradient with no light shapes, no bright streaks and no lighter areas on it. SUBJECT: The exact object from the attached reference image, recreated as a photorealistic hero shot and fully relit. Preserve its identity precisely: the same design, shape, proportions, construction, colors, prints and patterns, logos and lettering, materials and surface finish, and the same number of items (a pair stays a pair, a set stays a set). Do not redesign, simplify, restyle or add anything. Every material keeps its real character and its texture is crisp and readable: knit stays knit, suede stays suede, leather stays leather, mesh stays mesh, metal stays metal. If the object is transparent or translucent (glass, crystal, acrylic, resin, ice), it stays solid and keeps exactly what is inside it in the reference: never make it hollow, empty or box-like, never add air gaps or water lines. Show its real thickness, refraction, ripples, bevels and edge highlights, and keep anything inside it sharp, colorful and readable through the glass. Render only the object: no person, hand, body, mannequin, hanger, stand, string or support. COMPOSITION: Caught mid-tumble, rotated 30 degrees and seen from slightly above in three-quarter view, so its top and one side are visible; centered, filling about 60% of the frame. If the object is clothing, it is never worn and never on an invisible body: it tumbles through the air bunched, twisted and folded over itself into a sculptural form, with rounded rolls, deep folds and crevices for the light to model; sleeves twist and fold, the hem rolls up, the
collar tips sideways; it stays clearly recognizable and moves by its real weight. If the object is a pair, the two items float at different depths with complementary angles; laces, straps and cords drift in soft curves. SPACE: the object levitates in empty space with nothing under or around it: no floor, no tabletop, no surface, no cast shadow, no contact shadow, no reflection below it, no horizon line. It hangs in the air in front of the seamless gradient, clearly floating, with clean space on all sides. BACKGROUND: seamless vertical studio gradient, deep black at the top fading smoothly into rich wine-burgundy and dusty rose-red at the bottom; stops #0B0809 at 0%, #2A0F16 at 40%, #6E2433 at 75%, #B0626E at 100%. Flat, perfectly smooth and evenly toned from top to bottom, like seamless matte paper far behind the object; no blotches, no streaks, no diagonal light shapes, no vignette, no glow, no halo, no floor, no horizon. STYLE: high-end fine-art still-life photography, medium format, subtle analog film character with fine natural grain, rich true colors, razor-sharp focus on the object, museum-quality detail. FINAL CHECK: the exact object from the reference, unchanged; directional light from the upper left falling off across the object; a rich light-and-shadow pattern on every form; deep colored shadows with readable texture, nothing black; transparent objects stay solid and keep their contents; floating in empty space, no floor, no shadow below, no horizon; clean, flat, even gradient with no light shapes on it.
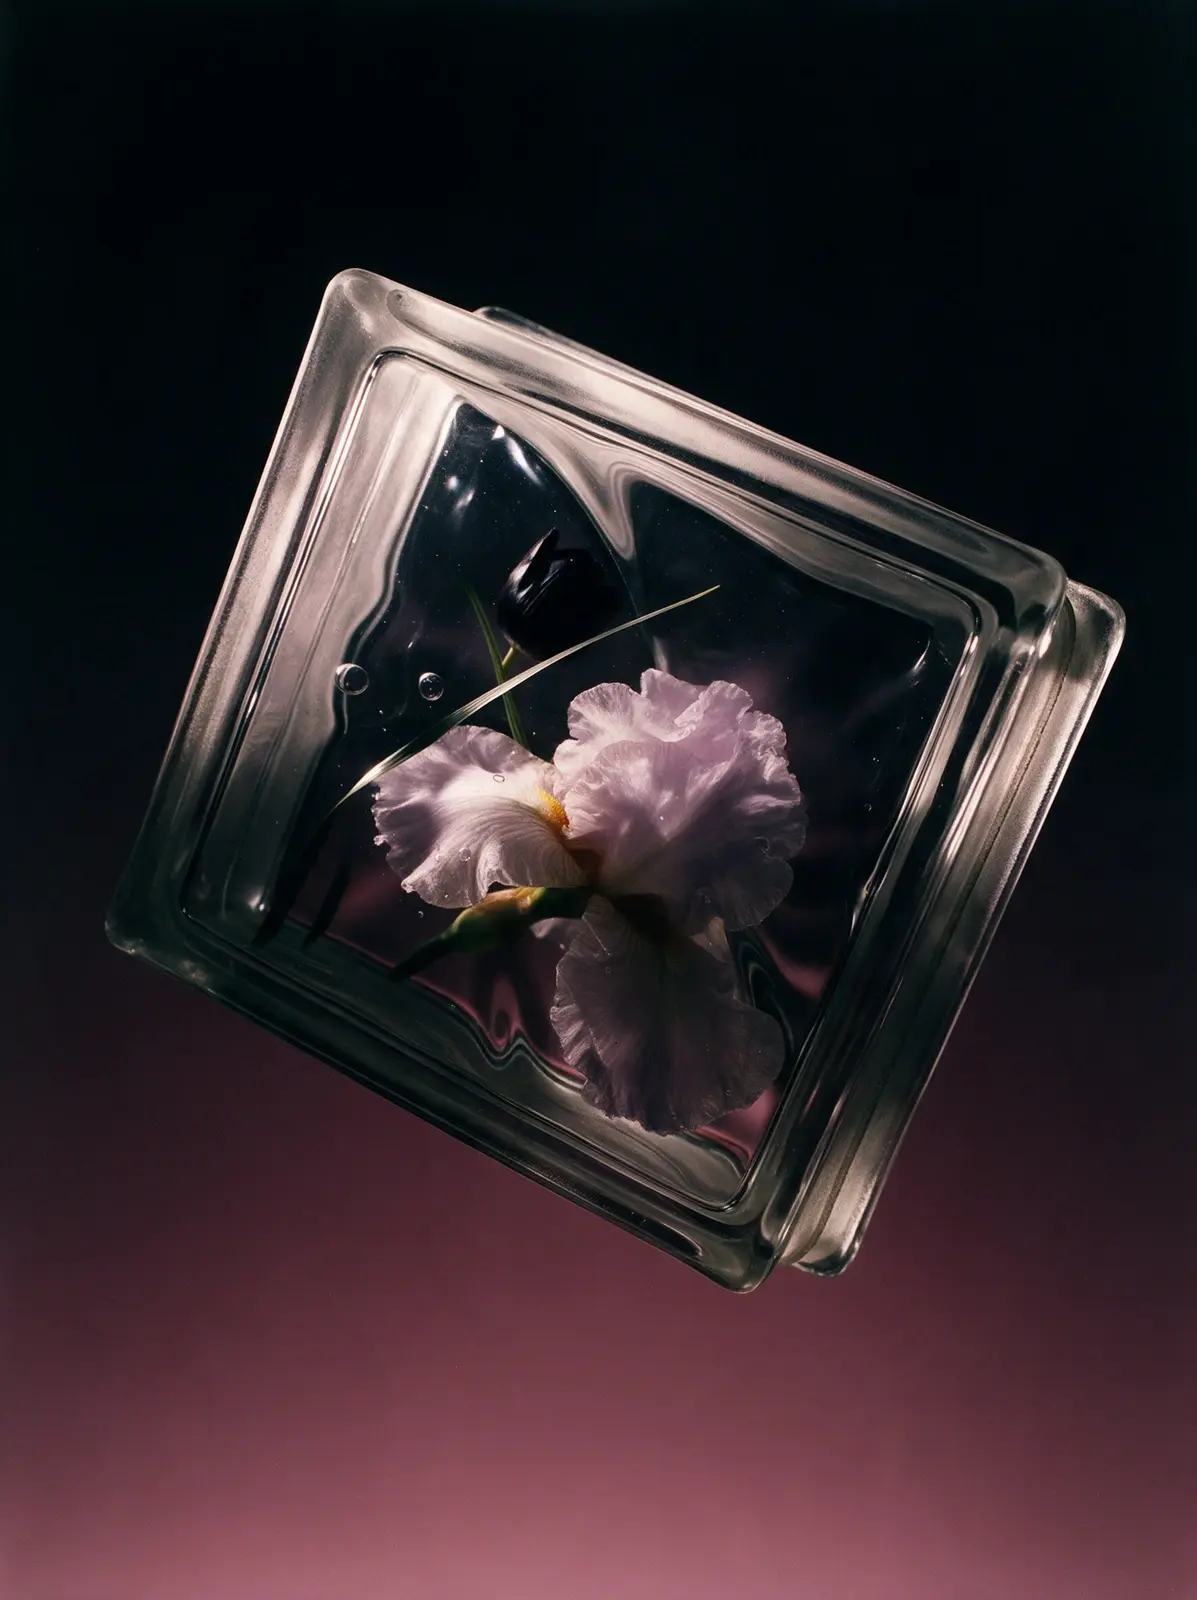
Seedream 5.0 Pro
Copy
{ "priority": "Lighting first; the object must stay exactly as in the reference.", "lighting": "beautiful dramatic directional light on the object, the same in every image. The object is lit from the upper left and slightly in front, with strong, smooth falloff across its form: the upper-left part is bright and luminous, the light gradually fades across the middle, and the lower-right part sinks into deep shadow, about 60% lit and 40% in shadow. Every curve, fold, seam, bevel and bulge is sculpted by its own highlight and its own small shadow, so the whole surface becomes a rich, lively pattern of light and shadow, and the texture shows crisp micro-shadows and tiny glints. Glass and glossy parts show long crisp specular highlights along their upper-left edges. The shadow side receives only soft colored reflected light from the lower part of the background, so shadows are deep and saturated, a richer version of the object's own colors mixed with the background hue, with texture and details clearly readable; nothing is solid black, nothing is flat or gray. Fine-art still-life contrast. Completely relight the object; do not keep the lighting of the reference photo. All the light falls on the object only: the background behind it stays a perfectly even, untouched gradient with no light shapes, no bright streaks and no lighter areas on it.", "subject": "The exact object from the attached reference image, recreated as a photorealistic hero shot and fully relit. Preserve its identity precisely: the same design, shape, proportions, construction, colors, prints and patterns, logos and lettering, materials and surface finish, and the same number of items (a pair stays a pair, a set stays a set). Do not redesign, simplify, restyle or add anything. Every material keeps its real character and its texture is crisp and readable: knit stays knit, suede stays suede, leather stays leather, mesh stays mesh, metal stays metal. If the object is transparent or translucent (glass, crystal, acrylic, resin, ice), it stays solid and keeps exactly what is inside it in the reference: never make it hollow, empty or box-like, never add air gaps or water lines. Show its real thickness, refraction, ripples, bevels and edge highlights, and keep anything inside it sharp, colorful and readable through the glass. Render only the object: no person, hand, body, mannequin, hanger, stand, string or support.", "composition": "tilted 18 degrees clockwise and turned so its front and right side are both visible, three-quarter view; camera slightly below center looking up a little; centered, filling about 65% of the frame.", "clothing_and_pairs": "If the object is clothing, it is never worn and never on an invisible body: it tumbles through the air bunched, twisted and folded over itself into a
sculptural form, with rounded rolls, deep folds and crevices for the light to model; sleeves twist and fold, the hem rolls up, the collar tips sideways; it stays clearly recognizable and moves by its real weight. If the object is a pair, the two items float at different depths with complementary angles; laces, straps and cords drift in soft curves.", "space": "the object levitates in empty space with nothing under or around it: no floor, no tabletop, no surface, no cast shadow, no contact shadow, no reflection below it, no horizon line. It hangs in the air in front of the seamless gradient, clearly floating, with clean space on all sides.", "background": { "description": "near-black plum at the top fading smoothly into dusty mauve-rose at the bottom", "stops": [ { "position": 0, "color": "#0D0A10" }, { "position": 40, "color": "#2A1C26" }, { "position": 75, "color": "#6E4F5E" }, { "position": 100, "color": "#A3818F" } ], "rules": "flat, perfectly smooth and evenly toned, like matte paper far behind the object; no blotches, streaks, diagonal light shapes, vignette, glow, halo, floor or horizon" }, "style": "high-end fine-art still-life photography, medium format, subtle analog film character with fine natural grain, rich true colors, razor-sharp focus on the object, museum-quality detail.", "final_check": "the exact object from the reference, unchanged; directional light from the upper left falling off across the object; a rich light-and-shadow pattern on every form; deep colored shadows with readable texture, nothing black; transparent objects stay solid and keep their contents; floating in empty space, no floor, no shadow below, no horizon; clean, flat, even gradient with no light shapes on it." }
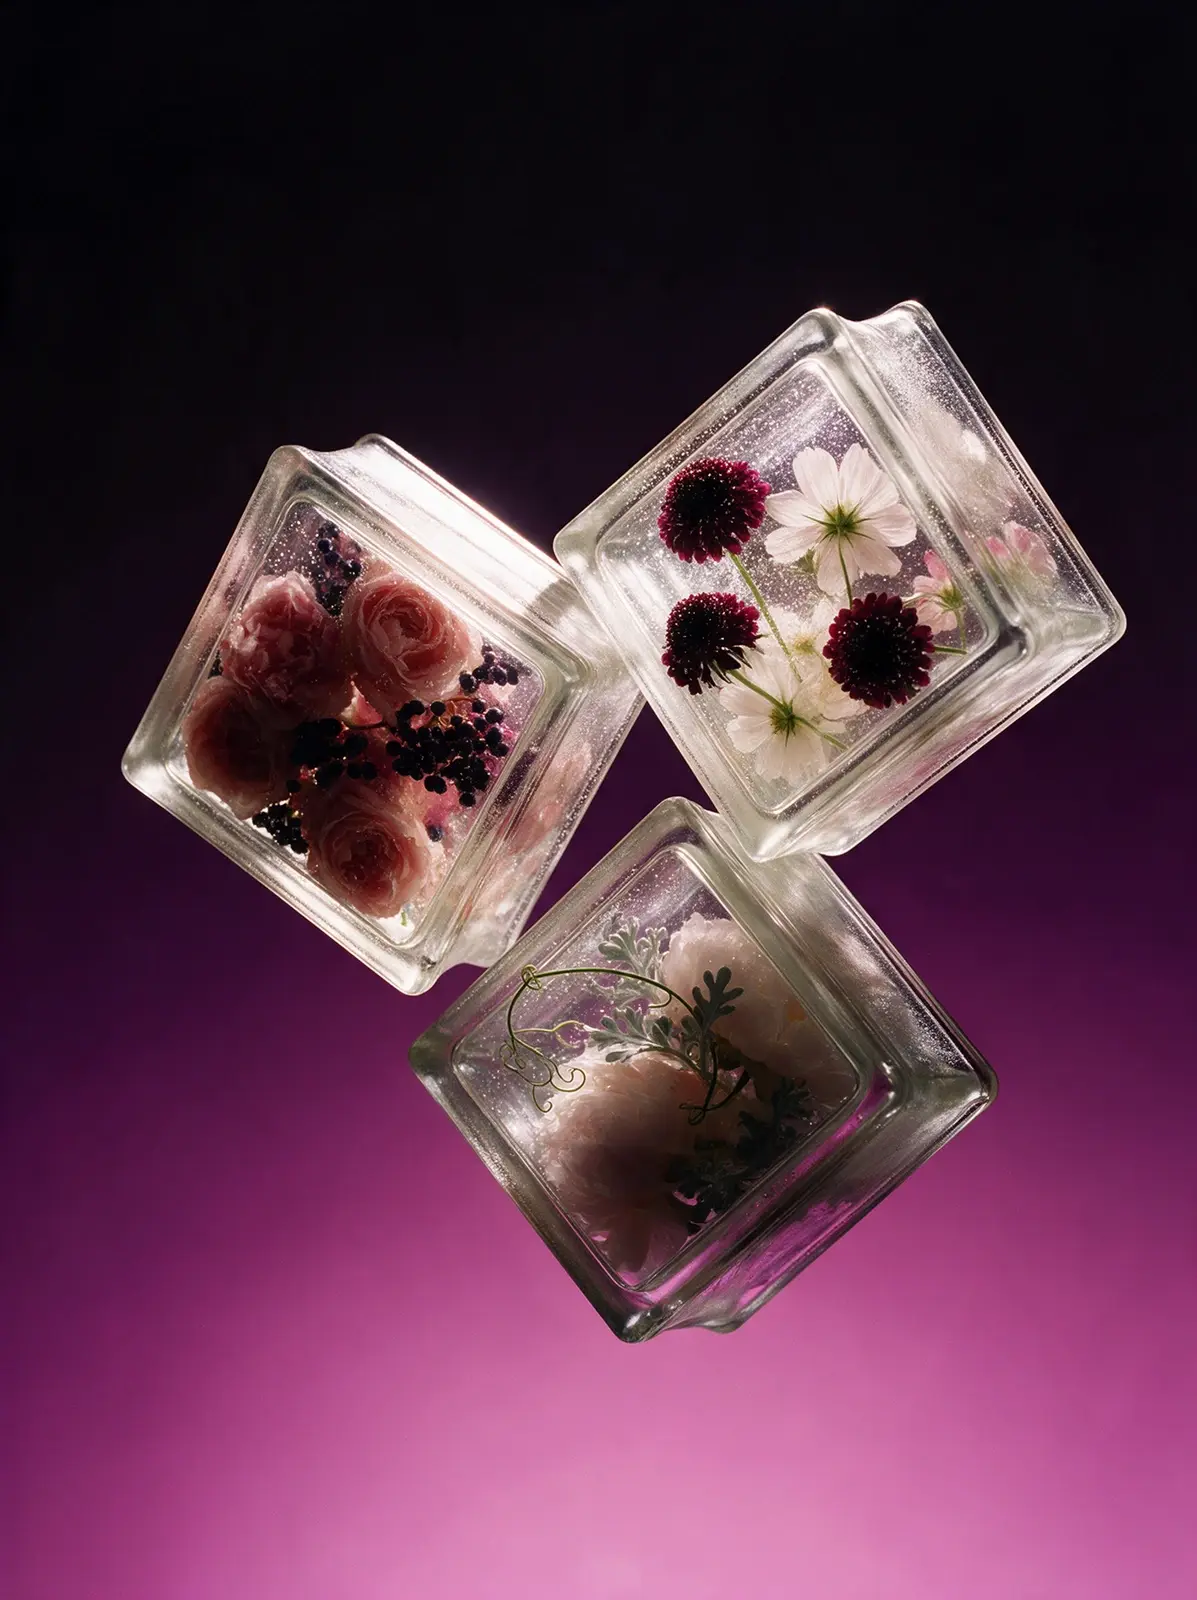
Seedream 5.0 Pro
Copy
{ "priority": "Lighting first; the object must stay exactly as in the reference.", "lighting": "beautiful dramatic directional light on the object, the same in every image. The light comes from outside the frame on the left, at about the height of the object and slightly toward the camera, so it reaches only the object, with strong, smooth falloff across its form: the upper-left part is bright and luminous, the light gradually fades across the middle, and the lower-right part sinks into deep shadow, about 60% lit and 40% in shadow. Every curve, fold, seam, bevel and bulge is sculpted by its own highlight and its own small shadow, so the whole surface becomes a rich, lively pattern of light and shadow, and the texture shows crisp micro-shadows and tiny glints. Glass and glossy parts show long crisp specular highlights along their upper-left edges. The shadow side receives only soft colored reflected light from the lower part of the background, so shadows are deep and saturated, a richer version of the object's own colors mixed with the background hue, with texture and details clearly readable; nothing is solid black, nothing is flat or gray. Fine-art still-life contrast. Completely relight the object; do not keep the lighting of the reference photo. The background is lit separately and evenly, and its brightness comes only from the gradient: the top edge and the top-left corner are the darkest, deepest part of the whole image, uniformly dark, and the background only gets lighter toward the bottom.", "subject": "The exact object from the attached reference image, recreated as a photorealistic hero shot and fully relit. Preserve its identity precisely: the same design, shape, proportions, construction, colors, prints and patterns, logos and lettering, materials and surface finish, and the same number of items (a pair stays a pair, a set stays a set). Do not redesign, simplify, restyle or add anything. Every material keeps its real character and its texture is crisp and readable: knit stays knit, suede stays suede, leather stays leather, mesh stays mesh, metal stays metal. If the object is transparent or translucent (glass, crystal, acrylic, resin, ice), it stays solid and keeps exactly what is inside it in the reference: never make it hollow, empty or box-like, never add air gaps or water lines. Show its real thickness, refraction, ripples, bevels and edge highlights, and keep anything inside it sharp, colorful and readable through the glass. Render only the object: no person, hand, body, mannequin, hanger, stand, string or support.", "composition": "tilted 25 degrees counterclockwise in three-quarter view, placed in the upper right part of the frame, filling about 55% of it, with generous empty space below and to the left, as if it is rising.",
"clothing_and_pairs": "If the object is clothing, it is never worn and never on an invisible body: it tumbles through the air bunched, twisted and folded over itself into a sculptural form, with rounded rolls, deep folds and crevices for the light to model; sleeves twist and fold, the hem rolls up, the collar tips sideways; it stays clearly recognizable and moves by its real weight. If the object is a pair, the two items float at different depths with complementary angles; laces, straps and cords drift in soft curves.", "space": "the object levitates in empty space with nothing under or around it: no floor, no tabletop, no surface, no cast shadow, no contact shadow, no reflection below it, no horizon line. It hangs in the air in front of the seamless gradient, clearly floating, with clean space on all sides.", "background": { "description": "deep black-violet at the top fading smoothly into vivid fuchsia and soft pink at the bottom", "stops": [ { "position": 0, "color": "#0C080D" }, { "position": 40, "color": "#2C0F2A" }, { "position": 75, "color": "#8C2C78" }, { "position": 100, "color": "#D97FBE" } ], "rules": "flat, perfectly smooth and evenly toned, like matte paper far behind the object; no blotches, streaks, diagonal light shapes, vignette, glow, halo, floor or horizon" }, "style": "high-end fine-art still-life photography, medium format, subtle analog film character with fine natural grain, rich true colors, razor-sharp focus on the object, museum-quality detail.", "final_check": "the exact object from the reference, unchanged; light from the left, outside the frame, falling off across the object; a rich light-and-shadow pattern on every form; deep colored shadows with readable texture, nothing black; transparent objects stay solid and keep their contents; floating in empty space, no floor, no shadow below, no horizon; clean, flat, even gradient whose top edge and top-left corner are the darkest part of the image." }
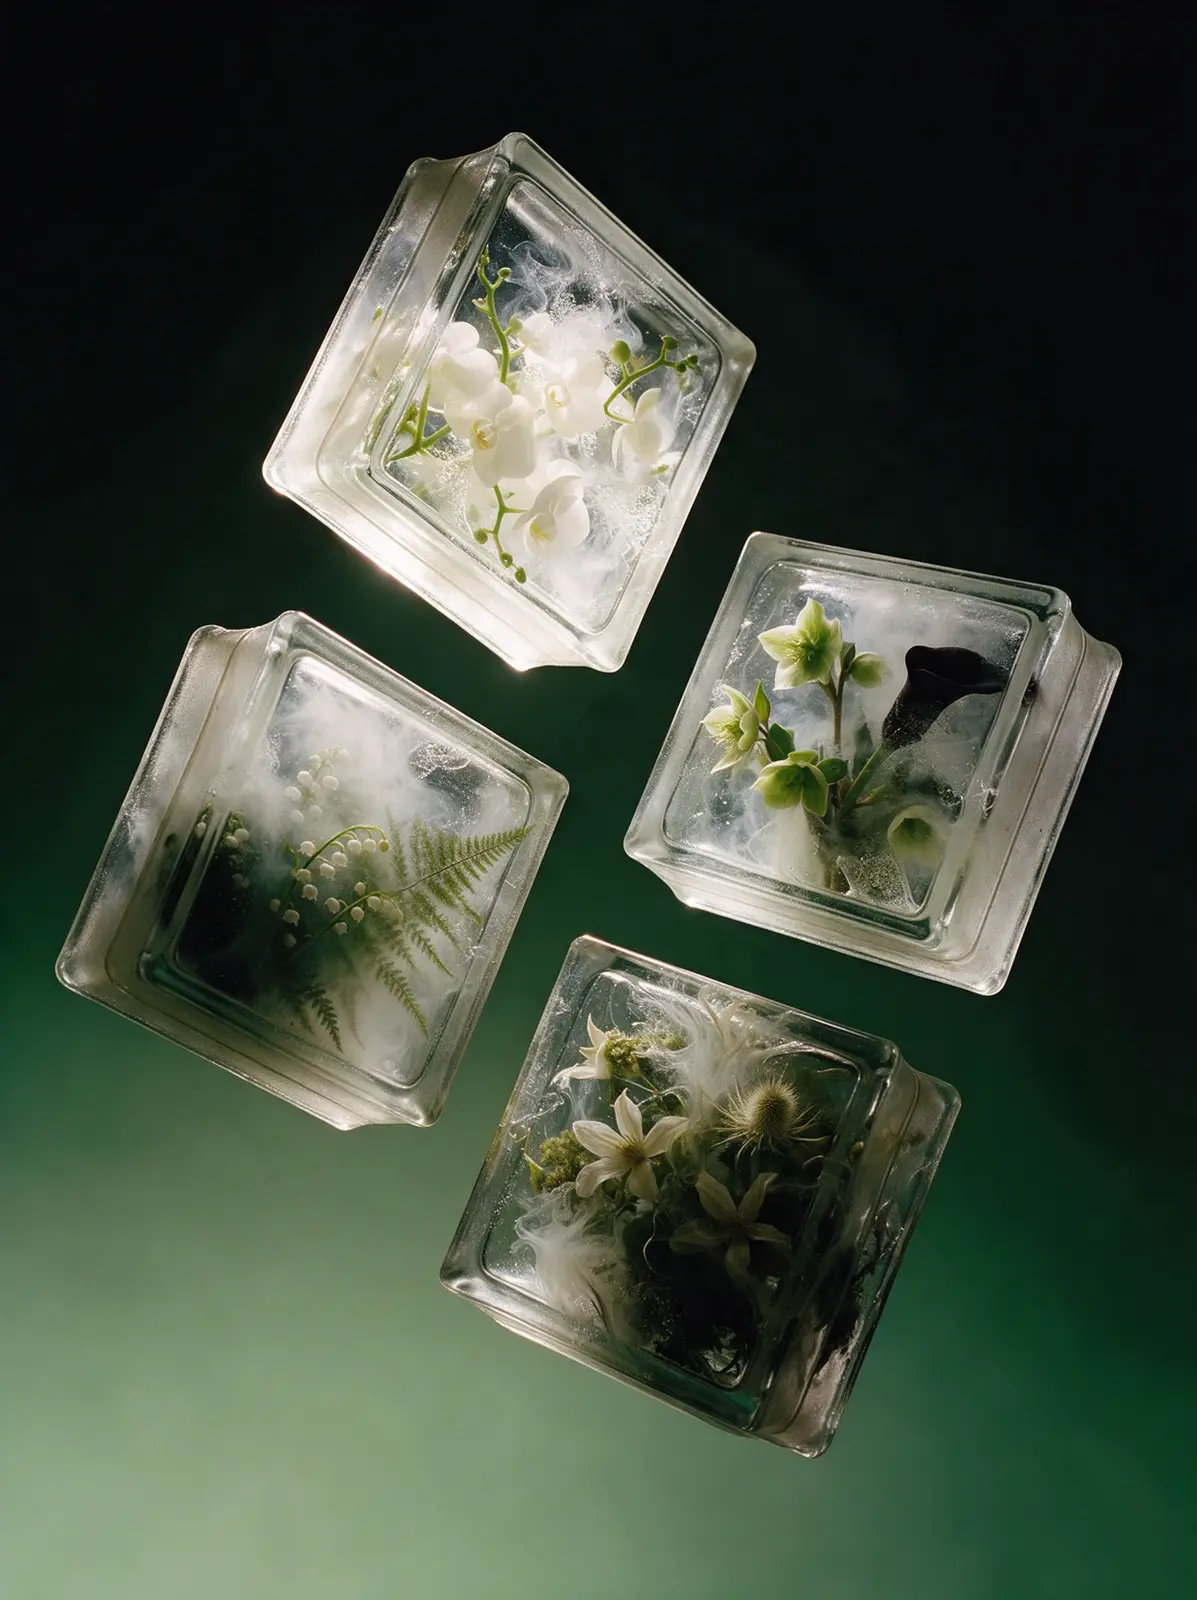
Seedream 5.0 Pro
Copy
{ "priority": "Lighting first; the object must stay exactly as in the reference.", "lighting": "beautiful dramatic directional light on the object, the same in every image. The light comes from outside the frame on the left, at about the height of the object and slightly toward the camera, so it reaches only the object, with strong, smooth falloff across its form: the upper-left part is bright and luminous, the light gradually fades across the middle, and the lower-right part sinks into deep shadow, about 60% lit and 40% in shadow. Every curve, fold, seam, bevel and bulge is sculpted by its own highlight and its own small shadow, so the whole surface becomes a rich, lively pattern of light and shadow, and the texture shows crisp micro-shadows and tiny glints. Glass and glossy parts show long crisp specular highlights along their upper-left edges. The shadow side receives only soft colored reflected light from the lower part of the background, so shadows are deep and saturated, a richer version of the object's own colors mixed with the background hue, with texture and details clearly readable; nothing is solid black, nothing is flat or gray. Fine-art still-life contrast. Completely relight the object; do not keep the lighting of the reference photo. The background is lit separately and evenly, and its brightness comes only from the gradient: the top edge and the top-left corner are the darkest, deepest part of the whole image, uniformly dark, and the background only gets lighter toward the bottom.", "subject": "The exact object from the attached reference image, recreated as a photorealistic hero shot and fully relit. Preserve its identity precisely: the same design, shape, proportions, construction, colors, prints and patterns, logos and lettering, materials and surface finish, and the same number of items (a pair stays a pair, a set stays a set). Do not redesign, simplify, restyle or add anything. Every material keeps its real character and its texture is crisp and readable: knit stays knit, suede stays suede, leather stays leather, mesh stays mesh, metal stays metal. If the object is transparent or translucent (glass, crystal, acrylic, resin, ice), it stays solid and keeps exactly what is inside it in the reference: never make it hollow, empty or box-like, never add air gaps or water lines. Show its real thickness, refraction, ripples, bevels and edge highlights, and keep anything inside it sharp, colorful and readable through the glass. Render only the object: no person, hand, body, mannequin, hanger, stand, string or support.", "composition": "tilted 22 degrees counterclockwise and turned to show its right side; dramatic low camera angle from below, looking up at its underside and front, so it feels monumental; centered, filling about 65% of the
frame.", "clothing_and_pairs": "If the object is clothing, it is never worn and never on an invisible body: it tumbles through the air bunched, twisted and folded over itself into a sculptural form, with rounded rolls, deep folds and crevices for the light to model; sleeves twist and fold, the hem rolls up, the collar tips sideways; it stays clearly recognizable and moves by its real weight. If the object is a pair, the two items float at different depths with complementary angles; laces, straps and cords drift in soft curves.", "space": "the object levitates in empty space with nothing under or around it: no floor, no tabletop, no surface, no cast shadow, no contact shadow, no reflection below it, no horizon line. It hangs in the air in front of the seamless gradient, clearly floating, with clean space on all sides.", "background": { "description": "deep green-black at the top fading smoothly into muted sage and pale grey-green at the bottom", "stops": [ { "position": 0, "color": "#0A100D" }, { "position": 40, "color": "#1C2B23" }, { "position": 75, "color": "#4F6E58" }, { "position": 100, "color": "#8FAA8C" } ], "rules": "flat, perfectly smooth and evenly toned, like matte paper far behind the object; no blotches, streaks, diagonal light shapes, vignette, glow, halo, floor or horizon" }, "style": "high-end fine-art still-life photography, medium format, subtle analog film character with fine natural grain, rich true colors, razor-sharp focus on the object, museum-quality detail.", "final_check": "the exact object from the reference, unchanged; light from the left, outside the frame, falling off across the object; a rich light-and-shadow pattern on every form; deep colored shadows with readable texture, nothing black; transparent objects stay solid and keep their contents; floating in empty space, no floor, no shadow below, no horizon; clean, flat, even gradient whose top edge and top-left corner are the darkest part of the image." }
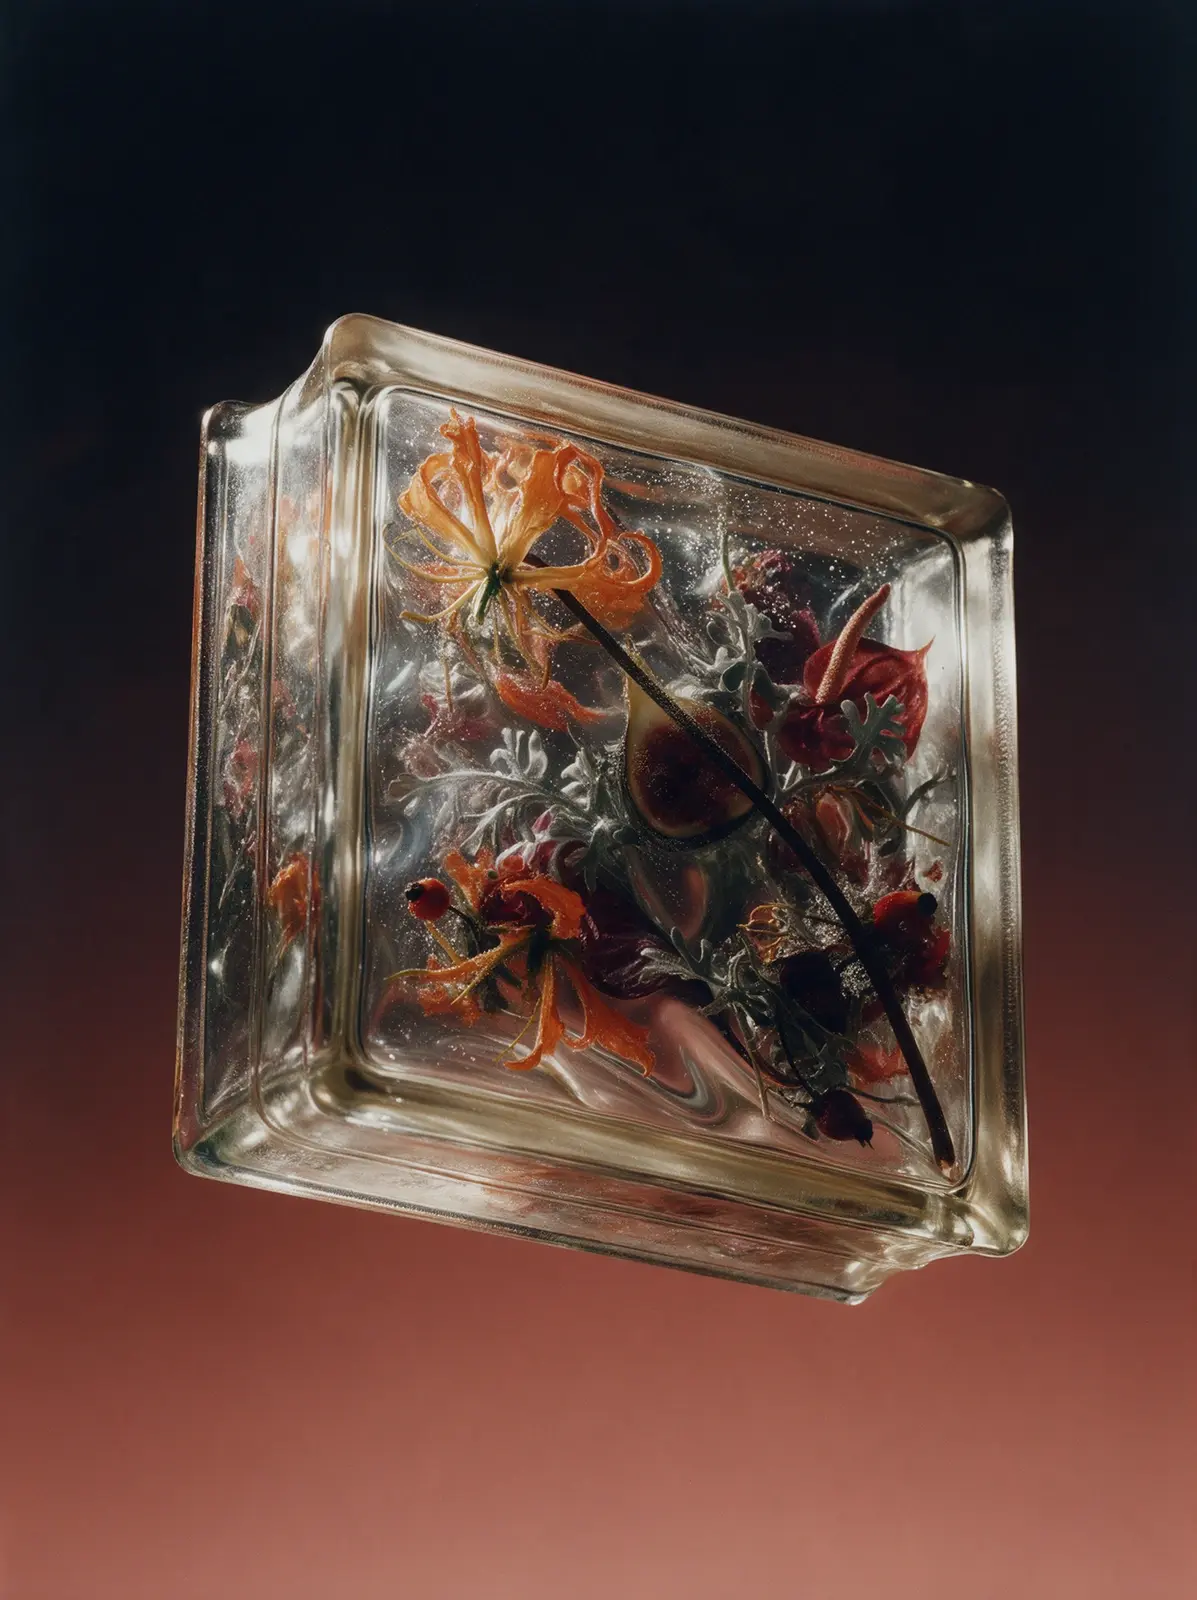
Seedream 5.0 Pro
Copy
LIGHTING (most important): beautiful dramatic directional light on the object, the same in every image. The object is lit from the upper left and slightly in front, with strong, smooth falloff across its form: the upper-left part is bright and luminous, the light gradually fades across the middle, and the lower-right part sinks into deep shadow, about 60% lit and 40% in shadow. Every curve, fold, seam, bevel and bulge is sculpted by its own highlight and its own small shadow, so the whole surface becomes a rich, lively pattern of light and shadow, and the texture shows crisp micro-shadows and tiny glints. Glass and glossy parts show long crisp specular highlights along their upper-left edges. The shadow side receives only soft colored reflected light from the lower part of the background, so shadows are deep and saturated, a richer version of the object's own colors mixed with the background hue, with texture and details clearly readable; nothing is solid black, nothing is flat or gray. Fine-art still-life contrast. Completely relight the object; do not keep the lighting of the reference photo. All the light falls on the object only: the background behind it stays a perfectly even, untouched gradient with no light shapes, no bright streaks and no lighter areas on it. SUBJECT: The exact object from the attached reference image, recreated as a photorealistic hero shot and fully relit. Preserve its identity precisely: the same design, shape, proportions, construction, colors, prints and patterns, logos and lettering, materials and surface finish, and the same number of items (a pair stays a pair, a set stays a set). Do not redesign, simplify, restyle or add anything. Every material keeps its real character and its texture is crisp and readable: knit stays knit, suede stays suede, leather stays leather, mesh stays mesh, metal stays metal. If the object is transparent or translucent (glass, crystal, acrylic, resin, ice), it stays solid and keeps exactly what is inside it in the reference: never make it hollow, empty or box-like, never add air gaps or water lines. Show its real thickness, refraction, ripples, bevels and edge highlights, and keep anything inside it sharp, colorful and readable through the glass. Render only the object: no person, hand, body, mannequin, hanger, stand, string or support. COMPOSITION: The object is turned 25 degrees to show its left side, with a slight 6 degree counterclockwise roll; camera at eye level; placed a little left of center, filling about 70% of the frame, with calm empty space on the right. If the object is clothing, it is never worn and never on an invisible body: it tumbles through the air bunched, twisted and folded over itself into a sculptural form, with rounded rolls, deep folds and crevices for the light to
model; sleeves twist and fold, the hem rolls up, the collar tips sideways; it stays clearly recognizable and moves by its real weight. If the object is a pair, the two items float at different depths with complementary angles; laces, straps and cords drift in soft curves. SPACE: the object levitates in empty space with nothing under or around it: no floor, no tabletop, no surface, no cast shadow, no contact shadow, no reflection below it, no horizon line. It hangs in the air in front of the seamless gradient, clearly floating, with clean space on all sides. BACKGROUND: seamless vertical studio gradient, deep warm black at the top fading smoothly into burnt terracotta and soft peach-clay at the bottom; stops #0C0909 at 0%, #2B1611 at 38%, #8A4836 at 72%, #D49478 at 100%. Flat, perfectly smooth and evenly toned from top to bottom, like seamless matte paper far behind the object; no blotches, no streaks, no diagonal light shapes, no vignette, no glow, no halo, no floor, no horizon. STYLE: high-end fine-art still-life photography, medium format, subtle analog film character with fine natural grain, rich true colors, razor-sharp focus on the object, museum-quality detail. FINAL CHECK: the exact object from the reference, unchanged; directional light from the upper left falling off across the object; a rich light-and-shadow pattern on every form; deep colored shadows with readable texture, nothing black; transparent objects stay solid and keep their contents; floating in empty space, no floor, no shadow below, no horizon; clean, flat, even gradient with no light shapes on it.
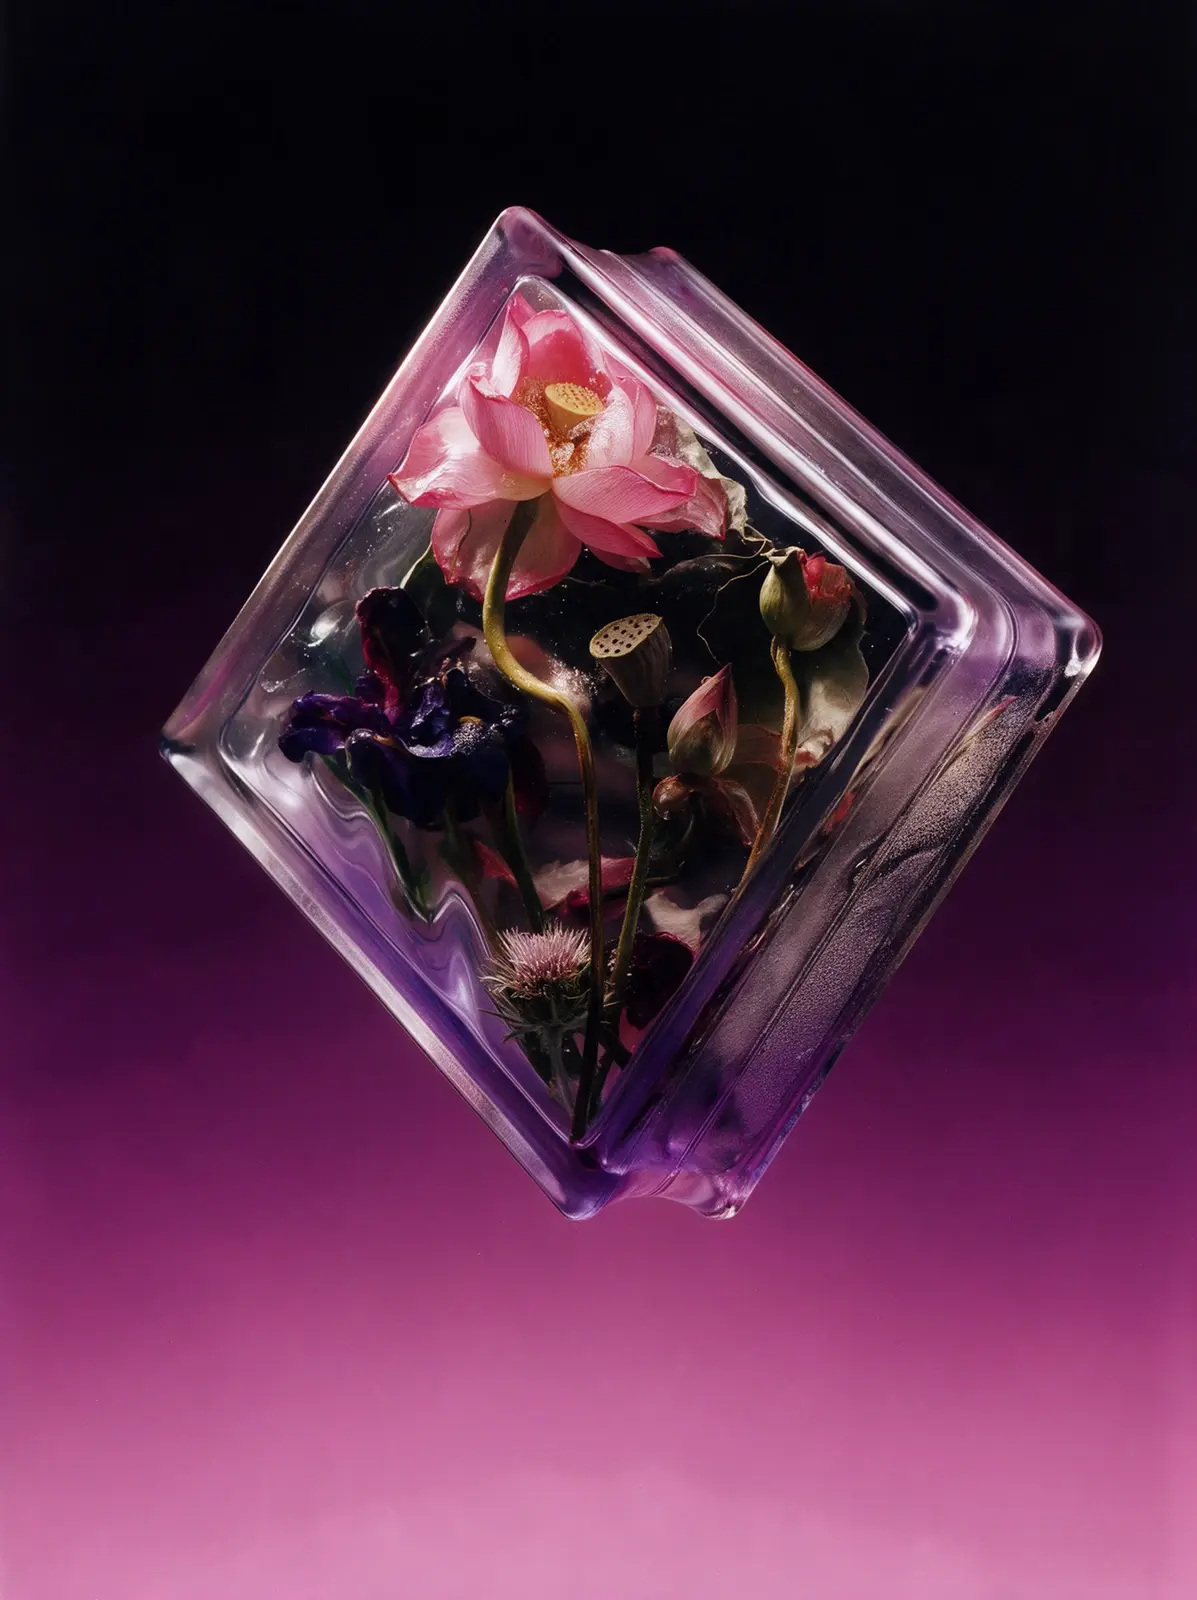
Seedream 5.0 Pro
Copy
{ "priority": "Lighting first; the object must stay exactly as in the reference.", "lighting": "beautiful dramatic directional light on the object, the same in every image. The object is lit from the upper left and slightly in front, with strong, smooth falloff across its form: the upper-left part is bright and luminous, the light gradually fades across the middle, and the lower-right part sinks into deep shadow, about 60% lit and 40% in shadow. Every curve, fold, seam, bevel and bulge is sculpted by its own highlight and its own small shadow, so the whole surface becomes a rich, lively pattern of light and shadow, and the texture shows crisp micro-shadows and tiny glints. Glass and glossy parts show long crisp specular highlights along their upper-left edges. The shadow side receives only soft colored reflected light from the lower part of the background, so shadows are deep and saturated, a richer version of the object's own colors mixed with the background hue, with texture and details clearly readable; nothing is solid black, nothing is flat or gray. Fine-art still-life contrast. Completely relight the object; do not keep the lighting of the reference photo. All the light falls on the object only: the background behind it stays a perfectly even, untouched gradient with no light shapes, no bright streaks and no lighter areas on it.", "subject": "The exact object from the attached reference image, recreated as a photorealistic hero shot and fully relit. Preserve its identity precisely: the same design, shape, proportions, construction, colors, prints and patterns, logos and lettering, materials and surface finish, and the same number of items (a pair stays a pair, a set stays a set). Do not redesign, simplify, restyle or add anything. Every material keeps its real character and its texture is crisp and readable: knit stays knit, suede stays suede, leather stays leather, mesh stays mesh, metal stays metal. If the object is transparent or translucent (glass, crystal, acrylic, resin, ice), it stays solid and keeps exactly what is inside it in the reference: never make it hollow, empty or box-like, never add air gaps or water lines. Show its real thickness, refraction, ripples, bevels and edge highlights, and keep anything inside it sharp, colorful and readable through the glass. Render only the object: no person, hand, body, mannequin, hanger, stand, string or support.", "composition": "tilted 25 degrees counterclockwise in three-quarter view, placed in the upper right part of the frame, filling about 55% of it, with generous empty space below and to the left, as if it is rising.", "clothing_and_pairs": "If the object is clothing, it is never worn and never on an invisible body: it tumbles through the air bunched, twisted and folded over itself into a
sculptural form, with rounded rolls, deep folds and crevices for the light to model; sleeves twist and fold, the hem rolls up, the collar tips sideways; it stays clearly recognizable and moves by its real weight. If the object is a pair, the two items float at different depths with complementary angles; laces, straps and cords drift in soft curves.", "space": "the object levitates in empty space with nothing under or around it: no floor, no tabletop, no surface, no cast shadow, no contact shadow, no reflection below it, no horizon line. It hangs in the air in front of the seamless gradient, clearly floating, with clean space on all sides.", "background": { "description": "deep black-violet at the top fading smoothly into vivid fuchsia and soft pink at the bottom", "stops": [ { "position": 0, "color": "#0C080D" }, { "position": 40, "color": "#2C0F2A" }, { "position": 75, "color": "#8C2C78" }, { "position": 100, "color": "#D97FBE" } ], "rules": "flat, perfectly smooth and evenly toned, like matte paper far behind the object; no blotches, streaks, diagonal light shapes, vignette, glow, halo, floor or horizon" }, "style": "high-end fine-art still-life photography, medium format, subtle analog film character with fine natural grain, rich true colors, razor-sharp focus on the object, museum-quality detail.", "final_check": "the exact object from the reference, unchanged; directional light from the upper left falling off across the object; a rich light-and-shadow pattern on every form; deep colored shadows with readable texture, nothing black; transparent objects stay solid and keep their contents; floating in empty space, no floor, no shadow below, no horizon; clean, flat, even gradient with no light shapes on it." }
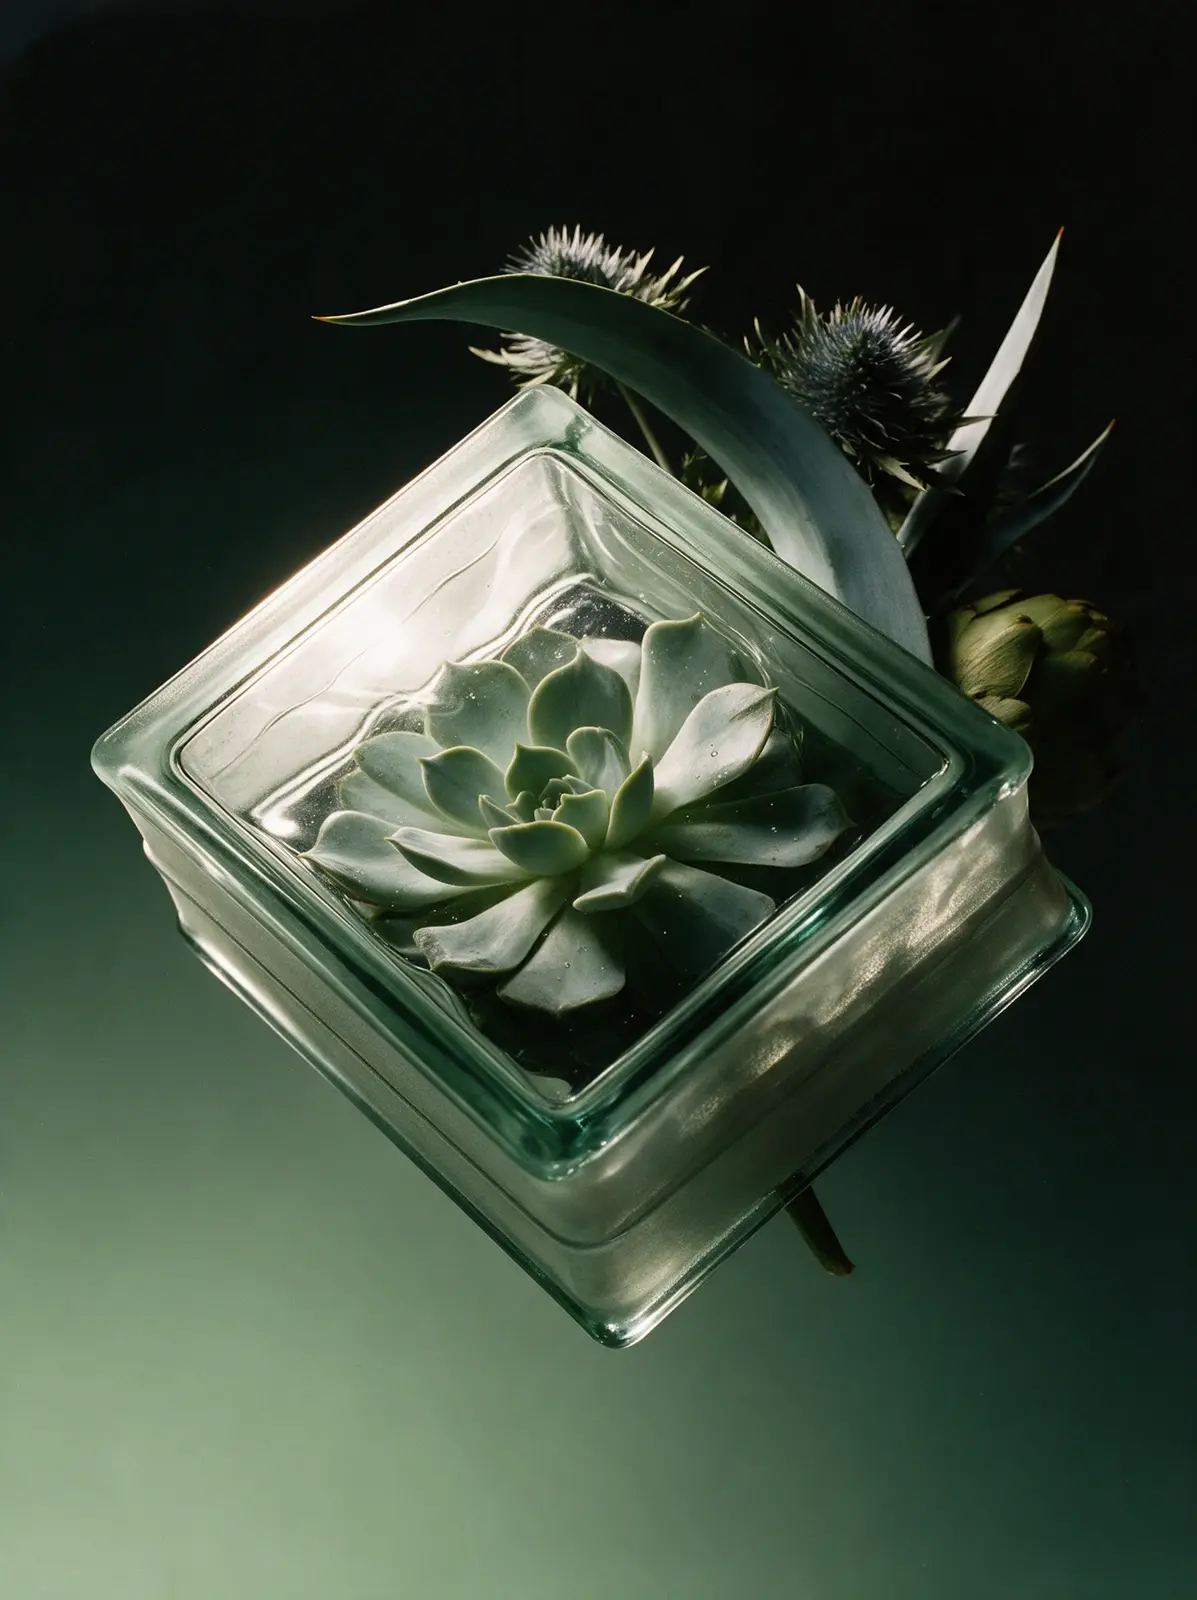
Seedream 5.0 Pro
Copy
{ "priority": "Lighting first; the object must stay exactly as in the reference.", "lighting": "beautiful dramatic directional light on the object, the same in every image. The object is lit from the upper left and slightly in front, with strong, smooth falloff across its form: the upper-left part is bright and luminous, the light gradually fades across the middle, and the lower-right part sinks into deep shadow, about 60% lit and 40% in shadow. Every curve, fold, seam, bevel and bulge is sculpted by its own highlight and its own small shadow, so the whole surface becomes a rich, lively pattern of light and shadow, and the texture shows crisp micro-shadows and tiny glints. Glass and glossy parts show long crisp specular highlights along their upper-left edges. The shadow side receives only soft colored reflected light from the lower part of the background, so shadows are deep and saturated, a richer version of the object's own colors mixed with the background hue, with texture and details clearly readable; nothing is solid black, nothing is flat or gray. Fine-art still-life contrast. Completely relight the object; do not keep the lighting of the reference photo. All the light falls on the object only: the background behind it stays a perfectly even, untouched gradient with no light shapes, no bright streaks and no lighter areas on it.", "subject": "The exact object from the attached reference image, recreated as a photorealistic hero shot and fully relit. Preserve its identity precisely: the same design, shape, proportions, construction, colors, prints and patterns, logos and lettering, materials and surface finish, and the same number of items (a pair stays a pair, a set stays a set). Do not redesign, simplify, restyle or add anything. Every material keeps its real character and its texture is crisp and readable: knit stays knit, suede stays suede, leather stays leather, mesh stays mesh, metal stays metal. If the object is transparent or translucent (glass, crystal, acrylic, resin, ice), it stays solid and keeps exactly what is inside it in the reference: never make it hollow, empty or box-like, never add air gaps or water lines. Show its real thickness, refraction, ripples, bevels and edge highlights, and keep anything inside it sharp, colorful and readable through the glass. Render only the object: no person, hand, body, mannequin, hanger, stand, string or support.", "composition": "tilted 22 degrees counterclockwise and turned to show its right side; dramatic low camera angle from below, looking up at its underside and front, so it feels monumental; centered, filling about 65% of the frame.", "clothing_and_pairs": "If the object is clothing, it is never worn and never on an invisible body: it tumbles through the air bunched, twisted and folded
over itself into a sculptural form, with rounded rolls, deep folds and crevices for the light to model; sleeves twist and fold, the hem rolls up, the collar tips sideways; it stays clearly recognizable and moves by its real weight. If the object is a pair, the two items float at different depths with complementary angles; laces, straps and cords drift in soft curves.", "space": "the object levitates in empty space with nothing under or around it: no floor, no tabletop, no surface, no cast shadow, no contact shadow, no reflection below it, no horizon line. It hangs in the air in front of the seamless gradient, clearly floating, with clean space on all sides.", "background": { "description": "deep green-black at the top fading smoothly into muted sage and pale grey-green at the bottom", "stops": [ { "position": 0, "color": "#0A100D" }, { "position": 40, "color": "#1C2B23" }, { "position": 75, "color": "#4F6E58" }, { "position": 100, "color": "#8FAA8C" } ], "rules": "flat, perfectly smooth and evenly toned, like matte paper far behind the object; no blotches, streaks, diagonal light shapes, vignette, glow, halo, floor or horizon" }, "style": "high-end fine-art still-life photography, medium format, subtle analog film character with fine natural grain, rich true colors, razor-sharp focus on the object, museum-quality detail.", "final_check": "the exact object from the reference, unchanged; directional light from the upper left falling off across the object; a rich light-and-shadow pattern on every form; deep colored shadows with readable texture, nothing black; transparent objects stay solid and keep their contents; floating in empty space, no floor, no shadow below, no horizon; clean, flat, even gradient with no light shapes on it." }
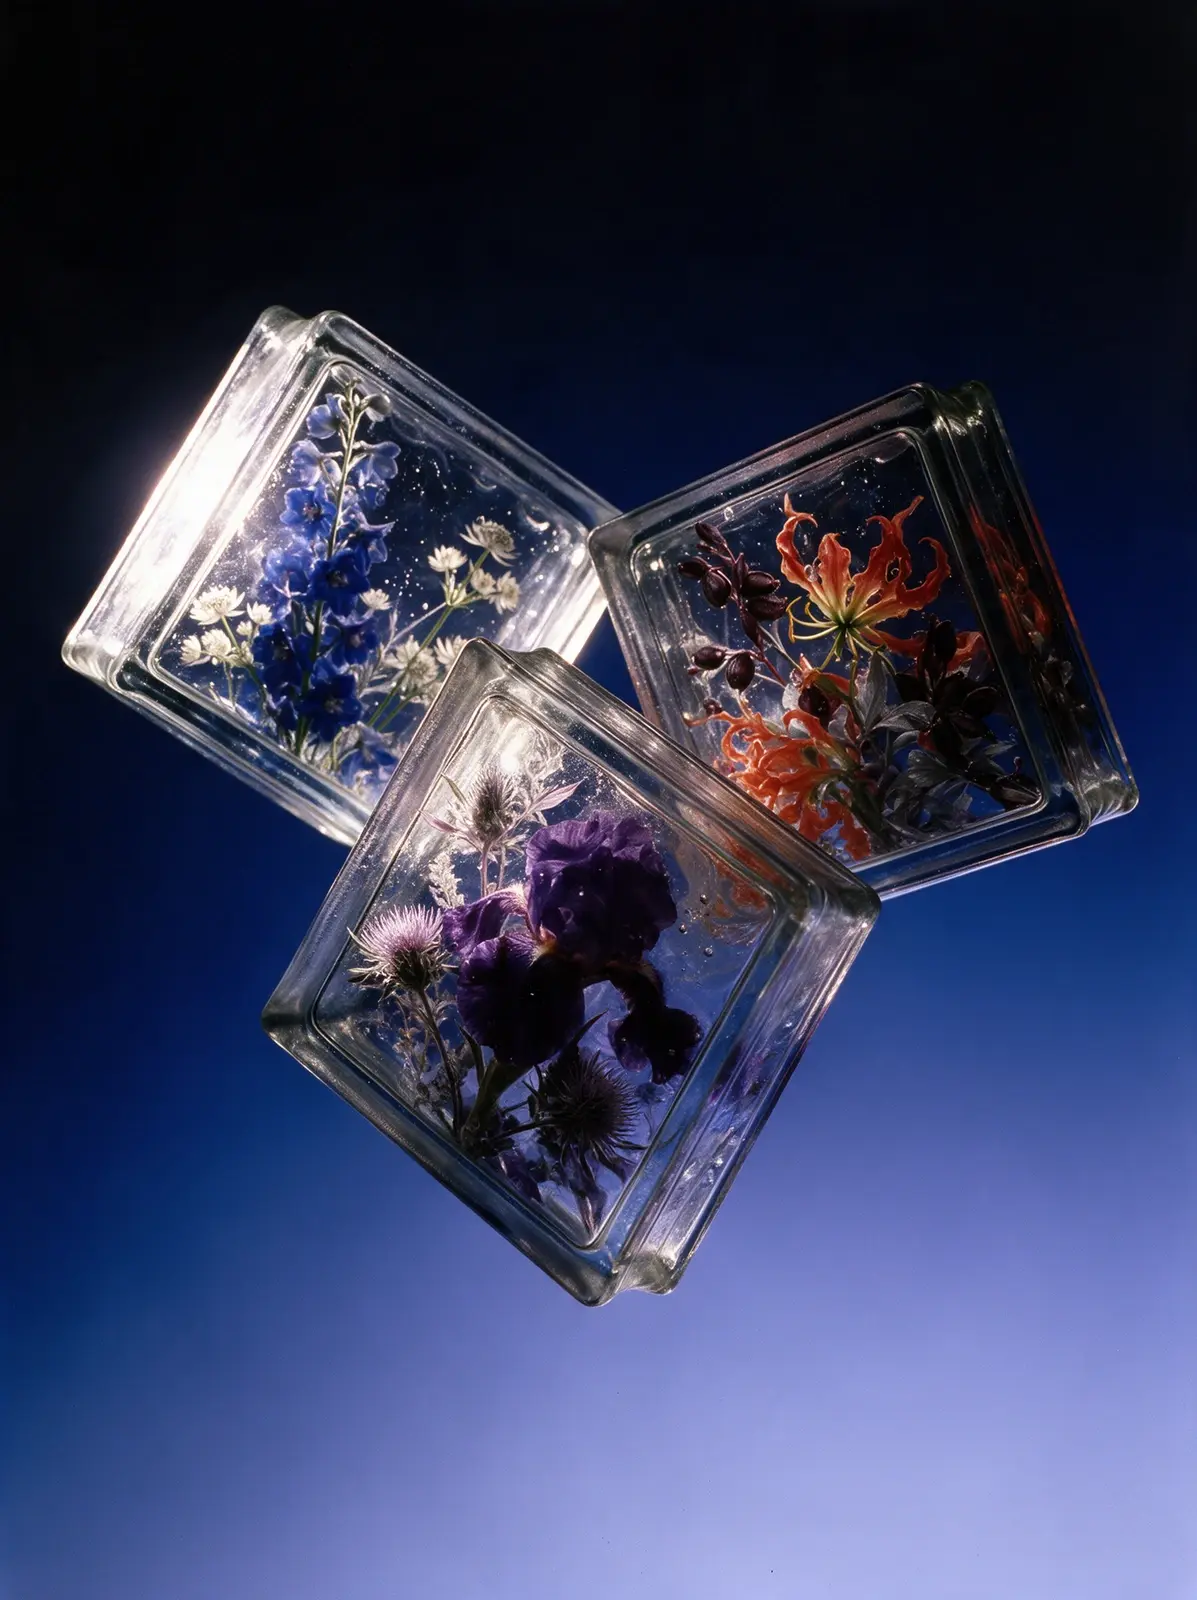
Seedream 5.0 Pro
Copy
{ "priority": "Lighting first; the object must stay exactly as in the reference.", "lighting": "beautiful dramatic directional light on the object, the same in every image. The light comes from outside the frame on the left, at about the height of the object and slightly toward the camera, so it reaches only the object, with strong, smooth falloff across its form: the upper-left part is bright and luminous, the light gradually fades across the middle, and the lower-right part sinks into deep shadow, about 60% lit and 40% in shadow. Every curve, fold, seam, bevel and bulge is sculpted by its own highlight and its own small shadow, so the whole surface becomes a rich, lively pattern of light and shadow, and the texture shows crisp micro-shadows and tiny glints. Glass and glossy parts show long crisp specular highlights along their upper-left edges. The shadow side receives only soft colored reflected light from the lower part of the background, so shadows are deep and saturated, a richer version of the object's own colors mixed with the background hue, with texture and details clearly readable; nothing is solid black, nothing is flat or gray. Fine-art still-life contrast. Completely relight the object; do not keep the lighting of the reference photo. The background is lit separately and evenly, and its brightness comes only from the gradient: the top edge and the top-left corner are the darkest, deepest part of the whole image, uniformly dark, and the background only gets lighter toward the bottom.", "subject": "The exact object from the attached reference image, recreated as a photorealistic hero shot and fully relit. Preserve its identity precisely: the same design, shape, proportions, construction, colors, prints and patterns, logos and lettering, materials and surface finish, and the same number of items (a pair stays a pair, a set stays a set). Do not redesign, simplify, restyle or add anything. Every material keeps its real character and its texture is crisp and readable: knit stays knit, suede stays suede, leather stays leather, mesh stays mesh, metal stays metal. If the object is transparent or translucent (glass, crystal, acrylic, resin, ice), it stays solid and keeps exactly what is inside it in the reference: never make it hollow, empty or box-like, never add air gaps or water lines. Show its real thickness, refraction, ripples, bevels and edge highlights, and keep anything inside it sharp, colorful and readable through the glass. Render only the object: no person, hand, body, mannequin, hanger, stand, string or support.", "composition": "tipped steeply by 40 degrees so it runs along a strong diagonal of the frame, as if balancing on one corner or tip, front toward the camera with a slight downward view of its top; centered, filling about
70% of the frame.", "clothing_and_pairs": "If the object is clothing, it is never worn and never on an invisible body: it tumbles through the air bunched, twisted and folded over itself into a sculptural form, with rounded rolls, deep folds and crevices for the light to model; sleeves twist and fold, the hem rolls up, the collar tips sideways; it stays clearly recognizable and moves by its real weight. If the object is a pair, the two items float at different depths with complementary angles; laces, straps and cords drift in soft curves.", "space": "the object levitates in empty space with nothing under or around it: no floor, no tabletop, no surface, no cast shadow, no contact shadow, no reflection below it, no horizon line. It hangs in the air in front of the seamless gradient, clearly floating, with clean space on all sides.", "background": { "description": "deep ink-navy at the top fading smoothly into periwinkle blue and soft lilac-blue at the bottom", "stops": [ { "position": 0, "color": "#080B18" }, { "position": 40, "color": "#1A2350" }, { "position": 75, "color": "#4E5FA8" }, { "position": 100, "color": "#A3ADE3" } ], "rules": "flat, perfectly smooth and evenly toned, like matte paper far behind the object; no blotches, streaks, diagonal light shapes, vignette, glow, halo, floor or horizon" }, "style": "high-end fine-art still-life photography, medium format, subtle analog film character with fine natural grain, rich true colors, razor-sharp focus on the object, museum-quality detail.", "final_check": "the exact object from the reference, unchanged; light from the left, outside the frame, falling off across the object; a rich light-and-shadow pattern on every form; deep colored shadows with readable texture, nothing black; transparent objects stay solid and keep their contents; floating in empty space, no floor, no shadow below, no horizon; clean, flat, even gradient whose top edge and top-left corner are the darkest part of the image." }
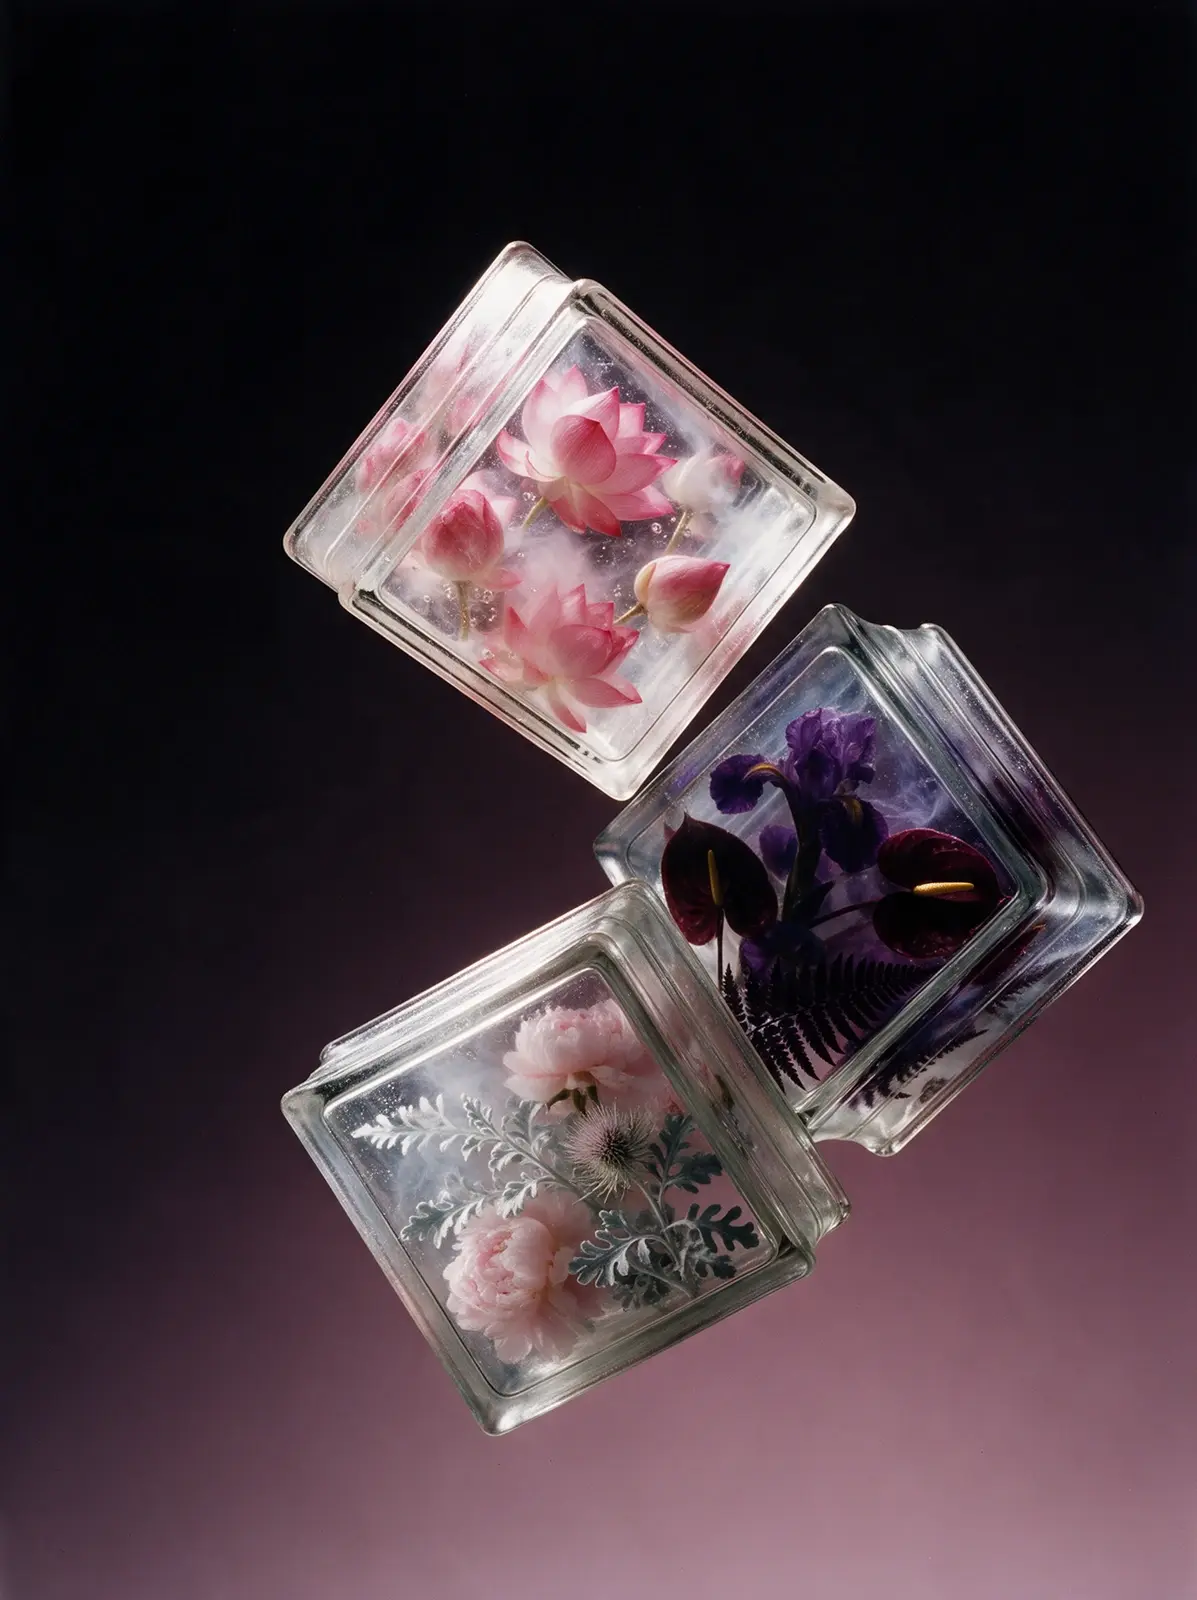
Seedream 5.0 Pro
Copy
{ "priority": "Lighting first; the object must stay exactly as in the reference.", "lighting": "beautiful dramatic directional light on the object, the same in every image. The light comes from outside the frame on the left, at about the height of the object and slightly toward the camera, so it reaches only the object, with strong, smooth falloff across its form: the upper-left part is bright and luminous, the light gradually fades across the middle, and the lower-right part sinks into deep shadow, about 60% lit and 40% in shadow. Every curve, fold, seam, bevel and bulge is sculpted by its own highlight and its own small shadow, so the whole surface becomes a rich, lively pattern of light and shadow, and the texture shows crisp micro-shadows and tiny glints. Glass and glossy parts show long crisp specular highlights along their upper-left edges. The shadow side receives only soft colored reflected light from the lower part of the background, so shadows are deep and saturated, a richer version of the object's own colors mixed with the background hue, with texture and details clearly readable; nothing is solid black, nothing is flat or gray. Fine-art still-life contrast. Completely relight the object; do not keep the lighting of the reference photo. The background is lit separately and evenly, and its brightness comes only from the gradient: the top edge and the top-left corner are the darkest, deepest part of the whole image, uniformly dark, and the background only gets lighter toward the bottom.", "subject": "The exact object from the attached reference image, recreated as a photorealistic hero shot and fully relit. Preserve its identity precisely: the same design, shape, proportions, construction, colors, prints and patterns, logos and lettering, materials and surface finish, and the same number of items (a pair stays a pair, a set stays a set). Do not redesign, simplify, restyle or add anything. Every material keeps its real character and its texture is crisp and readable: knit stays knit, suede stays suede, leather stays leather, mesh stays mesh, metal stays metal. If the object is transparent or translucent (glass, crystal, acrylic, resin, ice), it stays solid and keeps exactly what is inside it in the reference: never make it hollow, empty or box-like, never add air gaps or water lines. Show its real thickness, refraction, ripples, bevels and edge highlights, and keep anything inside it sharp, colorful and readable through the glass. Render only the object: no person, hand, body, mannequin, hanger, stand, string or support.", "composition": "tilted 18 degrees clockwise and turned so its front and right side are both visible, three-quarter view; camera slightly below center looking up a little; centered, filling about 65% of the frame.",
"clothing_and_pairs": "If the object is clothing, it is never worn and never on an invisible body: it tumbles through the air bunched, twisted and folded over itself into a sculptural form, with rounded rolls, deep folds and crevices for the light to model; sleeves twist and fold, the hem rolls up, the collar tips sideways; it stays clearly recognizable and moves by its real weight. If the object is a pair, the two items float at different depths with complementary angles; laces, straps and cords drift in soft curves.", "space": "the object levitates in empty space with nothing under or around it: no floor, no tabletop, no surface, no cast shadow, no contact shadow, no reflection below it, no horizon line. It hangs in the air in front of the seamless gradient, clearly floating, with clean space on all sides.", "background": { "description": "near-black plum at the top fading smoothly into dusty mauve-rose at the bottom", "stops": [ { "position": 0, "color": "#0D0A10" }, { "position": 40, "color": "#2A1C26" }, { "position": 75, "color": "#6E4F5E" }, { "position": 100, "color": "#A3818F" } ], "rules": "flat, perfectly smooth and evenly toned, like matte paper far behind the object; no blotches, streaks, diagonal light shapes, vignette, glow, halo, floor or horizon" }, "style": "high-end fine-art still-life photography, medium format, subtle analog film character with fine natural grain, rich true colors, razor-sharp focus on the object, museum-quality detail.", "final_check": "the exact object from the reference, unchanged; light from the left, outside the frame, falling off across the object; a rich light-and-shadow pattern on every form; deep colored shadows with readable texture, nothing black; transparent objects stay solid and keep their contents; floating in empty space, no floor, no shadow below, no horizon; clean, flat, even gradient whose top edge and top-left corner are the darkest part of the image." }
Nano Banana 2.1
Copy
3D CGI render of the exact selected subject from the reference, rebuilt as a complete volumetric asset with newly rendered materials and lighting. Present the isolated product freely levitating against the specified gradient. Use this variant's specified gradient throughout the new scene: a pale cream top, vivid orange middle and deep burgundy bottom. Aim a focused hard spotlight beam directly onto the actual subject. Its concentrated bright core strikes a real visible raised surface and creates an intensely luminous local light patch, colored neighboring half-tones and strong deep shadows on the subject itself. The light falls away across the surrounding form; the entire product is not evenly illuminated. Existing folds, seams, edges and overlaps cast decisive own-shadows. This concentrated beam impact and large light-to-shadow separation are the defining visual effect. Preserve exactly the selected product inventory and material identity. Use series preset 16. Render only the subject explicitly named by the user. When no subject is named, select the clearly featured product or clearly isolated coherent product set and preserve its exact evident item count; a clearly presented product pair remains a pair. The reference is evidence for this target, not permission to reproduce or invent an entire outfit or surrounding scene. For a worn garment, select the featured garment as one item, remove the wearer and exclude the other clothes on that wearer. Multiple worn garments are included together only when the user explicitly selects that outfit or set. Before reconstruction, establish the exact selected item count and a closed inventory of its visible construction, genuine attachments and defining features. Every rendered product component must correspond to that selected subject. Preserve true pairs, layers belonging to the same garment, product hardware and real attached accessories. Reconstruct concealed continuations of existing parts conservatively; hidden areas are never permission to introduce a new garment or separate accessory. For a standalone blouse, shirt, jacket or top, finish the object at its real hem; keep empty background below it. For a standalone skirt, begin at its actual waistband and retain only the skirt; keep empty background above it. Trousers, dresses and all other garment types retain their own real boundaries. A top never acquires an extra skirt, trousers, legs or lower outfit to complete a body. A skirt never acquires an extra top. Preserve ruffles, peplums, lining and panels only when they are actual connected features of the selected garment. Empty garment apertures reveal genuine lining or the new background according to their real geometry. For apparel, freeze the selected garment in the prescribed midair movement phase. Its shape comes from fabric inertia, the specified air impulse, padding, real seams and material stiffness. Apply sleeve movement only to existing sleeves, hem movement only to the actual hem and torso deformation only to the garment panels that exist. Every moving region remains continuously connected to its original seam or attachment. Preserve the collar, lining, closures, cuffs, hem and pockets that belong to the selected item. The wearer, mannequin, hanger, body-shaped support, additional outfit pieces and invented attachments are absent. If a separate image is explicitly designated as a lighting reference, use it only for the strength of light-to-shadow separation, highlight concentration, shadow depth and texture revealed by raking light. Its object, silhouette, garment parts, colors of the background and framing are excluded from the product reconstruction. Product identity comes only from the selected product reference; the numbered preset continues to control camera, pose and gradient. With a single product reference, construct the hard-light setup described here rather than copying the source photograph lighting. Physically based shading with clean sampled indirect illumination. Camera-invisible emitters; D denotes the normalized assembly diameter. Aim at the actual visible structural surface nearest this normalized camera-space target. Coordinates are measured from the rotated assembly center: x right, y up and z toward the camera. Choose a genuine raised material plane reached by this beam; an empty gap, aperture or hidden surface is never the target. If the coordinate projects into a gap, use its nearest real visible structural boundary. For a fully transparent subject, the beam interacts with its genuine optical interfaces while the new background remains transmissive. Maintain this same targeting rule within the numbered series. Use the key at camera-right, azimuth 54 degrees and elevation 14 degrees, distance 3D, emitting size 0.145D by 0.1D. Its light temperature is 5000K. Apply color filter #FFC775. Use a focused cone of 12.2 degrees, bright core diameter 0.42D and outer footprint diameter 0.64D at the target distance. Aim at camera-space coordinate (0.12D, 0.02D, 0.12D). A focused hard spotlight with a small emitting aperture sends a concentrated cone directly onto the selected product surface. The bright beam core creates a strongly luminous light patch with pale textured peaks. A short controlled falloff passes into colored half-tones, then deep shade. Illuminate a limited connected region of actual geometry rather than flooding the full assembly or tracing its outline. The footprint bends, foreshortens and breaks over the existing shape; material ridges and folds cast coherent strong self-shadows inside and beside it. The cone does not contain painted circular markings or a graphic stripe. Clear air shows only the resulting surface illumination; the source fixture and an external light shaft are absent. Use the fill at camera-left, azimuth 15 degrees and elevation 12 degrees, distance 3D, emitting size 3D by 2D. Its light temperature is 5000K. Apply color filter #FFC775. Its incident illumination at the assembly center is 0 times the key. The fill is switched off. There is no neutral frontal beauty light, opposite softbox, white reflection card or automatic shadow-brightening substitute. Opposite opaque planes receive only physically unavoidable bounce within the actual product. Do not expose deep shadows to the same readability as the flash-lit face. Use pale cream and amber and burgundy in the environment at 0 times the key illumination at the assembly center. Use the listed environment hues in fixed camera coordinates, with subdued lighter hues on the key-side upper hemisphere and deeper hues on the opposite rear hemisphere. This low-level reflection environment is separate from the unlit visible background. External ambient illumination is switched off. Surrounding reflection directions remain dark except for the stated emitters and the independently specified gradient where optical rays actually see it. The gradient is a camera and transmission-visible background, not an all-around bright illumination dome. Clear glass still transmits and refracts the specified new gradient; opaque-surface darkness never blocks a real transparent aperture. Use the palette grazing accent at camera-right, azimuth 62 degrees and elevation -4 degrees, distance 3D, emitting size 0.12D by 0.1D, color #F1814F, with incident illumination 0.02 times the key at the assembly center. A very restrained subordinate colored contribution reaches only existing relief within the main lit region. It supplies slight chromatic nuance without illuminating the broad surrounding shadow mass. The dominant focused beam remains responsible for the bright visible patch and the strong own-shadows. This source never creates an all-around fill or a new product contour. Lock exposure to the concentrated beam impact: render its light-facing raised surfaces brilliant, with fine texture in pale highlight peaks, while surrounding opaque volumes remain substantially darker. Maintain a conspicuous separation from luminous patch through saturated half-tones into deep own-shadow. The equivalent-material lit-to-shaded contrast target is four to five stops. Preserve intrinsic material hue as albedo and material-dependent response rather than copying source photographic brightness. Deep shadow detail is allowed to disappear. White balance stays fixed at 5000K; automatic black lifting, shadow recovery, exposure equalization and full-subject HDR fill are excluded. The background keeps its exact listed display colors independently. Keep the fixed directional rig and render material-appropriate Fresnel reflection and transmission. Clear or lightly tinted glass interiors remain visibly transmissive to the newly specified gradient, with curvature-dependent refraction and small shaped light reflections. Restrict stronger reflections to appropriate grazing angles. Never turn the transparent interior into a dark opaque shadow mass or use a white softbox reflection to cover its entire area. Strong directional shadows fall from genuine product parts onto other genuine product surfaces, including existing folds, recesses, layered construction and component overlaps. Model these shadows with the single focused key direction and real occlusion. Preserve substantial deep interiors and clean geometry-dependent boundaries. Contact occlusion is subtle and restricted to genuine product contacts. External floors, supporting geometry, shadow catchers, background cast shadows, contact halos and background vignettes are absent. Shadows belong to the selected object itself. Rebuild the selected subject as coherent volumetric 3D geometry, including side faces, thickness, seams, openings and visible interior surfaces. Infer concealed construction conservatively from the reference. The new camera must reveal a newly rendered view of this geometry. Use the source for design, construction, material identity, graphics and lettering. Discard the source photograph as a rendered surface: rebuild highlights, gradients, reflections, self-shadows and visible texture under the new lights. Apply original graphics to the modeled surface with correct perspective. Create real foreshortening, differing near and far planes, curved highlight travel, material-dependent reflections and self-occlusion. Maintain a crisp airborne silhouette and open space around it. Every visible face participates in the new lighting. A concentrated beam visibly strikes the object, producing a brilliant localized illuminated volume beside substantial deeply shaded volumes. Give the beam impact enough exposure that it stands out strongly from the source material midtone. The adjacent dark planes stay dark instead of being lifted to display equal detail. This is concentrated directional chiaroscuro on physical geometry, not a general warm tint over an evenly exposed object. Create pronounced deep own-shadow masses on receding and occluded opaque regions, together with clearly directional cast shadows from existing seams, overlapping parts and relief. The beam-facing face is intensely lit; a comparable diffuse material in deep shade should look roughly four to five photographic stops darker. This is a contrast target for equivalent material, not a forced color mask on every surface. The shadow boundary follows the actual geometry with narrow penumbrae; curvature creates natural tonal changes within the lit region. Opaque areas outside the beam may be barely illuminated. Never raise their exposure to make all surfaces equally readable. Preserve each material class and source finish under the new light. Color reaches matte and textile surfaces through diffuse illumination, not only through specular reflection. Fabric remains fibrous, leather retains its own grain and sheen, rubber remains rubber and metal retains its true reflective response. Metallic or chrome shading is confined to actual metal. Glass keeps transmission and refraction of the new gradient, with intrinsic tint and restrained surface reflections. Broad opaque-surface shadows never replace a clear glass interior or an empty aperture. Show a clear localized hit of light on the actual visible subject. Its brilliant central patch extends across neighboring raised surface features, with steep shading transitions into broad dark areas outside the beam and on turned-away planes. Existing protrusions, folds and overlapping details interrupt the beam and cast strong directional self-shadows. For a product pair or set, all visible lit patches and shadows derive from the same cone and source direction. The exact geometry governs coverage; never add a swollen panel, new part or extra object merely to create a lighting shape. The primary emitter color is #FFC775; its effect on light neutral material ranges from pale luminous crests toward fuller luminous golden-amber half-tones. Use #FFF0CA as a qualitative highlight hue and #451323 as a qualitative deep-shadow hue for neutral opaque material, never as a painted product texture or a forced value on colored materials. Inherent colored materials filter the illumination naturally. These lighting hue guides are independent of the exact background HEX stops. Fix the beam's camera-space target at (0.12D, 0.02D, 0.12D), with a bright core diameter of 0.42D and an outer footprint of 0.64D at the target distance. Use the targeting rule stated for the key. The brightest light lands on the selected existing surface, not in empty space between items. The beam intensity distribution follows this fixed footprint for the series, while its visible contour responds to the product geometry. Seamless vertical gradient, top to bottom, as an independent unlit background color field. Direction: Top to bottom. Set the gradient stops to #F3EACF at 0%, #F6F1D9 at 14%, #FAD89C at 25%, #FCAA6B at 40%, #FD6724 at 54%, #E6471C at 66%, #AB2D29 at 80%, #711537 at 97%, #711537 at 100%. Preserve the specified display colors and positions independently of subject exposure and lighting. Maintain a pale cream top, vivid orange middle and deep burgundy bottom. Continuous high-precision interpolation, uniform horizontal color and exceptionally fine tonal gradation, free of banding, stripes, grain, blotches and haze. The gradient is physically behind the product and visible to transmission and refraction rays. Curved glass samples it through the optical geometry; empty openings reveal it directly. Retain the directly visible gradient colors independently of product lighting. Use the listed display colors and stop positions as the sole visible background palette. Completely replace the source-image backdrop. Neither product colors, source lighting, previous scene colors nor reflected glare select a different palette. Keep the background free of exposure shifts and vignetting. Place this new gradient behind all product geometry, including optical regions. Every glass transmission or refraction ray samples this new background; source-scene pixels inside glass are discarded. For every genuine glass or clear-plastic region, use the reference only for its boundary, curvature, thickness, intrinsic tint and intentional printed graphics. Fully regenerate the entire area enclosed by that boundary. Discard the photographed interior fill, photographed sky or studio backdrop, original reflected scene and all background pixels inherited inside the glass. Reconstruct actual product parts behind the glass at their newly rotated positions. First establish the specified new gradient behind the complete product. Establish an unobstructed view to that gradient through each optical region, retaining genuine product geometry behind it. Then build the actual solid glass interfaces and render that new scene through them using refraction, thickness-dependent absorption and restrained surface reflection. The completed region contains optically transformed new-scene content rather than retained source-image interior content. Render glass and transparent plastic as transmission-dominant solid optical materials with real thickness, front and back interfaces, and material-appropriate refractive index. For sunglasses, show transmissive lenses with a subtle original tint; preserve a mirror coating only when the user explicitly requests it. Opaque product parts and metal retain their opacity. Trace the view through both optical interfaces to the new gradient behind the product. Display the background sampled by the refracted ray, with smooth local distortion governed by actual curvature and thickness. Thin nearly parallel panes produce restrained distortion; curved or thick glass produces stronger lensing. The gradient's color progression remains visibly recognizable through the glass. Preserve real components behind it at their correct refracted positions. Refraction changes the direction and position from which the new background is seen; material absorption filters its hue and brightness. These effects derive entirely from the new scene and the optical material. Apply the original glass hue as a restrained absorption filter over the transmitted new background. Use light tint density so transmission remains clearly visible. Restrict surface reflections to controlled highlights and stronger grazing-angle reflections at edges. Remove inherited uniform blue-gray lens fills and photographed reflected scenes; the bulk of each optical area shows transmitted background. Make the transmitted new scene the dominant visible interior contribution across clear or lightly tinted optical areas. On each sunglasses lens, render the corresponding newly established gradient through that lens. The two lenses sample the same new scene independently according to their geometry. Keep the original tint subtle enough that the new gradient's tonal and chromatic progression stays distinguishable. Broad inherited blue-gray blocks, source-sky images and full-surface softbox glare are replaced. Empty through-holes and unobstructed gaps reveal the exact background at the corresponding image position. Glass-covered regions instead reveal the refracted, optionally tint-filtered view. Hollow garment openings show lining or background according to real occlusion. Retain opaque geometry naturally located behind openings. Preserve exact rigid geometry, proportions, construction, openings and physically connected parts. For flexible subjects preserve their cut, panel dimensions, material thickness, seams, closures and connections while allowing a new physically plausible airborne shape. Source garment folds and worn torso contours are replaced by the prescribed moving fabric configuration. Preserve the selected item boundaries and existing component count through every deformation; the movement changes the pose of genuine parts only. Separate new physical objects are excluded. Preserve product colors, patterns, logos and exact lettering, including letter shapes and spacing. Original product graphics remain part of the product. Preserve material identity, intrinsic hue, finish and realistic texture scale. Source-photo lighting, shadows, reflected scenes and background colors are replaced. For glass, the requested transmission takes priority over copying photographed lens darkness or glare. Preserve original colors as material base colors; the new illumination determines their rendered appearance and replaces photographed shading. This numbered variant is one fixed series preset. Reuse its exact product angles, lens, camera axis, frame occupancy, light directions, apparent softbox size, illumination ratios, white balance, tone response and gradient for every product. Keep the selected output aspect ratio consistent. Reuse this variant's pair arrangement and free-appendage curvature rules across the series. Product-dependent geometry follows the same normalized movement directions. Begin with the product canonically upright and front-facing. Rotate the whole assembly about its center: yaw, backward pitch, then image-plane roll. Preserve component relationships. Source pose and source camera angle are replaced. Apply articulated local rotations before the common assembly rotation. The specified assembly roll, pitch and yaw remain the final common presentation. Only camera distance adjusts to the framing rule. Scale the lighting rig with D, the diameter of the complete rotated assembly's enclosing sphere. Maintain consistent key illumination at its center. Materials retain their natural differences in brightness, texture and reflectivity. An explicitly designated approved series image provides presentation and lighting continuity; the product reference supplies identity. Use an image-plane roll of exactly 26 degrees clockwise, a backward pitch of exactly 11 degrees, and a yaw of exactly 34 degrees exposing the product's right side. Apply the same angles to every product in this numbered variant, measured from its canonical front-facing orientation. Treat the selected product and its own components as one floating assembly. Center the bounding box of its complete rotated silhouette at exactly 50% frame width and 50% frame height. Fit the complete assembly so the larger of its normalized image width and normalized image height occupies exactly 60% of the frame. Keep the other dimension proportional. Include every accessory and extremity, leaving at least 20% continuous background at all four edges. Use the same output aspect ratio throughout a series. Use a fixed 90mm virtual lens with a level camera aimed at the assembly center, zero camera roll and the same frontal camera axis for the series. Set distance solely by the 60% framing rule after the object rotation. Keep the entire product sharply focused. Create an unmistakable suspended-in-air arrangement through varied depth, separated silhouettes and freely curved attached details. Preserve crisp focus and substantial uninterrupted space beneath the complete airborne group. Fit the camera only after posing every free appendage. The final image reads as a frozen turning or lifting moment. Preserve the prescribed tilt visibly in the projected dominant axis; the camera remains at its specified roll. These airborne rules are universal and conditional on the uploaded subject's actual structure. First distinguish a rigid single object, independently movable multiple objects and attached flexible parts. Use only the applicable motion behavior. Preserve the exact subject identity and existing construction. Keep the overall assembly rotation fixed by the composition preset. Apply additional local rotations only to independently movable product items. Connected rigid parts retain their construction. Flexible attached parts may bend while preserving their physical length, connections and fastening state. For local offsets and flexible arc amplitudes, let L denote the longest unrotated dimension of the main product, or the larger individual item in a pair. Apply the same normalized pose rules for repeated use of this variant. When the selected subject is a pair of shoes or boots, separate the two items into a coherent midair arrangement. Relative to their canonical product orientation and before the common assembly rotation, rotate the left item by yaw 27 degrees, toe-up pitch 16 degrees and roll 8 degrees; rotate the right item by yaw -22 degrees, toe-up pitch -8 degrees and roll -16 degrees. Offset their centers to (-0.22L, +0.12L, +0.08L) and (+0.22L, -0.12L, -0.08L), where x runs rightward, y upward and z toward the camera. Reveal complementary sides and depth while keeping each item recognizable and unobstructed. Existing exposed lace ends and lace loops float in gently lifted three-dimensional curves biased toward the upper right, with free-arc height up to 0.14L as their real free length allows. Keep laces threaded through the original eyelets, knots intact, lace count and real lengths preserved. Internal threaded segments stay structurally correct. Cloth laces retain fabric texture and realistic thickness. A bag's existing free strap or handle forms a suspended outward-curving arc biased toward the upper right, with lift up to 0.14L as its physical length allows. Preserve every original attachment, buckle, joint, edge seam and strap width. Fixed rigid handles keep their real form. Free ends and chain segments may articulate coherently within their existing connected length. Existing cords, ribbons, ties, loose garment edges and soft attachments follow the same restrained upper right floating direction. Preserve item identity and plausible stiffness. Add motion only to parts that actually exist and have freedom to move. Treat the final articulated product and every free end as the complete silhouette for the existing 60% occupancy rule and 20% minimum margins. Maintain a legible composition with open background gaps between separated items. External floors, supporting objects and background cast shadows remain excluded. Rigid subjects, including containers, devices, furniture, toys, sculptures, food, rigid organic forms and graphic marks, retain their shape and internal construction. They levitate as complete solids through the fixed overall rotation and visible dimensional depth. Flexible accessories are introduced only when present in the source. Glass regions retain their optical reconstruction. For independently movable items other than footwear, use the same preset's opposing local rotations and staggered depth as a restrained arrangement template. Preserve source item count, recognizable identities and readable silhouettes. Parts of a single joined construction remain joined; independently movable posing never disassembles the subject. When the subject is a garment, freeze one coherent upward and camera-right air impulse. Keep the main body at the preset image-plane tilt, with a gentle 14-degree twist distributed through existing flexible panels. Where sleeves exist, lift the leading sleeve by 30 degrees from its relaxed direction and let the trailing sleeve lag by 24 degrees with a distinct natural bend. Let one hem edge rise and the opposite edge trail, forming a readable asymmetric sweep rather than a standing torso configuration. Preserve lengths and seam continuity. Thin textiles billow in broad smooth folds with smaller trailing ripples. Padded garments form substantial rounded moving volumes separated by their real quilting and seam constraints. Leather and stiff fabrics bend in fewer firmer curves. Rigid shells retain their shape. Apply these behaviors only to materials and parts present in the uploaded subject. Make the motion readable through a diagonal dominant axis, varied limb or appendage height, genuine depth separation and delayed flexible edges. Keep the subject recognizable and all defining features readable; use controlled material deformation with the same movement direction on each use of this preset. Resolve genuine material structure before decorative detail. Preserve sharp construction edges, seam paths, stitch spacing, panel boundaries, zipper teeth, pullers, hinges and fasteners at their actual scale. For woven textiles, resolve fine directional weave, continuous individual threads and subtle fiber detail appropriate to the actual fabric. Smooth synthetic outerwear uses a tight fine weave, subdued directional sheen and gentle roughness variation. Distinguish broad padded volume, medium folds and fine surface texture; keep stitches and seam tension legible. Assign physically distinct responses to each material actually present. Preserve the source roughness and class: fabric fibers, leather grain, matte rubber, satin plastic, real metallic hardware and transmissive glass stay visibly distinct. Bright colored illumination never converts textile, rubber or leather into chrome, molten metal or glass. Preserve original surface finish and wear state. Render native-resolution geometry and material texture cleanly with precise antialiasing and restrained sharpening. Fine weave, stitch structure, material grain and relief resolve most strongly where the hard directional light reaches them. Deep shadow areas can legitimately lose fine visibility while retaining correct geometry; never brighten them simply to display texture. Preserve smooth surfaces as smooth. Invented enlarged fibers, gritty noise, smeared stitches, melted hardware, waxy smoothing and sharpening halos are excluded. At the beam impact, resolve bright individual thread ridges, small dark inter-thread gaps, seam relief, grain and stitch shadows at their real scale. Use light and shadow inside the actual material microstructure to make the illuminated patch tactile. The texture continues physically through shaded areas while its visibility decreases with illumination. Avoid uniform exposure, invented raised grain, enlarged weave, metallic conversion of cloth or rubber, gritty sharpening and a flat white glare patch that erases the source texture. Only the complete levitating product assembly and uninterrupted gradient. Preserve structural surfaces belonging to the product. External floors, support surfaces and shadow catchers are excluded. All self-shadows remain on product surfaces. The exposed background stays horizontally uniform and free of projected shadows, dark patches, halos and object reflections.